
Learn How to Drill Drywall Anchors for Secure, Lasting Mounts
This post contains affiliate links. As an Amazon Associate, we earn from qualifying purchases.
To drill drywall anchors, you must match four things: the anchor type to the load, the wall material to the drill bit size, the drill speed to the anchor material, and the screw to the anchor’s rated size. A mismatch in any one strips the threads, cracks the drywall, or pulls the fixture off the wall within weeks.
The “match four things” rule is essential for durability. It determines whether a towel bar stays up for a decade or rips out drywall quickly. The four variables lock together, so using a heavy toggle bolt for a light picture frame creates an oversized hole.Choose a fine-thread screw for a coarse-thread anchor and the grip is gone before you finish tightening.
What follows: the four specific matches, the manufacturer specs most guides skip, and the one drill setting that ruins self-drilling anchors before they even seat.
Key Takeaways
- Match load to anchor type. Use a toggle bolt for anything over 50 lbs; a self-drilling anchor like a DeWalt Zip-It tops out at medium-duty loads and is not rated for overhead use.
- Pre-drill only when the wall fights back. For very hard wallboard or solid plaster, switch from the anchor’s self-drilling tip to a 1/4″ or 7/16″ drill bit first, the DeWalt Zip-It manual calls this out explicitly.
- Cap your drill speed at 400 RPM. Self-drilling anchors melt their own threads if you run a cordless drill at full throttle. Low speed and gentle pressure let the tip cut cleanly.
- The “allowable load” is one-quarter of the breaking point. Manufacturer tables apply a safety factor of 4.0. A Zip-It rated for 50 lbs in tension should only hold 12.5 lbs in real use.
- When in doubt, find a stud. No anchor beats a screw directly into wood. Drilling into a stud is the only way to guarantee a permanent, high-weight hold.
The 4-Step Match That Stops Pull-Outs
Proper anchor installation depends on precise alignment. You must coordinate four separate specifications, as a mistake in any one causes the whole assembly to fail early.The process looks simple, drill, tap, screw, but the margins are thin.
First, know what you’re hanging and how much it weighs with everything on it. A shelf rated for 20 lbs holds 20 lbs of books, not 20 lbs plus the shelf itself. Weigh the item if you can. That number decides your anchor type.
Second, identify your wall. Is it 1/2-inch drywall, 5/8-inch fire-rated board, or old plaster? Thickness changes holding capacity. The third step is choosing the right tool: a drill for pre-drilling, a screwdriver for final setting, and the correct bit. Finally, you execute with the right speed and pressure. Rush it and you’ll shred the drywall or crack the anchor collar.
Common mistake: Using the same anchor for a 10-pound clock and a 30-pound mirror. The clock needs a small expansion anchor; the mirror needs a toggle bolt. Mixing them guarantees one will fail.
Match 1: Anchor Type to Load
Drywall anchors fall into three weight classes, and crossing classes is where walls get damaged. Light-duty anchors are for sub-20 lb items like picture frames, small shelves, or thermostats. Medium-duty covers 20 to 50 lbs, think larger mirrors, robe hooks, or lightweight floating shelves. Heavy-duty is anything above 50 lbs, like wall-mounted cabinets or large TVs.
| Anchor Type | Best For | Weight Capacity (in 1/2″ drywall) | Installation Note |
|---|---|---|---|
| Plastic Expansion | Picture frames, small hooks, thermostat plates | Up to 25 lbs | Requires pre-drilled hole; taps in with hammer |
| Self-Drilling (Zip-It, E-Z Ancor) | Mirrors, towel bars, medium shelves | 30–50 lbs | May self-drill; pre-drill in hard walls |
| Toggle Bolt | Shelves, cabinets, TVs, heavy mirrors | 70+ lbs | Requires large pre-drilled hole; toggle drops behind wall |
The DeWalt Zip-It is the default choice for most DIY medium-duty jobs. It’s a one-piece metal or nylon anchor that cuts its own threads. The Simpson Strong-Tie Sure Wall anchor works on the same principle. Both are fast. Neither is rated for overhead ceilings or “applications where holding values are critical,” per the Zip-It data sheet. For those, you need a toggle.
Toggle bolts distribute weight across the back of the drywall. The trade-off is the hole: once you drill for a toggle, you can’t easily go back to a smaller anchor. Choose once.
Match 2: Wall Material to Drill Bit Size
Self-drilling anchors have a tip designed for standard gypsum board. When the wall is harder, double-layer drywall, fire-rated 5/8-inch board, or solid plaster, that tip can’t penetrate cleanly. It skates, strips, or cracks the surface before the threads engage.
The fix is in the manual. DeWalt’s guide for the Zip-It says: pre-drill if you encounter difficulty. For very hard wallboard or double-board, use a 1/4″ diameter drill bit. For a solid plaster wall, use a 7/16″ diameter drill bit (HSS or Carbide). That’s a specific, sourced number most installers never check.
Where this goes sideways: Forcing a self-drilling anchor into plaster without pre-drilling. The plaster facing is brittle, the aggregate behind it is hard, and the anchor tip blunts against it. You’ll feel increasing resistance, then a sudden crack as the surface spalls. The anchor never seats flush, and the screw strips the damaged threads on the first tightening attempt.
When should you pre-drill for a standard anchor? Always check the package. Most plastic expansion anchors list a specific drill bit size, often 1/4″, 5/16″, or 3/8″. The hole must be clean and round. A ragged hole cut by a worn bit gives the anchor nothing to expand against, and it will spin loose when you drive the screw. Using the correct bit size is a non-negotiable first step for reliable drywall anchors.
Match 3: Drill Speed to Anchor Material
This is the most overlooked match. A self-drilling anchor is not a screw. You cannot run your cordless drill at 1500 RPM and expect it to cut threads. The DeWalt Zip-It manual caps the speed at 300–400 RPM. Exceed that, and the friction melts plastic nylon anchors or galles metal ones. The threads deform, the anchor won’t go in straight, and the holding power drops by half.
The right technique: use a low-speed setting on your drill or a manual screwdriver. Apply gentle, steady forward pressure. Let the anchor’s tip do the cutting. You’ll feel it bite and then start pulling itself in. If you’re drilling into drywall for a pre-drilled anchor, use a sharp drill bit and moderate speed to avoid blowing out the back.
The part nobody mentions: A high-speed drill generates enough heat to weaken the drywall paper face around the hole. That burnt paper has no tensile strength. The anchor might seat, but it’s gripping a ring of crumbly charcoal that gives way under load.
Match 4: Screw to Anchor Spec
Every anchor is designed for a specific screw diameter and length. A #6 screw in a #8 anchor rattles loose. A #8 screw in a #6 anchor splits the plastic or strips the zinc threads. The Simpson Sure Wall anchor is a #8 x 1-1/4″ screw. The DeWalt Zip-It takes a #8 screw for standard, a #6 for the Jr. Model.
The screw length must also account for the fixture thickness. If you’re mounting a 1/2-inch thick shelf, you need a screw long enough to go through the shelf, through the drywall, and still engage the anchor’s full threaded length. The Zip-It requires minimum screw engagement of 3/4 inch inside the anchor body. Add it up: shelf (1/2″) + drywall (1/2″) + engagement (3/4″) = 1-3/4″ screw minimum.
Mismatch the screw, and you’re not actually using the anchor. You’re just hanging the item on a screw stuck in a loose sleeve.
Reading the Capacity Table (It’s Not What You Think)
Anchor packages list “holding weight” or “allowable load.Those numbers represent ceilings divided by four, not targets. Manufacturers like DeWalt and Simpson apply a safety factor of 4.0 to their ultimate strength tests.A Zip-It that fails at 50 lbs in the lab gets an “allowable load” rating of 12.5 lbs.
Why the huge margin? Drywall isn’t consistent. Age, moisture, installation quality, and hidden damage all weaken it. The safety factor covers those variables. If you hang a 45-pound mirror on an anchor rated for 50 lbs, you are exceeding the safe working load by a factor of four. It might hold for a month, but a door slam or a slight bump overloads the compromised material.
The E-Z Ancor data sheet states its performance values “will change depending on age, moisture content and surface treatment of the drywall.” Their listed weights are averages from lab tests on perfect, new board. Your walls are not lab specimens.
TL;DR: Take the package’s weight rating and divide by four. That’s your real working limit. For anything heavier, use multiple anchors or find a wall stud.
When Not to Use an Anchor At All
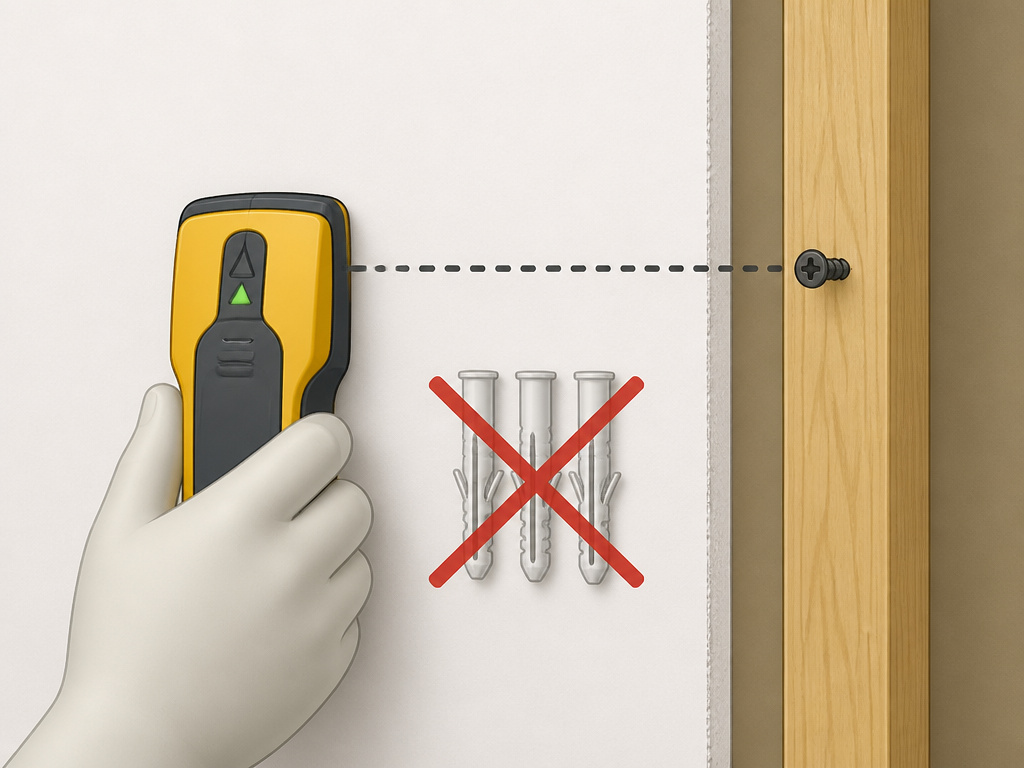 Drywall anchors have a hard ceiling. The Simpson Sure Wall guide notes the “performance of multiple anchors spaced closely together has not been investigated.” Clustering three anchors to hold a 100-pound cabinet is an untested gamble. The drywall between them can flex and fail as a unit.
Toggle bolts have their own limit. The E-Z Toggle requires about 23 full rotations to fully tighten a 1/2-inch thick fixture, per its instructions. That’s a lot of threading, and the thin drywall behind the toggle can crater under the pressure if overtightened.
Skip this if: There’s a stud behind your desired mounting point. A screw directly into wood holds more than any anchor. Drilling a screw into the wall over a stud is permanent. Always check for studs first with a finder or magnet. Anchors are a workaround, not a first choice.
Overhead ceilings are another no-go zone. Neither the Zip-It nor the Sure Wall is recommended for overhead applications. The constant downward pull works against the drywall’s strength, and failure is a matter of when, not if. For ceilings, you must screw into joists.
The Tool Shortlist
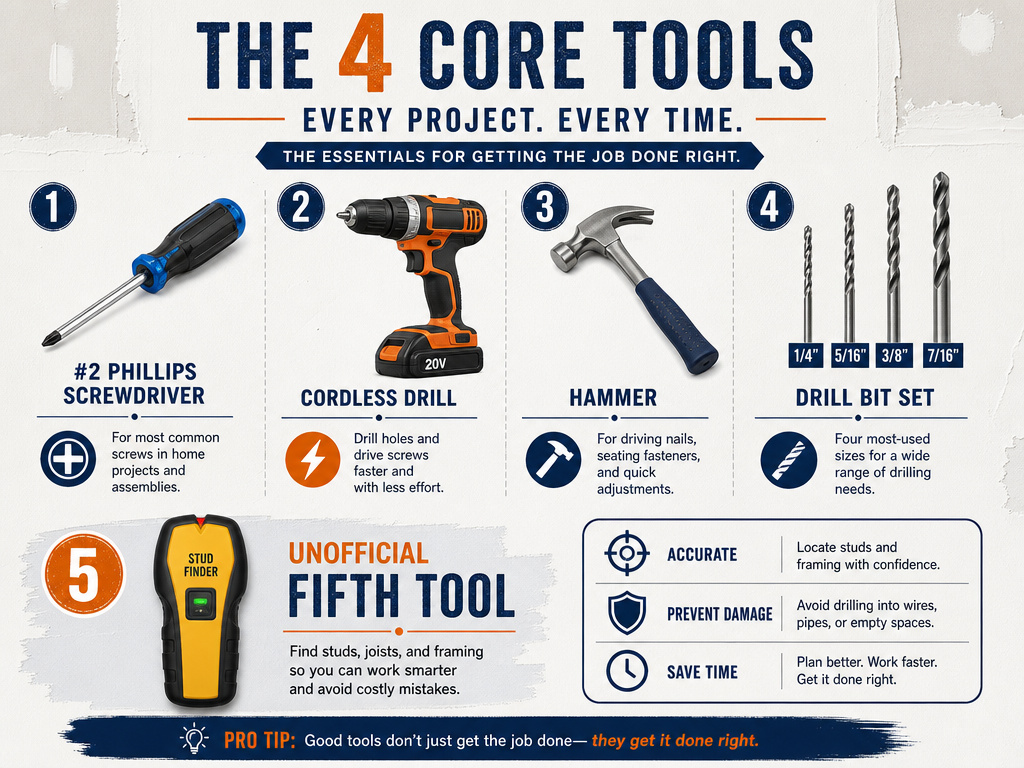 You don’t need a full workshop. These four tools cover 95% of anchor jobs:
- #2 Phillips Screwdriver: The manual choice. Essential for final tightening and for installing self-drilling anchors where drill speed control is critical.
- Cordless Drill/Driver: For pre-drilling holes. Set the clutch low to avoid over-driving screws.
- Hammer: To tap in unthreaded expansion anchors flush with the wall.
- Drill Bits: A set including 1/4″, 5/16″, 3/8″, and 7/16″ sizes. The 7/16″ is specific to plaster, per the Zip-It spec.
A stud finder is the unofficial fifth tool. Use it. Every time. Finding a stud eliminates the entire anchor selection problem.
Step-by-Step: Installing a Self-Drilling Anchor
This sequence assumes a DeWalt Zip-It or similar anchor for a medium-weight item on standard drywall.
- Locate and Mark. Use a stud finder. If no stud, mark the mounting point with a pencil.
- Check for Difficulty. Press the anchor’s tip against the wall and try to turn it by hand with the screwdriver. If it doesn’t bite easily, stop. Switch to the pre-drill step.
- Pre-drill if Needed. For hard drywall or plaster, use the specified drill bit (1/4″ or 7/16″). Drill straight in, just deep enough to clear the anchor’s tip.
- Drive the Anchor. Insert the screwdriver into the anchor head. Apply gentle pressure and turn clockwise at low speed until the collar is flush with the wall. Do not overtighten.
- Mount the Fixture. Hold the item in place. Insert the correct screw through the fixture and into the anchor. Tighten until snug, then give one final quarter-turn. Stop when you feel firm resistance.
The risk at step five is overtightening. You’ll feel the screw start to spin freely without getting tighter. That means the threads in the anchor or drywall are stripped. If that happens, remove everything. You’ll need to fill the hole and start over a few inches away, or use a larger anchor type that requires a new hole.
Frequently Asked Questions
Can I install an anchor without a drill?
Yes, for certain types. Self-drilling anchors like the Zip-It are designed for use with a screwdriver alone. Traditional plastic anchors require a pre-drilled hole, so you need a drill for the initial hole unless the wall is very soft. Methods for installing plastic anchors without a drill often involve making a pilot hole with an awl or nail, but this risks cracking the drywall face.
What if my anchor spins but won’t come out?
The threads are stripped inside the drywall. Stop turning. Use pliers to pull the anchor straight out. You’ll likely have a cratered hole. Patch it with drywall compound, let it dry, sand it smooth, and move your mounting point over by at least two inches. Use a larger anchor type for the new hole.
How much weight can a screw in drywall hold without an anchor?
About 10 pounds, max. A screw relies solely on the grip of the drywall paper and gypsum core. It has no expansion or toggle mechanism. It will pull straight out under modest load or vibration. Always use an anchor for anything heavier than a very light picture frame.
Are metal anchors better than plastic?
It depends on the load and wall. Metal anchors like zinc Zip-Its have higher tensile strength and are less likely to crack during installation. Plastic nylon anchors are non-conductive (important for electrical boxes) and can be easier to remove. For medium-duty loads in standard walls, metal is more reliable. For light duty or non-critical items, plastic is fine.
Why did my toggle bolt fall behind the wall?
You removed the screw completely. A toggle bolt’s wings spring open behind the drywall. To remove the fixture, you must unscrew the bolt, which lets the wings fall free into the wall cavity. To reinstall, you need a new toggle bolt. There’s no way to retrieve the old one without cutting open the wall.
Before You Go
Drilling drywall anchors is a game of exact matches. Pick the anchor by the real weight of your item, not the package claim. Pre-drill when the wall material is harder than standard board, 1/4″ for double drywall, 7/16″ for plaster. Never let your drill exceed 400 RPM on a self-drilling anchor. And always, always divide the printed weight rating by four.
The one anchor I keep in my shop is the DeWalt Zip-It in zinc. It covers the majority of household hanging jobs, from shelves to mirrors, and the instructions are clear about its limits. For anything heavier than a large mirror, I skip the anchor search entirely and spend the extra five minutes to find a stud.
