
Learn How to Drill a Screw into Any Wall Type Successfully
This post contains affiliate links. As an Amazon Associate, we earn from qualifying purchases.
To drill a screw into a wall, you match three things: the wall material, the correct fastener, and the right location. For wood or steel studs, use a drill with a clutch and a #6 or #8 drywall screw, driving it just below the surface. For masonry, use a hammer drill with a masonry bit and a plastic anchor or a concrete screw. The critical step everyone misses is verifying there are no pipes or wires behind the drilling point.
That verification is not a suggestion. It’s the line between a successful mount and a flooded wall or a dead circuit. The National Electrical Code mandates a 1-1/4 inch setback for wiring behind a stud because a standard 1-1/2 inch drywall screw penetrates about 3/4 of an inch into the wood. Drilling dead center on a 3-1/2 inch wide stud is the electrician’s rule for a reason.
What follows breaks the wall types into a single decision tree: studs, hollow drywall, or solid masonry. Each path has a specific tool, a named screw, and a spacing rule you can measure. By the end, you’ll know which of the three you’re looking at and the one drill setting that changes everything.
Key Takeaways
- Identify the wall first. Tapping for a hollow sound versus a solid thud tells you if you’re hitting a stud, empty drywall, or masonry. Use an electronic stud finder with wire detection for certainty.
- Screw choice is non-negotiable. For wood studs, use a Type W coarse-thread drywall screw. For steel studs, you need a Type S fine-thread screw that complies with ASTM C1002. Using the wrong type strips the metal and the screw spins uselessly.
- Respect the hole-spacing codes. In a load-bearing wood stud, the maximum hole diameter is 40% of the stud’s width. Exceed that, and you compromise the wall’s strength where it matters most.
- Speed kills on thin metal. When driving screws into lightweight 20-gauge steel studs, drop your drill’s RPM to 2500 or lower. High speed causes instant spin-out, leaving a useless hole.
- Masonry requires a hammer drill. A standard drill will burn out on brick or concrete. You need a hammer drill’s impact action to pulverize the aggregate, followed by a plastic anchor or a concrete screw for the hold.
The Step-by-Step Wall Prep Checklist
You don’t start by picking up a drill. You start by figuring out what you’re drilling into. Getting this wrong means the screw has nothing to grip, or you hit something expensive.
First, tap the wall. A solid, dull thud means a stud. A hollow echo means empty drywall or plaster. A hard, unyielding feel is masonry. For studs, confirm with an electronic stud finder that also detects live AC voltage, the Zircon MetalliScanner M40 is a reliable pick. This tells you where the wood or metal is, and more importantly, if there’s a wire directly behind your target.
Before you start: Assume every wall cavity contains wires and pipes. A stud finder with deep-scan and electrical detection is your only real safeguard. Drilling into a live wire can cause electrocution or a fire. Hitting a water pipe floods the wall cavity within minutes.
Second, decide your anchor strategy. If you’re hitting a stud, you can screw directly into it. If you’re in hollow drywall, you need a drywall anchor rated for the weight of your object. If it’s masonry, you need a masonry bit and an anchor.
Third, measure your setbacks. This is the part DIYers skip, and it’s the one that calls a plumber.
| Wall Type | Fastener Needed | Critical Setback Rule |
|---|---|---|
| Wood Stud | #6 or #8 Drywall Screw (Type W) | Hole must be ≥1-1/4″ from stud edge to protect wiring (National Electrical Code). |
| Steel Stud | #6 Drywall Screw (Type S) | Use sharp-point screws and reduce drill speed to 2500 RPM for studs thinner than 0.030″. |
| Hollow Drywall | Plastic Expansion Anchor | Must be used in the field of the panel, never within 3/8″ of the edge where the board is weak. |
| Brick/Concrete | Masonry Anchor & Screw | Use a hammer drill setting; a standard drill will overheat and dull the bit. |
The table is a cheat sheet. The reasoning is in the specifics behind each rule.
Choosing the Right Screw & Drill Bit
The screw is not a generic piece of metal. Its thread pattern, coating, and head are engineered for one material. Using a wood screw in steel is a guaranteed failure.
For wood studs, you want a coarse-thread drywall screw. The Grabber #6 x 1-1/4 inch bugle-head screw is the standard for a reason. Its coarse threads bite deep into the wood fibers, and the bugle head is designed to sit just below the drywall surface without tearing the paper. The drill bit is simple: a Phillips #2 bit matched to your screw gun.
For steel studs, the game changes. You need a fine-thread, self-drilling screw that meets ASTM C1002, often called a Type S screw. These have a sharper point and tighter threads to cut into the metal and grip the thinner material. If your steel studs are lightweight 20-gauge (0.019 inch thick), the Gypsum Association mandates a speed reduction. Crank your drill above 2500 RPM, and the screw will spin in the metal without pulling the head tight, a failure called “spin-out.”
The Gypsum Association recommends 30 mil steel studs for impact-resistant drywall. If you install these heavy panels on thinner 20 EQ studs, use sharp point fine-thread screws and reduce your screw gun speed to 2500 RPM. Drill-point screws on thin studs are not recommended.
For masonry, the screw is almost secondary. The anchor does the holding. You need a carbide-tipped masonry bit sized exactly for your plastic anchor. Drill the hole, tap in the anchor, then drive a standard screw into it. For heavier loads, use a concrete screw (like a Tapcon) which cuts its own threads into the brick or block. These require a specific sized bit, usually 3/16 inch for a #10 screw, and a hammer drill.
The bottom line: Match the screw to the substrate. A wood screw in metal strips. A masonry screw in drywall pulls out. Keep a jar of each type labeled.
How to Drill into a Stud Without Hitting Wires
This is the core skill. A stud is the strongest point in your wall, but it’s also a vertical highway for electrical cables and plumbing. The goal is to use its strength without severing a line.
Locate the stud edges precisely with your finder. Mark the center. Now, you must decide where vertically to drill. Wires and pipes typically run horizontally through holes drilled in the stud center. Your safest bet is to drill in the vertical center third of the stud height, away from common horizontal run points near outlets and switches.
The National Electrical Code rule exists for a reason. It states that any hole containing a cable must be set back at least 1-1/4 inches from the face of the stud. Why? Because a 1-1/2 inch drywall screw penetrates about 3/4 of an inch. If you drill your pilot hole closer than 1-1/4 inches to the edge, your screw could pierce a wire running through a hole right behind it. Most electricians drill a 3/4 inch hole dead center on a 3-1/2 inch stud. This gives a 1-3/8 inch buffer on each side.
Common mistake: Drilling a pilot hole too close to the edge of a stud. The screw finds the hidden wire, and the circuit dies the moment you flip the switch back on. The repair requires opening the wall.
When you’re ready to drill, use a bit slightly smaller than your screw’s core diameter. For a #6 screw, a 1/16 inch bit is enough. The pilot hole guides the screw and prevents the wood from splitting, especially near the end of a stud. Drive the screw with a drill that has a adjustable clutch. Set it so the screw head seats just below the drywall surface and the clutch disengages. Over-driving breaks the drywall paper and ruins the hold.
Fastening Drywall and Backerboard: Two Different Rules
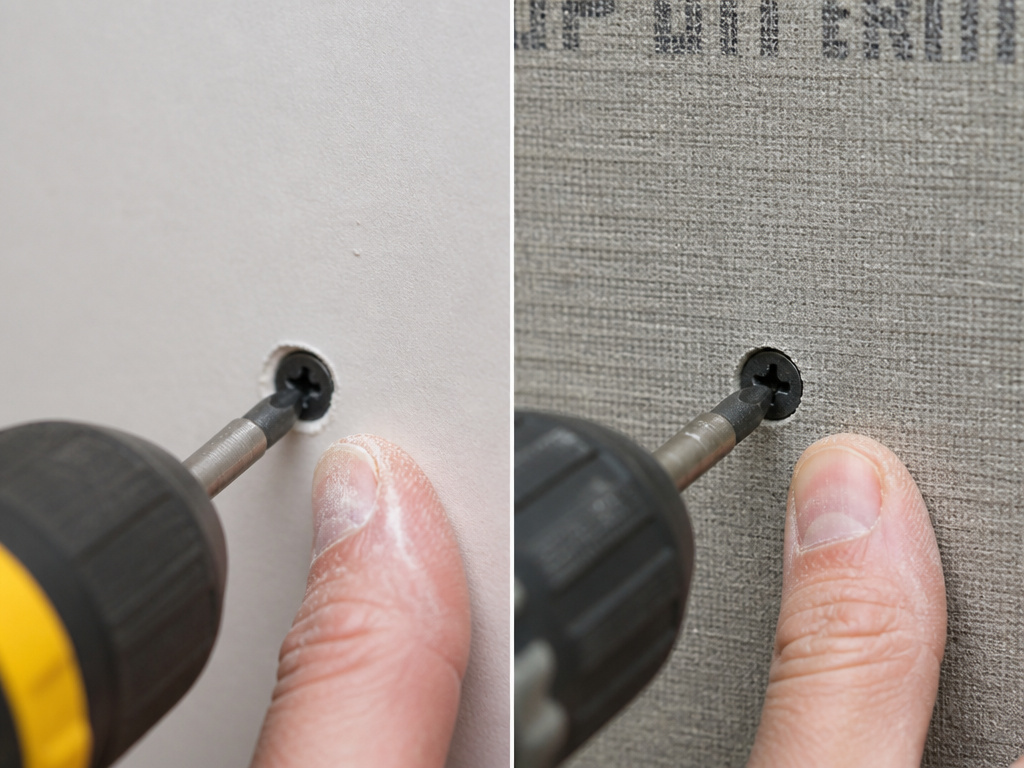 Attaching a sheet of material to a stud seems straightforward. But drywall and cement backerboard have opposite rules for screw seating, and mixing them up weakens the installation.
For standard drywall, the screw must be driven so the head is slightly below the surface, creating a dimple for joint compound. The face paper must not be broken. This is why a depth-sensitive screw gun nose piece is essential. It stops the screw at the exact right depth. The official spacing for drywall screws is 12 inches on wall studs and 16 inches on ceiling joists.
For cement backerboard like USG Durock, the rule flips. The manufacturer’s submittal sheet is explicit: “Install screws with screw-heads flush with the panel surface. Do not countersink screws.” Countersinking a Durock screw craters the dense cement surface, creating a weak point. Use their specific Durock screw, which has a large wafer head and strip-out prevention ribs. Space them 8 inches on center for walls, 6 inches for ceilings.
| Material | Screw Head Position | Key Specification | Common Error |
|---|---|---|---|
| Gypsum Drywall | Slightly below surface | ASTM C1002 screw, 12″ o.c. Spacing | Over-driving, breaking paper, weakening hold. |
| Cement Backerboard | Flush with surface | USG Durock screw, 8″ o.c. Spacing | Countersinking, which fractures the cement face. |
| Wood Sheathing | Flush or slightly countersunk | #8 or #10 exterior screw, corrosion-resistant coating | Using interior screws that rust and fail. |
The tools differ, too. A standard drywall screw gun runs up to 4000 RPM. For driving Durock screws into steel, USG recommends a minimum 4-amp drill capable of 1500-2500 RPM. The slower speed provides more torque for driving through the dense board without stripping the screw head.
Drilling into Masonry Walls: Brick, Concrete, and Block
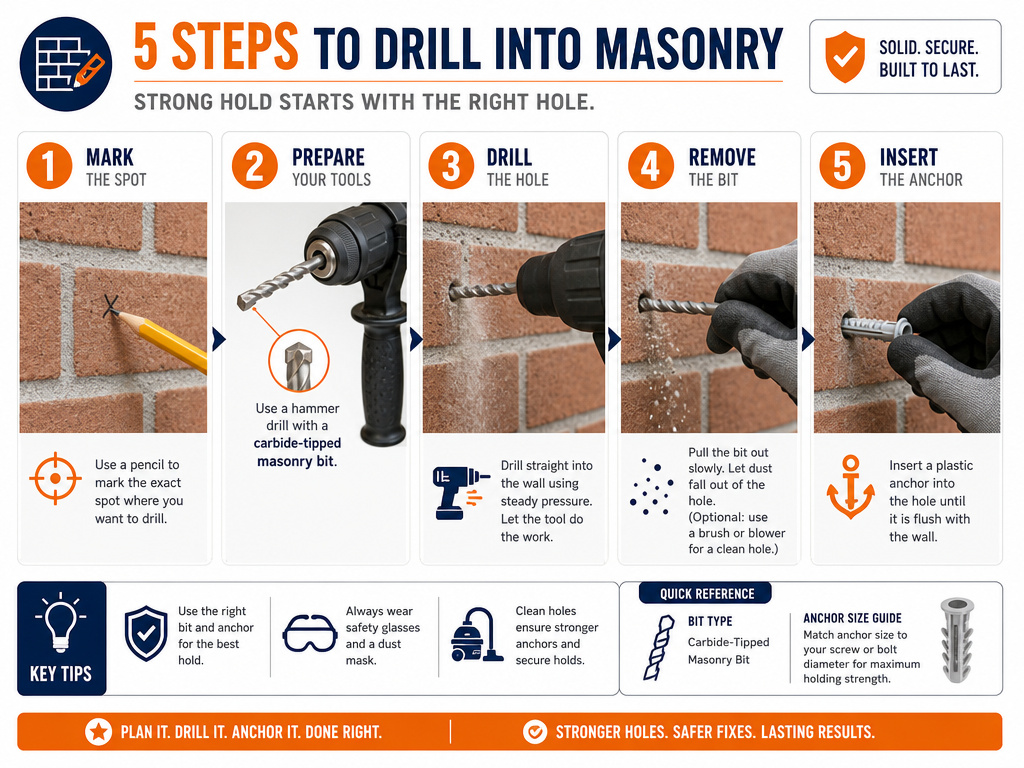 A regular drill will not work here. The aggregate in masonry dulls standard bits instantly and stalls the motor. You need a hammer drill. Its pounding action chips away the material while the bit rotates.
The process is a sequence: mark, drill, clean, anchor. 1. Mark the spot with a pencil and use a center punch to make a small dent. This stops the bit from “walking” across the hard surface. 2. Insert a carbide-tipped masonry bit into your hammer drill. Set the drill to hammer mode. Wear safety glasses and a dust mask, this creates fine silica dust. 3. Drill straight in at a slow, steady pressure. Let the tool do the work; forcing it overheats the bit. Drill to a depth slightly longer than your anchor. 4. Pull the bit out periodically to clear dust from the hole. A clogged hole prevents the anchor from seating fully. 5. Blow or vacuum out the hole. Insert your plastic anchor until it’s flush with the wall. For concrete screws, simply drive the screw directly into the clean hole.
The anchor type matters. For brick, a plastic expansion anchor is fine for light to medium loads. For concrete or cinder block, use a sleeve anchor or a concrete screw for a stronger hold. Remember, the drill into mortar joints between bricks is often easier than drilling into the brick itself, but the holding power is slightly less.
Where this goes sideways: Using a dull masonry bit. It creates heat, not a hole. The bit glazes over, the drill binds, and you can burn out the drill’s motor. A sharp carbide bit goes through concrete in under 30 seconds.
The Tools You Actually Need (Not the Marketing List)
You can drill every screw in your house with three tools. The rest are conveniences for speed or specialty work.
- A Quality Cordless Drill/Driver: This is your workhorse. Look for one with a variable speed trigger and an adjustable clutch. The clutch is the key, it prevents over-driving screws. A DeWalt 20V MAX XR or a Milwaukee M18 Fuel drill will handle 95% of tasks.
- A Hammer Drill: For masonry, this is non-negotiable. You can often get a combo kit with your standard drill. The hammer function is a separate setting that engages a mechanical pounding action.
- A Stud Finder with Wire Detection: Don’t guess. The best practice for any drill into a stud project starts with knowing what’s behind the wall. A basic magnetic finder only finds nails. An electronic finder like the Franklin Sensors ProSensor T6 finds the stud edges and can alert you to live wires.
Your bit collection should be just as focused: – A set of Phillips #2 driver bits. – A set of twist drill bits (1/16” to 1/4”). – A few carbide-tipped masonry bits (1/4” and 3/8” are most common). – A depth stop collar for your drill bits. This lets you drill pilot holes to an exact depth in a stud, preventing you from blowing through the other side.
Keep your drill bits sharp. A dull bit requires more pressure, increases the chance of slipping, and produces a rough, oversized hole that weakens the screw’s grip.
Frequently Asked Questions
Can I use a regular drill for concrete?
No. A standard drill lacks the hammering action needed to fracture masonry aggregate. It will overheat, dull the bit, and likely stall or burn out the motor. You need a hammer drill or rotary hammer for concrete, brick, or cinder block.
How do I know if I hit a stud?
Solid, dull thud when tapping and strong resistance when drilling indicate a stud. An electronic stud finder is the most reliable method, showing the stud’s edges. If you drill and get wood shavings, you’ve found a wood stud. If you get fine metal shavings, it’s a steel stud.
Why does my screw keep spinning and not tightening?
This is “spin-out.” In drywall, it means the screw has stripped the hole in the stud, the material is too weak to hold. In steel studs, it usually means you used the wrong screw type (a wood screw) or your drill speed was too high for the thin metal. The fix is to move the screw location or use a specialized toggle anchor.
How deep should a screw go into a stud?
For maximum holding power, a screw should penetrate the stud by at least 1 inch. A standard 1-1/4 inch drywall screw into a 1/2 inch drywall sheet gives you about 3/4 inch of bite, which is the minimum. For heavier loads, use a 1-5/8 inch screw to get a full inch of penetration.
What’s the difference between a drywall screw and a wood screw?
Drywall screws have a bugle head that prevents paper tear-out and a sharp point for easy starting. They are brittle and can snap under lateral stress. Wood screws have a tapered head, a smoother shank under the head, and are made of tougher steel to withstand shear forces. Use drywall screws only for hanging drywall.
How do I patch a hole if I drill in the wrong spot?
For small screw holes, use a lightweight spackle. Press it into the hole, let it dry, and sand it smooth. For larger holes from anchors, you may need a patching compound or a drywall repair patch. The key is to fill the cavity completely and sand flush before priming and painting.
Before You Go
Drilling a screw into a wall is a binary task: it either holds securely or it fails. The difference is in the three matches you make before the drill ever spins. Match the screw to the wall material, coarse thread for wood, fine thread for steel, an anchor for hollow board, and a masonry system for brick. Match your tool to the task, a clutch drill for studs, a hammer drill for concrete. Most critically, match your location to the safety codes. That 1-1/4 inch setback from the stud edge isn’t trivia; it’s the margin that keeps the lights on and the walls dry.
When in doubt, drill a smaller pilot hole first. You can always make it bigger, but you can’t undo a cut wire or a split stud. The right screw, driven into the right place with the right tool, holds for decades. Everything else is just making holes.
