
How to Fill Drill Holes in a Wall: A Complete Repair Guide
This post contains affiliate links. As an Amazon Associate, we earn from qualifying purchases.
To fill a drill hole in a wall, you need the right filler matched to the hole’s size and the wall’s material. For small holes under 1/2 inch, use lightweight spackle. For holes up to 2 inches in drywall or plaster, use a fiber patch kit with setting-type joint compound. For holes in structural panels or those over 2 inches, you must install mechanical backing before filling. The wrong filler sags, cracks, or shows through paint.
That size-and-material match decides everything that comes next. A 1/4-inch hole from a picture hook and a 2-inch hole from a misplaced anchor are different jobs with different failure points. Use spackle on the big one, and it shrinks into a visible crater. Use a structural patch on the small one, and you waste an hour.
What follows is the breakdown: the three filler types, the six-step patch that works for 90% of holes, and the manufacturer specs that tell you when a hole is too big for just filler. By the end, you’ll look at a hole and know in ten seconds which tub on the shelf fixes it.
Key Takeaways
- Match the filler to the hole depth. Lightweight spackle (like DAP DRYDex) fills only up to 1/2 inch deep in one go; deeper holes need a patching system or a layered fill.
- Temperature and humidity control drying time. Applying filler below 50°F (10°C) can prevent proper curing, leading to a soft, crumbly patch that never hardens.
- For holes wider than your thumb, you need a scrim or fiber patch behind the hole. The patch carries the filler, preventing sag and shrinkage.
- Sanding is not the goal. The best fillers, like SikaWall Deep Gap Filler, are formulated to dry smooth and require little to no sanding if applied correctly with a flexible knife.
- On fire-rated walls or structural panels, a simple fill may not restore the wall’s rating. The American Gypsum Association’s GA-225 guide requires mechanical attachment for patches over a certain size.
The Three Fillers You Actually Need (And When to Grab Each)
You don’t need a shelf full of products. You need to identify which of three material categories your hole falls into. The wrong pick guarantees a callback.
Lightweight Spackle is for small, shallow defects. Think nail holes, tiny screw holes, or hairline cracks. Its advantage is that it dries fast and sands easily. Its limitation is depth.
Common mistake: Filling a 1-inch deep hole with spackle. It shrinks as the water evaporates, leaving a concave dent you’ll see from every angle after painting.
Products like DAP DRYDex or LePage Polyfilla Big Hole Repair are typical. Check the technical sheet. DAP’s TDS states it repairs holes “up to 4 inches in diameter” but is meant for shallow applications; its solids content is 77% by weight. LePage’s product is formulated for holes “up to 1/2 inch deep in one application.” For anything deeper, you must build in layers, waiting 24 hours between each 1/2-inch lift. That’s a two-day job for a 2-inch deep hole.
Setting-Type Joint Compound is your workhorse for standard drywall repairs, especially when using a fiber patch. It comes as a powder you mix with water. It sets by chemical reaction, not just drying, so it doesn’t shrink and can be built up thickly. It’s harder to sand than spackle, so the skill is in the application, not the sanding.
Deep-Gap or One-Shot Fillers are a newer category. Products like SikaWall Deep Gap Filler use ceramic spheres to prevent sag. The SikaWall TDS says it can fill a void up to 50 mm (about 2 inches) deep in one coat with no sagging. Its density is 1.15-1.25 g/cm³—heavier than spackle but engineered to stay put on vertical surfaces. This is for the hole that’s too big for spackle but not big enough to warrant a full patch kit.
| Filler Type | Best For Hole Size | Key Limitation | Drying/Curing Time |
|---|---|---|---|
| Lightweight Spackle (DAP DRYDex) | Up to 4″ wide, but ≤ 1/2″ deep | Shrinks in deep fills; not structural | 1-5 hours (per DAP TDS) |
| Deep Gap Filler (SikaWall) | Up to 2″ deep in one coat | Interior use only; not for structural repair | Ready to sand/paint in ~30 min |
| Setting-Type Joint Compound | Any size with a patch | Requires mixing; short working time (5-20 min) | Sets in 20-90 min, dries fully in 24 hrs |
The 6-Step Patch Job for Holes Up to 2 Inches
This is the process for a typical hole from a drywall anchor or a small plumbing mistake. It uses a fiber-reinforced patch, which is a self-adhesive mesh that bridges the hole.
1. Clean the Hole and Surrounding Area
Dig out any loose drywall paper or crumbled gypsum. The edges must be solid. Use a utility knife to cut away any frayed paper—this prevents bubbles later. Wipe away dust with a dry cloth. If the hole is in a bathroom or kitchen, the surface must be bone-dry. Moisture trapped behind the patch kills the adhesive.
2. Apply the Fiber Patch
Peel the backing off the patch. If the hole is irregular, you can cut the patch with scissors. The patch should extend at least 1.5 inches beyond the hole’s edge on all sides. Press it firmly over the hole, ensuring full contact, especially at the edges. Don’t stretch it.
3. Apply the First Coat of Filler
Use a setting-type joint compound or a heavy-duty spackle. With a 4-inch flexible putty knife, press the filler firmly through the mesh and onto the wall. Cover the entire patch, feathering the edges out onto the surrounding wall. The goal is to bury the mesh completely. This coat can be thick. Let it dry completely. With setting compound, this means waiting until it changes color (usually from dark gray to light gray).
Where this goes sideways: Applying the second coat before the first is fully dry. The underlying coat stays soft, and sanding later will gouge the entire patch out. Wait the full time on the package.
4. Apply a Second, Wider Coat
This coat is for blending. Use a 6-inch knife. Apply a thin layer of filler over the first coat, extending your feathering out another 2-3 inches. The transition from the patch to the wall should be a gentle slope, not a cliff. This coat hides the patch outline.
5. Sand Smooth
Once the second coat is dry, sand lightly with a sanding sponge or 120-grit sandpaper. Don’t over-sand. You’re just knocking down high spots and blending the feathered edges. The patch should be smooth to the touch and visually disappear when you shine a light across the wall at a shallow angle.
6. Prime Before Painting
This is the step people skip. The repaired area is more porous than the original painted wall. If you paint directly over it, the patch will absorb paint differently and flash—it will be visible as a dull spot under certain light. Apply a coat of drywall primer or a paint-and-primer-in-one product first. Then paint the whole wall section for a perfect match.
When a Hole Is Too Big for Filler Alone
A filler relies on the wall to support it. When the hole is too large, there’s no wall left to provide that support. You need to install backing.
The USG STRUCTO-CRETE® Structural Panels Repair Manual gives a clear rule: for their structural panels, a hole larger than 6 inches in diameter requires added framing. For holes up to that size, they specify a patching material like Mapei Mapecem Quickpatch, mixed at a precise ratio of 4.56 to 5 quarts of water per 50-lb bag. The working time is about 5 minutes.
For standard drywall, the rule of thumb is: if the hole is wider than 3 inches, or if you can’t find solid drywall around the edges to anchor a patch, you need to create backing.
How to install backing:
- Cut a piece of wood (like a 1×3) several inches longer than the hole’s width.
- Insert it into the hole, turn it sideways, and pull it back against the inside of the drywall.
- Screw through the drywall face into the wood to secure it. You now have a solid base.
- Cut a new piece of drywall to fit the hole, screw it into the wood backing, then tape and mud the seams as you would any other drywall joint.
This isn’t a filler job anymore. It’s a drywall repair. But it’s the only way to fix a large hole permanently.
Why Filler Fails: The Science of Sag, Shrink, and Flash
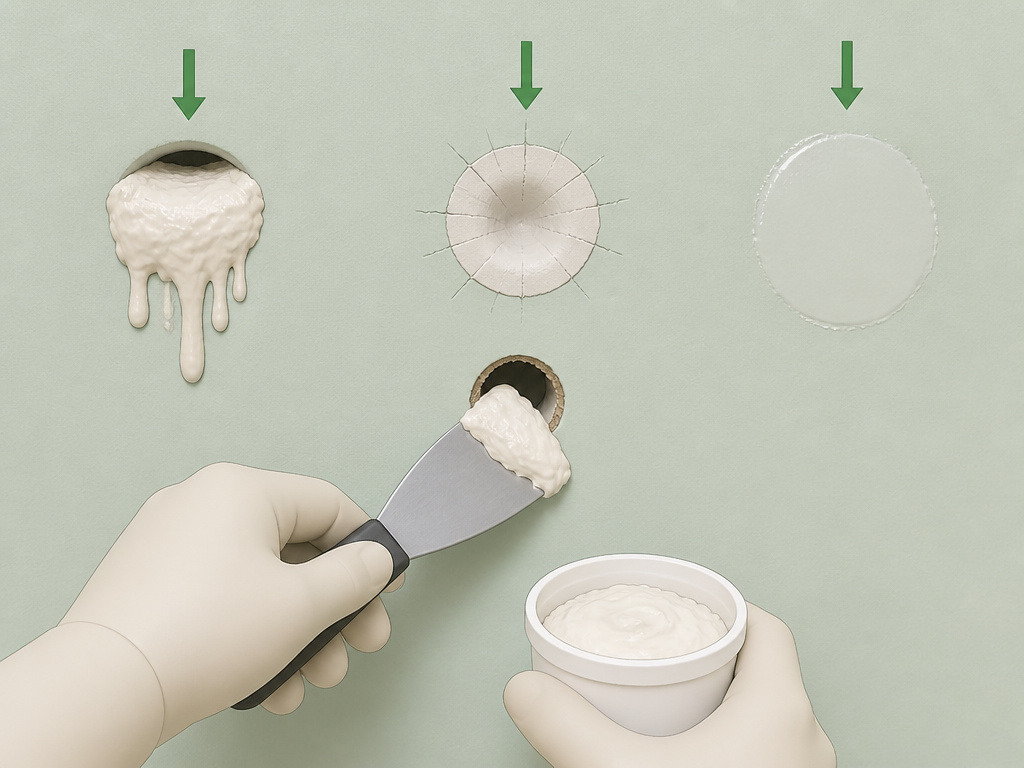
If you understand why patches fail, you can avoid it without memorizing steps.
Sagging happens when the filler is too heavy and wet for a vertical surface. Gravity wins before the filler sets. Lightweight spackles have low density—around 0.4–0.6 g/cm³ for LePage Polyfilla. They resist sag but can’t be built thick. Deep gap fillers like SikaWall include microscopic ceramic spheres that thicken the product without adding weight, giving you more working time before sag starts.
Shrinkage is water loss. As the water in spackle or joint compound evaporates, the material contracts. Shrinkage cracks are radial, emanating from the center of the hole. Setting-type compounds and some advanced fillers shrink less than 1% because they cure chemically. Always overfill a hole slightly to account for minor shrinkage.
Flashing is that shiny or dull spot you see after painting. It occurs because the repaired surface has a different texture and porosity than the surrounding wall. It absorbs paint at a different rate. The fix is always primer. Primer seals the porous patch, creating a uniform surface for the topcoat.
The part nobody mentions: The light angle in your room exposes every flaw. Sand your patch until it feels smooth, then shine a work light across the wall at a 10-degree angle. You’ll see every ripple and dip. Fix them now, before primer.
Frequently Asked Questions
Can I use toothpaste to fill a drill hole?
You can, but you shouldn’t. It’s a temporary hack for a rental inspection, not a repair. Toothpaste dries brittle, shrinks, and can stain the wall. It will likely fall out or show through paint within weeks. Use a $5 tub of spackle instead.
How long should I wait before sanding spackle?
Wait until it’s completely dry and hard. For indicator products like DAP DRYDex, wait until it turns from pink to white. In a humid room, this can take 5 hours or more. Sanding early gums up your sandpaper and pulls soft filler out of the hole, making it worse.
What’s the difference between spackle and joint compound?
Spackle is a lightweight, pre-mixed paste for small, shallow repairs. It dries by evaporation. Joint compound (or “mud”) is for taping and finishing drywall seams. Setting-type joint compound is a powder you mix; it cures hard with minimal shrinkage and is used for larger patches. Spackle is easier to sand; joint compound is more durable.
Why does my filled hole keep cracking?
The filler is moving because the wall is moving. This happens if you fill a hole over a stud or a seam that experiences seasonal expansion/contraction, or if you didn’t remove loose material around the hole’s edge. The fix is to widen the hole slightly to get to solid material, use a flexible patching mesh, and consider a more flexible filler like an acrylic-based caulk for very small, dynamic cracks.
How do I fill a hole in a concrete or brick wall?
For masonry, you need a different product. Use a hydraulic cement or a vinyl concrete patcher. These are powder-based products designed to bond with masonry. Clean the hole thoroughly, mix the patcher to a thick paste, push it in firmly, and smooth the surface. They set rock-hard and can be painted over.
Before You Go
Filling a drill hole is a simple job that goes wrong in predictable ways. Pick the filler by depth, not diameter. Use a patch for anything bigger than a screw hole. Let each layer dry all the way. And prime before you paint.
The default pick for most homeowners is a DAP DRYDex kit for holes up to 4 inches. It has the patch, the pink-to-white spackle, and the knife in one box. For deeper, nastier holes in drywall, a tub of SikaWall Deep Gap Filler saves a layer of work. If you’re patching structural sheathing or a garage wall, follow the panel manufacturer’s spec—for USG panels, that’s Mapecem Quickpatch mixed to the quart-per-bag ratio. That’s the difference between a patch that lasts and one you redo next year.
