
No-Drill Methods: How to Put Plastic Anchors in Your Wall
This post contains affiliate links. As an Amazon Associate, we earn from qualifying purchases.
To install a plastic anchor in a wall without a drill, you need either a self-drilling anchor designed for screwdriver installation or a standard plastic toggle anchor installed using a screwdriver as an impromptu drill bit. For a toggle anchor, a #3 blade (1/4″) screwdriver rotated by hand can create the required 5/16″ hole in drywall. Self-drilling anchors like the TOGGLER SnapSkru or DeWalt Wall-Dog are driven directly in with a #2 Phillips screwdriver until flush.
The “without a drill” clause changes everything. It’s not about skipping a step; it’s about matching the anchor’s design to the force a human arm can deliver through a hand tool. The wrong choice here doesn’t just fail, it strips the drywall core in seconds, leaving a useless crater.
What follows: the two proven methods, the exact tools each one demands, and the three mistakes that turn a 5-minute job into a wall repair.
Key Takeaways
- A #3 blade screwdriver can manually create a clean 5/16″ hole for a standard plastic toggle anchor, per TOGGLER’s own installation guide.
- Self-drilling anchors like the TOGGLER SnapSkru or DeWalt Wall-Dog are engineered for direct installation with a #2 Phillips screwdriver, no pre-hole needed.
- Hand-tightening has a hard stop: drive the anchor until it’s flush with the wall surface. Going further collapses the mechanism.
- Double-layer drywall (1-1/4″ thick) requires a 3/16″ pilot hole even with self-drilling anchors, or the tip will bind and strip.
- The anchor’s minimum screw length is critical, it must be at least 1 inch longer than the item you’re hanging, or it won’t engage the locking mechanism.
The Two Core Methods: Screwdriver vs. Self-Drilling
You have two paths. One adapts a common anchor to hand tools. The other uses an anchor built for the job from the ground up. Picking the wrong one is the fastest route to failure.
The first method is a workaround, but it’s manufacturer-approved. TOGGLER’s spec sheet for their Plastic Toggle Anchors states: “Where a drill is not available, a #3 blade (1/4″) screwdriver, when rotated, will make a 5/16″ installation hole in drywall.” That’s a specific, sourced fact. It works because drywall is soft gypsum; a sharp screwdriver tip acts as a crude rotary cutter.
The second method is purpose-built. Anchors like the TOGGLER SnapSkru and DeWalt Wall-Dog are designed as self-drilling drywall anchors. Their installation instructions explicitly call for a #2 Phillips screwdriver or screw gun, with no mention of a drill. They have sharp, threaded tips that pull themselves into the wall as you turn them.
TOGGLER’s technical bulletin confirms the screwdriver method: “Where a drill is not available, a #3 blade (1/4″) screwdriver, when rotated, will make a 5/16″ installation hole in drywall.” This turns a limitation into a valid technique.
| Method | Best Anchor Type | Tool Required | When It Fails |
|---|---|---|---|
| Screwdriver as Drill | Standard Plastic Toggle (e.g., TOGGLER) | #3 Blade Screwdriver | In double drywall or plaster; the screwdriver wobbles and makes an oval hole. |
| Self-Drilling Anchor | SnapSkru, Wall-Dog, Zip-Toggle | #2 Phillips Screwdriver | If the drywall is under 3/8″ thick; the anchor blows through the back. |
| Pilot Hole & Hand Drive | Any anchor, for tough walls | #2 Phillips, Awl, Hammer | Not actually “no drill”—requires a pilot hole made by other means. |
The choice comes down to what’s already in your wall and what’s in your hand. For a one-time picture hook in standard 1/2″ drywall, the self-drilling anchor is the cleanest bet. For a shelf bracket where you need the holding power of a toggle, the screwdriver method is your only manual option.
What You Actually Need: The 4-Tool Kit
Forget the full workshop. You can install plastic anchors with a shockingly small kit. The wrong screwdriver, however, guarantees a struggle.
- The Right Screwdriver: This is non-negotiable. For self-drilling anchors, you need a #2 Phillips head. For creating a hole for a toggle anchor, you need a #3 flat-blade (1/4″ tip). A #2 Phillips is the most common size in the world; a #3 is less common but found in many basic sets. Using a #1 Phillips on a self-driller will cam out and strip the head before the anchor is halfway in.
- A Hammer or Mallet: Not for driving, but for starting. A light tap on the back of the screwdriver seats the tip of a self-drilling anchor or punches the initial dent for the screwdriver-as-drill method. It prevents the tool from skating across the wall surface.
- A Pencil & Tape Measure: Obvious, but critical. If you’re installing more than one anchor for drywall, measure twice and mark with a pencil. A pen or ballpoint will leave a permanent stain.
- The Anchors & Screws: Ensure the screw length meets the anchor’s minimum. For the TOGGLER SnapSkru MINI, that’s 1 inch (25mm) plus the thickness of your item. A screw that’s too short never activates the anchor’s locking mechanism.
Common mistake: Using a screwdriver with a worn or rounded tip. It transfers less torque and strips the drive head. If your screwdriver spins without biting, check the tip before blaming the anchor.
You don’t need a fancy drill driver or an impact wrench. Muscle power and the correct interface between tool and fastener are what matter here. This is one of the few times where a more powerful tool is actually a liability, an electric screw gun set too high will over-drive a self-drilling anchor past its stop in a fraction of a second.
Step-by-Step: Installing a Standard Toggle Anchor by Hand
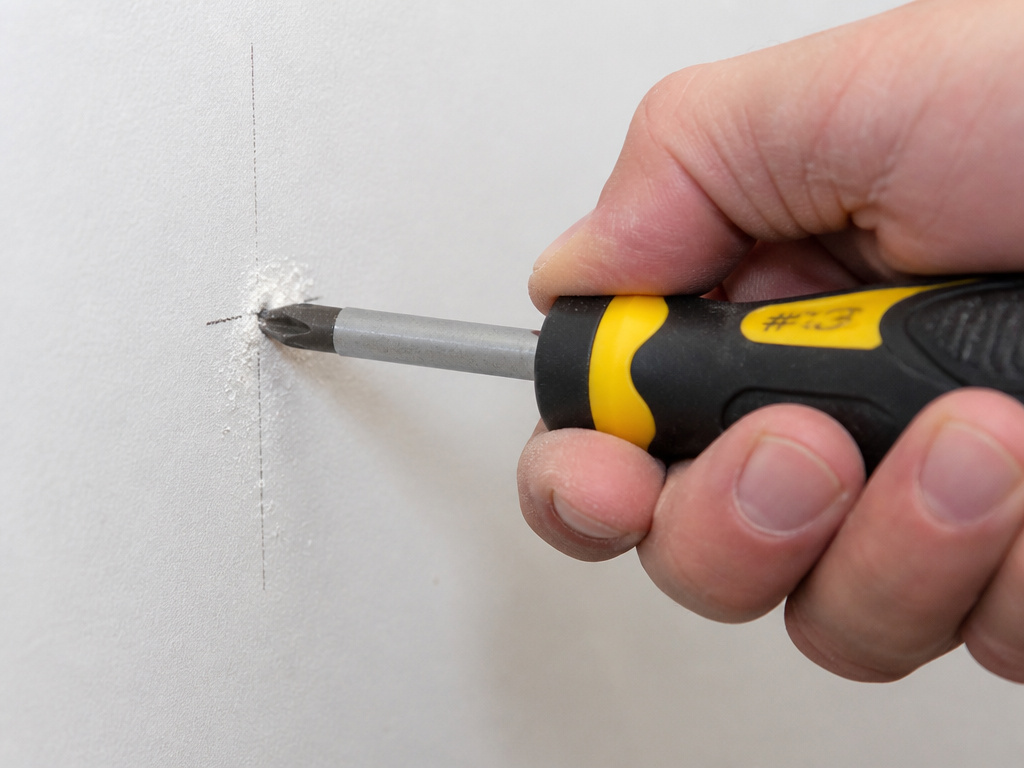 This is the adaptation method. It works because drywall is forgiving. The goal is a clean, round 5/16″ hole, not a ragged tear.
Step 1: Mark and Start the Hole
Press the tip of your #3 blade screwdriver directly on your pencil mark. Apply firm downward pressure and twist it back and forth 90 degrees to carve a starter dent. Once it’s seated, give the handle a light tap with a hammer. This punches the tip through the drywall’s paper face and into the gypsum core, giving the blade a clean starting point.
Step 2: “Drill” the Hole
Grip the screwdriver like a hand drill. Apply steady, firm pressure straight into the wall and rotate the handle clockwise. The blade will cut and grind through the drywall. The dust will be fine and white. Your progress will feel slow and gritty, that’s normal. If you hit sudden resistance, you may have found a stud. Stop.
This is where it goes sideways. If you let the screwdriver angle off vertical, you’ll create an oval, oversized hole. The toggle wings won’t seat flat against the back of the wall, and the anchor will pull out under load. Focus on keeping it straight.
Step 3: Set the Anchor
Insert the plastic toggle anchor into your fresh hole. It should slide in with slight finger pressure. If you have to force it, the hole is too small, rotate the screwdriver a few more times. If it’s loose, the hole is too big; this anchor location is compromised. Insert the setting key (the little red or black plastic tool that comes with TOGGLER anchors) and push until you feel a distinct pop. That’s the toggle arms snapping open and locking against the back of the drywall. No pop means no lock.
Step 4: Drive the Screw
Place your item over the anchor. Insert the correct screw and drive it in with your screwdriver. Tighten until the screw head is snug flush with your item. Do not keep tightening. The screw’s job is to clamp your item to the wall, not to further tighten the anchor. Over-tightening will pull the anchor’s head through the drywall face.
The whole process for one anchor should take about two minutes. If it’s taking longer, check your screwdriver tip and your wall material. This method is for drywall and plasterboard only.
Step-by-Step: Installing a Self-Drilling Anchor
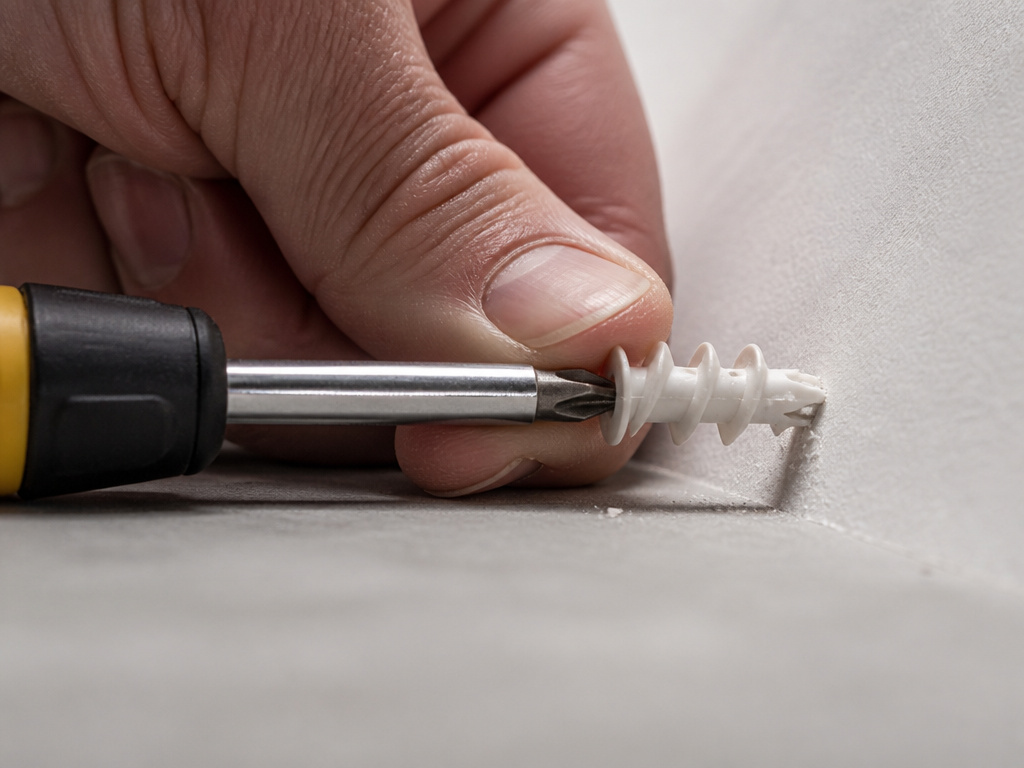 This is the streamlined method. Anchors like the TOGGLER SnapSkru and DeWalt Wall-Dog are the product of this specific problem.
Step 1: Align and Start
Hold the anchor against the wall on your mark. Insert your #2 Phillips screwdriver into the anchor’s drive head. Apply firm pressure straight into the wall and give the screwdriver handle a sharp tap with your palm or a hammer. This embeds the anchor’s sharp tip so it won’t skate.
Step 2: Drive to Flush
Now, rotate the screwdriver clockwise. Apply steady, moderate pressure. You will feel the anchor’s threads biting and pulling it into the wall. The anchor’s body will turn with the screwdriver, this is correct. Continue driving until the anchor’s flange is perfectly flush with the wall surface. Most self-drilling anchors have a built-in “positive stop” flange. When it seats against the wall, you’ll feel a noticeable increase in resistance. Stop driving.
Where this goes sideways: Driving the anchor past flush. Once the flange is against the wall, further rotation does nothing but grind away the drywall behind it, destroying the compression fit. The anchor becomes loose and won’t hold weight.
Step 3: Insert the Screw and Lock
Remove the screwdriver. Place your shelf bracket, curtain rod, or other item over the anchor. Insert your screw and drive it in. As the screw travels the last few turns, it will engage the anchor’s internal locking mechanism. With the SnapSkru, you’ll hear and feel a definitive pop as the base expands. Tighten until the screw head is snug. The anchor is now locked in compression.
When Hand Installation Isn’t Possible: The Limits
The “no drill” promise has a boundary. Recognizing it saves your wall.
The wall is too hard or thick. The screwdriver-as-drill method is for drywall. Plaster over lath, cement board, or ceramic tile will blunt a screwdriver tip instantly. The DeWalt Wall-Dog manual states that for materials like concrete, brick, or plaster, a 3/16″ pre-drilled hole is required. That’s a drill’s job. If you don’t have one, this anchor type isn’t suitable.
You’re in double-layer drywall. Some walls have two sheets totaling 1-1/4″ thickness. The TOGGLER SnapSkru guide includes a specific tip: for double thickness drywall, a 3/16″ pilot hole must be drilled first. A self-drilling anchor’s tip isn’t long enough to penetrate both layers before the threads engage; it will bind, over-torque, and strip.
The load is too heavy. This is a physics limit. Hand-driven anchors are for light to medium duty: curtain rods, blinds, small shelves, pictures. They are not for mounting a 65-inch television, a heavy floating shelf full of books, or a pull-up bar. Those loads require the precise, straight holes and robust anchors that only a drill can facilitate.
| Scenario | Can you proceed without a drill? | The Risk |
|---|---|---|
| Standard 1/2″ Drywall | Yes | Low, if method is followed. |
| Plaster Wall | No | Screwdriver will not penetrate; anchor will not seat. |
| Hanging a Lightweight Shelf (<10 lbs) | Yes | Use a self-drilling anchor rated for the load. |
| Hanging a TV | No | Dynamic load and weight exceed safe holding capacity. |
| Tile Over Drywall | For toggle anchors only (with 3/8″ hole) | High risk of cracking tile during manual “drilling.” |
If your project hits one of these limits, the answer isn’t to force it. The answer is to borrow, rent, or buy a basic cordless drill. It’s the smarter investment.
Troubleshooting a Failed Hand Installation
You followed the steps, but the anchor is spinning, loose, or pulled out. Here’s what likely happened and how to salvage it.
Symptom: The anchor spins freely in the hole.
Cause: The hole is oversized. This happens if the screwdriver wobbled or you drove a self-drilling anchor past its stop.
Fix: You cannot tighten a spinning anchor. Remove it. The hole is now too large for that anchor type. Your options are to use a larger-diameter anchor (which requires a larger hole, so you’re back to square one), move the installation over by an inch into fresh drywall, or use a wall repair patch and start over.
Symptom: The anchor pulls straight out with light pressure.
Cause: The locking mechanism never engaged. For toggle anchors, the wings didn’t pop open. For self-drilling anchors, the screw was too short or wasn’t driven deep enough to trigger the expansion.
Fix: For a toggle, remove it and check the setting key. Re-insert and push harder until it pops. For a self-driller, remove the screw, ensure it’s the correct minimum length, and re-drive it firmly until you feel the lock.
Symptom: The screw strips or won’t go in.
Cause: You’re using the wrong screwdriver size (#1 on a #2 head) or the screw is hitting the end of the anchor’s internal channel.
Fix: Match the driver to the head. If the screw is bottoming out, it’s too long for the anchor’s grip range. Switch to a shorter screw that still meets the minimum length requirement.
TL;DR: A failed anchor usually means the hole is bad, the tool was wrong, or the parts don’t match. Diagnose which before trying again.
Frequently Asked Questions
Can you really make a hole with just a screwdriver?
Yes, in drywall. A #3 blade (1/4″) screwdriver rotated under pressure acts as a crude rotary cutter. TOGGLER’s official installation guide lists this as a valid method for their plastic toggle anchors where a drill is not available. It’s slow and requires effort, but it creates a serviceable 5/16″ hole.
What’s the best plastic anchor to use without a drill?
The TOGGLER SnapSkru is the benchmark. It’s specifically engineered as a self-drilling drywall anchor that installs with a #2 Phillips screwdriver. Its main competitor is the DeWalt Wall-Dog, another steel, self-drilling anchor. For pure holding power without a drill, a properly installed toggle anchor using the screwdriver-as-drill method is stronger, but the SnapSkru is faster and easier.
Why did my self-drilling anchor get stuck halfway in?
You likely hit a stud or a metal drywall backing strip. Self-drilling anchors are for hollow walls. If the tip encounters solid wood or metal, it cannot penetrate. Stop driving immediately. You can either remove the anchor and relocate your item, or, since you’ve found a stud, simply drive a standard wood screw directly into the stud for the strongest hold possible.
How much weight can a hand-installed anchor hold?
It depends entirely on the anchor type and your drywall’s condition. A TOGGLER plastic toggle anchor installed correctly can hold 50-75 pounds in 1/2″ drywall. A SnapSkru or Wall-Dog is rated for lighter duty, typically 20-50 pounds. These are static weights. Dynamic loads (like a child pulling on a curtain rod) reduce safe capacity by half. Always check the specific anchor’s technical data sheet for its tested weight rating.
Can I use this method on a plaster wall?
No. Plaster is much harder and more brittle than drywall. A screwdriver will not cut through it effectively, and attempting to do so will likely cause the plaster to crack and crumble around the hole. Installing any anchor in plaster reliably requires a drill to create a clean pilot hole.
Before You Go
Putting a plastic anchor in a wall without a drill is a useful skill, but it’s a precision task, not a brute-force one. The victory isn’t getting the anchor in the wall; it’s getting it in correctly so the thing you hang stays up.
The screwdriver-as-drill method is your fallback for toggle anchors. The self-drilling anchor is your first-choice modern solution. Both demand the right driver bit, a steady hand, and the discipline to stop when the anchor tells you to. Ignore the stop, and you’ll be patching a hole. Your wall doesn’t care how the hole got there, only that it’s the right size and shape for the hardware you chose.
