
How to Drill Into a Stud: Avoid Common Code Violations & Mistakes
This post contains affiliate links. As an Amazon Associate, we earn from qualifying purchases.
To drill into a stud, you must follow two primary building code rules: keep the hole diameter under 60% of the stud’s width, and maintain a minimum edge distance of 1-1/4 inches from the nearest stud face for electrical cable. On a standard 2×4 stud, this means a maximum hole size of 1-3/8 inches, but you have only 1/4 inch of leeway before a steel nail plate is required. Drilling off-center or at an angle triggers that requirement instantly.
The 1-1/4-inch rule isn’t a suggestion. It’s the minimum distance a drywall screw can penetrate before it hits a wire. Miss that margin, and you’ve created a hidden fault line behind the drywall.
What follows is the breakdown of the International Residential Code and National Electrical Code sections that actually matter. You’ll get the specific bit sizes, the tool choices that make the job possible in tight spaces, and the exact failure points inspectors look for on every rough-in walkthrough.
Key Takeaways
- The 1-1/4-inch edge-distance rule is for electrical cable protection, while the 5/8-inch rule is a separate structural minimum. You must satisfy both.
- On a 2×4 stud, a 7/8-inch or 1-inch spade bit is the practical maximum for a single cable run; it keeps you within the 60% diameter limit and leaves material for the edge distance.
- Angled drilling almost always requires a nail plate. Even a correctly sized hole becomes non-compliant if the bit isn’t perpendicular to the stud face.
- Bearing walls have stricter limits. Holes over 40% of the stud width require the stud to be doubled, and notches cannot exceed 25% depth.
- Right-angle drills and auger bits aren’t luxury items for pros. They’re the only way to drill perpendicular holes in corners and tight bays without violating code.
The Two Code Rules That Govern Every Hole
Forget “drill in the center.” That’s incomplete advice. Two separate code sections control every hole you make, and they work together. One protects the structure, the other protects what runs through it.
The International Residential Code (IRC) Section R602.6 handles structural integrity. It says the diameter of a bored hole cannot exceed 60 percent of the stud’s width. The edge of that hole must also be at least 5/8 inch from the edge of the stud. This is the absolute structural floor.
Boring. The diameter of bored holes in studs shall not exceed 60 percent of the stud depth, the edge of the hole shall not be less than 5/8 inch (16 mm) from the edge of the stud, and the hole shall not be located in the same section as a cut or notch.
The National Electrical Code (NEC), adopted into the IRC as Section E3802.8, adds a stricter layer for safety. It mandates that holes for electrical cable must be at least 1-1/4 inches from the nearest face of the stud. This isn’t about wood strength. It’s about keeping drywall screws and nails away from live wires.
Where this goes sideways: Assuming the 5/8-inch rule is enough for electrical work. It’s not. The 1-1/4-inch rule overrides it for cable, and missing it means installing a nail plate or failing inspection.
These rules collide on a common 2×4. Its actual width is 1.5 inches. The 1-1/4-inch edge distance leaves just a quarter-inch buffer. Your target zone is a vertical strip only half an inch wide, dead center in the stud. Drill outside that strip, and you need a nail plate.
| Stud Type | Actual Width | Max Hole (60%) | Target Center Zone | Nail Plate Trigger |
|---|---|---|---|---|
| 2×4 Non-Bearing | 1.5 inches | 1-3/8 inches | ~0.5 inch wide | Hole edge < 1-1/4″ from face |
| 2×6 Non-Bearing | 5.5 inches | 2-1/4 inches | ~3.0 inches wide | Hole edge < 1-1/4″ from face |
| 2×4 Bearing Wall | 1.5 inches | 0.9 inches (over 40% requires doubled stud) | ~0.5 inch wide | Hole edge < 1-1/4″ from face |
Bearing Wall vs. Non-Bearing: The Stakes Change Everything
A non-bearing partition just holds up drywall. A bearing wall holds up your roof, a second floor, or both. The code treats them differently because the consequences of a mistake are structural, not just cosmetic.
In a bearing wall (typically exterior walls and some interior walls), the hole diameter limit tightens. You can drill a hole up to 40% of the stud’s width without reinforcement. Want to go bigger, up to the 60% maximum? The IRC says you must double that stud, install another identical stud right next to it, and you can’t do this to more than two studs in a row.
Notching is where people get into real trouble. In a bearing wall, you cannot notch a stud deeper than 25% of its width. In a non-bearing wall, you get 40%. Cut deeper, and you’ve created a hinge point. Under load, that stud will bow and crack at the notch. It’s not a maybe.
TL;DR: If you’re unsure if a wall is bearing, assume it is. Use the stricter limits. When in doubt about your drill bit selection for a thick pipe, build a 2×6 wall instead of drilling a giant, code-busting hole in a 2×4.
Tools That Actually Work for the Job
A cordless drill and a cheap spade bit will get a hole in the wood. They won’t get a code-compliant hole in the right place, every time. The wrong tool guarantees off-angle drilling, and off-angle drilling guarantees a nail plate violation.
For speed and clean holes in open bays, a self-feeding auger bit is the pro standard. The screw tip pulls the bit through, and the deep flutes clear chips fast. They also handle accidental contact with nails better than a spade bit. The Milwaukee Selfeed bit or equivalent is the one to beat for running multiple cables.
For one or two holes in a tight spot, a spade bit is fine. But you must use a drill with a side handle or a right-angle attachment to keep it perfectly perpendicular. A hand-held drill will wobble.
This is where the tool choice becomes non-negotiable. A right-angle drill (like the Milwaukee Hole Hawg) or a right-angle attachment for your standard drill is the only way to drill a perpendicular hole when the stud bay is too narrow for a full-size drill body. Guessing the angle never works.
Common mistake: Using the largest bit on the rack. A 1-1/2-inch hole saw in a 2×4 stud violates the 60% rule immediately. It also removes so much wood that the stud can split along the grain when the wall is racked by wind or settlement.
Your kit needs three things: a quality auger bit set (3/4″ to 1-1/4″), a right-angle capability, and a 2-foot bit extension for reaching deep into corner assemblies. Without the extension, you’ll try to drill at a crazy angle from the adjacent bay and fail the edge-distance test.
The Step-by-Step Process for a Code-Compliant Hole
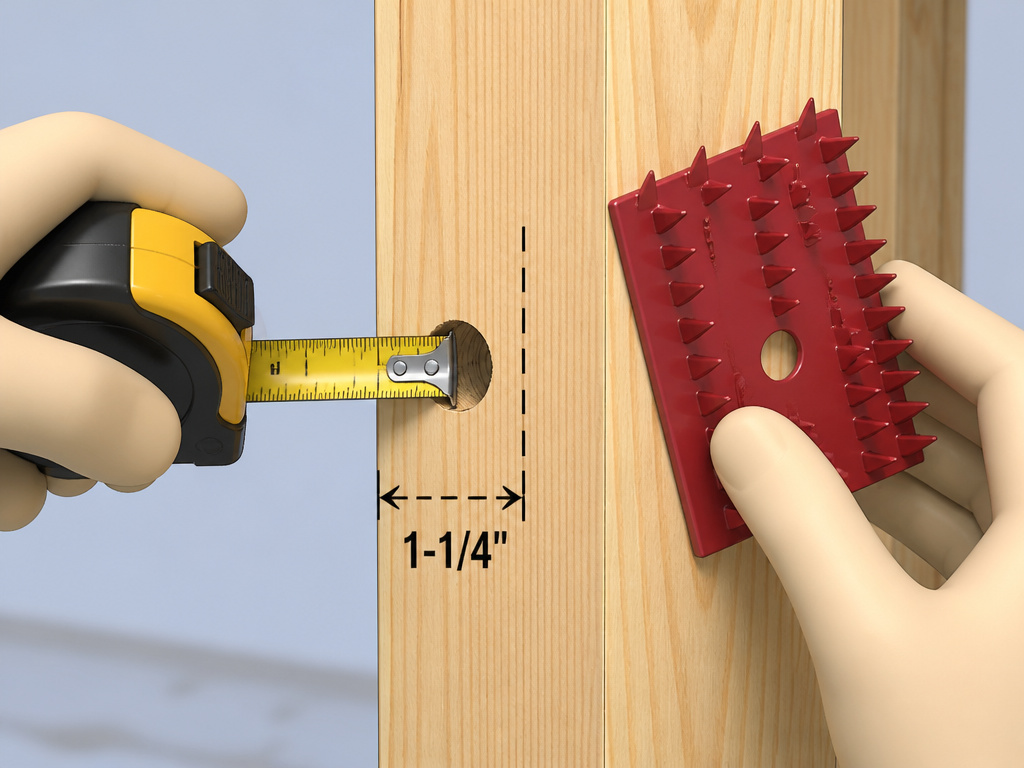 This sequence assumes you’re running electrical non-metallic (NM) cable. The principles are the same for low-voltage or plumbing, but always check the specific mechanical code for pipe clearance rules.
- Locate and Mark the Exact Center. Use a stud finder, then measure the stud’s width. Mark the exact vertical centerline with a pencil. This is your left-right guide.
- Establish Your Height. Decide on your hole height, usually 12-18 inches above floor level for outlets. Use a level to draw a light horizontal line across the stud face at that height. Where it crosses your centerline is your drill point. Consistency here makes pulling wire possible.
- Select the Bit. For one 14/2 NM cable, a 7/8-inch bit is ideal. For two cables, step up to 1 inch. Test that the cable bundle fits freely through the bit’s pilot hole before you commit.
- Set Up for Perpendicular Drilling. Attach your bit to the drill. If space is tight, attach the right-angle adapter. Hold the drill so you can sight down the bit toward your mark. The goal is zero visible angle relative to the stud face.
- Drill Steadily. Start the drill at low speed to establish the hole, then increase power. Let the tool do the work; forcing it creates tear-out and oval holes. For auger bits, moderate pressure is enough, the screw tip pulls it.
- Check Edge Distance Immediately. As soon as the bit clears, stop. Insert a tape measure or a small rule into the hole and measure from the edge of the hole to the nearest stud face. Is it at least 1-1/4 inches? If not, you install a nail plate now.
- Deburr and Install Protection. Feel inside the hole for splinters or rough edges that could chafe cable insulation. Sand them smooth. If your measurement failed in step 6, hammer a steel nail plate (minimum 1/16-inch thick) over the hole location. The plate’s prongs should bite into the wood, securing it flush.
Skipping step 6 is how fires start. A drywall screw driven 3/4 inch into the stud hits a wire. The insulation pierces, the screw makes contact, and the circuit shorts against the grounded metal box or another conductor. It can happen years later.
When You Absolutely Need a Nail Plate (And How to Install One)
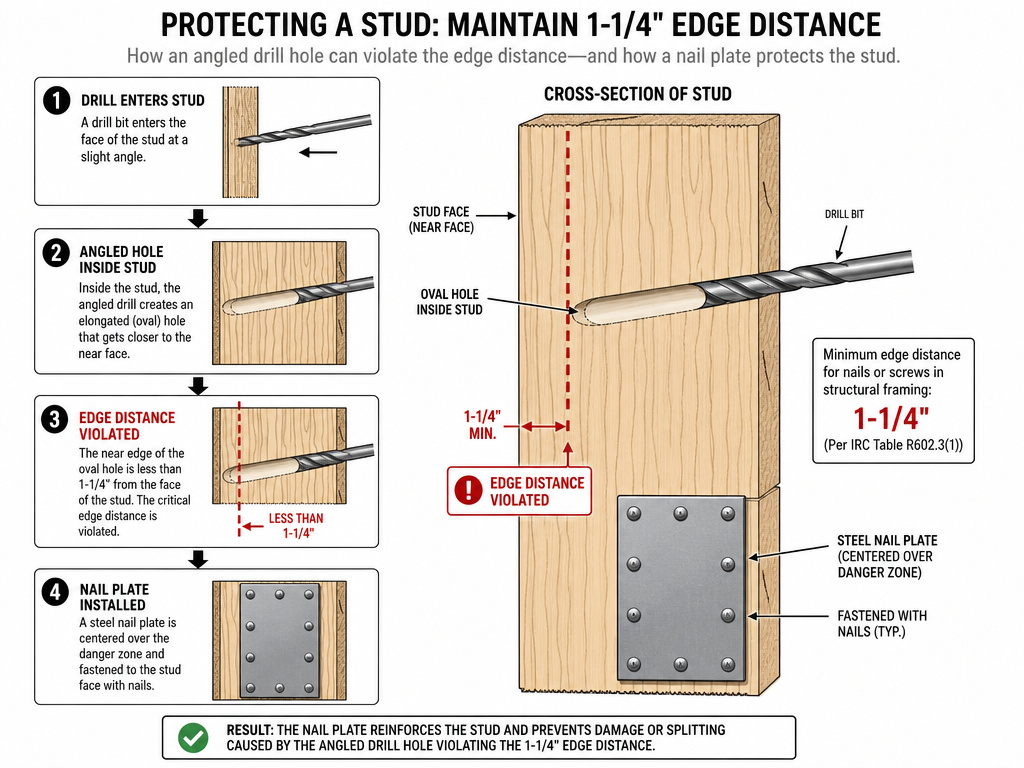 Nail plates are not optional extras. They are prescribed, code-required safety devices. You need one in three specific situations, all tied to that 1-1/4-inch edge distance.
First, when your hole is too close to the face. This is the obvious one. You drilled, you measured, and it’s only an inch away. Plate it.
Second, and this catches everyone, when you drill at an angle. Even if you used the right bit size and aimed for the center, a 10-degree angle will bring one edge of the hole closer to the face. The hole becomes an oval on the inside of the stud, and the near edge fails the test. This is why a right-angle drill isn’t a luxury, it’s a compliance tool.
Third, for any notch or groove cut into the face of a stud to run cable. Face-running cable is generally a bad idea, but if you must do it, the entire length of the notch must be covered by a nail plate.
I won’t recommend notching a stud face. It’s faster than drilling, but it weakens the stud across its entire width and requires a long plate. It also looks sloppy to an inspector. Drill the hole.
Installing the plate is simple. Buy the standard 1-1/2-inch by 3-inch steel plates from any electrical aisle. Position it so it completely covers the hole or notch. The pre-formed prongs on the back face the stud. Hammer it firmly until the plate is flat and the prongs are fully embedded. That’s it. The plate now acts as an armored shield, deflecting any fastener before it reaches the cable.
The One Mistake That Fails Rough-In Inspections
Inspectors have a checklist. At the top is “improper hole edge distance.” They carry a rule, and they will check random holes. The most common failure they see isn’t giant holes, it’s multiple holes drilled at the same height in adjacent studs.
Drilling three studs in a row, all with 1-inch holes at 16 inches off the floor, creates a horizontal plane of weakness. In a bearing wall, this can compromise the wall’s racking resistance. The fix is simple: stagger your hole heights. Drill the first stud at 16 inches, the next at 18 inches, the next at 14 inches. A 2-inch vertical stagger is enough.
The other guaranteed fail is drilling into a header or engineered lumber (LVL, PSL). Don’t. These members are designed with specific stress paths. A hole in the wrong place can invalidate the manufacturer’s warranty and require a structural engineer’s sign-off. If you must run something through a header, the time to plan that is during framing, not retrofit.
Your hammer drill vs cordless drill decision matters here, but not for the stud. Use a hammer drill or rotary hammer for concrete anchors in the bottom plate or masonry walls. For the wood stud itself, hammer action will shred the fibers and make an ugly, oversized hole. Keep it in standard drill mode.
Frequently Asked Questions
Can I drill a 2-inch hole in a 2×4 stud?
No. A 2-inch hole exceeds the 60% diameter limit for a 1.5-inch wide 2×4, which is 0.9 inches (or 1-3/8 inches under some interpretations). It also cannot satisfy the 1-1/4-inch edge-distance rule. For large pipes, you need to frame a 2×6 wall or use specially engineered stud shoes that are approved by your local inspector.
What’s the difference between the 5/8-inch and 1-1/4-inch rules?
The 5/8-inch rule (IRC R602.6) is a structural minimum to keep the hole from blowing out the edge of the stud. The 1-1/4-inch rule (IRC E3802.8 / NEC) is an electrical safety minimum to protect cable from fasteners. You must meet the stricter of the two for your application. For electrical, the 1-1/4-inch rule controls.
Do I need a nail plate for a low-voltage cable (TV, Ethernet)?
The building code’s edge-distance rule technically applies to “electrical cable,” which includes low-voltage. However, the risk of a short from a drywall screw is negligible. Most inspectors will not require a plate for low-voltage, but the safest, most compliant practice is to treat all cables the same and maintain the 1-1/4-inch distance.
Is it okay to drill a hole in the bottom or top plate?
Drilling through the bottom plate (the horizontal board on the floor) is standard for bringing wire up. Drilling or notching the top plate (the horizontal board at the ceiling) is heavily restricted. If you cut or drill more than 50% of its width, you must install a galvanized metal tie across the opening, fastened with eight 10d nails on each side. It’s a major structural repair.
What if I accidentally drill into a wire?
Stop drilling immediately. Do not pull the bit out yet, you could worsen the damage. Turn off the circuit breaker for that area. Carefully back the bit out. You must now replace the entire damaged section of cable between accessible boxes. Splicing wire inside a wall is not code-compliant. This is a scenario where knowing how to drill into drywall for access might become your next step for the repair.
Before You Go
Drilling into a stud is a binary task: either you follow the code or you create a violation. The 1-1/4-inch edge distance is the line. Respect it with a centered hole and a perpendicular drill. Arm yourself with an auger bit and a right-angle attachment for the tight spaces, that’s what keeps the hole straight.
When the rules feel restrictive, remember they’re written around drywall screws and structural loads, not opinion. A nail plate is a cheap, permanent fix for a close call. Stagger your hole heights in bearing walls. And never, ever guess about a wall’s load-bearing status. If you’re running cable, the official building code document is the final word, not a forum tip.
The goal isn’t just a hole. It’s a safe, strong wall that will last for decades without hidden hazards. That’s worth the extra minute to measure twice and drill once.
