
What Drill Bit for Plasterboard | The Spec That Decides It
This post contains affiliate links. As an Amazon Associate, we earn from qualifying purchases.
Use a High-Speed Steel (HSS) twist drill bit for plasterboard. The Tivoly 1200102 with its 30° type N flute and hexagonal shank is designed for this, cutting cleanly at 2000–3000 RPM. Avoid masonry bits; their aggressive cut crumbles the gypsum core. Match the bit diameter to your fixing, typically 3mm to 8mm for anchors like the Zip-It.
That answer covers the default. The real decision starts with what’s behind the board. A hollow stud wall demands a different approach than brick, and the wrong guess here turns a ten-second job into a patching project.
What follows: the exact HSS bit specs that matter, the RPM debate you won’t find in most guides, the two edge cases where you must pre-drill, and the anchor choice that decides your bit size before you even pick up the drill.
Key Takeaways
- HSS twist bits are the default. A bit like the Tivoly 1200102, with a hexagonal quick-change shank (DIN 3126 E6.3), drills plasterboard cleanly without tearing the paper face.
- Masonry bits crumble plasterboard. Their wide, carbide tip acts like a chisel on the soft gypsum core, blowing out the back of the hole even with light pressure.
- Speed splits the experts. OEM manuals for anchors like Zip-It say 300–400 RPM; other sources cite 2000–3000 RPM for HSS bits. The lower speed is for driving the anchor, not drilling the hole.
- Pre-drill for hard cases. The Zip-It product data mandates a 1/4″ drill bit for very hard wallboard or double-board construction, and a 7/16″ bit for solid plaster walls.
- The anchor chooses the bit. Your fixing’s required hole size, not the screw size, dictates your drill bit diameter. A 5mm anchor needs a 5mm bit, period.
The One Drill Bit Type You Should Reach For
Forget multi-purpose or “plasterboard” labels on generic bits. You need a High-Speed Steel (HSS) twist drill bit. Its geometry is the reason.
A High-Speed Steel twist drill bit has a 30° type N flute, providing rigidity and drilling precision for general use. The substrate is designed for use in materials up to 950 N/mm², making plasterboard a trivial cut that won’t stress the metal. The sharp, ground cutting edges slice the paper face and gypsum core cleanly, leaving a hole with intact edges for your anchor to grip.
The Tivoly 1200102 is the canonical example. Its hexagonal shank complies with the DIN 3126 E6.3 standard for quick-change chucks, a feature you’ll appreciate if you’re swapping between drilling and driving. The “Speed point” grind has two cutting edges around a centring point, which stops the bit from skating across the board when you start.
Drill bit selection for plasterboard isn’t about finding the strongest tool. It’s about finding the sharpest, most precise cutter for a soft, crumbly material. A general twist drill bit from a set like the Dewalt Jobber 13-piece kit (1.5mm to 6.5mm) works perfectly. The smaller diameters in that range, 3mm, 4mm, 5mm, are the ones you’ll use most.
Where this goes sideways: using a blunt bit. A worn HSS bit requires more pressure, which flexes the board and cracks the face paper around the hole. The fix is simple. Learn sharpening a drill bit on a bench grinder, or replace it. A sharp bit should pull itself through the board with the weight of the drill alone.
| Bit Type | Best For Plasterboard? | Why It Works (Or Doesn’t) | Risk If Used |
|---|---|---|---|
| HSS Twist Bit | Yes. The default choice. | Sharp edges shear cleanly. Moderate helix angle clears dust. | None when sharp. Blunt bits cause cracking. |
| Brad Point Bit | Acceptable, but overkill. | Very sharp point centres perfectly in soft material. | Point can punch through too fast, blowing out the back layer. |
| Masonry Bit | No. Actively damaging. | Carbide tip is for abrasion, not shearing. It pulverises gypsum. | Crumbled hole edges, no grip for anchors, inevitable cracking. |
| Spade / Flat Bit | No. Never use this. | Wide, flat blade splinters and tears the material. | Large, ragged hole that no standard anchor can seal. |
The HSS vs. Masonry Bit Debate (And Why One Opinion Is Wrong)
You’ll read that masonry bits “work fine” on plasterboard if you use light pressure. That advice is technically true but practically useless. It misses the mechanism.
A masonry bit’s tip is a carbide insert brazed onto a steel shaft. It’s not sharp like a knife; it’s abrasive. It works by hammering and grinding through brick. When you press that against plasterboard, the carbide doesn’t slice, it crushes. The gypsum core powders under the impact, and that powder has nowhere to go but outwards, stressing the paper face until it tears.
Common mistake: Thinking a masonry bit is “stronger” and therefore better. Strength is the problem. Plasterboard fails under crushing force, not cutting force. The bit’s aggression is its flaw.
HSS bits win because they are precisely not stronger than they need to be. They are sharp. They apply a shearing force along a thin edge, which the board’s structure can handle. The difference is visible immediately: a clean, circular hole versus a crater with ragged, chalky edges.
The RPM advice conflict stems from confusing two steps. Some sources, like the Zip-It anchor manual, state 300–400 RPM. That’s the speed for driving the self-drilling anchor into the pre-drilled hole, not for drilling the hole itself. For the drilling operation with an HSS bit, 2000–3000 RPM is standard. The high speed lets the sharp edges do the work with near-zero pressure.
Your tool matters here. A BLACK+DECKER 18V combi drill or any modern cordless drill with variable speed and a clutch is ideal. Set the clutch low when driving anchors to avoid stripping them. For drill bit operation, dial the speed to medium-high and let the tool’s rotation provide the cutting action.
What’s Behind the Wall? Your Bit Strategy Changes Here
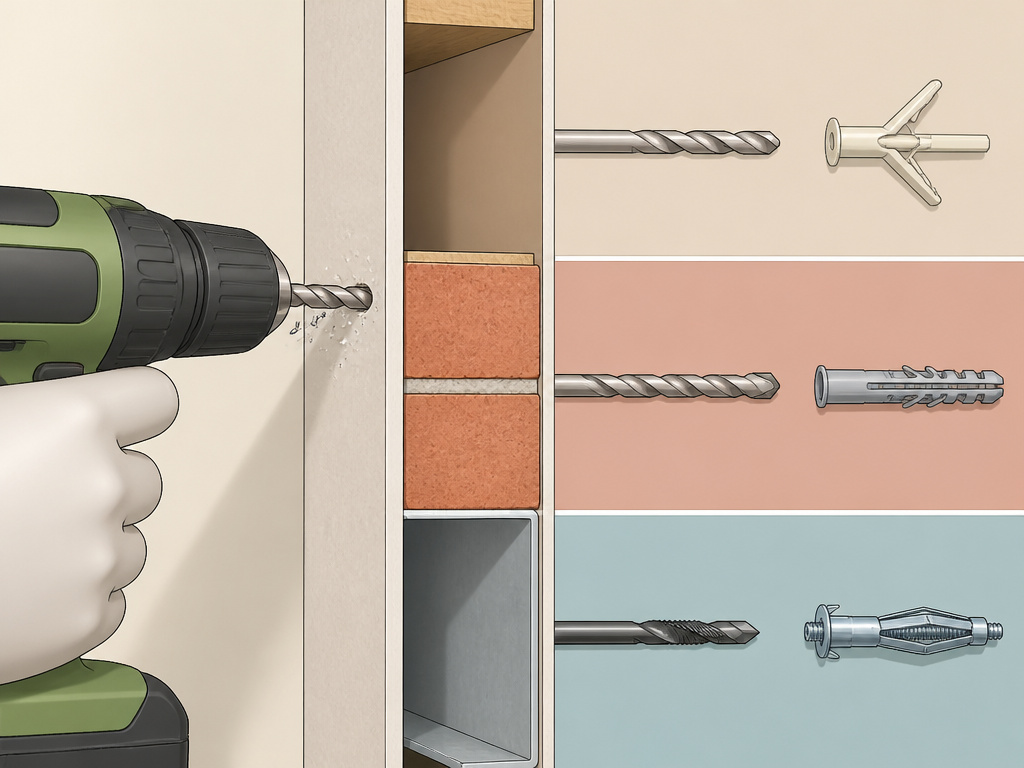
Plasterboard is just a veneer. Your drilling strategy is decided by the substrate behind it. This is the core of matching drill bit to material.
-
Hollow Stud Wall (Timber or Metal): This is the most common interior wall. You’ll drill through the board into empty cavity. Here, your bit only needs to handle the plasterboard. Use your HSS bit. Your fixing must be a cavity anchor, a spring toggle, a butterfly anchor, or a self-drilling plasterboard anchor like the Zip-It. The bit size is dictated by the anchor’s required passage hole.
-
Solid Wall (Brick/Block behind plasterboard): Tap the wall. A solid, dull thud means masonry behind. Your job just got easier for heavy loads. Use your HSS bit to drill through the plasterboard layer only. Stop once you hit brick. Then, switch to a masonry bit of the same diameter to drill into the brick. Use a standard wall plug. This is where knowing drill bit size for anchors is critical, the plug needs a specific hole size in the brick.
-
Metal Stud Wall: You’ll hear a hollow ring, but the drill will suddenly screech. Use an HSS bit to get through the board, then switch to a self-drilling metal screw (often with a pilot point) or a metal-cutting bit. Do not use wall plugs.
Where this goes sideways: Assuming every wall is hollow. Drilling into a solid wall with a cavity anchor gives you zero hold. Drilling into a metal stud with a masonry bit ruins the bit and barely scratches the steel.
Before you drill, use a stud, pipe, and cable detector. The few seconds it takes can prevent hitting a live wire or a water pipe. This isn’t scare talk. It’s the standard first step in any proper drilling technique.
When You Must Pre-Drill: The Two Edge Cases
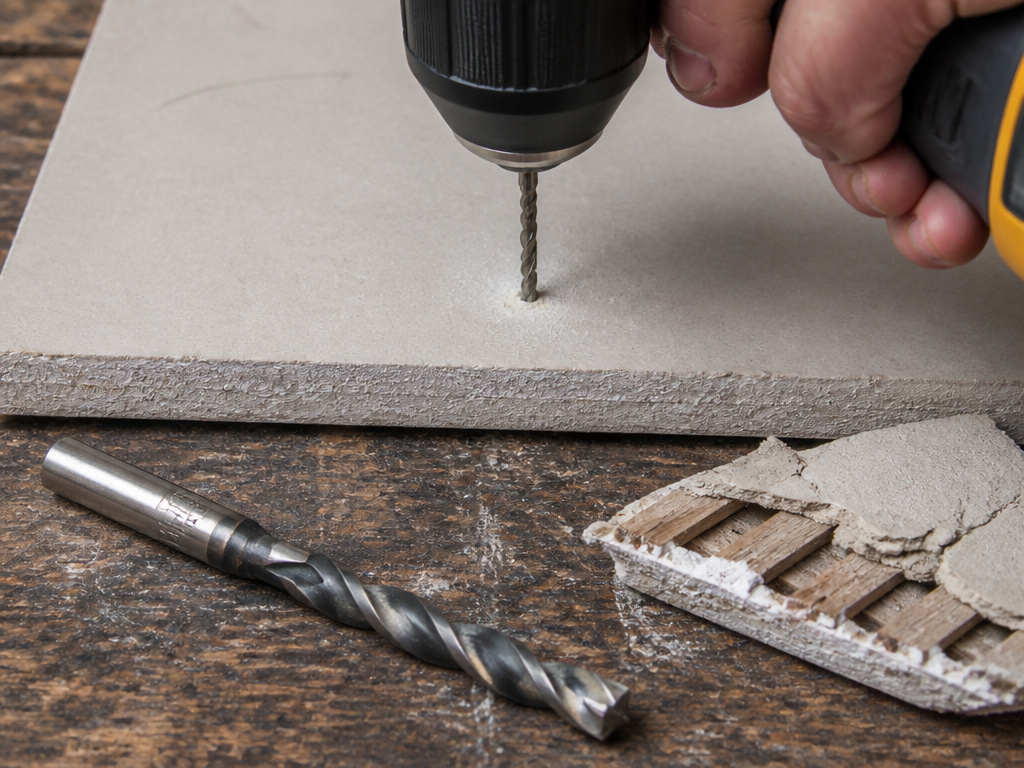
The “self-drilling” claim on anchors like the Zip-It has limits. The manufacturer’s own data sheet specifies two scenarios where you must pre-drill.
-
Very Hard Wallboard or Double-Board Construction: Some plasterboard, like fire-rated board, has a denser core. Double-board (two layers) effectively doubles the thickness. The Zip-It manual states: use a 1/4″ diameter drill bit (approx. 6.35mm) to pre-drill the hole. Forcing a self-drilling anchor through this can over-torque the screw, strip the anchor’s threads, or crack the board.
-
Solid Plaster Walls (Lath and Plaster): In older homes, you might find solid plaster on wood lath. The manual’s instruction is clear: use a 7/16″ diameter drill bit (approx. 11.1mm), HSS or Carbide, to pre-drill. Trying to drive a plastic anchor into this material without a pilot hole will fail.
These aren’t suggestions. They are corrections for observed failure modes during testing. If you encounter resistance immediately when trying to start an anchor, stop. You’ve likely hit one of these conditions. Switch to pre-drilling with the specified bit size.
Determining drill bit diameter for anchors in these cases is straightforward: the manual gives you the number. Your job is to have that size bit in your kit. A drill bit gauge or a set with clear size markings prevents the guesswork that leads to oversized, useless holes.
The Step-by-Step Process for a Clean, Strong Hole
Follow this sequence. Skipping step two is how TVs end up on the floor.
-
Detect and Mark. Use your detector. Find studs, avoid cables/pipes. Mark your hole location with a pencil. Place a small piece of masking tape over the mark. The tape reinforces the paper face, reducing the chance of surface chipping as the bit starts.
-
Select the Bit and Anchor. Decide what you’re hanging. Choose an anchor rated for the weight. Read the anchor packaging for the required drill bit size. Select that HSS bit from your kit. For light pictures, a simple plastic plasterboard plug. For shelves, a metal spring toggle.
-
Set Up the Drill. Insert the bit. Set your cordless drill to the drill mode (not hammer). Set the speed to medium-high (around 2500 RPM if adjustable). If your drill has a clutch, set it to a mid-range torque for the driving step later.
-
Drill the Hole. Hold the drill perpendicular to the wall. Place the bit tip on the taped mark. Start the drill at full speed before applying any forward pressure. Let the bit cut. Apply only the lightest pressure, the drill’s weight is often enough. Drill straight through in one smooth motion.
-
Clear Dust and Insert Fixing. Blow or vacuum the dust from the hole. Insert your anchor by hand until it’s flush. If using a toggle, fold the wings, insert through the hole, and pull the bolt to tighten.
-
Drive the Screw. Place your fixture over the anchor. Insert the screw and drive it in. If using a drill-driver, use the clutch setting to avoid overtightening. Stop when the screw head is snug against the fixture, not when it strips the anchor.
The part nobody mentions: Plasterboard dust is fine and static-prone. It gets everywhere. Do this before you vacuum the room, not after. Have a shop vac or dust extractor hose nearby if you’re doing more than a few holes.
Frequently Asked Questions
Can I use a masonry bit if it’s all I have?
You can, but you shouldn’t. It will work in the sense that a hole will appear. The hole will be messy, with a high chance of surface cracking and blown-out edges behind the board. This compromises the anchor’s grip. If you must, use the absolute minimum pressure and the slowest drill speed possible. Plan on patching the hole if you ever remove the fixing.
What size drill bit for a standard plasterboard plug?
Most common brown plastic plasterboard plugs (for screws like 4.0x30mm) require a 5mm drill bit. Always check the plug’s packaging. The rule is: the bit diameter should match the plug’s stated hole size, not the screw diameter. Getting this wrong is a classic error in anchor hole size selection.
How do I hang something heavy on plasterboard?
Locate a timber stud with your detector and screw directly into it. That’s the strongest method. If you must hang between studs, use a metal toggle bolt anchor (like a spring toggle) rated for the weight. A quality toggle bolt can hold 15-25kg per anchor. For very heavy items like a large TV, use a mounting kit designed for plasterboard that spans multiple studs.
Why does my drill bit keep slipping on the wall?
You’re likely using a worn bit or starting with the drill off-centre. The sharp centring point on a new HSS or brad point bit bites in immediately. If your bit is old, its point is rounded. Replace it or sharpen it. The masking tape trick also provides more grip for the initial bite.
What’s the best drill for plasterboard?
Modern cordless combi drill. The BLACK+DECKER 18V combi drill is a proven model that offers the variable speed and clutch control you need. You don’t need high torque or hammer action. You need control. A light, balanced drill prevents you from applying too much forward force.
Before You Go
Use an HSS twist bit. Match its diameter exactly to your anchor’s required hole size. Drill fast with light pressure. Ignore the masonry bit advice, it solves a problem you don’t have while creating one you do.
For hollow walls, your anchor does the heavy lifting. For solid walls, let the brick hold the weight. And for those two specific hard cases, pre-drill with the bit size the manual lists. That’s the whole game. Everything else is just keeping the dust contained and the bit sharp.
