
Learn How to Install Drywall Anchors Without Using Any Drill
This post contains affiliate links. As an Amazon Associate, we earn from qualifying purchases.
You install drywall anchors without a drill by using self-drilling anchors. Press the anchor’s sharp tip into the drywall and turn it clockwise with a Phillips #2 screwdriver until it seats flush. Then, drive your screw through the item and into the anchor. The anchor’s threads cut into the gypsum, and the screw expands the anchor’s locking mechanism behind the wall.
This method hinges on a specific product category: self-drilling drywall anchors. Brands like TOGGLER, Simpson Strong-Tie, and ITW Buildex engineer these anchors with a hardened tip and deep threads designed to displace drywall material, not pulverize it. Using a standard wall anchor this way will just chew a hole.
What follows is a breakdown of how these anchors actually work, the critical specs that decide success or failure, and a step-by-step walkthrough for three common types. We’ll also cover the one scenario where you do need a drill, even with a self-drilling anchor.
Key Takeaways
- Self-drilling anchors require a Phillips #2 screwdriver and a specific sheet metal screw; a wood screw strips the plastic threads.
- Match the screw length to your item: screw length = item thickness + 1 1/4 inches (or 32mm).
- For double-layer drywall, you must pre-drill a 1/4-inch pilot hole even with a self-drilling anchor.
- Drywall age and condition directly affect holding power; anchors hold less in old, crumbly, or previously repaired walls.
- The Simpson Strong-Tie Sure Wall anchor is the simplest pick for most basic fixtures under 50 pounds.
How Self-Drilling Anchors Work (The Mechanics)
They don’t actually drill. A self-drilling drywall anchor works more like a tap. The sharp, pointed tip concentrates your turning force onto a tiny area of the drywall paper and gypsum core. As you rotate the anchor clockwise, the leading threads cut and compress the material, forming a precise, threaded hole.
Technical Snippet: Self-drilling drywall anchors are injection-molded from glass-filled nylon or zinc. They feature a single-point cutting tip and deep, spaced threads designed to engage gypsum wallboard. Installation requires only a #2 Phillips screwdriver or square drive bit. The anchor pre-drills its own hole and creates internal threads, eliminating the need for a separate drill bit and anchor-setting tool.
The magic is in the thread form. Unlike a coarse wood screw, these anchors have a sharper, more aggressive thread profile. This lets them displace material cleanly rather than grinding it to dust. When you later drive the screw in, it doesn’t just wedge into a hole, it engages those pre-cut threads. On models like the TOGGLER SnapSkru, the screw also trips a internal locking mechanism that spreads wings or a collar behind the wall.
If your drywall is soft, old, or has a brittle core, this process can fail. The threads can’t get a clean bite, and the anchor just spins without pulling itself in. That’s your first sign the wall might not be suitable for any anchor, self-drilling or not.
Choosing the Right Anchor and Screw
This is where most DIY attempts stall. You need the right anchor type and, critically, the correct screw. They are a matched set.
| Anchor Type (Brand Example) | Best For | Screw Size & Type | Max. Fixture Thickness |
|---|---|---|---|
| Light Duty (ITW E-Z Mini) | Small pictures, thermostats, lightweight shelves | #6 or #7 Sheet Metal Screw (SMS) | 3/4 inch |
| Medium Duty (TOGGLER SnapSkru Mini) | Towel bars, curtain rods, medium shelves | #6 preferred, #8 acceptable (SMS) | N/A – use screw length formula |
| Medium/Heavy Duty (TOGGLER SnapSkru Regular) | Mirrors, cabinets, handrails, larger shelves | #8 preferred, #6 or #10 acceptable (SMS) | N/A – use screw length formula |
| Heavy Duty (ITW E-Z Toggle) | Large wall art, heavy shelves, small cabinets | #8 x 2-1/8″ Screw (provided) | 1/2 inch |
Sheet metal screws are non-negotiable. They’re fully threaded, with a sharper, harder tip designed to engage the nylon or zinc threads inside the anchor. A standard wood screw has a partially threaded shank and a wider, softer thread. It will bind, strip the anchor’s internal threads, and leave you with a spinning mess.
Screw length is the other silent killer. The screw must pass through your item and engage the full depth of the anchor. Manufacturers provide a formula: screw length = item thickness + 1 1/4 inches (32mm). For a 1/2-inch thick shelf, you need a 1 3/4-inch screw. A 1-inch screw will bottom out in the anchor before the shelf is tight.
Common mistake: Using any screw that fits. A wood screw in a self-drilling anchor strips the plastic within three full turns, and your fixture will pull off the wall the first time it bears weight.
The 3-Step Installation Process
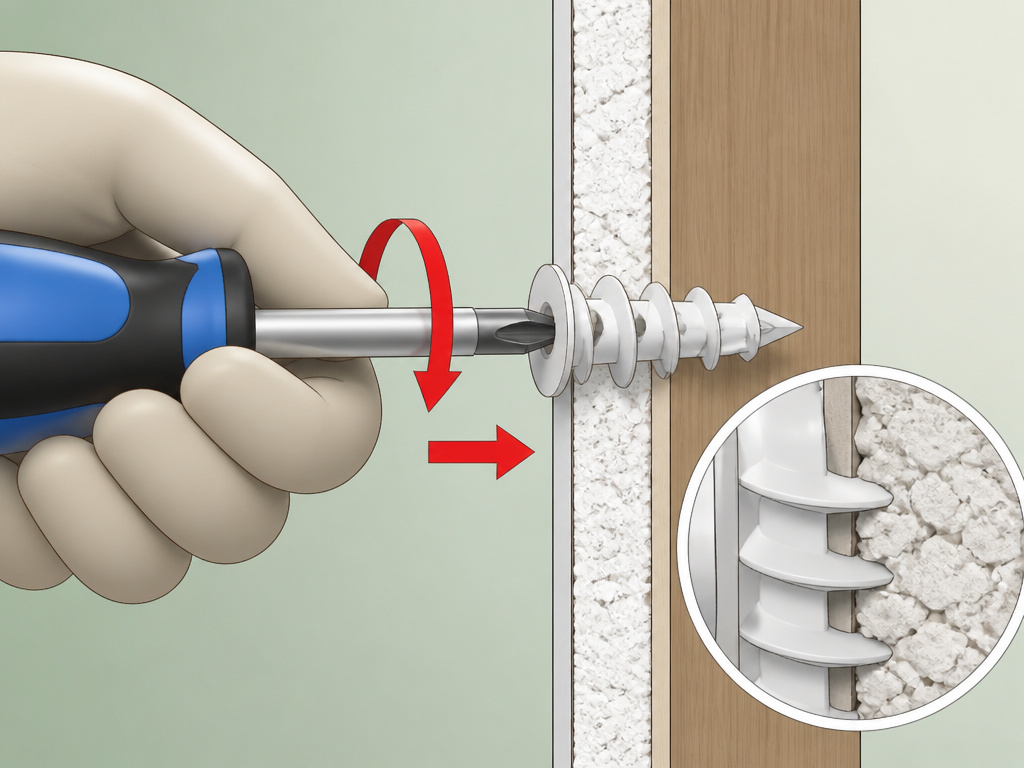
The basic sequence is universal, but the feel and final steps vary by anchor design. Have your Phillips #2 screwdriver ready, a power drill on a low clutch setting can work, but hand-driving is safer and gives you better feedback.
Step 1: Seat the Anchor
Press the anchor’s tip firmly into the drywall at your mark. Apply steady pressure and turn the screwdriver clockwise. Keep the anchor straight. You’ll feel resistance, then a smooth cutting action as it threads itself in. Stop when the anchor head is flush with the wall surface. Do not overdrive it.
What happens if you skip this? The anchor won’t have full thread engagement. When you tighten the screw, it will try to pull the anchor deeper into the wall instead of expanding it, often causing a blowout.
Step 2: Attach Your Fixture
Line up your shelf bracket, picture hook, or other item over the seated anchor. Insert the correct sheet metal screw through the fixture’s hole and into the anchor. Start turning.
Step 3: Tighten to Activate the Lock
This is the final, critical motion. As you tighten, you’ll feel increasing resistance. For locking anchors like the SnapSkru, you’ll hear a distinct audible pop when the internal mechanism snaps open behind the drywall. Stop tightening when the screw head is snug against your fixture. The fixture should not wiggle.
Where this goes sideways: Overtightening after the “pop” or after the fixture is snug. This can over-expand the anchor, cracking the drywall face or stripping the threads. The anchor is set. More torque does not mean more hold.
When You Still Need a Drill (The Double-Thickness Edge Case)
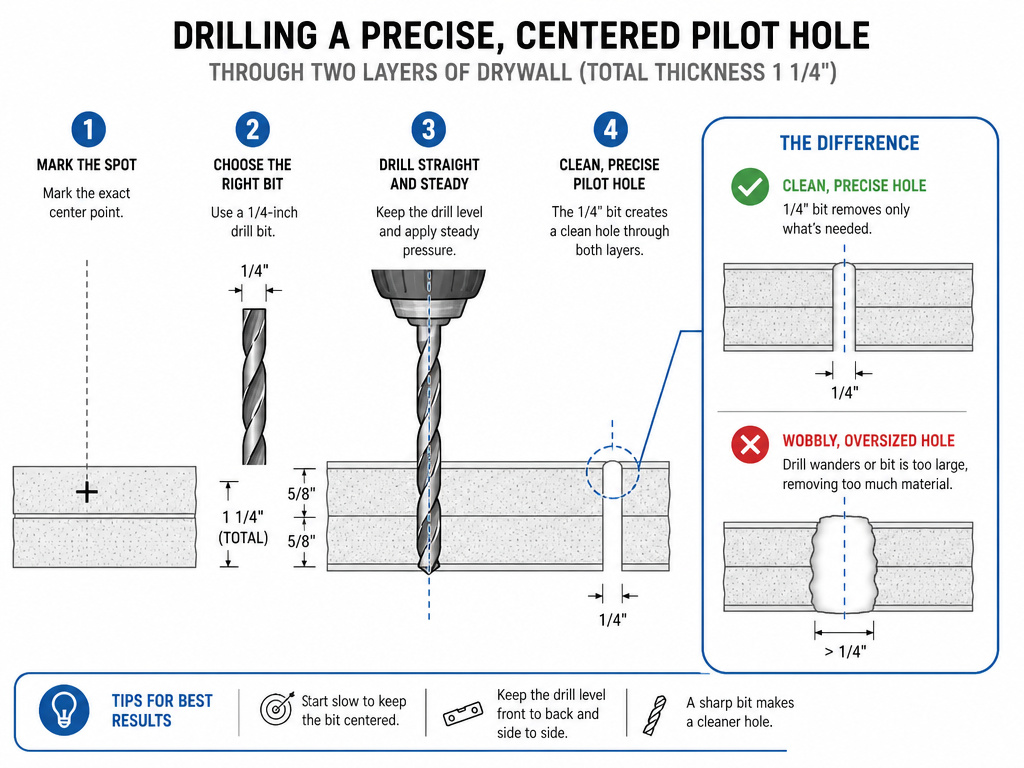
Self-drilling anchors have a wall thickness limit, usually 5/8 inch. What if your wall is double-layer drywall, totaling 1 1/4 inches? The anchor’s tip can’t penetrate that much material on its own.
The TOGGLER SnapSkru manual addresses this directly: for double-thickness drywall, you must drill a 1/4-inch pilot hole first. This is the one scenario where the “no drill” claim breaks.
The part nobody mentions: That pilot hole must be clean and precise. Use a 1/4-inch drill bit for drywall and drill straight in. A wobbly, oversized hole removes too much material, and the anchor’s threads won’t have anything to grip in the front layer. The anchor will seat but will spin when you try to drive the screw.
This exception underscores a broader rule: self-drilling anchors rely on the drywall’s integrity. They fail in crumbly plaster, water-damaged gypsum, or around old, patched holes.
Self-Drilling Anchors vs. Other No-Drill Options
You have alternatives for lightweight jobs. How do they compare?
| Fastening Method | How It Works | Holding Power | Best Use Case |
|---|---|---|---|
| Self-Drilling Anchor (TOGGLER SnapSkru) | Cuts its own threads, locks behind wall | High (up to 135 lbs tension in 5/8″ drywall) | Medium to heavy fixtures: shelves, cabinets, handrails |
| Adhesive Hook (Command Strip) | Pressure-sensitive adhesive foam | Very Low (5-10 lbs) | Ultra-light items: small pictures, wire decorations |
| Molly Bolt (traditional) | Requires drilled hole, then expands | Very High | Very heavy loads; not “no-drill” |
| Toggle Bolt (traditional) | Requires large drilled hole | Highest | Extreme loads; not “no-drill” |
For most household fixtures, the kind you’re installing without a drill, a self-drilling anchor is the only serious option. Adhesive hooks fail with time and heat. Traditional mollies and toggles require a drill. The self-drilling anchor occupies a specific middle ground: tool-minimal but confidence-maximal.
The Simpson Strong-Tie Sure Wall anchor is a standout here. Its simple, zinc or nylon design cuts clean threads and holds an allowable load of 50 pounds in shear in half-inch drywall. For a towel bar, a small shelf, or a thermostat, it’s almost foolproof.
Frequently Asked Questions
Can you reuse self-drilling drywall anchors?
Yes, most can be reused. The TOGGLER SnapSkru is designed to stay locked in the wall after you remove the screw. You can remount the fixture later. Other types, like the ITW E-Z ANCOR, can often be backed out of the wall with a screwdriver if needed, but reusing them in the same hole is less reliable.
Why is my anchor spinning in the wall?
It means the threads stripped. This happens if you used a wood screw, overtightened, or hit a weak spot in the drywall. The anchor is now useless in that location. You’ll need to move over a few inches to fresh drywall or use a toggle bolt that spans the damaged area.
How much weight can a self-drilling anchor hold?
It depends on the drywall thickness, anchor model, and screw size. In laboratory tests on 5/8-inch drywall, a TOGGLER SnapSkru Regular with a #8 screw held 135 pounds in tension. Industry safety standards recommend using only one-quarter of the ultimate load for safe, allowable weight. So, that 135-pound anchor should only be trusted with about 34 pounds in a real-world installation.
What’s the difference between nylon and zinc anchors?
Nylon anchors like the Sure Wall Nylon are non-conductive and corrosion-resistant, good for electrical fixtures. Zinc anchors like the Sure Wall Zinc are slightly stronger and work in plaster, but can corrode in damp environments. For most indoor drywall applications, the performance difference is minimal.
Can I use a power drill to install them?
You can, but use caution. Set your drill to a very low clutch setting or use the screwdriver function at low speed. The goal is to seat the anchor, not blast through the wall. Hand-driving with a screwdriver gives you the best tactile feedback to avoid overdriving.
Before You Go
Installing drywall anchors without a drill isn’t a magic trick, it’s a materials science hack. The right anchor, a sheet metal screw, and a Phillips #2 screwdriver do the job. Remember the screw length formula. Listen for the pop on locking models. And respect the one exception: double-thickness drywall needs that pilot hole.
For your next basic project, grab a pack of Simpson Strong-Tie Sure Wall anchors. They’re cheap, they work, and they’ll show you the mechanics in action. For something heavier like a floating shelf or a cabinet, step up to the TOGGLER SnapSkru Regular. Its locking feature is worth the extra few cents per anchor. Skip the adhesive hooks for anything you care about, and never force a wood screw into a plastic anchor. The wall always loses that fight.
