What Is a Left-Handed Drill Bit | The 3 Jobs It Solves
This post contains affiliate links. As an Amazon Associate, we earn from qualifying purchases.
A left-handed drill bit is a drill bit with a reverse-spiral flute, designed to turn counter-clockwise to cut material. Its primary job is to remove broken bolts, screws, and studs by drilling into them in reverse, often backing them out as it cuts. The three secondary jobs are reverse-thread tapping, removing broken taps, and drilling in machinery where clockwise rotation would tighten a fastener. You run it in reverse on a standard drill.
That reverse twist is the whole game. It’s not a specialty bit you use every day, but when you need it, nothing else works. The problem is that most people grab the first left-hand bit they find, match the diameter to the broken bolt, and start drilling. That works about half the time. The other half, the bit walks off the broken fastener, digs into the parent metal, and turns a simple extraction into a re-threading job.
What follows is a breakdown of how the bit’s anatomy dictates its job, the two point angles that decide whether it bites or skates, and the one material choice that determines if it survives the first minute of contact with hardened steel. You’ll also see exactly when to reach for a left-hand bit and when to go straight for a dedicated screw extractor.
Key Takeaways
- A left-hand bit’s reverse spiral is designed to pull chips up and out of the hole when turning counter-clockwise, which is the opposite of a standard bit.
- The point angle is more critical than the diameter for starting a clean hole on a broken fastener; a 135° split point won’t walk, a standard 118° point will.
- Cobalt bits (like the CHICAGO-LATROBE 46507) are mandatory for drilling into hardened steel or stainless fasteners; standard HSS bits dull in seconds.
- Never use a left-hand bit in a drill’s forward setting; the reversed flutes won’t clear chips, the bit will overheat, and it will snap.
- For a completely seized or rust-welded fastener, a dedicated screw extractor (Speed-Out) is often more reliable than a left-hand drill bit alone.
The Anatomy of a Left-Hand Drill Bit
Look at the business end. The flutes spiral to the left. When you run your drill in reverse (counter-clockwise), those flutes pull the metal chips up and out of the hole. A standard right-hand bit does the opposite, it requires forward rotation to work. Get the rotation wrong, and the bit just rubs. It heats up, loses its edge, and snaps.
The second thing to check is the point. Most left-hand bits come in two point angles: 118° and 135° split point. The 118° is the standard jobber point. It’s fine for soft materials where walking isn’t a concern. The 135° split point has a self-centering tip ground into it. That split point is the difference between the bit skating off a rounded bolt head and biting dead center. For extraction work, the split point is non-negotiable.
Where this goes sideways: Using a 118° point on a broken, rounded-off bolt. The bit walks, gouges the surrounding material, and ruins any chance of centering a screw extractor afterward. The repair shifts from a 10-minute job to a 30-minute hole-filling operation.
Material is the third leg. You have high-speed steel (HSS) and cobalt. HSS bits, like the CHICAGO-LATROBE 44511, are for mild steel, aluminum, and cast iron. Cobalt bits, like the CHICAGO-LATROBE 46507 or 46509, are alloyed for heat resistance. They’re what you need for stainless steel, grade-8 bolts, or any fastener that’s been in place for a decade. The cobalt version costs more, but it’s the only one that will last through a hardened stud.
The 3 Jobs a Left-Hand Bit Actually Solves
The commodity answer is “removing broken fasteners.” That’s true, but it’s incomplete. The bit solves three specific problems, and knowing which one you have tells you which bit to use.
1. Extracting Broken Bolts and Screws
This is the classic use. A bolt snaps off flush with the surface. You center-punch it, select a left-hand bit slightly smaller than the bolt’s minor diameter (the root of the threads), and drill slowly in reverse. The goal isn’t to drill through the bolt, but to let the reverse torque back it out. Often, the bit bites and the broken piece spins free before you’ve drilled more than a quarter-inch. If it doesn’t, you’ve now created a perfect pilot hole for a screw extractor.
2. Reverse Tapping and Thread Repair
Some machinery uses left-hand (reverse) threads. To tap a hole for a left-hand bolt, you must drill with a left-hand bit. Using a standard bit here leaves a spiral pattern in the hole that fights the left-hand tap, increasing the risk of breaking the tap. The same logic applies if you’re using a thread repair insert like a Heli-Coil, drill with a left-hand bit if the final fastener is left-hand thread.
3. Removing Broken Taps and Easy-Outs
This is the advanced move. A tap or a screw extractor (Easy-Out) snaps off inside a hole. It’s hardened steel, and it’s jammed in there. A carbide bit might shatter. A left-hand cobalt bit, run in reverse, can sometimes chew into the broken tool and back it out. It’s a last resort, but it works more often than you’d think because the broken tool is already under tension.
| Job | Best Bit Type | Critical Spec | If It Fails |
|---|---|---|---|
| Broken bolt extraction | Cobalt, 135° split point | Diameter 1/32″ under bolt threads | Switch to a speed-out drill bit |
| Reverse thread tapping | HSS, 118° point | Exact tap drill size | Hole is now oversize; may need an insert |
| Removing broken taps | Cobalt, 135° split point | Smallest diameter that contacts tap | Requires drilling out the tap entirely, risking the parent hole |
How to Choose the Right Left-Hand Drill Bit
You match three things: the job, the material, and the broken fastener’s size. Getting one wrong burns the bit or wrecks the workpiece.
Diameter is your first filter. For extracting a broken fastener, the bit must be smaller than the bolt’s threads. A 1/4″ bolt has a minor diameter of roughly 7/32″. You’d reach for a #11 or 3/16″ left-hand bit. Drilling oversize guarantees you’ll cut into the parent material and likely strip the threads you’re trying to save. For choosing a drill bit in general, the same rule applies: match the bit to the hole you need, not the fastener you see.
Material decides HSS vs. Cobalt. This isn’t a suggestion. * HSS (High-Speed Steel): Use it for low-carbon steel, aluminum, brass, and plastic. The CHICAGO-LATROBE 44511 is a classic #41 (0.096″) HSS jobber bit. It’s the right pick for a broken wood screw or a soft aluminum bolt. * Cobalt Steel: This is for hardened steel, stainless steel, and any fastener that’s been heat-treated or is rusted solid. The CHICAGO-LATROBE 46507 (7/64″) and 46509 (9/64″) are cobalt bits with a 135° split point. The cobalt alloy withstands the heat generated by drilling into tough material. An HSS bit will turn blue and dull in under 30 seconds on a grade-8 bolt.
Point Angle is the difference between starting and skating. The 135° split point is ground with a small, flat chisel edge at the tip. It doesn’t have a true center, so it can’t walk. It stays put on curved, broken surfaces. The 118° point has a sharper, more pronounced center. It’s better for drilling fresh, flat stock but will wander on a broken bolt. For extraction, the split point wins every time.
The 135° vs. 118° Trade-Off That Decides Your Success
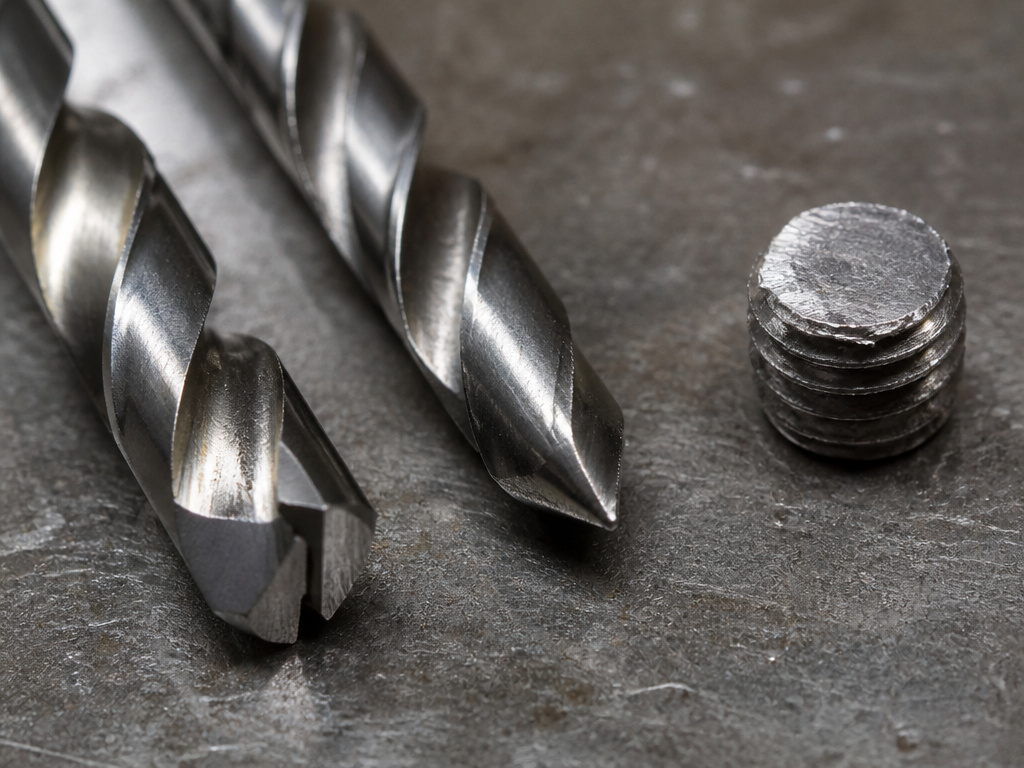 This is the spec most people miss. They see “left-hand drill bit” and buy based on diameter alone. The point angle dictates whether the bit starts cutting or starts grinding.
A 135° split point has a self-centering geometry that reduces “walking” by up to 50% on uneven surfaces compared to a standard 118° point. This isn’t a marketing claim, it’s a function of the flatter angle and the split-tip design, which contacts the material across a wider area before the cutting lips engage.
The 118° point is sharper. It requires less downward pressure to start in virgin material, which is why it’s the default for general-purpose using a left-hand drill bit. But that sharp point is a liability on the rounded, uneven stump of a broken bolt. It will skitter across the surface until it finds a low spot, almost always off-center. Once it’s off-center, you’ve lost the hole.
The 135° split point is blunt by comparison. You have to push harder to start it. That extra pressure, combined with the split-tip’s geometry, keeps it locked in place. It mills a small flat spot exactly where you placed it, then the cutting lips take over. For the single job of removing broken fasteners, the 135° split point is the only correct choice. Brands know this, most left-hand bits marketed for extraction are 135°.
Left-Hand Drill Bit vs. Screw Extractor (Speed-Out)
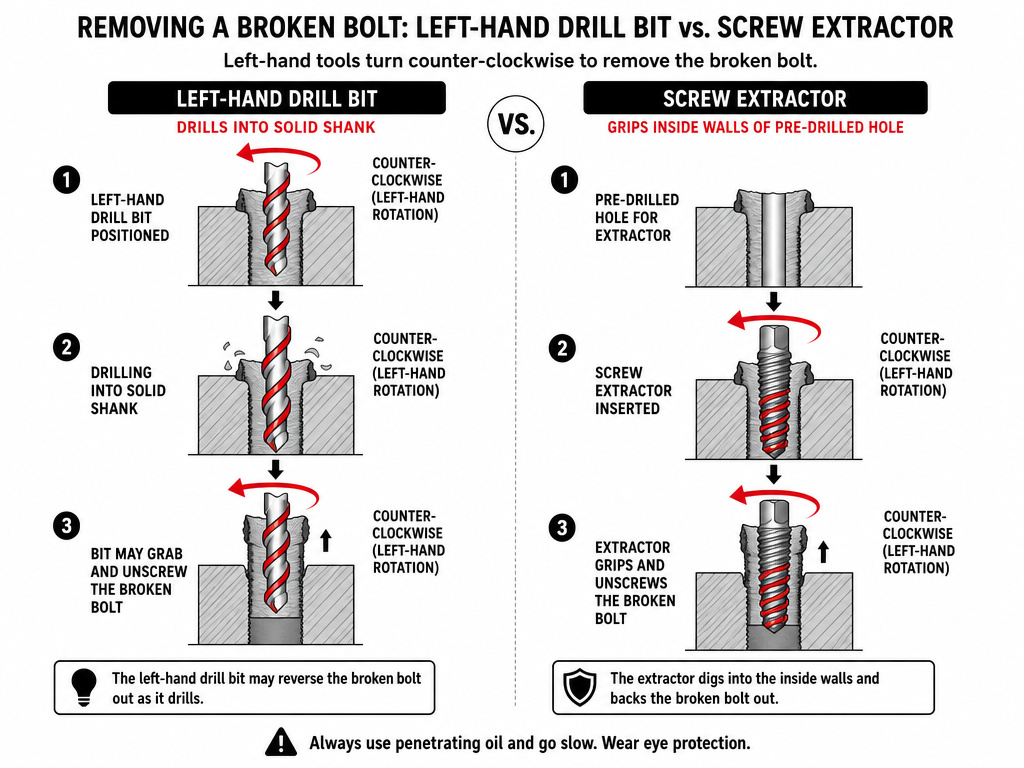 This is where the real decision happens. Both tools remove broken fasteners, but they are not interchangeable. One is a drill, the other is a wrench.
A left-hand drill bit is a cutting tool. Its job is to remove material, either to create a pilot hole or to generate reverse torque. It works on any broken fastener, even if the head is completely gone. A screw extractor (like a Speed-Out) is a gripping tool. It has left-hand flutes that bite into the walls of a pre-drilled hole and torque the fastener out. It requires a clean, centered pilot hole to work.
Common mistake: Using a screw extractor without a proper pilot hole. The extractor’ tapered flutes wedge into the hole and expand the fastener, locking it in place more tightly. The next step is usually removing a broken drill bit from the now-jammed fastener.
So, which first? The rule is sequential, not either/or. 1. Always start with the left-hand drill bit. Drill in reverse. If the broken piece backs out, you’re done. 2. If the bit drills through without backing the fastener out, you now have a perfect, centered pilot hole. Switch to the screw extractor. 3. Tap the extractor into the hole and turn it counter-clockwise. The left-hand spiral of the extractor grips and removes the bolt.
The left-hand bit is step one. The screw extractor is step two. Skipping to step two is how you break an extractor off inside the bolt, which is a far worse problem. For a complete walkthrough of that second step, see our guide on using a speed-out drill bit.
Step-by-Step: Using a Left-Hand Bit to Remove a Broken Bolt
Grab your safety glasses. This process throws sharp metal chips.
- Secure the workpiece. If it can move, it will. Use a vise or clamps. A shifting part is the number-one cause of broken bits.
- Find the center. If the bolt is broken flush, use a center punch. Hit it firmly to create a solid dimple for the bit to sit in. If the bolt protrudes, grind or file it flat first.
- Start with a small pilot bit (optional but recommended). Use a standard right-hand bit about 1/16″ in diameter to drill a shallow starter hole in the center of your punch mark. This gives the left-hand bit’s point a perfect seat.
- Insert the correct left-hand bit. Chuck it tightly. Set your drill to reverse (counter-clockwise). Use a low speed, between 500 and 1000 RPM is ideal for most metals. High speed generates heat and work-hardens stainless steel.
- Apply firm, steady pressure and drill. Keep the drill perfectly perpendicular. Let the bit cut; don’t force it. The moment you feel the bit catch and the broken fastener start to turn, stop drilling and back the piece out with pliers.
- If the bolt doesn’t back out, continue drilling to the depth needed for your screw extractor. Clear chips frequently by pulling the bit out of the hole.
Before you start: Wear eye protection. Metal chips are sharp and hot. Use cutting fluid on hardened or stainless steel, it keeps the bit cool and extends its life by three or four times. A dry bit on stainless will be dull in 15 seconds.
What happens if you run the drill in forward by mistake? The reversed flutes can’t evacuate chips. The bit clogs, overheats, and the cutting edge anneals (loses its hardness). The next time you use it, even correctly, it will be dull. If you’re lucky, it just won’t cut. If you’re not, it snaps off in the hole. Then you’re looking at methods for broken bits.
When a Left-Hand Bit Isn’t the Answer
It’s a specific tool for specific problems. Don’t reach for it when you should be reaching for something else.
- Drilling standard holes in wood or metal. Use a standard right-hand bit. A left-hand bit in reverse will cut poorly and burnish the material.
- The fastener is severely rust-welded. The corrosion has fused the bolt to the parent material. A left-hand bit will just drill through it. Apply penetrating oil for 24 hours, use heat, or consider drilling the bolt out completely and re-tapping the hole.
- The broken piece is a soft metal like aluminum or brass. A left-hand bit can still work, but it’s easy to gall the material and make the problem worse. Often, drilling it out carefully with a standard bit and using an extractor is cleaner.
- You need a flat-bottomed or precision-bored hole. That’s a job for a Forstner drill bit or a brad point drill bit, whose designs are for clean, accurate cuts in wood.
The other common misapplication is using it as a makeshift screw extractor. A left-hand bit cuts. A screw extractor grips. If the fastener is already loose enough that a cutting action would spin it, you could probably grab it with vice grips. If it’s not, the bit will just drill.
Frequently Asked Questions
Can I use a left-hand drill bit in a regular drill?
Yes, you must. A standard drill in its forward (clockwise) setting turns a right-hand bit. To use a left-hand bit, you set the drill to reverse (counter-clockwise). The drill’s chuck tightens normally. The reversed rotation is what engages the bit’s cutting edges and pulls chips out of the hole.
What’s the difference between a left-hand bit and a screw extractor?
Left-hand drill bit is for cutting material. A screw extractor is for gripping material. You use the drill bit first to create a pilot hole and potentially back the fastener out. If that fails, you use the extractor, which taps into the pilot hole and acts like a reverse-threaded wedge to unscrew the broken piece. They are a one-two punch, not substitutes.
Why did my left-hand drill bit break?
The usual causes are using the wrong rotation (drill in forward), excessive side pressure causing the bit to bend and snap, drilling at too high a speed without cutting fluid (overheating), or trying to force a dull bit. A broken bit stuck in a hole requires careful extraction, often with a punch or a dedicated broken drill bit removal tool.
Are left-hand bits only for metal?
No, but they are most effective on metal. Their primary design is for extracting metal fasteners. You can use them on wood or plastic, but a standard bit is more efficient. The reverse flute doesn’t offer an advantage in soft materials and may not clear chips as effectively.
How do I choose the correct size left-hand bit?
For extraction, select a bit with a diameter slightly smaller than the minor diameter (the innermost part) of the broken bolt’s threads. A common rule is to go 1/32″ to 1/16″ under the bolt’s nominal size. For a 1/4″ bolt, a #11 or 3/16″ bit is a good start. The goal is to drill into the bolt without cutting the surrounding threads.
The Bottom Line
A left-hand drill bit is a rescue tool. You don’t need it until you absolutely do, when a bolt snaps off flush or a screw head strips. For that job, the choice is binary: a cobalt bit with a 135° split point or a trip to the machine shop. The CHICAGO-LATROBE 46507 in 7/64″ or the 46509 in 9/64″ will handle most automotive and machinery fasteners. Keep one in your kit, know how to use it in reverse, and pair it with a center punch and cutting oil. For everything else, drilling new holes, woodworking, creating a recess for a screw head, reach for the standard bit designed for that job, like a countersink drill bit or a split point drill bit for clean metal starts.
