
What Is a Forstner Drill Bit | The DIN Standard Update
This post contains affiliate links. As an Amazon Associate, we earn from qualifying purchases.
A Forstner drill bit is a woodworking tool designed to bore exceptionally clean, flat-bottomed holes with smooth sidewalls, guided by a continuous outer rim rather than a screw point. It excels at overlapping holes, angled cuts, and tasks like installing European concealed hinges, where a spade bit or hole saw would tear out or leave a ragged bottom.
The updated DIN 7483:2024-11 standard, which replaced a 58-year-old version, now defines diameters from 10 mm to 100 mm and includes new variants like carbide-tipped bits and those with hexagonal shanks. This isn’t just a spec sheet update. It’s a response to how modern electric drills and cabinet-making demands have changed what the tool needs to be.
What follows: the three rim designs that determine heat and cut quality, the one physical flaw that makes a bit permanently inaccurate, and why the standard hinge-cup size isn’t the whole story for cabinet doors.
Key Takeaways
- The outer rim design, continuous, sawtooth, or wavy, dictates heat buildup, chip clearance, and performance on angled or partial cuts.
- A bent center spur will cause the bit to cut oversize and wander; it cannot be straightened and must be replaced.
- For cabinet doors thinner than 18mm, a standard Forstner bit’s center point can punch through the front face; you need a dedicated hinge boring bit.
- DIN 7483:2024-11 added carbide-tipped options and hexagonal shanks, expanding the formal diameter range to 10–100mm.
- Running a Forstner bit at twist-drill speeds generates enough friction heat to turn the steel blue in seconds, permanently ruining its temper.
What a Forstner Bit Actually Does (And Doesn’t Do)
A Forstner bit scrapes wood away, it doesn’t drill it. The center spur locates the hole. The outer rim scores a perfect circle. Two flat cutting wings then plane the bottom flat. This geometry lets it start a hole on a curve, cut at an angle, or overlap another hole without the bit skating off course.
A Forstner bit’s continuous outer rim scores the wood fibers before the main cutters engage, which is why it can start a hole on a curved surface or make overlapping cuts without the bit walking.
Spade bits and hole saws can’t do that. A spade bit has a single cutting edge that tears its way through, leaving a ragged exit and a conical bottom. A hole saw needs a pilot bit, leaves a center plug, and struggles with depth control. For any job where the hole’s sides and bottom need to be clean, like a hinge cup, a stopped housing for a shelf pin, or a decorative inlay, a Forstner is the only tool that starts and finishes the job in one pass.
Its limitation is speed and chip clearance. It’s a slow, controlled cutter. You run it in a drill press, not a handheld drill, for anything over about 20mm. And in deep holes, the chips pack in the cup and scorch the wood if you don’t back the bit out every 5-10mm.
Anatomy of a Forstner Bit
Every Forstner bit has four working parts, and if any one is compromised, the bit is finished.
The center spur is a small, sharp point that bites in first to locate the hole and provide a pivot. It’s the most delicate part. If it bends even slightly, from dropping the bit or hitting a knot, the bit will cut oversize and wander. You can’t straighten it. You replace the bit.
The continuous outer rim is a knife-edge that scores the circumference of the hole. This is what gives the Forstner its guiding accuracy and clean wall. A chipped or dented rim means the bit can’t scribe a clean circle, and the hole will be rough.
The two flat cutting wings are the primary cutters. They sit just inside the rim and scrape the wood out, creating the flat bottom. These wings do the bulk of the work and dull first. On a high-carbon steel (HCS) bit, they can be hand-sharpened with a fine file or diamond stone. On a carbide-tipped bit, you need a diamond wheel.
The shank is what your chuck grips. The new DIN 7483 standard now formally includes hexagonal shanks (DIN ISO 1173-E6,3) for electric hand and stand drills, which prevent slipping under high torque.
| Part | Function | Failure Mode |
|---|---|---|
| Center Spur | Locates hole, provides pivot | Bent = cuts oversize, wanders |
| Outer Rim | Scores hole circumference, guides bit | Chipped/Dented = rough hole wall |
| Cutting Wings | Planes wood to create flat bottom | Dull = requires more force, burns wood |
| Shank | Transmits torque from drill | Round shank slips in high-torque applications |
The Three Rim Types: Heat vs. Cleanliness
Not all Forstner bits are the same. The rim design is the single biggest factor in how the bit behaves, how hot it gets, and what jobs it can handle.
Continuous rim bits have a solid, knife-like edge. They score the cleanest line and guide the most accurately, especially on angled cuts or when the bit isn’t fully engaged on the edge of a workpiece. The trade-off is heat. The entire rim is in constant contact, so friction builds fast. You must run these slow, under 1000 RPM for a 35mm bit in hardwood, and feed steadily. If you see smoke, you’re already bluing the steel.
Sawtooth rim bits, sometimes called multi-spur bits, have teeth like a miniature hole saw. The teeth cut individual chips, which reduces friction and lets you run at slightly higher speeds. They stay cooler in deep, straight holes. The downside is guidance. The teeth can chatter on angled starts or when overlapping holes, sometimes skipping and leaving a rough entry. They’re a poor choice for fine cabinet work on visible faces.
Wavy rim bits are the modern compromise. Bosch markets this as their EXPERT Wood Forstner Drill Bit design. The wave-shaped cutting edge breaks up shavings for better ejection and runs cooler than a continuous rim, but it still guides cleanly like one. It handles angles and partial cuts without the chatter of a sawtooth rim. For general shop use where you need one set to cover everything from hinge cups to mortising, a quality wavy-rim set is the default.
Where this goes sideways: Choosing a sawtooth rim for angled hinge cup holes. The teeth will chatter on the bevel, leaving a torn entry that your hinge plate won’t fully cover.
The One Mistake That Ruins a Forstner Bit
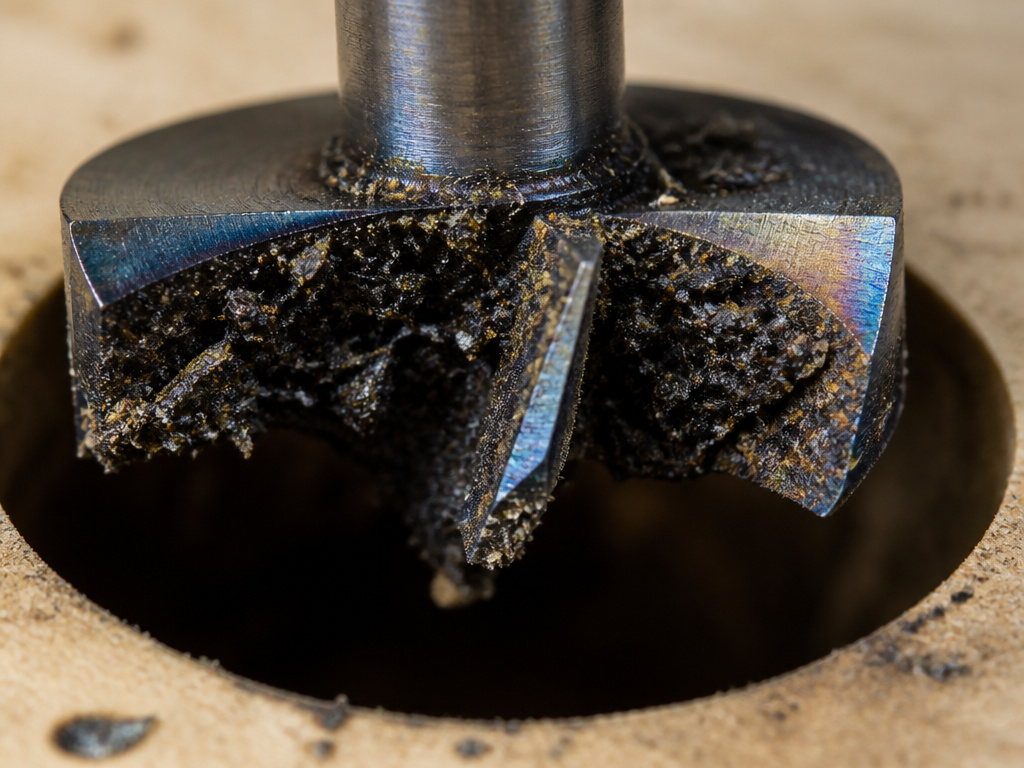
Overheating is a permanent death sentence. When the steel turns blue, you’ve drawn the temper. The bit will not hold an edge again. It happens in seconds if you run the bit too fast or feed it too hard without clearing chips.
The physics are simple. Friction between the rim, the cutting wings, and the packed wood shavings generates heat faster than the bit can dissipate it. High-carbon steel loses its hardness around 300°C (570°F), which is a dull cherry red in low light. In a deep hole in MDF or maple, you can hit that temperature in under thirty seconds at the wrong RPM.
The fix is peck-drilling. For any hole deeper than the bit’s cup, drill down 5-10mm, pull completely out to clear chips, then go back in. This keeps the cutting edges clean and lets air cool the bit. A drill press with a depth stop makes this rhythmic; freehand, it’s a chore you’ll skip. And then you buy a new bit.
Forstner Bits vs. Hinge Boring Bits: The Door Thickness Rule
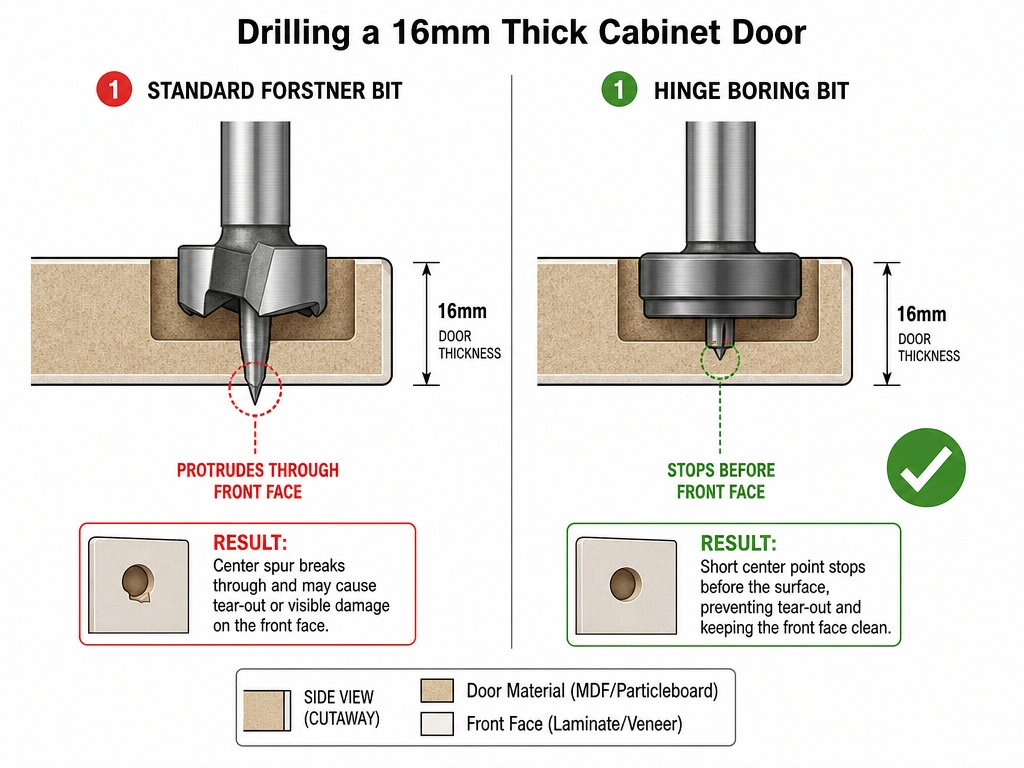
They look similar, but they solve different problems. This is the cabinet-maker’s specific edge case.
A standard Forstner bit has a center spur that protrudes 3-5mm beyond the cutting wings. On a 35mm European hinge cup that needs a 12-13mm deep recess, that spur will punch through the front face of a 16mm thick cabinet door before the cup is fully seated. You’re left with a visible pinhole on the show side.
A hinge boring bit is the solution. It has a much shorter center point or sometimes two peripheral spurs, so it can drill to the required depth without breaking through. The updated DIN 7483 standard now formally defines these as “hinge boring bits” (Form K).
| Feature | Standard Forstner Bit | Hinge Boring Bit |
|---|---|---|
| Center Point | Protrudes 3-5mm beyond cutters | Very short or absent |
| Primary Use | General flat-bottom holes | European concealed hinge cups |
| Door Thickness | 18mm and thicker | 16mm and thinner |
| DIN 7483 Form | Form A, E, H | Form K |
If you’re installing hinges on standard 18mm stock, a Bosch Professional 35mm Forstner bit is fine. For 16mm Ikea-style cabinet doors, you need the dedicated tool. Trying to modify a standard bit by grinding down the spur rarely works, you throw off the balance and it wanders.
How to Pick Your First Set
Buy for the job, not the kit. A 12-piece set with sizes you’ll never use is a waste. Start with the three sizes that cover 90% of woodworking.
- 35mm: The European concealed hinge standard. Non-negotiable for cabinet work.
- 20mm: Ideal for shelf pins, dowel holes, and general joinery.
- 10mm: A useful pilot size for larger holes or for hardware.
If you work with compact hinges, add a 26mm. For larger projects, a 50mm bit is the next step up. The new DIN 7483:2024-11 standard now formally covers bits up to 100mm in diameter, but those are specialty tools for lathe work or massive timber framing.
Common mistake: Buying a cheap set of high-carbon steel (HCS) bits for MDF or chipboard. These materials contain adhesives and minerals that blunt plain steel quickly. You’ll sharpen them twice per door. For sheet goods, step up to carbide-tipped.
For material, the choice is straightforward: – High-Speed Steel (HSS): The baseline. Cuts cleanly in softwoods and hardwoods but dulls faster in abrasive sheet goods. – Carbide-Tipped: The upgrade for MDF, plywood, or melamine. The cutting edges last 5-10 times longer. They are brittle, though, a drop onto concrete can chip the tip. – High-Carbon Steel (HCS): Often found in budget sets. It’s softer than HSS and will not hold an edge in demanding materials.
Your first real set should be HSS or carbide-tipped wavy-rim bits in the three sizes above. Store them in a block or case where they can’t rattle against each other. A dull bit is salvageable. A chipped one is not.
The 2024 DIN Standard Update (And Why It Matters)
The DIN 7483 standard for Forstner bits and hinge boring bits was unchanged from 1966 until November 2024. The 58-year gap tells you how mature the basic design is. The 2024 update reflects changes in how we use tools.
The key revisions in DIN 7483:2024-11 are practical: – Expanded the diameter range for standard bits (Forms A and E) from 10 mm to 100 mm. – Added Form H: Forstner bits with a circumferential cutter and a hexagonal shank for electric drills. – Added Form K: Hinge boring bits with two pre-cutters, formalizing the tool for thin-door cabinet work. – Formally included variants with three-flat shanks and carbide cutting inserts.
If a bit’s packaging says it conforms to DIN 7483, it now likely refers to the 2024 version. The hexagonal shank (Form H) is the big one for cordless drill users, it stops the bit from spinning in the chuck when you hit a knot. That was a common failure mode the old standard didn’t address.
Frequently Asked Questions
Can you use a Forstner bit in a hand drill?
You can, but you shouldn’t for holes over 20mm. The bit requires downward pressure and perfect perpendicular alignment to cut cleanly. A hand drill almost always wanders, leaving an oval or stepped hole. A drill press is the right tool. For smaller holes, go slow and brace the workpiece.
What speed should you run a Forstner bit at?
Slow. For a 35mm bit in hardwood, 600–900 RPM is the safe range. For a 10mm bit, you can go up to 1500 RPM. The larger the diameter, the slower the speed. If the bit is smoking or squealing, you’re going too fast. Refer to your drill press manual or the bit manufacturer’s chart, Bosch Professional publishes these for their range.
How do you sharpen a Forstner bit?
You can hand-sharpen the flat cutting wings on a high-carbon or HSS bit with a fine diamond file. Lay the bit flat and follow the existing bevel. The outer rim is much harder; a nick or dent usually means the bit is done. Carbide-tipped bits require a diamond wheel and a steady hand, for a single bit, it’s often more economical to replace it.
What’s the difference between a Forstner bit and a brad point bit?
Both are for clean holes in wood, but a brad point bit has a sharp, spiked center point and two spurs that score the hole’s circumference. It’s for through-holes. A Forstner bit has a smaller spur, a continuous rim, and flat wings for a flat bottom. It’s for stopped or blind holes. Think of a brad point bit as a precision twist drill for wood; a Forstner is a milling tool.
Why does my Forstner bit burn the wood?
Two reasons: speed or chips. You’re either running the drill too fast, creating friction heat, or you’re not clearing chips from the hole. In deep cuts, the packed shavings rub against the bit and the hole wall, generating immense heat. The solution is to slow down and use a pecking motion, drill a little, pull out to clear, repeat.
Before You Go
A Forstner bit isn’t a drill bit you use every day. It’s a specialist you reach for when the hole needs to be perfect, flat bottom, smooth walls, and no tear-out. The rim design decides the trade-off between cut quality and heat management. The center spur’s straightness decides the hole’s accuracy. And the material you’re cutting decides whether you need carbide or HSS.
For cabinet work, get a 35mm hinge boring bit if your doors are 16mm. For everything else, a 35mm, 20mm, and 10mm set in wavy-rim HSS will handle it. Run them slow, clear the chips, and store them where they won’t get knocked around. That’s the difference between a tool that lasts for years and one that’s blue and dull after one afternoon.
