
Split Point Drill Bit Guide: Definition, Design, and Uses
This post contains affiliate links. As an Amazon Associate, we earn from qualifying purchases.
A split point drill bit is a twist drill with a modified tip where the central chisel edge is ground away to form two additional, short cutting edges. This creates a self-centering point that reduces “walking” by up to 70% and requires significantly less downward thrust to start a hole, especially in harder metals and contoured surfaces.
That 70% thrust reduction is printed in the OEM sharpening guide as the mechanical outcome of replacing a blunt, scraping chisel edge with two sharp, positive-rake cutting lips. The bit doesn’t drag; it cuts from the instant it touches the workpiece.
What follows is the anatomy, the history pulled from factory spec sheets, and the specific sharpening rules that keep a split point from turning into a ruined stub. You’ll see why this design started in automotive crankshafts and why it’s the default for any portable drill work on stainless steel or angled surfaces.
Key Takeaways
- Split points eliminate the standard chisel edge, creating two secondary cutting lips that start cutting immediately, reducing required thrust force by up to 70%.
- Originally called “Crankshaft Points,” they were developed for drilling deep oil holes in automotive crankshafts where bushing guides weren’t possible.
- The self-centering action virtually eliminates walking, making a center punch optional for most drilling in metal.
- While common on 135° bits for hard materials, the split can be applied to 118° points for drilling contoured sheet metal like car body panels.
- Sharpening a split point requires a dedicated split-point port on a tool like the Drill Doctor; an uneven split causes the bit to drill oversized holes.
The Core Design: Chisel Edge vs. Secondary Cutting Lips
Look at a standard twist drill bit. The very center of the tip is a flat, angled ledge called the chisel edge, which does not cut.It scrapes and pushes material outward, which requires significant downward force and allows the bit to “walk” or skate across a curved or hard surface before it bites.
The straight chisel edge contributes to walking at the drill point, often making it necessary to spot the hole for improved accuracy. (Dormer Pramet Drill Nomenclature)
A split point removes this problem by grinding away the chisel edge. In its place, the manufacturer creates two short, sharp cutting edges that extend from the main cutting lips back toward the drill’s axis. These are the secondary cutting lips. They meet at a definite, sharp point at the center.
The difference is mechanical, not cosmetic. A standard point must be forced through material until the main cutting lips engage. A split point’s secondary lips are already cutting at the center, so the bit pulls itself into the workpiece. This is why the drill bit selection for hard or sheet material should default to a split point design.
The “Crankshaft Point” Origin and Modern Uses
The split point wasn’t invented for general DIY. Its original purpose explains its performance.
According to Dormer Pramet’s technical documentation, split-points were “originally developed for use on drills designed for deep oil holes in automotive crankshafts.” Drilling a deep, straight hole into the curved, hardened steel of a crankshaft with a portable drill is nearly impossible with a standard bit, it would walk off the radius instantly. The split point’s self-centering ability made it feasible. The guide notes this is “a distinct advantage when the drill is used in a portable drill or in drilling applications where bushings cannot be used.”
Today, that advantage translates directly to common workshop tasks.
Hard Metals: The 135° split point is the standard for stainless steel, tool steel, and hard alloys. The flatter point angle and split design withstand higher thrust loads and manage heat better. For example, Armeg’s technical sheet recommends a specific 13mm minimum chuck and provides an operational speed chart, for stainless steel, a 3mm split point bit should run at about 2,180 RPM.
Sheet Metal and Contoured Surfaces: Drilling a car fender, a pipe, or any curved surface is a classic walking scenario. The Drill Doctor manual explicitly recommends splitting the point “to prevent walking of the bit” when drilling contoured materials, even on a 118° bit.
General Precision: Any time you want a hole exactly where you marked it, a split point removes the need for a center punch. This speeds up repetitive drill bit uses in fabrication or cabinetry.
Split Point vs. Notched Point vs. Standard Point
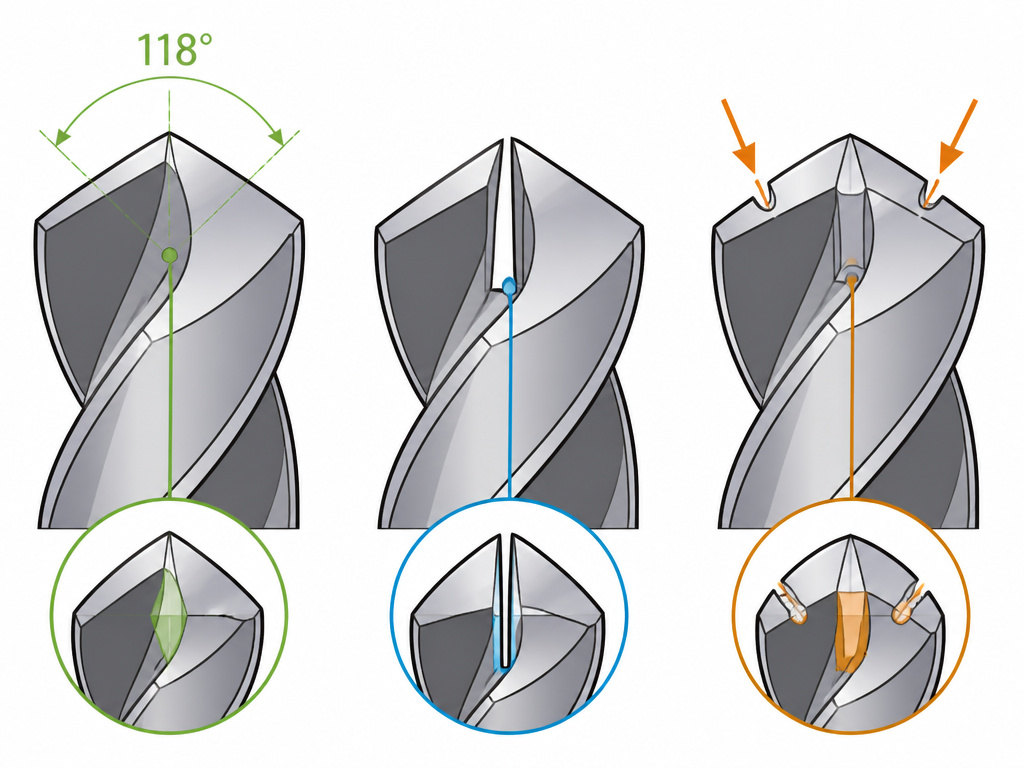
Not all modified points are the same. A notched point is a close relative, but it serves a different master.
| Point Type | Core Design | Primary Advantage | Best For |
|---|---|---|---|
| Standard (118°) | Single chisel edge, two main cutting lips. | General purpose, fast cutting in soft materials. | Wood, soft steel, aluminum, plastic. |
| Split Point (118° or 135°) | Chisel edge removed, two secondary cutting lips. | Self-centering, reduces walking, cuts thrust by ~70%. | Hard metals (135°), sheet metal/contoured surfaces (118°), portable drilling. |
| Notched Point (118° or 135°) | Chisel edge remains, with two notches ground behind it. | Chip control, reduced torque in stringy materials. | Tough, gummy alloys like titanium or certain stainless steels. |
The notched point, as Dormer explains, was “developed for drilling tough alloys.” It keeps the chisel edge for strength but adds notches that act as chip breakers. This prevents long, stringy chips from jamming the flutes. If your problem is wandering, you need a split point. If your problem is bird’s nests of tough chips, look at a notched point.
This distinction matters when comparing drill bit materials and coatings, a titanium nitride coating on a standard point won’t give you the self-centering of a split point.
How to Sharpen and Maintain a Split Point
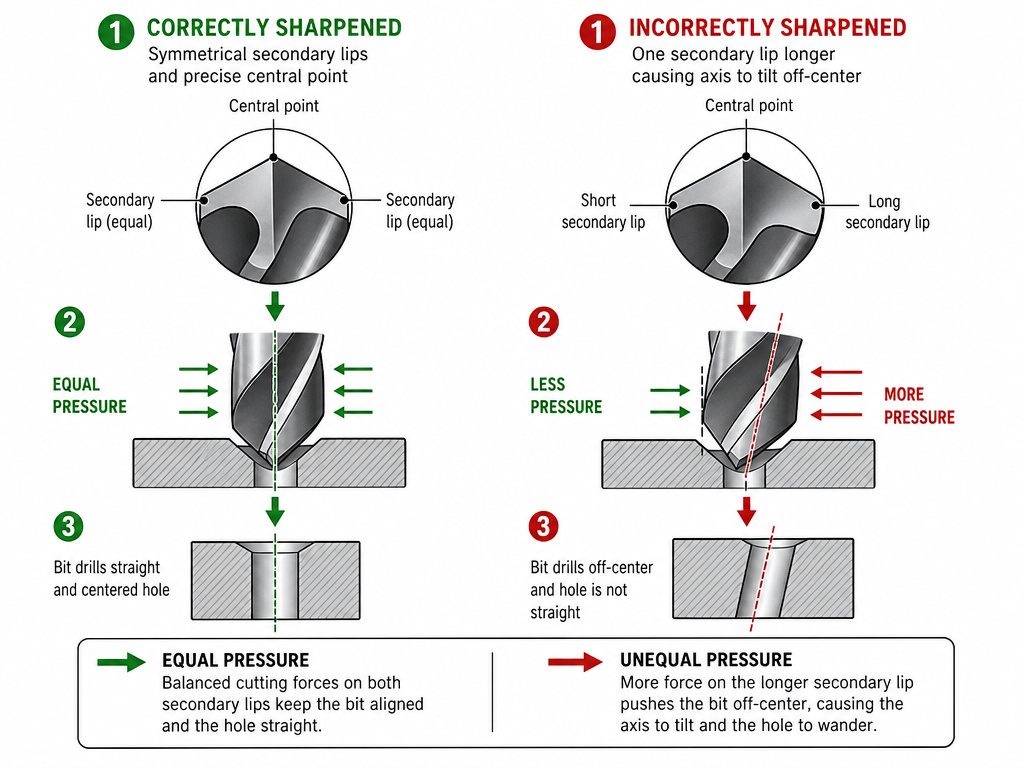
You can’t sharpen a split point on a standard bench grinder without losing the geometry. The secondary lips must be ground precisely opposite each other and at the correct angle relative to the main cutting lips. This is a job for a dedicated sharpening jig.
The Drill Doctor DD500X and DD750X models are built for it. Their process is a mandatory three-step sequence: Align, Sharpen, Split. The splitting step is optional for 118° bits but mandatory for 135° bits to restore the factory geometry.
Where this goes sideways: An uneven split point. If pressure isn’t equal during the splitting step, one secondary lip will be longer than the other. The bit will then rotate off-center, drilling an oversized, out-of-round hole. The fix is to re-insert the chuck and split both sides again until equal.
The manual lists a specific edge case: if the chuck isn’t fully seated in the splitting port, you won’t hear the grinding sound. You must visually align the chuck’s sharpening guide (a white line) with the splitting guide on the port. Missing this step means you didn’t split the point, and the bit will walk on its next use.
For those who sharpen drill bits on a grinder, converting a standard bit to a split point is an advanced skill. It involves carefully grinding back the chisel edge on a thin wheel, ensuring both new edges are identical. It’s often faster to use a dedicated sharpener or replace the bit.
Choosing and Using a Split Point Drill Bit
Start by checking your current bits. Many modern HSS bits, especially those sold in sets for metal, already have a split point. Look for the sharp center and the absence of a flat chisel edge. Brands like Starrett manufacture their metric HSS split point line to DIN 338 standard, with common sizes like 3mm x 61mm and 10mm x 133mm.
When to Buy Split Point:
- Drilling stainless steel, hardened steel, or cast iron.
- Any drilling with a hand-held cordless or corded drill.
- Projects on rounded, angled, or slippery surfaces.
- Precision work where you want to skip center-punching.
Diameters and Speeds: Don’t guess on RPM. The Armeg speed chart provides hard numbers. For a 5mm HSS split point in stainless steel, the target is around 1,308 RPM. In mild steel, you can push it to 1,910 RPM. Running too fast generates heat that destroys the bit’s temper, turning the cutting edges blue and soft.
The Feed Pressure Shift: This is the most counterintuitive part of using a drill bit. With a standard bit, you lean in to start the hole. With a split point, you use notably less pressure. Let the secondary cutting lips do their job. If you force it, you risk breaking the thin web at the tip, especially on bits smaller than 1/8″.
Frequently Asked Questions
Can I convert a standard drill bit into a split point bit?
Yes, but it requires a sharpening system with a dedicated split-point function, like a Drill Doctor. Freehand grinding on a bench grinder is unlikely to produce the symmetrical secondary cutting lips needed for true self-centering performance. It’s usually more cost-effective to buy bits that are already split.
Are split point bits only for metal?
No. While their self-centering and reduced thrust are most advantageous in metal, a 118° split point works very well in wood and plastic. It can prevent wandering in hardwoods or on curved wooden surfaces. However, for pure woodworking where a clean entry hole is critical, a brad point bits is still the superior choice.
What’s the difference between 118° and 135° split points?
The point angle. A 118° included angle is sharper and cuts more aggressively in softer materials like wood, aluminum, and mild steel. A 135° flatter angle is stronger and better for harder materials like stainless steel and tool steel because it puts more metal behind the cutting edge to handle the stress. Both angles can feature a split point.
Why did my split point bit still walk?
Two likely reasons. First, it may be dull. A worn split point loses its sharp secondary lips and acts like a blunt standard point. Second, it may have been sharpened incorrectly with an uneven split. Inspect the tip, if one secondary lip is visibly longer, that’s your culprit. You’ll need to re-split it correctly.
Can I use a split point bit in a drill press?
Absolutely. The self-centering benefit is still valuable for precision, and the reduced thrust is easier on the drill press’s quill and bearings. It’s an excellent choice for any press work involving metal.
The Bottom Line
A split point drill bit replaces a scraping chisel edge with two sharp cutting lips. That single change cuts required thrust by up to 70% and stops the bit from wandering. It turns a frustrating fight with a skating drill into a controlled, precise operation.
For drilling metal, especially hard or sheet metal, a split point is the default. Keep a set of HSS split points on hand for steel and a sharpener that can maintain the geometry.Your drill, your arms, and your accuracy will thank you. When a bit eventually snaps, you’ll know the drill bit extraction methods to get back on track.
