
How to Tell Drill Bit Size | The 3-System Decoder
This post contains affiliate links. As an Amazon Associate, we earn from qualifying purchases.
You tell a drill bit’s size by checking the marking stamped on its shank, using a physical drill gauge, or measuring the flute diameter with calipers. Most bits have the size etched near the chuck end, look for a fraction (1/4″), a number (#7), or a millimeter value (6mm). If it’s worn off, a drill gauge or a $20 digital caliper gives you the answer in seconds.
That stamped marking is your first stop. It’s the manufacturer’s guarantee, but it’s also the first thing to rub off after a year in a metal toolbox. The systems behind those markings, fractional inch, number gauge, and metric, aren’t just random. They follow published standards like ANSI B94.11M, and each has a logic that changes how you shop for replacements.
What follows is a decoder. You’ll learn how to read the three labeling systems, what to do when the ink vanishes, and why the diameter stamped on the shank isn’t always the one that matters for your hole.
Key Takeaways
- The size is almost always stamped on the shank. Look between the flutes and the chuck end for a fraction (1/4″), a number (#7), or a millimeter figure (6mm).
- Gauge numbers are counterintuitive. A #80 bit is tiny (0.0135″), and a #1 bit is large (0.2280″). The number gets smaller as the bit gets bigger.
- Measure the flute, not the shank, on reduced-shank bits. A 1/2″ bit with a 3/8″ shank still drills a 1/2″ hole, the shank size only matters for your chuck.
- For unmarked bits, a drill gauge is faster, but calipers are definitive. A gauge gets you close; a digital caliper reads to 0.01mm and doesn’t care about worn edges.
- The standard increment changes with the size. Fractional bits jump by 1/64″ up to 1″, but the step from 1/64″ to 1/32″ is a 100% increase. The step from 1 47/64″ to 1 3/4″ is less than 2%.
The Three Ways to Identify Any Bit
You have three reliable paths, and the best one depends on the bit’s condition and what’s in your toolbox. Start with the easiest.
First, inspect the shank. Rotate the bit under good light, looking at the smooth metal cylinder between the flutes and the end that goes into the chuck. Manufacturers stamp or laser-etch the size here. You might see 1/4″, 6mm, or #7. If you see it, you’re done. Clean the area with a rag and some solvent if it’s dirty.
Second, use a drill gauge. This is a flat metal or plastic plate with graduated holes. You insert the bit’s cutting end into the holes until you find the one it fits snugly. The hole is labeled. It’s a ten-second check, and a basic gauge costs less than a pizza. The catch is that a gauge works best on bits with sharp, unworn flutes. A dull bit might fit loosely in its true size and throw off your reading.
Third, measure with calipers. This is the definitive method for bits with worn markings or damaged tips. Use a digital or dial caliper, gently close the jaws on the widest part of the flute, the spiral cutting section, and read the measurement. Write it down. This gives you the actual cutting diameter, which is the size of the hole the bit will drill.
Where this goes sideways: Measuring the shank on a reduced-shank bit. Many larger bits, like the Irwin Unibit 1/2″ model, have a shank diameter smaller than their cutting size to fit a standard chuck. You drill a 1/2″ hole, but the shank measures 3/8″. Measure the flutes every time.
The method you choose sets your confidence level for the next project. A stamped 3/8″ is a fact. A gauge reading is a strong clue. A caliper measurement of 9.53mm is the truth, even if the bit says nothing at all.
Reading Fractional, Number, and Metric Markings
Drill bits speak three languages, and the one you see depends on where the bit was made and what job it’s for. You don’t need to be fluent in all three, but you need to recognize them.
Fractional-inch bits are the most common in the U.S. For general use. The size is a fraction of an inch: 1/16″, 1/8″, 1/4″. The standard increment, defined by ANSI B94.11M, is 1/64-inch for jobber-length bits up to 1 inch in diameter. That means your set likely has a 1/64″, a 1/32″, a 3/64″, and so on. Machinists often call these by their decimal equivalents, a 27/64″ bit becomes a “four-twenty-one drill” (.4219 inches).
Number gauge bits (also called wire gauge) are used for precise metalwork and pilot holes. They range from #80 (smallest) to #1 (largest). Here’s the twist that trips everyone up: the numbers run backward. A #80 bit is a microscopic 0.0135 inches. A #1 bit is 0.2280 inches. As the number gets smaller, the bit gets larger. You’ll find these sizes listed in any comprehensive drill and tap size chart.
Metric bits are the global standard. The marking is a straightforward millimeter measurement, like 3mm or 10mm. Sets follow standard metric progressions, often in 0.5mm or 1mm steps. A Bosch PRO Metal HSS-G Twist Drill Bit will have its metric diameter clearly stamped, for example, “1.5” for a 1.5mm bit.
| Marking System | Example Sizes | Best For | Key Trait |
|---|---|---|---|
| Fractional Inch | 1/16″, 1/4″, 1/2″ | General construction, woodworking, U.S. DIY | Increments of 1/64″ (0.0156″) |
| Number Gauge | #80, #30, #7 | Precision metalwork, electronics, pilot holes | #80 is tiny; #1 is large |
| Metric | 3mm, 6mm, 10mm | Automotive, machinery, global projects | Millimeter measurement; 1mm = 0.0394″ |
You don’t convert on the fly. You match the bit to the job it was bought for. If you’re drilling a pilot hole for a #8 screw, you reach for a #29 or 1/8″ bit, not a 3.5mm one. Our guide on the correct drill bit size for a #8 screw walks through that exact match.
When the Markings Are Gone
The stamp wears off. It gets coated in paint, grease, or rust. Now you have a useful bit with no label. This is where technique replaces the manufacturer’s cheat sheet.
Your first tool is a drill gauge. It’s a passive tool, no batteries, no settings. You push the bit into the holes until it won’t go further. The labeled size of that hole is your bit’s nominal size. It’s fast, but it has a margin of error, especially if the bit’s cutting edges are chipped or rounded. A bit that’s seen heavy use in metal might measure a full size smaller on a gauge than its original stamp.
Your definitive tool is a caliper. A digital model with a depth gauge is ideal. Open the jaws, place the bit’s flute between them, and gently close until there’s light contact. The digital readout shows the diameter. Record it. For a 1/4″ bit, your caliper will read 0.250″ or 6.35mm. This method doesn’t care about wear; it tells you the physical dimension you’re working with right now.
Common mistake: Assuming a bit is the size of the bolt it fits through. A 1/4″ bolt does not need a 1/4″ hole; it needs a hole for the bolt’s threads, which is a different drill bit selection process entirely. The bolt test is for clearance holes, not pilot holes.
What if the measurement is an odd number, like 0.257″? You’ve likely found a bit that’s between standard fractional sizes, or it’s worn. Consult a decimal-equivalent chart. 0.257″ is very close to 17/64″ (0.2656″). In practice, you’d use it as a 17/64″ bit or buy a new one. This is also how you identify specialized bits, like a Forstner drill bit, which is identified by its diameter and the flat bottom it creates, not just a stamped number.
Shank vs. Flute: What You’re Actually Measuring
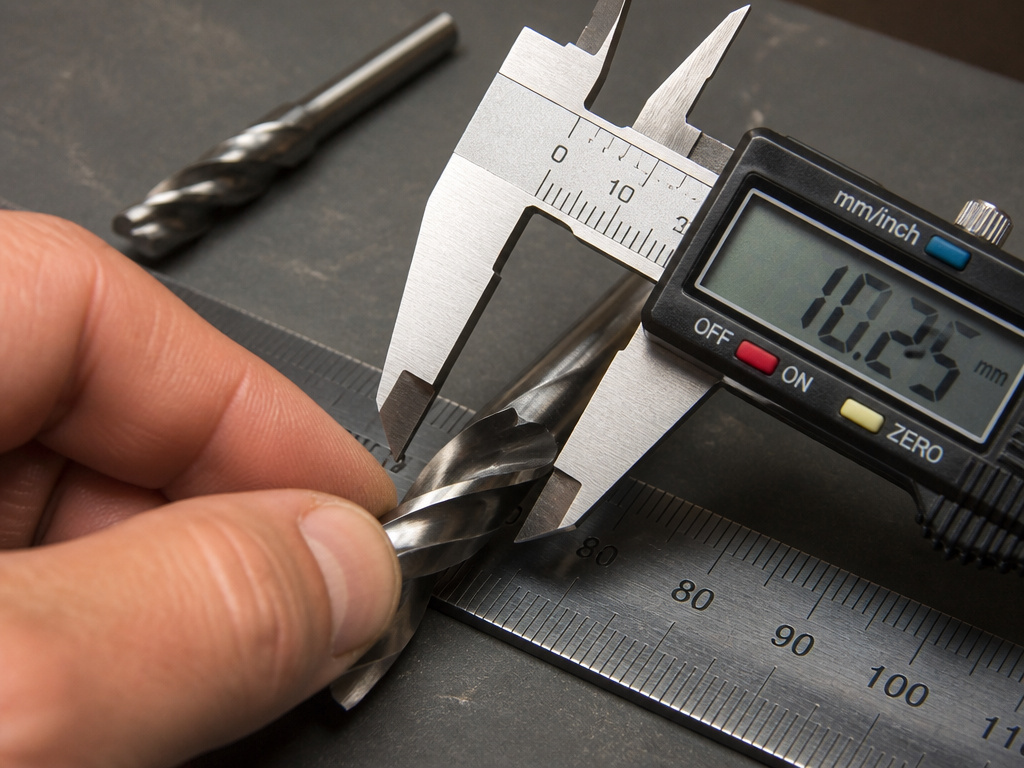
This is the detail that separates a correct identification from a frustrating error. Two diameters matter on a drill bit, and only one determines your hole size.
The flute diameter is the cutting width. It’s the widest part of the spiraled grooves. When you measure with calipers, this is the dimension you take. It defines the hole the bit will drill. A bit stamped 3/8″ should have a flute diameter of 0.375 inches.
The shank diameter is the smooth cylinder that your drill chuck grips. For most standard bits, the shank and flute are the same size. But for larger, high-power bits, manufacturers use a reduced shank. This lets a 1/2″ cutting bit fit into a 3/8″ chuck. The Irwin Unibit 1/2″ model has a flute length of 4-1/2″ but a shank designed for a standard chuck.
| Bit Type | Flute Diameter | Shank Diameter | Why It Matters |
|---|---|---|---|
| Standard Jobber | 1/4″ | 1/4″ | Chuck size matches hole size. |
| Reduced Shank | 1/2″ | 3/8″ | Drills large hole with standard chuck. |
| Hex Shank | 1/4″ | 1/4″ (Hex) | Prevents slippage in high-torque drivers. |
If you measure the shank of a reduced-shank bit, you’ll get a false reading. You’ll think you have a 3/8″ bit when you actually have a 1/2″ bit. This mistake means your hole will be too small, or you’ll buy the wrong replacement. Always measure the flutes.
This distinction is critical when moving between materials. The difference between masonry and regular bits isn’t just the tip geometry; it’s also that a masonry bit’s shank is often uniform to withstand hammer drill pounding.
Sourced Specifications and Industry Standards
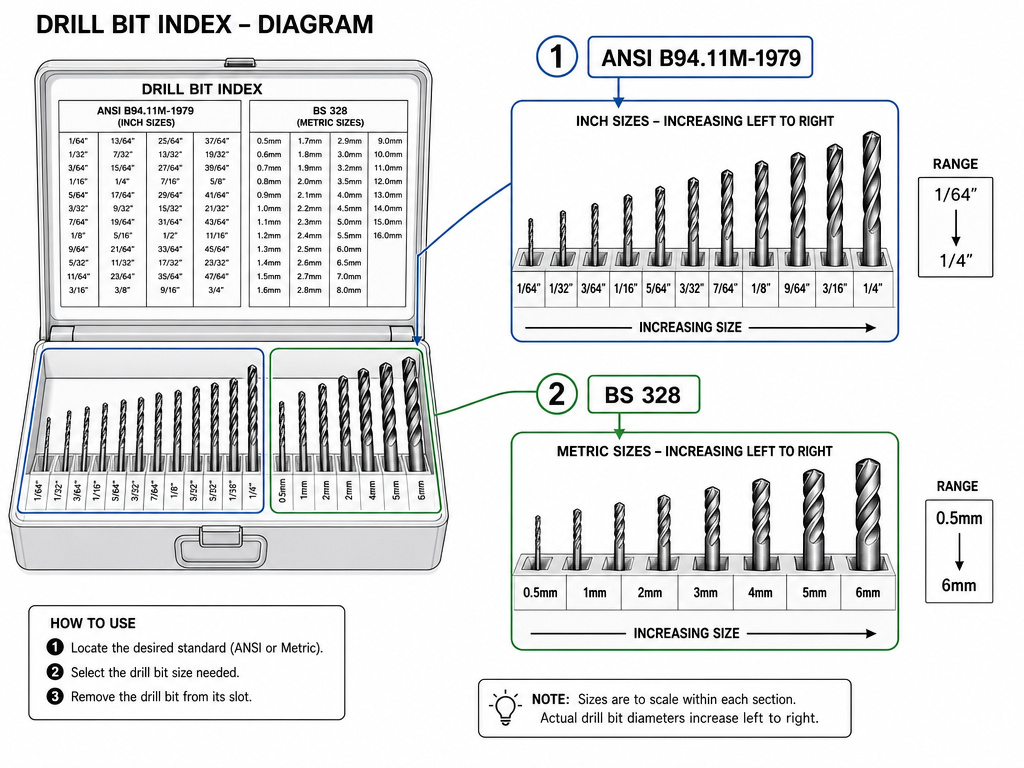
The numbers on bits aren’t arbitrary. They come from engineering standards that ensure a 1/4″ bit from one brand matches a 1/4″ bit from another. This interchangeability is what lets you replace a lost bit without re-engineering your project.
The ANSI B94.11M-1979 standard governs fractional-inch twist drill sizes in the U.S. It specifies jobber-length bits from 1/64 inch through 1 inch in 1/64-inch increments. For larger, Morse-taper shank bits, the standard continues in 1/64-inch steps up to 1 3/4 inches, then shifts to 1/32-inch increments. This structured progression is why your drill index has a logical order.
For metric bits, British Standard BS 328 is a common reference, defining sizes from 0.2 mm to 25.0 mm. Industrial standards go much deeper. The NIST diamond core drill standard (CS17-42) details everything from EX and AX casing sizes to the exact thread specifications for core-barrel bits, ensuring dimensional interchangeability for professional drilling rigs.
The percentage size increment between drill bits becomes larger as bit sizes get smaller. The step from 1/64″ to 1/32″ is a 100% increase in diameter. The step from 1 47/64″ to 1 3/4″ is less than a 2% increase.
Why does this matter to you? It explains why missing a small bit in your set is a bigger problem than missing a large one. The jump from a 1/16″ bit (0.0625″) to the next common size, 5/64″ (0.0781″), is about 0.0156″, the same absolute step as between 1/2″ and 17/32″. But that tiny step represents a 25% increase in hole area for the small bit, dramatically affecting screw grip or wire fit. This precision is at the heart of selecting the right bit.
Tools for Identification and Verification
You don’t need a machinist’s lab. Three inexpensive tools cover 100% of identification tasks.
A drill gauge is the quick-check tool. Buy one that covers fractional, number, and metric sizes. Drop a bit in, note the size, and move on. It lives in my top drawer. Its limitation is wear, it can’t tell you if a bit is 0.248″ instead of 0.250″.
A digital caliper is the truth-teller. I use a basic 6-inch model that reads in inches and millimeters. It measures flute diameter to within 0.01mm. It also measures shank diameter, depth of a hole, and whether a bolt is truly 1/4″. For under $20, it’s the most useful tool in my shop for verification. It’s how you confirm the specs on a titanium vs carbide drill bit, the coating might be different, but the underlying size must be exact.
A magnifying glass or headlamp is the reader. Stamped markings can be faint. Good light and a little magnification make “3/8” appear out of what looked like a scratch. Combine this with a quick wipe with mineral spirits to clear off grime.
Don’t use a ruler. The gradations are too coarse. Trying to align a bit with the lines on a standard ruler will leave you guessing between 1/8″ and 5/32″. That guess will split your wood or break your bit.
For sharpening, a tool like the Drill Doctor DD500X has a built-in sizing guide for bits from 3/32” to 1/2”. It’s a specialized case where the identification is part of the sharpening fixture. The manual warns that too many rotations on a small-diameter bit during sharpening can produce an incorrect edge, another reason knowing the exact size before you start matters.
Frequently Asked Questions
What if my drill bit has no size marked on it?
Use a drill gauge or digital calipers. The gauge is faster for a rough size. The calipers will give you an exact decimal or metric measurement you can cross-reference on a chart. This is common for old, well-used bits or cheaper sets where the stamping was shallow.
Why are some drill bit sizes labeled with a number instead of a fraction?
Numbered bits (#1-#80) follow the wire gauge system, traditionally used in metalworking and electronics for precise pilot holes. The system is standardized, so a #29 bit is always 0.1360 inches, which matches the root diameter of a #8 screw thread. Our article on the drill bit for #10 screw explains this matching process.
Is a 1/4 inch drill bit the same as 6mm?
Almost, but not exactly. 1/4 inch equals 6.35 millimeters. A 6mm bit is 0.2362 inches. The difference is 0.35mm, which is enough to make a screw fit loosely or a dowel joint sloppy. Always use the measurement system your plans or fasteners specify.
How can I tell the difference between a wood and a metal drill bit by looking at it?
The tip geometry is the giveaway. A standard twist drill bit for metal has a sharp, pointed tip at a 118-degree angle. A brad point bit for wood has a sharp central spur and two outer spurs that score the wood grain for a clean hole. A drill bit for concrete has a carbide tip that’s brazed onto a steel shaft.
What does the drill bit size actually refer to?
It refers to the diameter of the hole the bit will cut, which is the diameter of the flute at its widest point. It does not refer to the shank diameter (what the chuck holds) unless it’s a non-reduced-shank bit where the two are the same. This is the core of what drill bits do.
The Bottom Line
Find the stamp first. If it’s there, your job is done. If it’s gone, measure the flute with calipers, not the shank. Keep a decimal-equivalent chart on your shop wall or phone.
The three systems, fraction, number, metric, are just different labels for the same physical truth. A 1/4″ bit, a #3 bit (approximately), and a 6.35mm bit all drill the same hole. Your drill doesn’t care about the label, but your project’s success does.
Buy a drill gauge for speed. Buy a digital caliper for certainty. Together, they turn a drawer of mystery metal into a sorted, ready-to-use toolkit.
