
How to Use a Core Drill Bit | The Specs That Stop a Glaze
This post contains affiliate links. As an Amazon Associate, we earn from qualifying purchases.
To use a core drill bit, you match three things: the bit’s diameter to the correct RPM, a constant water or coolant flow, and light, even pressure not exceeding 12-15 kilograms. Start at a 45-degree angle to prevent skating, then straighten the drill once a groove is established.
That 12-15kg pressure ceiling isn’t a suggestion. It’s the line between a clean cut and a glazed bit. Go over it and the diamond segments polish smooth against the concrete instead of cutting, turning a $80 barrel into a noisy paperweight in under a minute.
What follows: the exact RPM chart for sizes from 5mm to 35mm, when to switch from hand-drilling to a stand, the two-minute trick to fix a glazed bit, and the one check that prevents the core from jamming inside the wall.
Key Takeaways
- Match RPM to diameter. A 1-inch (25mm) bit runs at 1500-2000 RPM; a 4-inch (100mm) bit needs under 500 RPM. Exceeding this burns the bond.
- Cooling is non-negotiable. A dry diamond core bit overheats in seconds, permanently damaging the segments. Use a constant water stream or spray.
- Pressure is a feel, not a force. Let the bit do the work. Max pressure is 12-15kg (about the weight of a medium-sized dog).
- Start at an angle. Engage the material at a 45-degree angle to create a guiding notch, then slowly bring the drill to vertical.
- Listen to the motor. A bogging sound means too much pressure or a dull bit. A high-pitched whine often means insufficient cooling.
What a Core Drill Bit Actually Does (And Doesn’t Do)
A core drill bit doesn’t cut. It grinds. The diamond-impregnated segments on its rim are designed to abrade hard materials like concrete, brick, stone, and asphalt. Unlike a twist bit that chips material away, a core barrel removes a solid plug, leaving a clean, round hole. This makes it the only tool for jobs like running conduit through a foundation or installing plumbing in a slab.
The part nobody mentions: A core bit’s performance hinges on the bond holding the diamonds. The bond wears away just enough to expose fresh, sharp diamond edges. Too much pressure or heat glazes the bond shut, polishing it smooth. From that moment on, the bit just spins and heats up.
This grinding action generates immense heat and requires a specific machine. You cannot use a standard hammer drill for coring—the hammering action will shatter the diamond segments. You need a rotary-only drill with high torque and variable speed control. Understanding this fundamental difference is the first step in operating a hammer drill correctly for its intended purpose, and knowing when to switch tools entirely.
The Non-Negotiable Specs: RPM, Cooling, and Pressure
Getting these three variables wrong doesn’t just make the job slower. It breaks tools.
RPM by Diameter: The Manufacturer’s Rule
The smaller the bit, the faster it can spin. This isn’t about power; it’s about the distance each diamond segment travels. A 1-inch bit rotating at 2000 RPM has its outer edge moving much slower than a 4-inch bit at the same RPM. Spin the big one too fast, and the centrifugal force can stress the segments, while the friction heat skyrockets.
The MK Diamond MK-190 manual provides a clear, sourced RPM chart. These numbers are your bible.
| Bit Diameter | Recommended RPM Range |
|---|---|
| 5mm – 13mm (1/2″) | 2000–2500 |
| 15mm – 25mm (1″) | 7 1500–2000 |
| 30mm – 35mm (1-3/8″) | 1000–1500 |
For larger bits, common sense scales this down. A 4-inch (≈100mm) bit should run well below 500 RPM on a powerful rig. The U.S. SAWS CORE PRO-4 hand-held unit, for example, runs at a fixed 1700 RPM and is rated only for bits up to 4 inches.
Cooling: Water is Mandatory
Dry drilling with a diamond core bit is a guaranteed way to destroy it. The heat generated will soften the metal bond, causing the diamonds to fall out or the segments to glaze over permanently.
The technical snippet: Wet drilling serves two critical functions: it cools the diamond segments to prevent thermal degradation of the bond matrix, and it flushes abrasive slurry from the cut to prevent the bit from binding. A constant flow is required, whether from a spray bottle, a sponge, or a dedicated water feed attachment.
For hand-held drilling, spraying water into the cut or drilling “through” a puddle works. For a stand-mounted drill, a pump system is best. The moment the slurry turning from gray to a steamy paste, you’ve lost cooling.
Pressure: The 12-15kg Ceiling
The MK-190 manual states drilling force should be kept at “low pressure, up to max 12-15kg.” To visualize that, think of pressing down with a 30-pound dumbbell. That’s it.
Where this goes sideways: Leaning into the drill. Your body weight is too much. Excessive pressure flattens the diamond segments against the material, creating friction heat faster than coolant can remove it. The bit glazes, progress stops, and the only fix is to redress it by drilling into an abrasive backup material like a cinder block.
The drill’s motor should sound loaded but not strained. If you’re fighting to keep it spinning, you’re pushing too hard. This is where selecting a drill bit with the right hardness for your material also comes into play, as a bit meant for soft brick will wear instantly under the same pressure in concrete.
The Core Drilling Process: A Step-by-Step Walkthrough
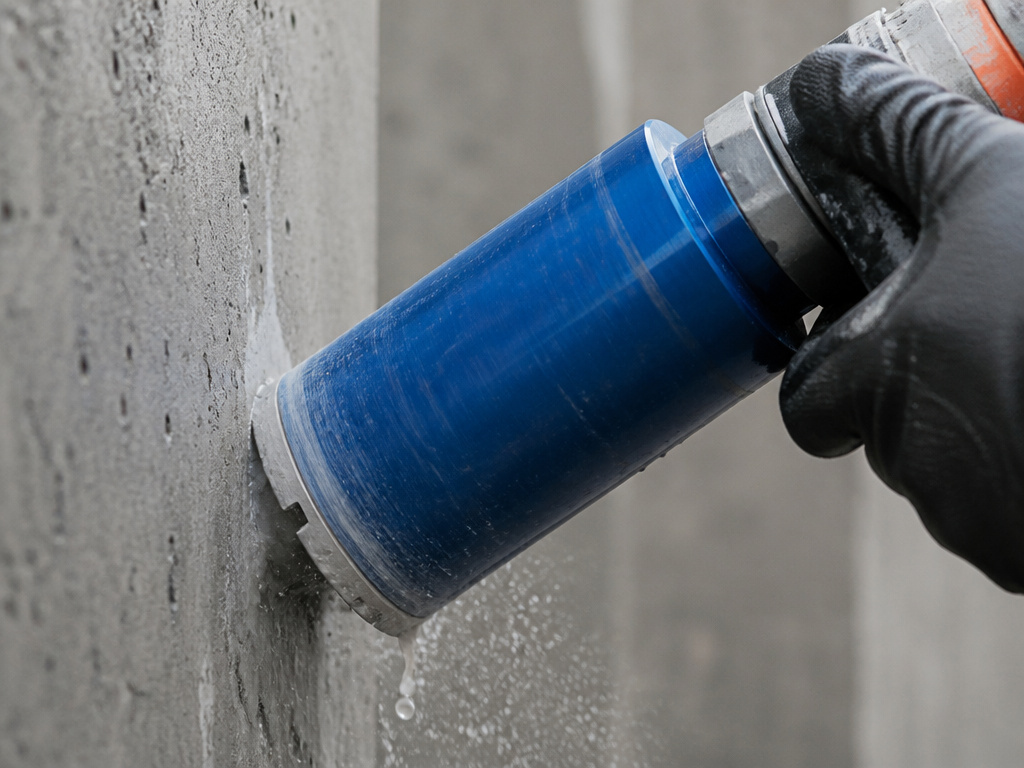
Step 1: Pre-Drilling Checks and Setup
Gather your PPE: safety glasses, hearing protection, gloves, and a dust mask if dry-cutting. Inspect the core bit for cracks or loose segments. Never use a damaged bit. Verify your drill has the correct chuck system (SDS-Max, SDS-Plus, or 1¼ inch UNC) and that the bit is secure. A wobble over 1 mm can crack the barrel.
For hand-held drilling, mark your hole and consider a simple wooden template pinned to the wall to guide the initial angle. For any hole over 60mm in diameter, or when drilling reinforced concrete, you should use a core drill stand. The stand guarantees a straight hole and manages the torque.
Step 2: Starting the Cut (The 45-Degree Angle)
With the drill running at the correct RPM and water flowing, position the bit at a 45-degree angle to the surface. Gently bring the spinning rim into contact. This angled start creates a crescent-shaped notch that prevents the bit from “skating” across smooth concrete.
Once the notch is established—usually after 5-10 seconds—slowly and smoothly pivot the drill to the vertical position. Do not force it straight; let the bit find its center.
Step 3: The Main Drilling Phase
Maintain light, steady pressure. You should see a steady flow of gray slurry washing out of the hole. Minimal oscillation (a very slight back-and-forth rock) can help clear debris and improve cooling, but don’t overdo it.
If progress slows, don’t push harder. First, check the coolant flow. Then, consider if you’ve hit rebar. The slurry will turn a brighter, sparkly gray if you’re cutting steel.
Step 4: Breaking Through and Retrieving the Core
As you near the back side of the material, reduce pressure significantly. Breaking through with full force can blow out the back side of the hole and damage the last segment of the bit.
For through-holes, the core plug will often remain stuck inside the barrel. Use an ejector drift (a steel wedge) inserted into the slots on the side of the bit to knock it out. Never try to pry it out with a screwdriver against the diamond segments.
Hand-Held vs. Stand-Mounted Drilling: When to Switch
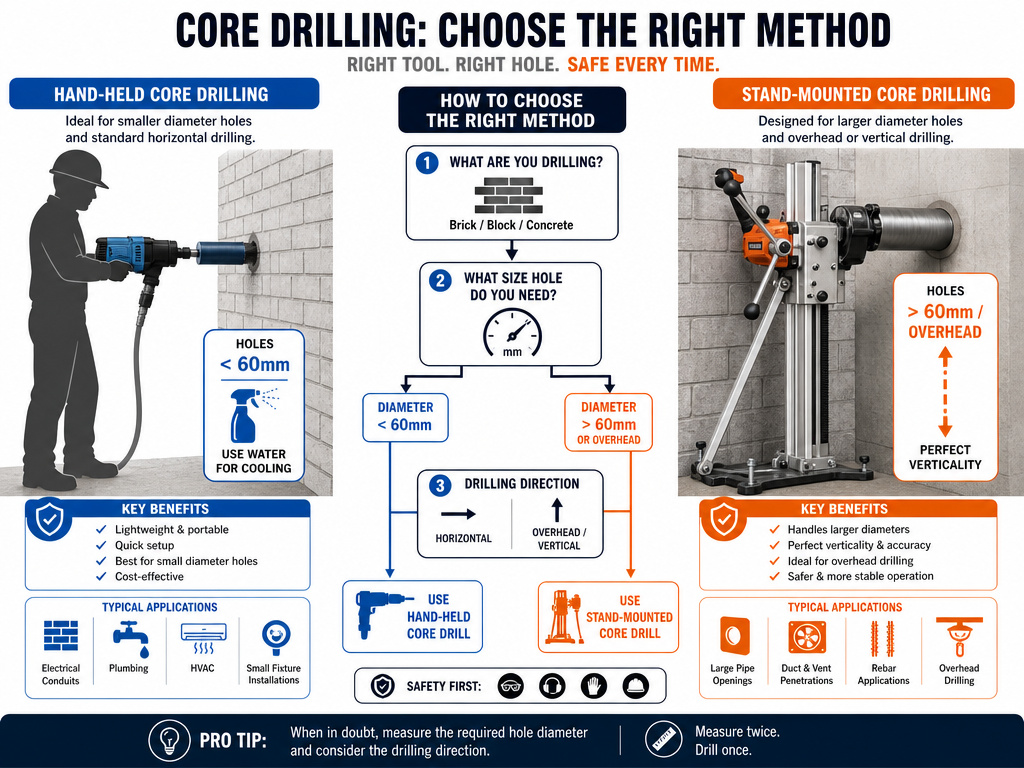
The choice here is about control and safety, not just convenience.
| Scenario | Recommended Method | Why |
|---|---|---|
| Holes under 60mm (2.5″) in brick or block | Hand-held | Manageable torque; easy to guide and cool with a spray bottle. |
| Holes over 60mm in any material | Stand (rig) | Torque is too high for safe control by hand; ensures perfect verticality. |
| Any overhead or vertical wall drilling | Stand | Prevents the heavy drill from falling if it binds; allows secure anchoring. |
| Precision plumbing or electrical conduit | Stand | Guarantees straight, aligned holes essential for running pipe or conduit. |
A hand-held drill like the U.S. SAWS CORE PRO-4 is a powerful tool, but its fixed 1700 RPM means you must carefully select bit diameters it can handle. Using a stand also protects you from kickback if the bit suddenly grabs rebar. This is a key aspect of hammer drill safety and technique that translates to all powerful rotary tools.
Common Mistakes and How to Spot Them
Glazing
The sign: Drilling progress grinds to a halt. The bit may smoke or smell hot, even with water. The motor spins freely without loading down.
The cause: Excessive pressure, insufficient coolant, or RPM too high for the diameter. The bond has polished over.
The fix: Immediately stop drilling. For a wet bit, reduce the water flow by half and drill into a soft, abrasive material like a limestone block or old cinder block for 30-60 seconds. This abrasion can wear the glaze away and expose fresh diamonds.
Stalling/Binding
The sign: The drill motor bogs down severely or stops entirely.
The cause: The bit has jammed in the hole, often because the core plug has shifted sideways or debris has packed between the plug and the barrel.
The fix: Do not force it. Reverse the drill rotation if your model allows it while gently pulling back. If stuck, you may need to carefully break the core plug apart inside the barrel with a long chisel.
Uneven Segment Wear
The sign: One side of the bit’s segments appears more worn than the other.
The cause: Drilling at an inconsistent angle, or the drill not being held perfectly perpendicular during the main cut.
The consequence: The bit will cut an oversized, tapered hole and wear out prematurely. This is a fundamental error in basic drilling technique that’s magnified with expensive core bits.
Troubleshooting a Slow or Problematic Cut
When things aren’t going right, run through this checklist in order:
- Coolant: Is there a consistent stream? Is the slurry flushing out?
- RPM: Is the drill speed appropriate for the bit diameter? Refer to your chart.
- Pressure: Are you leaning on it? Lighten up. Let the tool work.
- Bit Condition: Are the diamond segments visibly worn down or damaged? A bit that’s simply used up won’t cut, no matter what you do.
- Material: Have you hit unexpected steel? If cutting rebar, drop your speed to the lowest setting and reduce pressure by about a third. “Pump” the drill slightly to clear steel chips.
If you’ve checked all five and the bit is still not cutting, it’s likely glazed. Attempt the redressing procedure. If that fails, the bit is done. This is why identifying a masonry bit and other specialty tools correctly before purchase matters—you need the right bond hardness for your primary material.
Core Bit Maintenance and Storage
A clean bit lasts longer. After each use, rinse all slurry off the bit with water. Use a soft brush to clean the segments and the inside of the barrel. Let it air-dry completely before storage.
Store core bits standing on end or hanging on a rack. Laying them flat can cause warping over time. Keep them in a dry place to prevent rust on the steel body, which can weaken the braze holding the segments.
Before your next job, do the 30-second inspection: look for cracks, check that all segments are firmly attached, and ensure the shank isn’t damaged from a stuck chuck. This quick habit saves you from a mid-job failure.
Frequently Asked Questions
Can I use a core bit in a regular drill?
No. A standard drill lacks the sustained high torque and low-speed control required. It also likely lacks a chuck system (like SDS-Plus) that can securely hold the large shank of a core bit. You need a dedicated rotary hammer or core drill machine.
How do I know what size core bit I need?
The bit diameter should match the outer diameter of the pipe, conduit, or anchor you need to install. For a 1-inch pipe, a 1.5-inch or 2-inch hole is typical to allow for insulation or a sleeve. Always check local building codes. This process is part of determining correct drill bit size for anchors and other fixtures.
Why is my core bit getting stuck in the hole?
The most common cause is the core plug not breaking free from the back side of the material. As you finish the cut, reduce pressure and speed to minimize this. Using a bit with a slightly tapered design can also help. If it’s stuck, a few gentle taps with a hammer on the side of the barrel can often loosen it.
What’s the difference between a diamond core bit and a TCT (tungsten carbide tipped) core bit?
Diamond bits grind through incredibly hard, abrasive materials like concrete and reinforced stone. TCT bits have carbide teeth that chip through softer masonry like brick, block, and soft stone. They are cheaper but cannot touch concrete or rebar. Knowing this difference between concrete and wood bits and other types is crucial for selection.
Is it safe to core drill overhead?
Only with a properly anchored core drill stand. The weight of the drill and the force of a potential bind make hand-held overhead drilling extremely dangerous. The stand must be physically anchored with bolts or a vacuum base rated for the application.
The Bottom Line
Using a core drill bit successfully isn’t about muscle. It’s about respecting three numbers: the RPM on the chart, the 12-15kg pressure limit, and the constant flow of coolant. Start at an angle, let the diamonds grind, and listen to the tool. When you hear the motor strain, you’re already pushing too hard.
For the occasional DIYer needing a clean 2-inch hole through a foundation, renting a hammer drill for concrete with a stand and a water kit is the smart move. For pros, matching the bit’s bond and segment design to your daily material—like choosing a carbide drill bit over a titanium one for masonry—is where real efficiency is found. Get the specs right, and the hole almost makes itself.
