
Learn How to Figure CFM Air Compressor for Your Real Needs
This post contains affiliate links. As an Amazon Associate, we earn from qualifying purchases.
To figure CFM for an air compressor, you must reconcile the advertised SCFM (Standard CFM) with the actual ACFM (Actual CFM) you’ll get at your site. This means correcting the manufacturer’s standard-condition rating for your specific altitude, inlet air temperature, and humidity. A compressor rated for 100 SCFM at sea level delivers only about 83 SCFM-equivalent mass flow in Denver, a 17% shortfall that stalls tools.
The gap between the spec sheet and your workshop floor is where projects fail. SCFM is a corrected, comparable number. ACFM is the physical air volume at your compressor’s discharge, right now. Your tools need mass flow, which SCFM represents, but your piping and tank deal in ACFM.
What follows is the translation layer. You’ll get the formula to convert SCFM to your site’s ACFM, a field test to verify any compressor’s true output, and the one conversion. SCFM to ACFM at pressure, that prevents the most common pipe-sizing mistake.
Key Takeaways
- SCFM is for comparing compressors; ACFM is for sizing your system. Never use an SCFM rating directly for pipe or receiver tank calculations without converting it to ACFM at your operating pressure.
- Altitude cuts mass flow. A compressor’s SCFM rating assumes sea-level pressure (14.7 PSIA). For every 1,000 feet above sea level, expect about a 3-4% drop in deliverable air mass.
- Heat expands air and reduces density. A 90°F (32°C) inlet temperature versus a 60°F (15°C) standard can cut effective flow by roughly 6% before the compressor even starts.
- Verify marketing claims with a tank pump-up test. Timing pressure rise in your tank is the only way to measure true delivered CFM under your specific conditions.
- Pipe sizing uses ACFM, not SCFM. At 100 PSI, air compresses to about 1/7.8th of its standard volume. Using SCFM for pipe diameter will oversize your lines by a factor of nearly eight.
The Three CFM Letters You Actually Need
Forget CFM as a single idea. It’s a category. When you’re figuring out what a compressor can do, you’re almost always dealing with one of three specific, measured versions.
SCFM (Standard Cubic Feet per Minute) is the most important number on the tag. It’s the flow rate corrected to a standard set of atmospheric conditions, temperature, pressure, and humidity, so you can compare one compressor to another. It represents a mass flow rate. Your air tools consume a specific mass of air to operate; their requirements are listed in SCFM.
SCFM is the volume of air flow, reconciled back to a specific set of “standard conditions.” This is a critical step because air-consuming equipment rates their product demand in SCFM.
But here’s the first catch: there isn’t one universal standard. Most North American manufacturers use the “traditional US standard”: 14.7 PSIA, 60°F, and 0% relative humidity (dry air). However, the ISO 1217 and newer CAGI (Compressed Air & Gas Institute) standard is 14.5 PSIA, 68°F, 0% RH. The difference is about 1.5% in mass flow. It’s small, but it means you must confirm which standard your compressor’s SCFM rating uses, especially when comparing brands.
ACFM (Actual Cubic Feet per Minute) is what you can physically measure coming out of the compressor discharge. It’s the volumetric flow at the actual pressure and temperature at that point in your system. This number changes with altitude, shop temperature, and humidity. Your compressor’s pump produces a more-or-less fixed ACFM, but the mass of air in that ACFM (its SCFM value) shrinks or grows.
ICFM (Inlet Cubic Feet per Minute) is the flow rate of air entering the compressor’s intake. For practical purposes in a packaged unit, ICFM and ACFM are often the same number. The distinction matters more for system designers separating the compressor from its intake filter.
| Term | What It Measures | Key Question It Answers |
|---|---|---|
| SCFM | Mass flow corrected to standard conditions. | “Does this compressor have the oomph to run my tools?” |
| ACFM | Volumetric flow at actual discharge conditions. | “What size pipe do I need from the compressor to the wall?” |
| ICFM | Volumetric flow at the compressor intake. | “Is my intake piping or filter restricting the pump?” |
The Formula That Corrects for Altitude and Heat
Your compressor’s nameplate SCFM is a promise made in a climate-controlled lab. Your garage is not a lab. To figure the CFM you’ll actually have to work with, you need to de-rate that SCFM number for your local conditions. The governing physics are straightforward: air is less dense at higher altitudes and at higher temperatures.
The formula to convert SCFM to the actual ACFM your compressor will deliver is:
ACFM = SCFM × (P_standard / P_actual) × (T_actual / T_standard)
Where: * P_standard is standard pressure (14.7 psia for US standard). * P_actual is your local atmospheric pressure in psia. * T_standard is standard temperature in Rankine (°F + 460). * T_actual is your inlet air temperature in Rankine.
Where this goes sideways: Plugging in sea-level pressure (14.7 psia) when you live at 5,000 feet (~12.2 psia). Your actual ACFM might be close to nameplate, but the mass of air in it (the useful SCFM) will be 17% lower. Your tools will stall.
Let’s apply it. You’re looking at a compressor rated for 25 SCFM (US standard). Your workshop in Denver (5,280 ft) has an average atmospheric pressure of 12.2 psia. On a summer day, your inlet air temperature is 85°F (545 Rankine).
First, find the actual ACFM the compressor will produce there: ACFM = 25 × (14.7 / 12.2) × (545 / 520) ACFM = 25 × 1.205 × 1.048 ≈ 31.6 ACFM
The compressor is moving more volume (31.6 ACFM vs. A theoretical 25 at standard conditions) because the air is thinner. But volume is useless. We need mass.
Now, work backwards to find the effective SCFM, the real mass flow you get: Effective SCFM = ACFM × (P_actual / P_standard) × (T_standard / T_actual) Effective SCFM = 31.6 × (12.2 / 14.7) × (520 / 545) Effective SCFM = 31.6 × 0.83 × 0.954 ≈ 25.0 SCFM
Wait, that’s the nameplate. So it’s fine? No. This calculation assumes the compressor’s pump can maintain its volumetric output (ACFM) despite the thinner air. Many can’t. The pump itself becomes less efficient with lower inlet pressure. The real-world result is often a 3-4% drop in effective SCFM per 1,000 feet of altitude. That 25 SCFM compressor in Denver might only deliver 20-21 SCFM of useful air to your tools.
The Field Test: Measuring True CFM Yourself
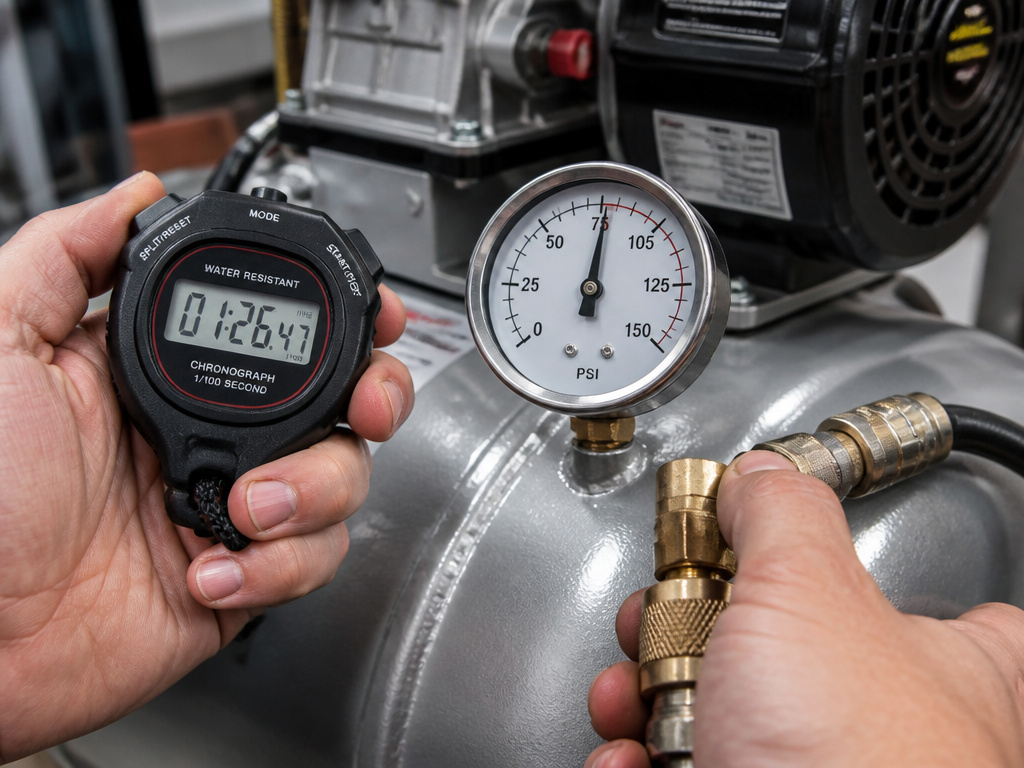 Marketing claims are one thing. Performance in your driveway is another. If you own a compressor and suspect it’s underperforming, or if you’re checking a used machine, a simple tank pump-up test tells the truth.
This method, outlined in practical guides from community sources, measures the true ACFM at current conditions delivered into the tank.
What You Need: Your compressor, an accurate pressure gauge on the tank, and a stopwatch (your phone works).
- Determine Tank Volume in Cubic Feet. Find the gallon rating (e.g., “30 Gallon”). Divide by 7.48. A 30-gallon tank is about 4.0 cubic feet.
- Choose Your Pressure Range. For tools running at 90 PSI, a range from 75 PSI (cut-in) to 105 PSI (cut-out) is practical. Start with the tank drained to at least 10-15 PSI below your low point (e.g., 60 PSI).
- Time the Pressure Rise. Start the stopwatch the moment the gauge hits your low pressure (75 PSI). Stop it the moment it hits your high pressure (105 PSI). Record the time in minutes.
- Calculate True Delivered CFM.
- Pressure Rise (ΔP) = High PSI – Low PSI. (105 – 75 = 30 PSI)
- Atmospheric Pressure Units Added = ΔP / 14.7. (30 / 14.7 ≈ 2.04)
- Cubic Feet Pumped = Tank Volume (cu ft) × Atmospheric Units Added. (4.0 × 2.04 = 8.16 cu ft)
- CFM (ACFM) = Cubic Feet Pumped / Time (minutes).
If it took 0.5 minutes (30 seconds) to pump from 75 to 105 PSI, your compressor’s true output is 8.16 / 0.5 = 16.3 ACFM at those conditions.
Common mistake: Testing from 0 to 125 PSI. Compressors deliver their highest CFM at low tank pressure and their lowest at high pressure. Testing across a narrow band near your operating pressure (e.g., 75-105 PSI) gives you the most relevant number for tool use.
This measured ACFM is your ground truth. You can compare it to the manufacturer’s claimed SCFM by using the conversion formula in reverse, plugging in your test-day temperature and altitude. A significant shortfall points to wear, intake restriction, or… An optimistic nameplate.
Matching Your Compressor to Your Tools (The Right Way)
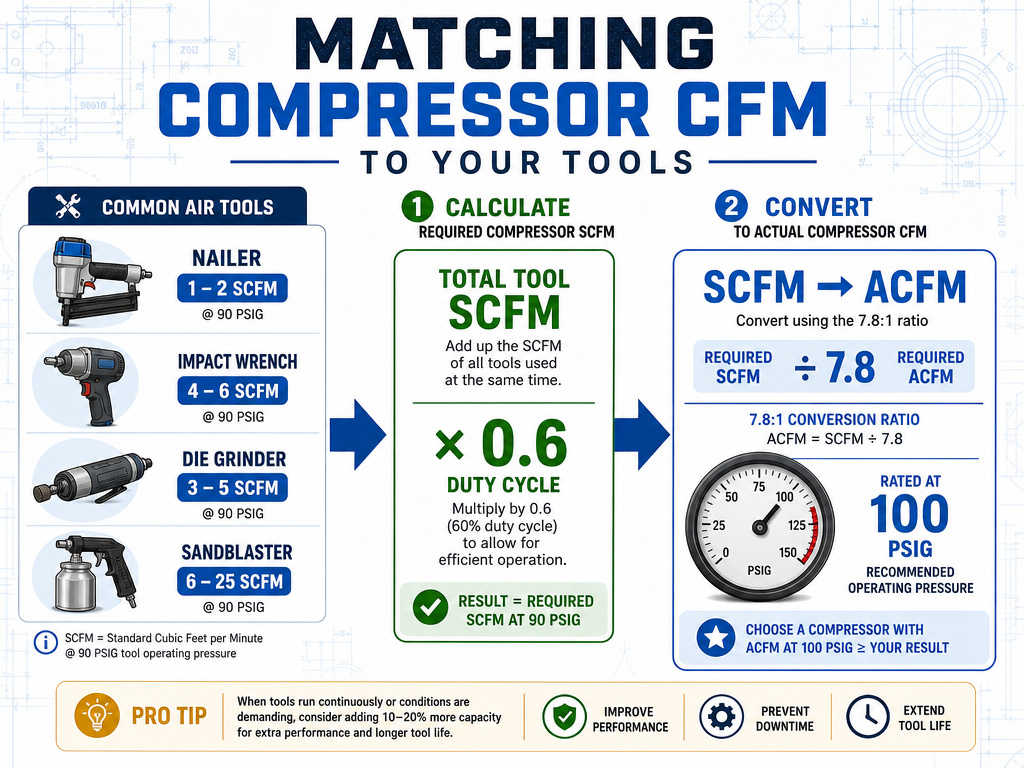 You don’t buy a compressor based on a single number. You buy it to run specific tools without stalling. This is where most DIY guides oversimplify. They say “add up the SCFM of your tools.” That’s step one. Step two is understanding duty cycle and system losses.
First, get the real CFM PSI requirements for each tool. A 1/2″ impact wrench might need 5 SCFM at 90 PSI for continuous use, but only 2.5 SCFM for intermittent work.
| Common Tool | Typical SCFM @ 90 PSI | Critical Note |
|---|---|---|
| Framing Nailer | 2.2 – 2.5 | Low demand, high burst. |
| 1/2″ Impact Wrench | 4 – 5 | The benchmark for garage compressors. |
| Die Grinder | 4 – 6 | Continuous demand. Drains small tanks fast. |
| Sandblaster (small) | 10 – 20 | Requires a dedicated, large air compressor for tools. |
Second, apply a duty cycle factor. You won’t run every tool at once, and most don’t run continuously. A professional shop sizes for 100% simultaneous use. A home garage can often use a 50-70% factor. If your total tool SCFM is 20, a 13-15 SCFM compressor might suffice if you’re careful.
Third, and most critically, convert your total SCFM need to ACFM for system sizing. This is the 7.8:1 ratio.
Your tools need, say, 15 SCFM of mass flow. At your operating pressure of 100 PSIG, that mass of air is compressed into a much smaller volume.
ACFM at Pressure = SCFM / ( (Pressure PSIG + 14.7) / 14.7 )
ACFM = 15 / ( (100 + 14.7) / 14.7 ) ACFM = 15 / (114.7 / 14.7) ACFM = 15 / 7.8 ≈ 1.92 ACFM
This 1.92 ACFM is the actual volumetric flow rate inside your pipes at 100 PSI. Size your hose or pipe diameter for this ACFM number to maintain proper velocity (20-30 ft/sec). Using 15 SCFM here would lead to massively oversized, sluggish piping where water condenses and drops out.
The Hidden Killers: Humidity and System Resistance
Two factors steal CFM before it reaches your tool: water vapor and pressure drop.
Humid air is partly water vapor, which gets condensed out in the compressor’s aftercooler and tank. That water volume represented space that could have been dry air. At extreme humidity (95°F, 80% RH), water vapor can be 3% of the inlet volume. It’s usually a minor loss compared to temperature and pressure, but it directly affects how much drying equipment you need downstream.
System resistance is a bigger thief. Every foot of hose, every elbow, every quick-connect, and a dirty intake filter creates a pressure drop. Your compressor might be delivering 100 PSI at its outlet, but if you have 15 PSI of drop in your lines, your tool only sees 85 PSI, and its CFM demand skyrockets to compensate.
Easy to miss: A clogged air intake filter can create a vacuum of 0.3 PSI or more at the pump inlet. That’s effectively raising your altitude by over 1,000 feet, cutting mass flow before compression even begins. Check it monthly.
This is why properly sizing your air compressor hose and minimizing fittings is not just about convenience; it’s about preserving the CFM you paid for. A larger diameter hose (3/8″ vs. 1/4″) can cut pressure drop in half over a 50-foot run.
How to Increase Your Effective CFM Output
Sometimes, figuring out your CFM reveals a shortfall. Buying a bigger compressor isn’t the only answer. You can often improve what you have.
- Add a Larger Receiver Tank. This is the fastest fix. A tank doesn’t increase your compressor’s pump CFM, but it stores air for high-demand bursts. It lets a smaller compressor “average out” demand. If your 10 SCFM compressor feeds a 60-gallon tank, you can run a 20 SCFM tool for short periods by drawing down the tank.
- Optimize Inlet Conditions. Bring in cooler, drier air. Extend an intake duct to a cooler outside source (with a proper filter). For every 20°F you drop the inlet air, you gain roughly 3-4% in mass flow density.
- Reduce System Pressure Drop. Upgrade to larger, shorter hoses. Use high-flow fittings. Clean your filter. Ensure your air compressor size is matched to your piping. Every PSI of drop you eliminate is free CFM.
- Stage Your Tools. Be mindful of duty cycle. Don’t run the die grinder (continuous high CFM) and the impact wrench (high burst) at the same time if your compressor is at its limit.
- Fix Leaks. A 1/8″ hole at 100 PSI can waste 25+ SCFM. An ultrasonic leak detector is a wise investment. Regular maintenance is a form of methods to increase airflow.
Frequently Asked Questions
What’s the difference between CFM and SCFM?
CFM is a generic term for cubic feet per minute. SCFM vs CFM is the critical distinction: SCFM is CFM corrected to a standard set of temperature and pressure conditions, representing mass flow. CFM alone is unqualified and often refers to ACFM, the actual volume flow at local conditions, which varies.
How much CFM do I need for a home garage?
For a typical home garage running a 1/2″ impact wrench, an air ratchet, and a nailer, a compressor delivering 10-15 SCFM at 90 PSI is a solid target. This covers most intermittent work. If you plan on continuous sanding or grinding, look for 15+ SCFM and a large (60+ gallon) tank to support the demand.
Can I use a tool that requires more CFM than my compressor provides?
Yes, but only intermittently and with a large enough receiver tank. The tool will drain the tank and then stop working as pressure falls below its operating minimum. The compressor will run continuously trying to catch up, overheat, and likely shorten its life. It’s hard on both the tool and the compressor.
Why does my compressor’s CFM drop as tank pressure rises?
This is a fundamental characteristic of piston compressors. As pressure in the tank increases, it becomes harder for the pump to push more air in against that pressure. The pump’s volumetric efficiency drops. That’s why CFM ratings are always given at a specific pressure (e.g., 5.0 CFM at 90 PSI). The CFM will be higher at 40 PSI and lower at 120 PSI.
Does a higher HP motor mean more CFM?
Not directly. Horsepower relates to the work the motor can do, which influences the maximum pressure and flow the pump can generate. However, a pump’s design (cylinder size, stroke, number of stages) is the primary governor of CFM. You can have a high-HP motor driving an inefficient pump and get low CFM. Always compare the rated SCFM, not just horsepower.
Before You Go
Figuring out CFM isn’t about memorizing formulas. It’s about understanding the translation from the perfect world of the spec sheet to the messy reality of your shop. The nameplate SCFM is a starting point, not a guarantee. Your local altitude and temperature will de-rate it. Your hose and fittings will steal from it.
The single most actionable step is the tank pump-up test. It costs you nothing but twenty minutes and tells you exactly what you’re working with. Match that truth to your tools’ real demands, not their peak marketing numbers. Size your pipes for the compressed ACFM, not the standard SCFM. And if you’re short, look at a bigger tank or cooler intake air before you automatically buy a bigger compressor.
That’s how you move from wondering if you have enough air to knowing you do.
