
How to Adjust an Air Compressor Pressure Switch Correctly
This post contains affiliate links. As an Amazon Associate, we earn from qualifying purchases.
Adjusting an air compressor pressure switch requires setting two specific pressures: the cut-in (when it starts) and the cut-out (when it stops). The critical, non-negotiable rule is maintaining a minimum pressure differential, often 7 psi or more, between them. A differential below the manufacturer’s specified minimum causes contact chattering, rapid cycling, and motor failure within weeks.
That differential is the whole game. It’s not a suggestion. On a common Condor MDR-11 switch, the manual states a differential below 7 psi guarantees chattering. The contacts will bounce as pressure nears the cut-out point, turning the compressor on and off faster than the motor can cool.
What follows is the map: the two pressures you control, the tools you need, and the model-specific procedures that keep you out of the repair shop. We’ll walk through the Furnas 69H, the MDR4, and the one adjustment you do with the tank pressurized.
Key Takeaways
- The cut-in pressure is when the compressor starts; the cut-out pressure is when it stops. The difference between them is the differential.
- Never set the differential below the manufacturer’s minimum (e.g., 7 psi for a Condor MDR-11). A low differential causes contact chattering and destroys the motor.
- Always disconnect and lock out main power before exposing the switch’s electrical contacts. High voltage is present when the unit is plugged in.
- Adjustment procedures vary by switch type. For a Furnas 69H, you adjust cut-in with the large screw and cut-out with the small screw. For an MDR4, you adjust under pressure.
- A worn pressure switch diaphragm is a common failure point. If adjustments don’t hold or the unit cycles erratically, inspect the diaphragm per the 12-month/2000-hour service interval.
The Two Pressures You’re Actually Setting
Forget “high” and “low” for a second. Every adjustment targets one of two operational points defined by the switch’s internal diaphragm and spring assembly.
The cut-in pressure is the lower threshold. When system pressure drops to this point, the diaphragm moves, the electrical contacts close, and the compressor motor starts. The cut-out pressure is the upper limit. When rising pressure reaches this point, the diaphragm moves the opposite way, the contacts open, and the motor stops.
The pressure differential is the gap between cut-in and cut-out. This gap provides a cooling buffer for the motor and prevents the rapid, destructive cycling called contact chattering.
The differential is either fixed by the switch design or adjustable via a dedicated screw. On switches without a differential adjustment, turning the main range screw shifts both cut-in and cut-out pressures together, keeping the span constant. On adjustable models, you set each point independently.
Why does the differential matter physically? The motor’s starter and windings generate heat each time they engage. A 30-second run lets that heat dissipate into the casing. A 3-second cycle does not. The heat builds locally at the contacts and windings, insulation breaks down, and the motor fails. It’s a predictable thermal overload, not bad luck.
Before You Start: The Non-Negotiables
This isn’t a casual tweak. You’re working on a pressurized vessel connected to line voltage. Skip one of these steps and the best outcome is a broken compressor. The worst doesn’t bear thinking about.
Before you start: Disconnect, lock out, and tag the main power supply. High voltage is present at the pressure switch terminals when the unit is plugged in. Then, run the compressor’s drain valve or use an air/water syringe to bleed all pressure from the tank and lines.
Your tool list is short but specific. Have these ready: * Pressure Gauge: The one on your tank is okay, but a trusted standalone gauge connected near the switch is better for accuracy. * Screwdrivers: Typically flat-head and Phillips for removing covers and terminal blocks. * Wrenches: An adjustable crescent wrench for cover nuts and adjustment nuts. * 7/64″ Allen Key: Specifically required for Robertshaw adjustable air pressure switches (P/N 352-00350-001). * Notebook: To write down your original settings before you turn anything.
One procedural debate splits the manuals: should you adjust with the tank pressurized or depressurized? The consensus for most switches is to adjust with the system depressurized for safety. However, the instruction book for MDR4 switches explicitly states to adjust the air pressure switch while it is pressurized. When in doubt, follow your specific switch’s OEM manual.
Decoding Your Switch Type
Not all switches adjust the same way. Using the 69H procedure on an MDR4 will leave you frustrated. The first step is identifying what you have. Look for a model number stamped on the switch body or consult your compressor’s manual.
| Switch Model | Cut-In Control | Cut-Out Control | Key Spec / Warning |
|---|---|---|---|
| Furnas 69H (General SWP60113) | Large metallic screw (A) | Small metallic screw (B) | Minimum differential: 7 psi. |
| Furnas 69W (General SWP60401U OLD) | Center metallic screw (B) | Black plastic screw (A) | Minimum differential: 13 psi. |
| Condor MDR-11 (General SWP60401U NEW) | Range adjustment | Differential adjustment | Differential must be 7 psi or more to prevent chattering. |
| MDR4 (Common on CR-series) | Screw (2) for stopping pressure | Screw (5) for pressure difference | Adjust with system pressurized. Max pressure via screw (4). |
| Robertshaw (P/N 352-00350-001) | 7/64″ Allen key in viewing window | Single set-point adjustment | Hard stops indicate mechanical limits. Exceeding them damages the switch. |
If your switch has an on/off lever on the side, note this critical warning from the Ingersoll-Rand manual: THIS LEVER IS NOT A DIFFERENTIAL ADJUSTMENT CONTROL. It’s only for manually opening the contacts.
Step-by-Step: Adjusting a Furnas 69H or 69W Switch
 This procedure is the blueprint for many common adjustable switches. It uses the bleed-and-check method, which is safe and accurate.
- Depressurize and Energize: Ensure the tank is at 0 PSI. Reconnect power. The compressor should start immediately because pressure is below cut-in. Let it run until it shuts off automatically. Note the gauge reading, this is your current cut-out pressure.
- Bleed to Find Cut-In: Slowly open the tank drain valve to bleed air. Watch the gauge. The moment the compressor kicks back on, note the pressure. This is your current cut-in pressure.
- Adjust Cut-In (Large Screw on 69H): Turn the power off. To change where the compressor starts, adjust the large metallic screw (A). Clockwise increases the cut-in pressure. Make small turns, a quarter-turn at a time. Restore power and repeat steps 1 and 2 to check the new cut-in point. The cut-out will also shift slightly; that’s expected.
- Adjust Cut-Out (Small Screw on 69H): Once cut-in is set, adjust the small metallic screw (B) to set the cut-out. Clockwise raises the shut-off pressure. Again, use small increments and re-test the full cycle.
- Verify the Differential: After each adjustment, calculate the differential (Cut-Out minus Cut-In). For a 69H, it must be 7 psi or more. For a 69W, it must be 13 psi or more.
Where this goes sideways: Rushing the bleed step. If you bleed air too fast, the gauge won’t reflect the true system pressure at the switch diaphragm, and you’ll set the cut-in point 5-10 psi too low. Bleed slowly, watching for the exact moment the contacts click.
The Special Case: Adjusting an MDR4 Pressure Switch
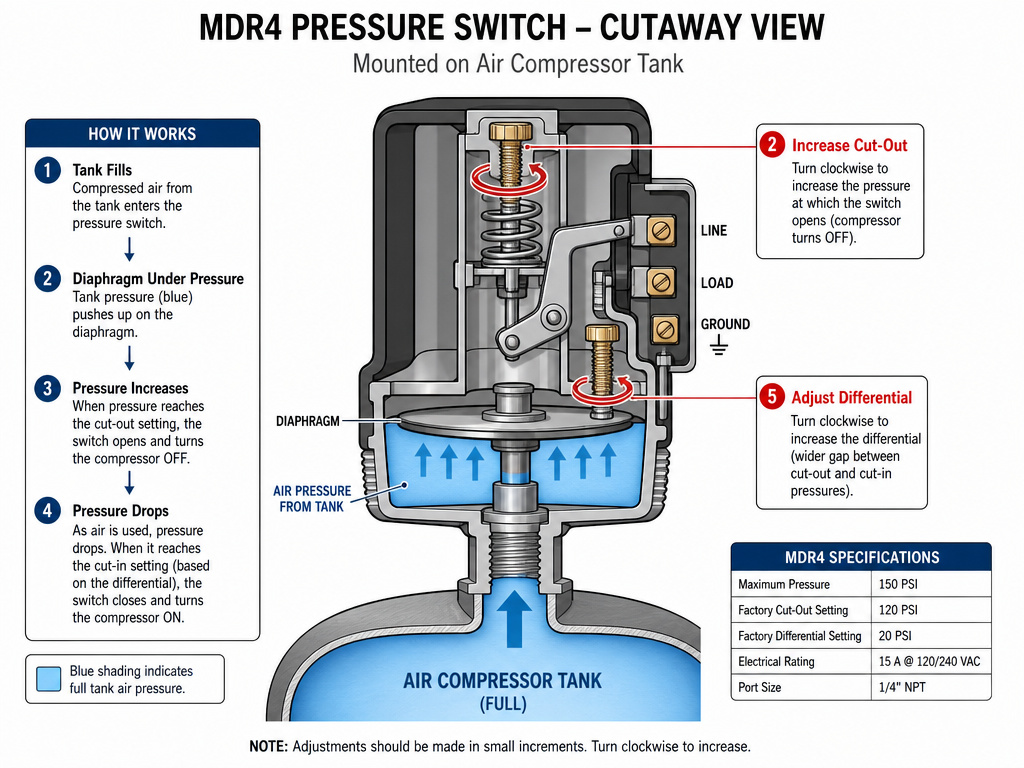 The MDR4, found on many industrial-grade units, flips the script. You adjust it with air in the tank.
- Close the air outlet valve and disconnect any downstream hose. Start the compressor and let it run until it stops automatically. The tank is now pressurized at the current cut-out.
- Switch off the power. Remove the pressure switch cover.
- With the receiver under pressure, locate the adjusting screws. Turn screw (2) clockwise to increase the stopping pressure (cut-out). Turn screw (5) to adjust the pressure difference (differential).
- Replace the cover, restore power, and restart the compressor. Close the outlet valve and monitor the gauge to verify it reaches the new shut-off pressure without the relief valve opening.
This method works because the switch diaphragm needs pressure against it to calibrate the spring tension accurately. It feels wrong, but it’s the OEM directive.
When Adjustment Isn’t the Answer
You can turn screws all day, but some problems require a wrench, not an adjustment. If you encounter these signs, stop adjusting and start diagnosing.
- The differential won’t hold. You set a 20 psi gap, but after a few cycles it’s down to 5 psi. This points to a worn or ruptured diaphragm inside the switch. The diaphragm flexes with each cycle; when it fatigues, it loses its spring constant and the pressures drift.
- The compressor short cycles even with a correct differential. This often indicates a significant air leak downstream of the switch or a failing check valve at the tank, allowing pressure to bleed back into the pump.
- The adjustment screws are at their mechanical hard stops. The Robertshaw guide warns that exceeding these limits damages the switch internally. If you need a setting beyond the stop, you need a different switch model.
In these cases, your next steps are inspecting the air compressor not building pressure guide for leak tests, or learning how to wire a pressure switch for a replacement. General air compressor repair principles apply.
The One Tool You Didn’t Know You Needed
For switches like the Robertshaw 352-00350-001, the adjustment tool is non-negotiable: a 7/64” Allen key. Using a metric key or a ball-head hex driver will strip the soft set screw.
The procedure is precise: 1. Insert the Allen key into the viewing window. 2. Turn clockwise to increase the set point, counter-clockwise to decrease. 3. For the highest accuracy, the manual advises turning clockwise past your target, then counter-clockwise back to it. This removes backlash from the gear train. 4. The scale in the window is only valid for standard vertical installation. If you mount the switch horizontally, you must consult the offset table in the manual, the reading will be wrong.
This attention to detail separates a working adjustment from a calibrated one. It’s the difference between your compressor stopping at “about 120 psi” and stopping at 120 psi.
Frequently Asked Questions
What happens if the pressure differential is too low?
If the differential is below the switch’s minimum (like 7 psi on an MDR-11), the contacts will “chatter” as pressure nears the cut-out point. This causes rapid, incomplete cycling that overheats the motor contacts and windings. The motor can be destroyed in a short period, sometimes within a few days of continuous use.
Can I adjust the pressure switch while the compressor is running?
No. You should never attempt to adjust the internal screws while the unit is powered and running. You must shut off and lock out the power, and for most procedures, also depressurize the system. The exception is specific steps for switches like the MDR4, where you adjust the stopping pressure screw with the tank pressurized but the power off.
How do I know if my pressure switch is bad and needs replacement, not adjustment?
Signs of a failed switch include: the compressor won’t shut off at any pressure, it fails to start at all (clicking but no motor), or the cut-in and cut-out pressures drift uncontrollably after being set. Physical signs are a ruptured diaphragm (often visible by removing the cover) or burnt, pitted electrical contacts.
What is a typical cut-out pressure setting for a home garage compressor?
Most single-stage, 120-gallon garage compressors have a factory cut-out pressure setting between 125 and 150 PSI. The cut-in is typically 30-40 psi below that. Always check your compressor’s nameplate or manual for the specified maximum operating pressure and never adjust the switch to exceed it.
Does adjusting the pressure switch affect my compressor’s CFM?
No. Adjusting the pressure switch only changes the pressure range at which the compressor starts and stops. It does not alter the pump’s physical displacement or motor speed, which are the determinants of SCFM vs CFM output. To truly increase CFM, you need mechanical changes like a larger pump or a higher-speed motor.
The Bottom Line
Adjusting a pressure switch is about discipline, not force. Find your model’s manual. Respect the minimum differential, that 7 psi rule is there because they’ve seen the motors that didn’t follow it. Use the right tool, whether it’s a crescent wrench or a 7/64″ Allen key.
The goal isn’t just to change a number on a gauge. It’s to create a reliable, repeatable cycle that lets the motor live its full life. Set the cut-in where your tools need it, set the cut-out well below your tank’s rating, and keep that differential wide. Your compressor will thank you with years of steady service, whether it’s a single-stage compressor for nail guns or a two-stage unit for sandblasting. And always use the correct compressor oil, the right lubrication keeps the pump healthy so the pressure switch has something to control.
