
How to Increase CFM on an Air Compressor | The Real Levers
This post contains affiliate links. As an Amazon Associate, we earn from qualifying purchases.
To increase CFM on an air compressor, you cannot exceed its manufacturer-rated SCFM. The real goal is to get more usable air from your system. This is done by lowering operating pressure to reduce demand, eliminating leaks and restrictions that waste air, adding storage capacity to handle peak loads, or physically upgrading to a larger compressor or a second unit.
The rated CFM is a ceiling. Your compressor’s motor and pump are built to move a specific volume of air at a specific pressure. Trying to force more air through it will burn out the motor or overheat the pump.
What follows is a breakdown of the four real levers you can pull. We’ll cover why lowering pressure is your first move, how a $100 air leak can cost you thousands, the math behind adding a tank, and when the only answer is a bigger machine.
Key Takeaways
- You cannot magically increase your compressor’s CFM rating. The pump and motor have a fixed capacity.
- Lowering your system’s operating pressure is the fastest way to free up usable CFM, as tools consume less air at lower PSI.
- A single 1/8-inch air leak can waste over 25 CFM, directly stealing air from your tools.
- Adding a larger or secondary air tank lets a smaller compressor handle short, high-demand bursts by drawing from stored air.
- For a permanent, high-CFM solution, you must upgrade to a larger compressor, a two-stage unit, or a rotary screw model.
The Short Answer: You Can’t, But You Can Do This
The pump on your compressor is a fixed-displacement device. Its CFM rating is the maximum volume of air it can physically ingest and compress in one minute under standard conditions. A 20-gallon pancake compressor with a 4.0 SCFM rating will never produce 10 SCFM. The electric motor driving it isn’t sized for that load, and the pump’s cylinder bore and stroke are literal physical limits.
The Compressed Air & Gas Institute (CAGI) defines the “Standard Air” used for SCFM ratings as air at 68°F, 14.5 psia pressure, and 0% relative humidity. This creates a consistent baseline to compare compressors, but your shop air is never at these perfect conditions.
Your real mission isn’t to change the rating. It’s to deliver more of that rated air to your tools when they need it. The gap between the CFM your compressor can make and the CFM your tools actually receive is where you win or lose. That gap is filled with leaks, pressure drops, and inefficient control.
Start by knowing your actual demand. Use our guide to calculate CFM needs for your specific tools. Then, understand the difference between SCFM and CFM to read compressor specs correctly.
Lever 1: Lower System Pressure to Free Up CFM
This is the most counterintuitive but effective move. Lowering your system pressure increases the effective CFM available to your tools.
Air tools consume air based on pressure. A die grinder might use 20 CFM at 90 PSI but 25 CFM at 120 PSI. The higher pressure pushes more air molecules through the tool per minute. By reducing the system pressure to the minimum your slowest tool needs, you reduce the CFM demand of every tool on the line. This instantly makes your existing compressor capacity cover more work.
How Pressure and CFM Are Linked
The relationship depends on your compressor type. For a standard fixed-speed piston compressor, the CFM output is constant. Changing the pressure switch only changes when the motor cycles on and off. For a Variable Speed Drive (VSD) compressor, the relationship is direct and inverse: increase pressure, CFM drops; decrease pressure, CFM rises.
| Compressor Type | Pressure Change Effect | Best For |
|---|---|---|
| Fixed-Speed Piston | No change to CFM output. Alters motor run/stop cycle. | Steady, predictable air demand. |
| Variable Speed Drive (VSD) | Lower PSI = Higher CFM. Higher PSI = Lower CFM. | Shops with highly variable air usage. |
| Rotary Screw | Similar to VSD; control system modulates output to match pressure setpoint. | Continuous, high-demand industrial applications. |
Common mistake: Cranking up the pressure to “get more power.” You’re just making your tools and leaks consume air faster. The work done doesn’t increase proportionally, but your energy bill does.
Find the lowest workable pressure. Start by identifying the tool in your shop with the highest pressure requirement, often a sandblaster or a heavy-duty impact wrench. Set your compressor’s cut-out pressure 10-15 PSI above that tool’s requirement. This gives you a safety margin. For precise pressure settings, adjust the pressure switch gradually while testing your tools.
Lever 2: Eliminate Waste – Leaks and Restrictions
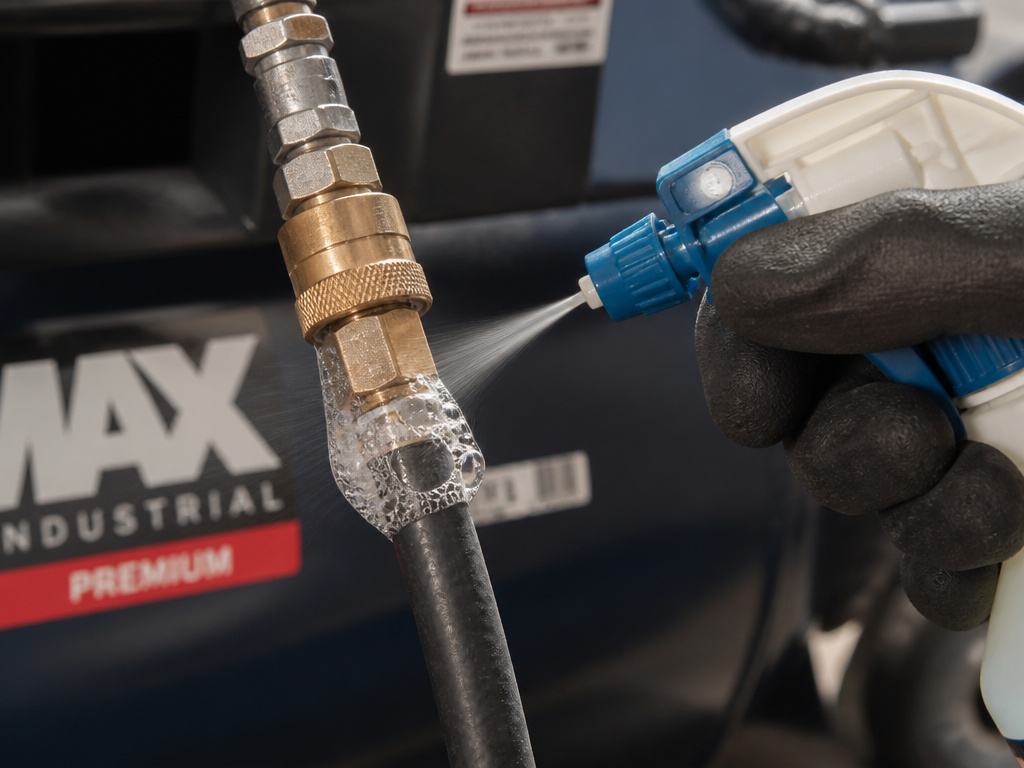 Your compressed air system is likely hemorrhaging air. The Department of Energy’s industrial compressed air guide notes that leaks typically account for 20-30% of a system’s output. A 1/8-inch hole at 100 PSI can waste over 25 CFM, that’s an entire small compressor’s output gone before you even pick up a tool.
Find and Fix Leaks
Leak detection is non-negotiable. Listen for hissing during quiet periods. Use a soapy water spray on fittings, hoses, quick-connects, drains, and tool couplings. Bubbles mean money leaving the line. Replace cracked hoses and worn O-rings immediately. Pay special attention to the condensate drain on your tank; automatic drains fail open.
Reduce Pressure Drop
Pressure drop is a silent thief. It’s the loss of pressure between the compressor discharge and the tool inlet, caused by friction and restrictions. If your tool needs 90 PSI to run but a clogged filter and undersized hose drop the pressure to 70 PSI by the time air arrives, your compressor has to run at 110 PSI to compensate. That higher pressure, as we know, increases CFM demand.
| Restriction Source | Typical Pressure Drop | Fix |
|---|---|---|
| Undersized Hose (25′ of 1/4″ hose at 20 CFM) | 15-20 PSI | Upgrade to 3/8″ or 1/2″ inner diameter hose. |
| Clogged Inline Filter | 5-30+ PSI | Replace filter element regularly. |
| Tight Elbows & Tees | 2-5 PSI per fitting | Use sweep elbows instead of sharp 90-degree bends. |
| Old, Pinched Quick-Connect Couplers | 3-10 PSI | Replace with high-flow, automotive-style couplers. |
A system with minimal pressure drop lets you run at a lower overall pressure. That directly translates to lower CFM demand and more available air from the same compressor. It’s the cheapest CFM “increase” you can buy.
Lever 3: Add More Air Storage
 If your problem is short, high-CFM bursts that overwhelm your compressor, like running a sandblaster for 30 seconds, a larger air tank is the answer. The tank acts as a battery, storing air during low-demand periods to be released during peak demand.
Think of it this way: a 5 CFM compressor can’t power a tool that needs 15 CFM. But if that tool only runs for 30 seconds, a large enough tank can supply the 15 CFM burst while the compressor slowly refills the tank over the next several minutes.
Sizing an Auxiliary Tank
The calculation is about volume and time. You need to know your tool’s CFM demand, your compressor’s CFM output, and how long you need to run the tool.
Example: You want to run a 20 CFM tool. Your compressor outputs 8 CFM. * The deficit is 12 CFM (20 – 8 = 12). * If you need a 2-minute (120-second) run time, you need the tank to supply 12 CFM for 120 seconds. * Storage needed = Deficit CFM x Time (in minutes) * Storage = 12 CFM x 2 minutes = 24 cubic feet of air.
Since standard tank sizes are in gallons, convert: 1 cubic foot = 7.48 gallons. 24 cubic feet x 7.48 ≈ 180 gallons. You’d need a 180-gallon auxiliary tank to meet this 2-minute burst.
Where this goes sideways: Connecting an auxiliary tank with undersized piping. The pipe between the tanks must be at least as large as the compressor’s discharge port, or you create a massive restriction that defeats the purpose.
Adding a tank doesn’t increase your compressor’s CFM rating. It increases your system’s duty cycle, allowing a smaller, continuous compressor to handle intermittent, high-demand tools. It’s a bridge between your current compressor and your needs, often saving you from a premature upgrade. For help determining compressor needs for your specific tools, our sizing guide walks through the math.
Lever 4: Upgrade Your Hardware
When the first three levers are maxed out, the only path forward is more compressor. This means a larger unit, a second compressor, or a different technology.
Bigger Single Compressor
Moving from a 5 HP to a 10 HP unit will roughly double your available SCFM. This is a straightforward capacity increase. When considering this, look at the duty cycle. A 100% duty cycle compressor (like most rotary screw models) can run continuously, while a typical homeowner piston compressor might have a 50% duty cycle, meaning it needs to cool down half the time.
Two-Stage Compressor
A two-stage air compressor is inherently more efficient for high CFM output. It compresses air to an intermediate pressure, cools it, then compresses it again to the final pressure. This cooler process allows a smaller motor to deliver more CFM than a single-stage unit of the same horsepower. They are the default for serious shop air.
Rotary Screw Compressor
For the highest, most consistent CFM output, a rotary screw compressor is the industrial standard. These are constant-duty machines ideal for auto shops or manufacturing. They deliver a smooth, pulse-free air supply and are much quieter than piston compressors. The upfront cost is higher, but the reliability and output are unmatched for continuous use.
Adding a Second Compressor
This is a strategic move for shops with two distinct demand patterns. You can run a small, efficient compressor for everyday tasks (air blow guns, nailers) and have a larger unit kick on only when running high-CFM tools. This is often more efficient than running one oversized compressor all day. Properly sequencing them requires a master control system to prevent both from starting simultaneously and overloading your electrical circuit.
TL;DR: For most home shops, fixing leaks and adding a large auxiliary tank solves 80% of “low CFM” problems. For professional daily use, stepping up to a two-stage piston or a rotary screw compressor is the long-term answer.
Frequently Asked Questions
Can I increase CFM by increasing HP on my compressor?
No, not directly or safely. The pump, crankshaft, valves, and cooling system are engineered for a specific HP motor. Swapping in a larger motor will likely overstress these components, leading to rapid failure. It also violates safety certifications and voids any warranty.
Does a smaller pulley on the pump increase CFM?
Technically, yes, it makes the pump cycle faster, moving more air. Practically, it’s a terrible idea. It increases piston speed, leading to excessive heat, accelerated wear, and almost certain mechanical failure. You’ll burn out the pump long before you enjoy any extra air.
My compressor’s CFM is lower than advertised. Why?
The advertised CFM is usually the pump displacement (a theoretical maximum), not the actual delivered SCFM. Real SCFM is always lower due to pump inefficiency. Furthermore, if your inlet air is hot or you’re at high altitude, the actual mass of air being compressed is less. Always compare SCFM ratings, not CFM, and understand the SCFM rating explained.
Do aftermarket air compressor “boosters” or “supercharger” kits work?
No. These are universally scams. They often consist of a resistor to trick the pressure switch, causing the compressor to run longer at higher pressure. This does not increase CFM; it only increases strain, heat, and the risk of catastrophic failure. There is no magic box that changes the laws of physics governing your pump.
Is it better to get a compressor with a higher max PSI for more CFM?
Only indirectly. A compressor with a higher max PSI rating often has a heavier-duty pump and motor, which may also be capable of higher CFM. However, the CFM at your operating pressure (e.g., 90 PSI) is the only number that matters. Check the manufacturer’s performance chart. A high max PSI with low CFM at your working pressure is useless.
Before You Go
Chasing more CFM is really about system efficiency. Start with a leak audit, it’s free and often reveals the biggest gains. Then, see if you can lower your operating pressure by 10 PSI. Those two steps will make your existing air feel more powerful.
If bursts are the issue, price out a large auxiliary tank before shopping for a new compressor. It’s frequently the cheaper solution.
When you do upgrade, let your actual SCFM needs guide you, not horsepower or tank size. Match the new compressor’s output to your peak demand with a small margin. And for constant, heavy use, skip the single-stage piston compressor. The jump to a two-stage or rotary screw unit is worth every penny in reliability and air quality. For a curated list of high-output models, see our picks for the best compressor for air tools.
