
How to Drill Out a Stripped Bolt Without Damaging the Threads
This post contains affiliate links. As an Amazon Associate, we earn from qualifying purchases.
To drill out a stripped bolt, you need a left-hand drill bit and a screw extractor. Center-punch the bolt, drill a pilot hole with the left-hand bit, its reverse rotation can loosen the bolt as you drill, then tap in the extractor and turn it counter-clockwise to remove the bolt. The critical measurement is depth: for aluminum housings like an oil pan, official repair guides specify boring only 3-4mm deep to avoid punching through.
That depth limit isn’t a suggestion. It’s the line between a clean repair and a punctured oil pan. Get it wrong, and you’re replacing the entire housing.
What follows is the full breakdown: the three tools that actually work, the one material where heat is forbidden, and the factory service bulletins that change how you approach a common job like a drain plug. By the end, you’ll know when to drill, when to use a chemical thread repair, and the single mistake that turns a 20-minute fix into a weekend project.
Key Takeaways
- Use a left-hand drill bit. Its counter-clockwise rotation can bite into and unscrew the bolt as you drill, often removing it before you even need an extractor.
- Never apply heat to a bolt threaded into aluminum. The aluminum expands faster than the steel, galling the threads and often welding the fastener in place.
- For thread repairs in aluminum oil pans, the NHTSA’s technical service bulletin mandates a maximum boring depth of 3-4mm. Drilling deeper risks punching through the thin casting.
- Official procedures for vehicles like certain BMW M models require replacing specific sub-frame bolts after any loosening, they are one-time-use torque-to-yield fasteners.
- If the surrounding threads are damaged, a permanent fix like a threaded insert or a product like Loctite FORM-A-THREAD is better than forcing a larger bolt.
The Real Goal: Remove, Don’t Destroy
Drilling is a last resort. Your aim is to remove the fastener without destroying the threads in the part it’s screwed into, the housing, block, or bracket. A successful extraction leaves the original hole intact and ready for a new bolt or a repair insert.
A failed extraction often means drilling the hole oversize, tapping new threads, and using a larger bolt or insert. That’s more work, requires more tools, and isn’t always possible due to space or part design.
Common mistake: Hammering a standard Torx or Allen bit into a stripped head. This rarely works on hardened bolts, deforms the bit, and mushrooms the bolt head, making any future gripping attempt impossible.
The moment you see the tool starting to spin without biting, stop. Forcing it will only round the head further. That’s when you shift to the drill-out procedure.
The 3 Tools You Actually Need (And One to Avoid)
You can’t improvise this. Using the wrong bit or a dull drill guarantees a bigger problem. These three tools form the core of a reliable extraction kit.
A Left-Hand Drill Bit Set
This is your first and most important tool. A left-hand drill bit is cut to rotate counter-clockwise (reverse). As you drill into the center of the stripped bolt, the cutting action applies unscrewing force. It’s not uncommon for the bolt to simply spin out on its own before you finish the pilot hole. Start with a small diameter, like 1/8 inch, and step up as needed. The left-hand drill bit is the single biggest upgrade over a standard bit for this job.
A Quality Screw Extractor Set
Also called “easy-outs” or speed-out bits. These are hardened steel bits with a reverse-threaded, tapered design. You drill a pilot hole, tap the extractor in, and turn it counter-clockwise. The extractor bites into the walls of your pilot hole and applies rotational force to remove the bolt. Avoid cheap, brittle extractors. A good set from a brand like Irwin or Hanson will have multiple sizes. The speed-out bit is simple, but it requires a correctly sized pilot hole.
A Center Punch and Hammer
You must start your drill bit exactly in the center of the bolt. A center punch creates a small divot that prevents the drill bit from “walking” across the hard, rounded surface of the bolt head. Hit it firmly once. If you’re off-center, the drill will drift into the softer surrounding material and ruin the threads.
The Tool to Avoid: Heat on Aluminum
A propane torch is a common trick for loosening rusted or seized fasteners in steel. Do not use it if the bolt is threaded into an aluminum part. Aluminum expands nearly twice as fast as steel when heated. Applying heat to the bolt head can cause the surrounding aluminum to expand and grip the bolt tighter, galling the threads. In some cases, it can effectively weld the two metals together.
| Tool | Its Job | Risk If Skipped/Misused |
|---|---|---|
| Center Punch | Creates a fixed starting point for the drill bit. | The drill bit walks, damages the parent thread, and makes centered drilling impossible. |
| Left-Hand Drill Bit | Drills a pilot hole while applying reverse torque. | Using a standard bit adds no loosening force and can work-harden the bolt, making it tougher. |
| Screw Extractor | Bites into the pilot hole to apply removal torque. | A cheap extractor snaps off inside the bolt, creating a hardened steel obstruction that is nearly impossible to drill. |
The 7-Step Process for Drilling Out a Bolt
This sequence works for standard bolts in steel brackets, engine blocks, or suspension components. The principles are the same for a broken bolt or a stripped screw; only the starting point differs.
Step 1: Secure the Work and Apply Penetrant
Lock the part in a vise or stabilize it so it cannot move. If there’s any sign of rust or corrosion, soak the area with a penetrating oil like PB Blaster or Kroil. Let it sit for at least 15 minutes, overnight is better. This lubricates the threads and can slightly reduce the extraction force needed.
Step 2: Center-Punch the Bolt Head
Find the exact center of the bolt. Use a center punch and a firm hammer strike to make a clear indent. This dimple is your guide. If the bolt head is broken off flush, you must be extra precise; take your time to find the center of the remaining bolt shank.
Step 3: Drill a Pilot Hole with a Left-Hand Bit
Start with a small left-hand drill bit (often 1/8″ or 3mm). Set your drill to reverse (counter-clockwise) rotation and low speed. Use firm, steady pressure and let the bit cut. The goal is a clean, straight hole down the center of the bolt, about halfway through its depth. The left-hand rotation might loosen the bolt right now. If it starts to turn, stop drilling and try to back it out with pliers.
Step 4: Upsize the Pilot Hole
Switch to a larger left-hand bit. The diameter should be close to, but not exceeding, the inner diameter of the bolt’s threads. You want thick walls for the extractor to bite into, but you must avoid touching the parent material’s threads. Drill to the same depth. Keep the drill straight.
Step 5: Tap in the Screw Extractor
Select an extractor that matches your final pilot hole size. Tap it into the hole with a hammer until it’s firmly seated. Do not hammer it so hard that you expand the bolt and jam it tighter in the hole. The extractor should feel hand-tight.
Step 6: Turn the Extractor Counter-Clockwise
Use a tap wrench or a adjustable spanner on the extractor’s square shank. Apply steady, firm pressure in the counter-clockwise (loosening) direction. The extractor should bite and begin to turn the bolt. If it feels stuck, do not force it to the point of breaking. Apply more penetrant, tap the extractor gently again, or try applying inward pressure while turning.
Step 7: Remove the Bolt and Clean the Threads
Once the bolt is out, inspect the threads in the housing. Clean them with a thread chaser, not a tap, which cuts new metal. A wire brush and solvent will remove debris. This is critical before installing any new fastener or repair insert.
This 20-minute procedure, outlined in an NHTSA technical service bulletin for oil pan repair, assumes you have the right tools and a centered start. The most common point of failure is step 2, an off-center punch.
When Drilling Out is the Wrong Move
 Drilling is destructive by nature. Some scenarios call for a different approach first, or mandate a specific repair that drilling would compromise.
The Bolt is in a Thin Aluminum Housing
This is the classic oil drain plug scenario. The wall of an aluminum oil pan is often only 5-6mm thick. Drilling out a stripped plug here is a surgical operation. The official BMW repair procedure for this exact issue, documented in an NHTSA bulletin, specifies using a specialized boring tool to a depth of 3-4mm. Drilling deeper will puncture the pan. In these cases, a dedicated thread repair kit designed for aluminum is the only safe choice.
The Threads in the Housing are Already Damaged
If the reason the bolt stripped is because the female threads in the housing are corroded or crossed, drilling out the bolt solves nothing. You’ll just have a clear hole with bad threads. Here, you need a thread repair. For small holes, a product like Loctite FORM-A-THREAD can rebuild the thread surface. For larger, load-bearing holes, a solid threaded insert (like a Time-Sert) is the professional permanent fix.
The Fastener is a “One-Time-Use” Bolt
Modern vehicles use torque-to-yield bolts in critical areas like cylinder heads and sub-frames. These bolts are designed to stretch when properly torqued and must not be reused. A 2016 NHTSA vehicle recall bulletin for BMW M cars was issued because repair instructions failed to specify replacing the rear sub-frame bolts after removal. Reusing them could allow them to loosen over time, affecting vehicle handling. If you’re working on a modern car, consult service information, you may be required to replace, not extract, the bolt.
| Scenario | Better Approach Than Drilling | Reason |
|---|---|---|
| Stripped head, but bolt is loose | Vise-Grips or locking pliers. | The threads aren’t seized; you just need grip on the shank. |
| Small screw in soft material | Manual screw extraction with a rubber band or specialty bit. | Drilling risks destroying the base material (like plastic or thin sheet metal). |
| Threads in housing are stripped | Thread repair insert or FORM-A-THREAD. | Drilling removes the bolt but leaves the root problem unaddressed. |
Why Left-Hand Bits and Extractors Work (The Mechanics)
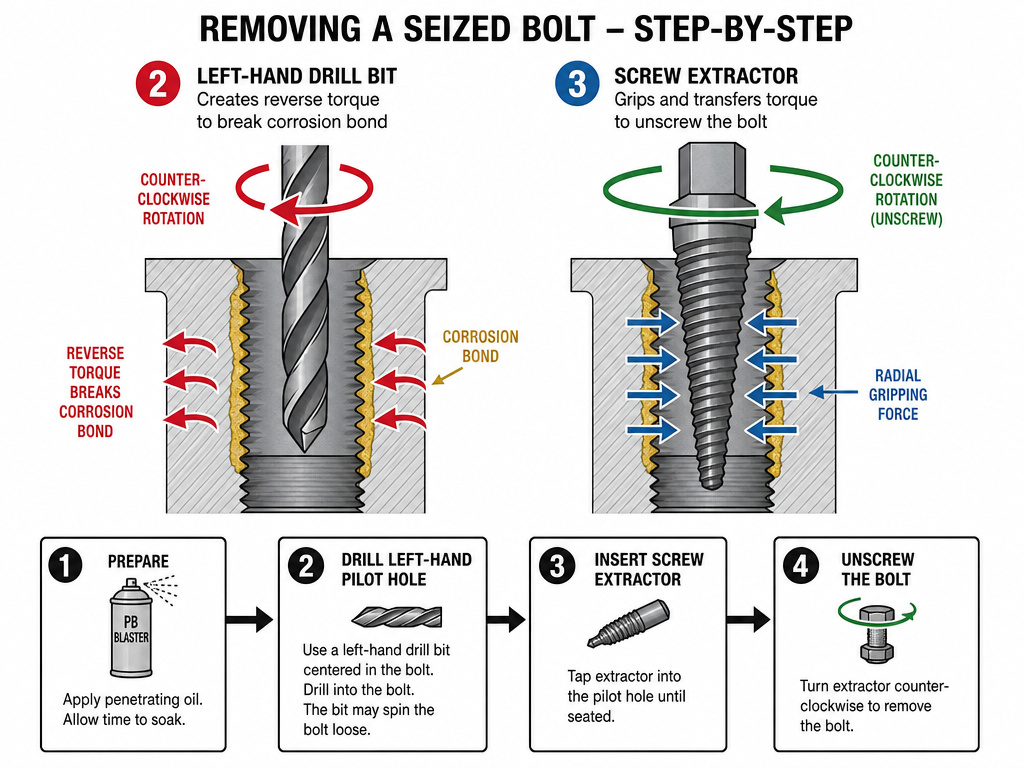 Understanding the “why” prevents mistakes. These tools aren’t magic; they use simple mechanics.
A left-hand bit works because its cutting flutes are ground to remove material only when rotating counter-clockwise. As it cuts into the center of the seized bolt, it applies constant reverse torque. This torque fights the corrosion or adhesion holding the bolt threads. If the breaking force is lower than the bolt’s tensile strength, the bolt will back out before the bit drills through it.
A screw extractor works on the wedge principle. Its tapered, reverse-fluted design means that as you turn it counter-clockwise, it tries to screw itself deeper into the pilot hole. This expansion creates enormous radial pressure against the walls of the pilot hole, gripping it tightly. The harder you turn the extractor, the tighter it grips, transferring all the rotational force to the bolt.
The failure mode is instructive. If you turn an extractor too hard in a brittle bolt, or with a pilot hole that’s too small, the bolt’s material can fail before the corrosion bond breaks. The extractor will either spin freely in a now-enlarged hole, or the bolt will shear off. That’s why pilot hole size is critical, it’s a balance between enough wall thickness for grip and not over-weakening the bolt.
Where this goes sideways: Using an extractor on a bolt that’s bottomed out or threaded into a blind hole. The extractor needs space to expand downward. If the bolt is solid at the bottom, the extractor can’t wedge in properly and will just spin.
After the Bolt is Out: Repairing the Threads
Extraction is only half the job. You now have a hole that needs a functional thread.
First, clean the hole. Use compressed air, a wire brush, and solvent to remove all metal shavings, oil, and debris. Any leftover debris will compromise the new fastener’s torque and sealing.
Next, assess the threads. Run a thread chaser, not a tap, into the hole. A chaser is designed to clean and reform existing threads without cutting away good material. If the chaser spins freely and the threads look clean, you can install a new bolt of the original size and specification.
If the chaser feels loose or the threads are visibly damaged, you need a repair. For non-critical, low-torque applications, a helical wire insert (Heli-Coil) is a common fix. For high-stress or sealing applications like an oil drain plug, a solid bushing insert like a Time-Sert is stronger and more reliable.
For the DIYer facing a damaged thread in a non-structural piece, a liquid repair like Loctite FORM-A-THREAD can be a viable option. It’s an anaerobic compound that hardens in the absence of air, filling gaps and building a new thread form around a coated bolt. Follow the instructions precisely, especially about release agent on mating surfaces.
The goal is a repair that matches or exceeds the original strength. Don’t just force a larger bolt into a ragged hole. That’s a temporary patch that will fail under vibration.
Frequently Asked Questions
Can I use a regular drill bit to drill out a bolt?
You can, but you shouldn’t. A standard right-hand drill bit rotates clockwise. As it cuts, it applies tightening force to the bolt, potentially seating it further. A left-hand bit applies loosening force, giving you two ways to win. The left-handed drill bit technique is the standard for a reason.
What if the screw extractor breaks off inside the bolt?
This is the worst-case scenario. The extractor is made of hardened steel, which is extremely difficult to drill. Your options are limited: try drilling it out with a carbide bit, use an EDM (electrical discharge machining) service, or, if possible, drill the entire assembly out oversize and use a thread repair insert. Prevention is key, use high-quality extractors, the correct pilot hole size, and steady pressure, not brute force.
How do I know if a bolt is one-time-use?
Consult the vehicle or equipment service manual. One-time-use, or torque-to-yield, bolts are common in modern engines (cylinder heads, main bearings) and suspension/sub-frame connections. They often have a distinct appearance, a narrow “neck” under the head or specific markings. When in doubt, and especially on safety-critical components, replace it. The NHTSA recall 16V-653 details exist because reused sub-frame bolts can loosen.
Is welding a nut onto a stripped bolt a good idea?
It can be an excellent solution for a bolt with a broken or badly stripped head, provided you have a welder and the surrounding area is safe for welding. The heat from welding can also help break corrosion’s grip. However, it’s not suitable for bolts in aluminum (the heat will damage the parent material) or near fuel lines, plastic, or wiring.
What’s the difference between an extractor and a left-hand drill bit?
An extractor is a removal tool used after you drill a pilot hole. A left-hand drill bit is a drilling tool that can also perform removal. The bit cuts the pilot hole and may remove the bolt. The extractor doesn’t cut; it only grips and turns. Many jobs are completed with just the left-hand bit, making it the more versatile first step in the bolt removal process.
Before You Go
Drilling out a stripped bolt is a test of patience and preparation. The tool that matters most is the left-hand drill bit, it’s the difference between a fighting chance and a guaranteed struggle. Remember the depth rule for thin aluminum, and never heat a bolt in an aluminum hole.
When the threads are gone, repair them properly with an insert. Don’t just upsize the bolt. And on modern cars, check the manual. That “reusable” bolt might be a one-way ticket to a recall-style problem.
Keep the extractor for when the left-hand bit doesn’t quite get it. And always, always start with a solid center punch. That’s the step that keeps everything else in line.
