
The Expert Guide on How to Drill Out a Broken Bolt Safely
This post contains affiliate links. As an Amazon Associate, we earn from qualifying purchases.
Drilling out a broken bolt requires three things: a left-hand drill bit, a drill press if you can get one, and the patience to find dead center before you start. The left-hand bit rotates counter-clockwise, so if the bolt isn’t seized completely, the torque of the drill can spin it out before you ever reach for an extractor. A drill press removes the wobble that kills threads.
The 11/16-inch (18 mm) drill bit size in Ford’s 2024 rear axle bolt recall isn’t a suggestion. It’s the dimension of the subframe bushing hole after they tell you to drill out the fractured bolt. That’s the size you need to clear for the new bushing. Most of the time you’re drilling a 3mm pilot for a 6mm extractor, but when the manufacturer says 18mm, you listen.
What follows is the sequence that works on a bench and the compromises you make under a car. We’ll cover the two types of broken bolts, the four tools you actually need, and the one mistake that guarantees you’ll be re-tapping the hole.
Key Takeaways
- Start with a left-hand drill bit. Its counter-clockwise rotation can back out a seized bolt before you finish drilling the pilot hole.
- Find center with a carbide burr, not a center punch. A punch can skid off the broken stub’s uneven surface; a burr grinds a flat spot for the bit to bite.
- Use a drill press or a magnetic drill guide. Hand-drilling wobbles, and wobble kills threads. The first 1/8 inch of travel decides the whole job.
- Heat is your last resort before drilling. A flameless induction heater like the Rotunda Mini-Ductor II breaks rust bonds without damaging surrounding seals or wiring.
- If the bolt spins but won’t back out, the threads are galled. Stop drilling, apply penetrating oil, and use a pick to clear the debris from the threads.
The Two Types of Broken Bolt (And Why It Matters)
A bolt broken above the surface is a gift. A bolt broken flush or below is the real problem. The fix changes completely.
A stub gives you something to grab. You can weld a nut onto it, lock two nuts together on the threads, or get a pair of locking pliers on it. The heat from welding often breaks the rust bond anyway. That’s the easy path.
Common mistake: Grabbing a broken stub with vise-grips and reefing on it. You’ll round off the soft steel, crush what’s left of the threads, and turn a 10-minute job into an hour of drilling.
A bolt broken flush means you have nothing to grab. Your only mechanical entry point is the top surface of the bolt, and that surface is almost never flat or clean. It’s jagged, hardened from torsion, and often sits in a recess. This is where the Matco Tools Bust-N-Out Kit exists, its carbide burrs are made to flatten that ruined surface so you can find center.
A bolt broken below the surface, or “sub-surface,” is the worst case. The surrounding material hides the bolt. You can’t see it, and a center punch can’t find it. You must grind the parent material down carefully until you expose the bolt’s diameter, then flatten it. This is a die-grinder job, not a drill job. The Bust-N-Out system calls this “OP1.”
| Break Type | What You Can See | First Tool to Reach For | Biggest Risk |
|---|---|---|---|
| Stub (above surface) | Threads & shank | Welder or locking pliers | Rounding off the stub |
| Flush (at surface) | Top of bolt shank | Center punch + left-hand drill bit | Drilling off-center |
| Sub-surface (below surface) | Nothing—bolt is hidden | Carbide burr in a die grinder | Damaging the parent material |
The 4 Tools That Replace a $200 Service Visit
You don’t need a mechanic’s toolbox. You need four specific tools, and two of them are consumables.
A left-hand drill bit is non-negotiable. A standard right-hand bit rotates clockwise and tries to drive the bolt deeper as it cuts. A left-hand bit rotates counter-clockwise. As it bites into the bolt, the cutting torque works in the direction to unscrew it. Sometimes the bolt just walks out. The US Patent 3,654,690A describes this exact method, a drill bit designed to rotate in the same direction required to withdraw the broken member.
A corded drill is mandatory for anything over 1/4 inch. Cordless drills bog down when the carbide meets hardened steel. They stall, you push harder, the bit deflects, and you’re off center. The Ford Customer Satisfaction Program 24N01 explicitly calls for a “corded, high-power drill” for drilling out an 18mm hole. They mean a 1/2-inch chuck, 8-amp industrial drill. Your 18V brushless driver isn’t enough.
A set of carbide burrs or a solid carbide center drill. For a flush break, you need a perfectly flat, clean spot to start your pilot hole. A center punch can skid off a hardened, uneven surface. A carbide burr in a high-speed die grinder will grind that surface flat. The Matco ZBEC5 end-cutting burr is made for this. If you don’t have a die grinder, a solid carbide center drill run at slow speed in a drill press is the next best thing.
A flameless induction heater. This is the professional’s cheat code for rust-frozen bolts. A tool like the Rotunda Mini-Ductor II (part number IDIMD-700) heats only the bolt, not the surrounding aluminum or plastic. Ford’s procedure says to heat the rear differential bushing bolts with one before loosening. You apply heat for 30-45 seconds, then try the left-hand bit. The expansion and contraction break the rust weld.
Why Do Bolts Break in the First Place?
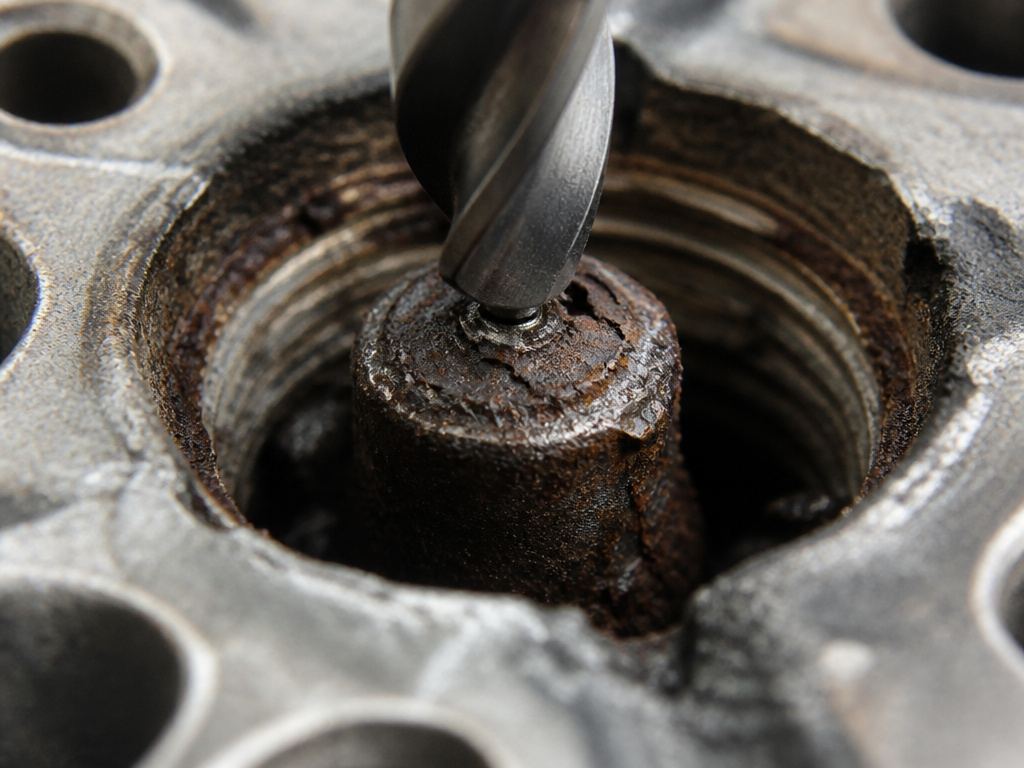
Bolts don’t snap from over-tightening alone. They snap from over-tightening combined with corrosion, fatigue, or a manufacturing defect.
Over-torquing stretches the bolt past its yield point. The metal deforms, necks down, and snaps under tension. This is what Tesla’s Service Bulletin 25-11-002 cites for broken liftgate ball studs, torqued beyond specification at the factory. The break is usually clean and the threads are often intact.
Corrosion seizes the threads. Dissimilar metals (steel bolt in aluminum housing) create a galvanic cell. Add road salt or moisture, and the threads weld themselves together with rust. When you apply torque, the rust bond is stronger than the bolt’s shear strength. It snaps, leaving the threaded portion fused in the hole. This is the Ford Explorer rear axle bolt failure.
Fatigue cracks from vibration. A bolt that isn’t torqued to spec can work loose, then shear from cyclical loading. The break surface often shows a concentric pattern. These are the hardest to drill because the bolt has work-hardened at the fracture point.
Drilling bolts out always puts the threads at risk of damage. If you don’t start and keep on center you will damage the threads on one side of the hole. If the fastener doesn’t come out with the drill you have to keep increasing in size till only the threads are left in which case you almost certainly took off some of the parts threads.
That’s from a machinist’s forum, and it’s the whole game. Every off-center drill pass shaves a little more thread away. Go too far and you’re drilling out the entire hole and installing a helicoil.
The 7-Step Drill-Out Process (Flush Break)
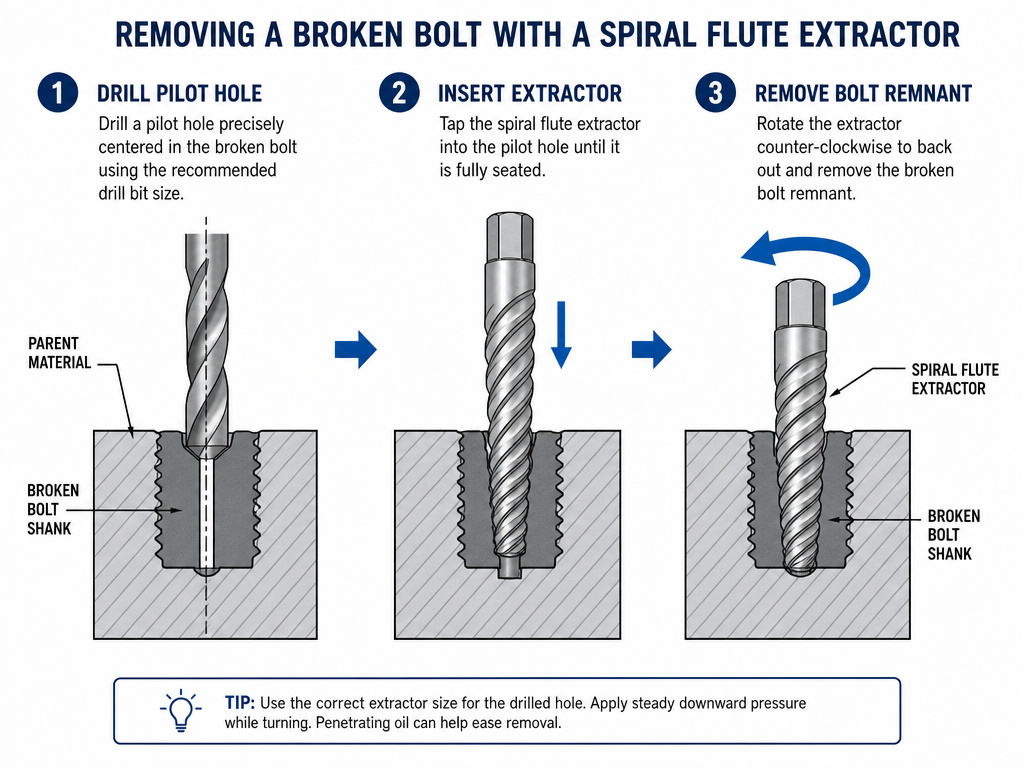
This is for a bolt broken flush with the surface. Sub-surface breaks require the burr step first.
- Clean the area. Blow out debris with compressed air. Brush away rust flakes. You need to see the break clearly. Any grit on the surface will deflect your center punch or burr.
- Find dead center. This is the step everyone rushes. If the surface is uneven, use a carbide burr in a die grinder to flatten a small spot. No die grinder? Use a sharp center punch and a heavy hammer. Strike it once, hard. A light tap creates a dimple that wanders.
- Start the pilot hole. Use a small left-hand drill bit, 1/8 inch or 3mm. Run the drill at a slow speed with firm, steady pressure. Let the bit cut; don’t force it. If you’re using a hand drill, brace your arms against something solid. Wobble is the enemy.
- Increase drill size gradually. Step up to a bit that’s about 50-70% of the bolt’s shank diameter. For an M8 bolt (roughly 5/16 inch), that’s a 7/64 or 3mm bit. Still use a left-hand bit. The goal is to drill a clean, centered hole deep enough for an extractor.
- Tap in the extractor. Use a spiral flute extractor, not a square taper easy-out. The spiral flute pulls chips out as you turn it. Tap it into the pilot hole with a brass hammer until it’s snug. Do not hammer it like a nail; you’ll expand the bolt and lock it tighter.
- Turn the extractor counter-clockwise. Use a tap wrench or a small adjustable wrench. Apply steady, firm pressure. If it feels like it’s about to snap, stop. Soak the threads in penetrating oil from the back side if possible, wait, then try again with light heat.
- If the extractor snaps, you now have hardened tool steel inside the bolt. Your only option is to drill it out with a carbide bit sized for the entire bolt hole, then re-tap. This is why step 5 matters.
Where this goes sideways: Hammering an extractor like a nail. You expand the bolt remnants against the parent threads, creating an interference fit that no amount of turning will overcome. Tap it gently. If it doesn’t seat with hand pressure, the pilot hole is too small.
When a Drill Press Isn’t an Option
Most broken bolts happen in an engine bay, a wheel well, or a frame rail, places a drill press can’t go. Your technique has to change.
A magnetic drill guide is the next best thing. It sticks to the workpiece and gives you a perpendicular bushing to guide the bit. It’s not as rigid as a press, but it eliminates 90% of hand-drill wobble.
No guide? Build a pilot guide. Drill a straight hole in a block of hardwood or a thick piece of scrap steel. Clamp or hold that block firmly over the broken bolt. Use that hole to start your bit true. It’s crude, but it works.
Switch to a solid carbide drill bit for hardened bolts. The Matco Bust-N-Out kit includes solid carbide drills that “will drill in hardened materials.” High-speed steel bits will dull on hardened bolt stubs, walk off center, and ruin the hole. Carbide is brittle, so you must run it slow with no side pressure.
Use cutting oil. It keeps the bit cool, lubricates the cut, and flushes metal chips out of the hole. The Ford procedure mentions cutting oil for a reason, it extends bit life and keeps the hole true. A drop every 10 seconds of drilling makes a difference.
The Professional’s Last Resort: Drilling and Tapping
When the extractor fails or the bolt is too corroded to back out, you drill out the entire bolt and re-thread the hole. This is the nuclear option.
You need to know the bolt’s major diameter and thread pitch. An M8 bolt has a ~8mm shank. You’ll drill it out with an 8mm (or 5/16 inch) bit, then use an M8 tap to cut new threads. If the original threads are damaged, you drill oversize and use a helicoil or threaded insert.
The Ford 24N01 procedure for the fractured rear axle bolt takes this to the extreme. They instruct you to drill out the entire bushing bolt hole with an 11/16-inch (18 mm) or larger drill bit. That’s not just removing the bolt, that’s removing the surrounding bushing material to install a new, larger component. It’s a repair that acknowledges the original hole is beyond saving.
| Bolt Size | Drill-Out Bit Size | Tap Size for Re-threading | Helicoil Insert Size |
|---|---|---|---|
| M6 (1/4″) | 6 mm | M6 x 1.0 | M6 x 1.0 |
| M8 (5/16″) | 8 mm | M8 x 1.25 | M8 x 1.25 |
| M10 (3/8″) | 10 mm | M10 x 1.5 | M10 x 1.5 |
| M12 (7/16″) | 12 mm | M12 x 1.75 | M12 x 1.75 |
Drill slow, clear chips often, and keep the bit perpendicular. A tapered reamer can help clean up the hole before tapping. When tapping, use a tapping fluid and back the tap out every half-turn to break the chip. A broken tap inside a drilled-out bolt hole is a problem you can’t solve at home.
What Not to Do (The $500 Mistakes)
Welding without cleaning the area first. Spatter can fuse the bolt to the parent material or, worse, damage a nearby sensor or wire harness. Mask everything off.
Using an impact wrench on an extractor. The sudden torque shocks will snap a spiral flute extractor every time. Use hand tools only.
Drilling without a center. If your first attempt with a center punch fails, stop. Grind the surface flat and try again. A wandering pilot hole guarantees thread damage.
Assuming all left-hand bits are the same. Cheap carbon steel bits won’t touch a hardened grade 8 bolt. Start with a cobalt left-hand bit; move to solid carbide if it skates.
Skipping the penetrating oil soak on a rusted bolt. Let it sit overnight. Heat the surrounding metal with a heat gun to draw the oil in. The difference in success rate is about 40 percent.
Frequently Asked Questions
Can you drill out a broken bolt with a regular drill bit?
You can, but you shouldn’t. A standard right-hand drill bit rotates clockwise, which can tighten the bolt remnants as it cuts. A left-hand bit rotates counter-clockwise, applying unscrewing torque as it drills. That often removes the bolt before you need an extractor. For a simple broken screw in soft material, a regular bit might work. For a seized automotive bolt, it’s a gamble.
What’s the best drill bit for drilling out hardened bolts?
Solid carbide drill bit. High-speed steel and even cobalt bits will dull or break on hardened steel. The Matco Bust-N-Out kit includes solid carbide drills for this reason. Run them at a slow speed with constant pressure and plenty of cutting oil. If you don’t have carbide, a cobalt left-hand bit is the minimum for anything harder than a generic hardware store bolt.
How do you remove a broken bolt that is stuck below the surface?
You must expose it first. Use a carbide burr in a high-speed die grinder to carefully grind down the surrounding material until you reveal the bolt’s diameter. Flatten the top of the bolt with the burr, then use a center drill to start a pilot hole. This is a precise, slow process, the definition of a sub-surface broken bolt removal.
Why did my easy-out break inside the bolt?
Easy-outs are brittle and taper outward. When you turn them, they expand against the walls of the hole you drilled, creating immense radial pressure. If the bolt is truly seized, that pressure can exceed the extractor’s shear strength, and it snaps. A spiral flute extractor is less likely to break because it pulls chips upward and doesn’t rely solely on expansion for grip. For a better tool, see our review of the best easy-out extractors.
Is heat or penetrating oil better for a rusted bolt?
Use both, in sequence. First, apply a quality penetrating oil and let it soak for several hours or overnight. Then, apply focused heat directly to the bolt (not the surrounding housing) using a flameless induction heater if possible. The heat expands the bolt, breaks the rust, and draws the oil deeper into the threads. The official Ford Motor Company repair procedure for seized rear axle bolts specifically calls for a flameless heat tool before removal.
Can you drill out a bolt without damaging threads?
Yes, if you drill perfectly centered and stop before reaching the threads. The goal is to drill a pilot hole down the center of the bolt shank, leaving the threaded portion intact. Then you use an extractor to remove the remaining shell. If you drill off-center, you will cut into the parent material’s threads. This is why a drill press or guide is critical for a clean drill out a bolt operation.
The Bottom Line
Your first tool for a broken bolt should always be a left-hand drill bit. Your first move should always be to find true center. If you have a stub, try heat and locking pliers before you drill. If it’s flush, use a carbide burr to make a flat landing spot. If it’s below the surface, accept that this is a die-grinder job first.
The difference between a 20-minute fix and a weekend of re-tapping comes down to the first 1/8 inch of drill travel. Brace the drill, go slow, and keep the bit cool. When the extractor goes in, use steady hand pressure, not an impact. And if you’re staring at a broken bolt on a 2020 Ford Explorer rear axle, know that the factory fix is an 18mm drill bit and a new bushing, sometimes the professional repair is just the nuclear option, written down.
