
How to Drill Out Rivets: A Step-by-Step Guide to Safe Removal
This post contains affiliate links. As an Amazon Associate, we earn from qualifying purchases.
To drill out a rivet, you need a drill bit slightly smaller than the rivet shank, a center punch, and a pin punch. Drill through the rivet head without touching the base metal, pry off the head, and drive out the shank. The critical variable is the drill bit size, for a 1/8″ CherryMAX® rivet, that’s a #30 drill bit (0.129″–0.132″). Drilling the hole oversized is the single most common reason the rivet stem breaks low and the fastener fails to extract cleanly.
That drill size isn’t a suggestion. It’s printed in the Cherry Aerospace CA-1015 process manual. Get it wrong by even a few thousandths, and the rivet sleeve spins with the drill, work-hardens, and refuses to budge. You’re left with a mangled hole that needs to be repaired or enlarged for an oversize fastener.
What follows is the difference between a five-minute job and an hour of frustration. We’ll walk through the three rivet types you’ll face, the NASA spec that lets you modify the rivet itself, the four tools that replace a service call, and the exact sequence that keeps the hole intact.
Key Takeaways
- Use a drill bit one size smaller than the rivet shank diameter. For a 1/8″ rivet, that’s a #30 bit (0.129″).
- Never drill completely through the rivet sleeve into the base material. This enlarges the hole every time.
- Center punch the rivet head dead center before drilling. An off-center drill bit will walk and damage the surrounding metal.
- Solid rivets and blind rivets (pop rivets) require different removal techniques. Confusing them strips the head or spins the sleeve.
- The pin punch diameter must match the rivet shank. A smaller punch mushrooms the shank and jams it in the hole.
The One Difference That Decides Your Method
You’re not just drilling out a “rivet.” You’re dealing with one of three mechanical systems, and the wrong approach turns a simple extraction into metal surgery.
Solid rivets are the original. They’re a soft metal pin that’s hammered or squeezed to form a head on the backside. Think bridge girders, aircraft frames, and heavy truck frames. Blind rivets, like CherryMAX® or CherryLOCK®, have a hollow sleeve and a mandrel (stem) that’s pulled to collapse the back. They’re for when you can only access one side. Pop rivets are the common, cheap blind rivet found in home projects; their mandrels often break off flush.
Where this goes sideways: Using a drill bit sized for a solid rivet on a blind rivet. The bit catches the thin sleeve, spins the entire rivet in the hole, and gallies the metal. The joint is now useless, and you must drill out a now-fused fastener.
The removal procedure in a Cherry Aerospace manual explicitly warns against drilling completely through the rivet sleeve. For solid rivets, the NASA PRC-9001 specification even allows the installer to shorten the rivet for a better fit before installation. That level of specificity matters. Your first step is always identification.
The Tools You Actually Need (Not the Marketing List)
This isn’t about buying a specialty kit. It’s about four basic tools used with precision.
A variable-speed cordless drill gives you control. You need slow speeds (300–600 RPM) for steel or titanium, higher speeds (2000–3000 RPM) for aluminum. An impact driver is the wrong tool here, it lacks the finesse and can shatter drill bits. A proper drill and driver kit like a Milwaukee M18 Fuel combo provides the consistent torque.
Drill bits are the consumable. For hardened steel rivets, a cobalt drill bit is the starting point. For stainless or titanium, you need the aggressive cutting geometry of a dedicated screw extractor bit, like those from Alden or Irwin. The extractor isn’t just for screws; its left-hand spiral can catch and back out a stubborn rivet shank if you’re lucky.
Your pin punch must be hardened steel and its diameter should be within 0.005″ of the rivet shank. A 1/8″ rivet needs a 1/8″ punch. A smaller punch deforms the shank, a larger one won’t fit. A center punch with a sharp, fine point is non-negotiable. A dull center punch is why drill bits walk.
Finally, a small hammer (4–8 oz.) and safety glasses. Metal shavings fly.
| Tool | Specific Purpose | What Happens If You Skip It |
|---|---|---|
| Center Punch | Creates a dimple for drill bit to seat | Drill bit “walks,” scars the workpiece, leads to off-center hole |
| Cobalt Drill Bit | Cuts through hardened rivet steel | HSS bit dulls immediately, creates heat, work-hardens the rivet |
| Pin Punch (matched size) | Drives out remaining rivet shank | Shank mushrooms, requires drilling, enlarges the hole |
| Safety Glasses | Protects eyes from metal chips | A single stainless steel shaving can cause a corneal abrasion |
The Step-by-Step Drilling Process
This is the core. Rushing any step here costs you the hole.
1. Secure the Work and Identify the Rivet
Clamp the workpiece. If it’s two sheets of metal, ensure they are clamped tightly together to prevent movement and burr formation between layers. The MIL-R-47196 specification is clear: “hold the sheets securely together so there is no misalignment of holes due to shifting.”
Determine the rivet type and size. Measure the head diameter with calipers. A 3/16″ rivet head means a 3/16″ shank. This tells you your target drill size.
2. Center Punch the Rivet Head
Place the center punch’s tip exactly in the middle of the rivet head. Strike it firmly once with a hammer. You want a clean, deep dimple. This divot gives the drill bit’s tip a place to sit so it can’t skate across the hard, curved surface.
The part nobody mentions: If the rivet head is flush or countersunk, use a punch with a sharper angle (60°). A standard 90° punch will slip off the shallow surface. This is where most attempts on aircraft skins fail before they start.
3. Select and Start the Drill Bit
Refer to the manufacturer’s table. For a 1/8″ nominal diameter CherryMAX® rivet, the required drill size is a #30 (0.129″–0.132″). This is 0.003″–0.005″ smaller than the nominal shank size, giving you a margin of error.
Start the drill at a 90-degree angle to the surface. Use low to medium pressure. Let the bit cut; do not force it. The moment you lean on the drill, you risk breaking the bit or losing perpendicularity. Drill straight through the rivet head, but stop the instant you feel the bit break through the bottom of the head.
4. Remove the Rivet Head
Insert a small flat-head screwdriver or a pry bar into the slot you’ve just drilled between the head and the workpiece. Pry upward with steady pressure. The head should snap off. If it doesn’t, you didn’t drill deep enough. Do another shallow drilling pass.
Never try to pry off a head you haven’t fully severed. You’ll tear the metal around the rivet.
5. Drive Out the Shank
With the head gone, the rivet shank remains in the hole. Select your pin punch, the one matching the shank diameter. Place it squarely on top of the shank and tap it firmly with a hammer. The shank should drive out the backside.
If it doesn’t move, the hole is likely undersized or the shank is deformed. Do not hit it harder. This is when you switch to a screw extractor. Use a left-hand drill bit slightly smaller than the shank to drill a pilot hole into the center of the stuck shank, then tap the extractor in and turn counter-clockwise.
Why Your Rivet Stem Breaks (And How to Fix It)
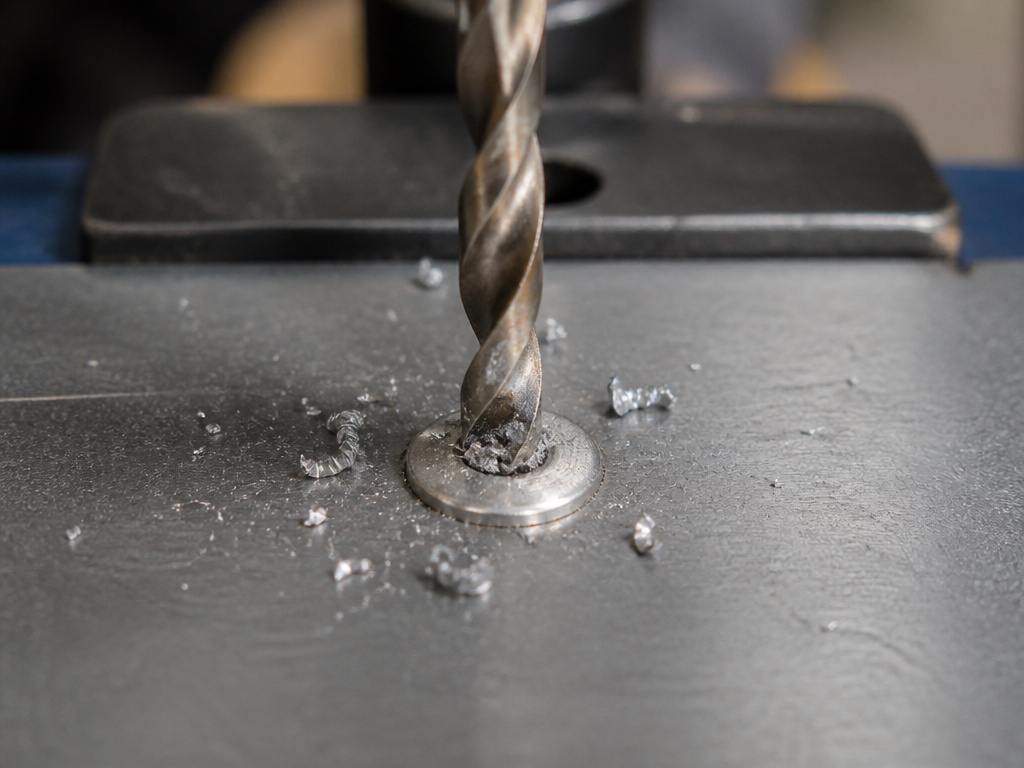
The troubleshooting guide in the CherryMAX® manual lists two stem failures: high breaks and low breaks. A high break (stem sticks out too far) means the hole is oversized. The rivet sleeve can’t expand properly to grip. A low break (stem breaks flush or below) means the hole is too small. The excessive force required to pull the mandrel snaps it prematurely.
Source of the problem: Rivet installed in an oversized hole. Double check the hole sizes and use correct drill size for rivet to be installed. – Cherry Aerospace CA-1015.pdf
If you’re removing a rivet and the stem snaps low, you’ve likely already lost. The rivet is over-compressed and seized. Your only recourse is careful, centered drilling with a bit sized for the original, correct hole size, not the currently seized size. This is where knowing how to drill out a broken bolt or a stripped screw translates directly. The principles of centered pilot holes and gradual sizing up are identical.
Blind Rivet vs. Solid Rivet: The Removal Split
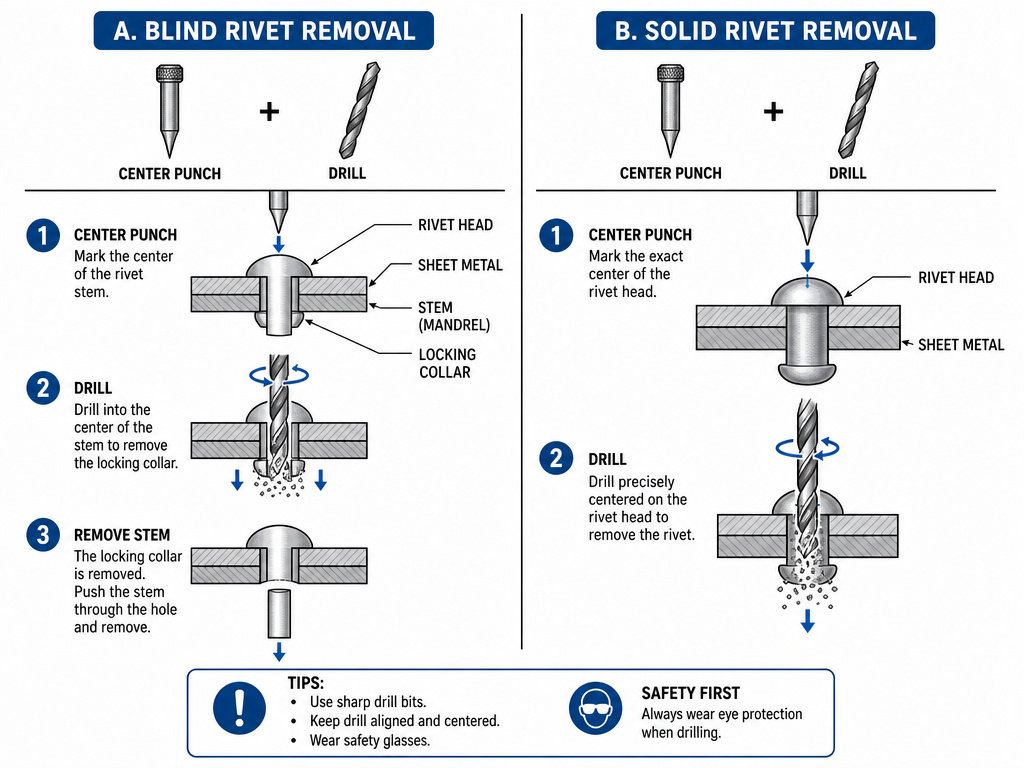
The procedure diverges completely here. Getting it wrong guarantees damage.
For Blind Rivets (CherryLOCK®, CherryMAX®, Pop Rivets):
The official manual says to first try driving out the locked stem with a pin punch in thick material. In thin sheets, you must drill away the lock. Center punch the stem, use a small center drill, then a larger drill to remove the locking collar. Only then do you drill off the head and drive out the sleeve. The cardinal rule: Never drill completely through the rivet sleeve.
For Solid Rivets:
The process is more direct, as outlined in the NASA solid rivet installation specification (PRC-9001). Drill the head, pry it, punch the shank. The NASA spec introduces a crucial flexibility: “Rivets may be shortened by installer if necessary to achieve a better appearance, as long as the grip size called out on the engineering drawing is still used.” This means if you have a rivet that’s slightly too long, you can carefully cut it before driving. That same mindset applies to removal, precision is more important than brute force.
The .005” Margin That Saves the Hole
Precision work lives in thousandths of an inch. The stem flushness tolerance for a 1/8″ CherryMAX® rivet is 0.010″ above to 0.015″ below the head surface (dimension “A Max” and “B Max”). That’s a 0.025″ total allowable range. Your goal when removing is to be even more precise.
| Rivet Diameter | Target Drill Size | Hole Tolerance (Min–Max) | Stem Flushness Tolerance |
|---|---|---|---|
| 1/8″ (0.125″) | #30 | .129″ – .132″ | +.010″ / -.015″ |
| 5/32″ (0.156″) | Refer to P/N T172-5 | Not Specified in Table | +.010″ / -.020″ |
| 3/16″ (0.1875″) | #10 | .192″ – .196″ | +.010″ / -.020″ |
| 1/4″ (0.250″) | F | .256″ – .261″ | +.015″ / -.025″ |
Drilling within these tolerances means the hole is still usable. Drilling outside them means the hole is now “oversize,” and you must decide whether to use an oversize rivet, install a heli-coil, or drill the entire component out to a larger size. That’s a cascade failure that starts with a $2 drill bit.
When to Walk Away From the Drill
Drilling out rivets isn’t always the answer. If the surrounding material is thin-gauge aluminum or a composite, the heat and pressure from drilling can delaminate or distort it. If the rivet is in a critical load-bearing member on an aircraft or vehicle, and you lack the specific repair manual, stop. Professional rivet removal may involve specialty tools like a rotary rivet remover that cores out the rivet without touching the sides.
For many DIY and automotive applications, removing pop rivets can be done with just a punch and hammer if you can access the backside to drive the mandrel back through. Always check if there’s a non-destructive path first. Drilling is the last resort, not the first step.
Frequently Asked Questions
What size drill bit do I use for a 3/16 rivet?
For a standard 3/16″ solid or blind rivet, use a #10 drill bit. This creates a hole between 0.192″ and 0.196″, which is the specified range for a 3/16″ CherryMAX® fastener. Do not use a 3/16″ bit (0.1875″); it’s too small and will cause a low stem break.
Can you drill out a rivet with a regular drill bit?
You can, but only if it’s the correct material. A standard High-Speed Steel (HSS) bit will struggle and dull on hardened steel rivets. For anything tougher than mild steel, use a cobalt bit. Understanding cobalt and HSS drill bit differences is key, cobalt retains hardness at higher temperatures generated by drilling hard metals.
How do you remove a rivet without damaging the metal?
The sequence is everything: secure the work, center punch perfectly, use the exact drill size, drill only through the head, and use a matching pin punch. The goal is to remove the rivet while preserving the hole’s original diameter and roundness. Any damage usually comes from an off-center start or using a drill bit that’s too large.
What’s the best way to remove a pop rivet?
For pop rivet removal, the simplest method is to drill out the center mandrel with a bit slightly smaller than the mandrel diameter. Once the mandrel is drilled out, the rivet sleeve often collapses inward and can be pulled out with pliers. If it’s stubborn, switch to the standard head-drilling method.
How do you remove a rivet when the head spins?
Spinning head means the rivet is loose in an oversized hole or the backside has failed. Grip the head firmly with vise-grip pliers to hold it stationary, then drill through the center as normal. The spinning is a symptom of a problem you’ll have to fix later, the hole is likely already too big.
Before You Go
Drilling out a rivet is a test of patience, not strength. The specs from Cherry Aerospace and NASA give you the numbers; your job is to follow them. Match the drill bit to the rivet shank, not the head. Center punch every time. Let the tool do the cutting.
When you face a stripped fastener, the skills here translate directly to drilling out a broken screw. When the bit itself snaps, you’ll need to know how to extract a drill bit from the hole. This is foundational metalwork. Get it right, and the hole remains. Get it wrong, and the repair grows. Start with a #30 bit for that 1/8″ rivet, go slow, and stop when the head comes free. The rest is just tapping.
