
How to Drill Perspex Without Cracking | The Zero-Rake Fix
This post contains affiliate links. As an Amazon Associate, we earn from qualifying purchases.
To drill Perspex without cracking, you need a drill bit ground to a zero-rake angle, a firm backing board, low rotational speed, and consistent cooling for any hole deeper than 5mm. The zero-rake geometry scrapes the acrylic instead of cutting it, which eliminates the grabbing force that initiates cracks. Skip the center punch, always drill a pilot hole, and clear swarf regularly.
That zero-rake spec isn’t a suggestion. It’s the physical difference between a clean hole and a sheet spiderwebbed with stress fractures. A standard drill bit is designed to cut into wood or metal by shearing material away. On Perspex, that shearing action grabs and pulls, generating heat and tensile stress faster than the brittle acrylic can handle.
What follows is the workshop protocol pulled directly from OEM design guides. We’ll break down the bit geometry, the non-negotiable backing setup, the speed and cooling numbers for different thicknesses, and the right tool for holes over 12mm. By the end, you’ll know how to set up for a single hole or a production run.
Key Takeaways
- Regrind a standard twist drill to a zero-rake angle. This transforms the cutting action from a grabby shear to a controlled scrape, which is the single most important factor in preventing cracks.
- Always use a backing board. Clamp your Perspex to a scrap piece of wood or acrylic. This supports the exit side of the hole and prevents the dreaded “breakout” splintering.
- Cool anything over 5mm thick. Use a spray bottle of water to cool the bit and the hole itself every 10-15 seconds of drilling. Heat above 80°C softens Perspex and induces stress-cracking.
- For holes larger than 12mm, use a hole saw or a cone-cut drill. Hole saws need a fine tooth pitch and lots of coolant; cone-cut drills are specialized for thin, unsupported sheet where a backing board isn’t possible.
- Never use a center punch. The impact point creates a localized stress concentration that becomes the epicenter for a crack. Use a small pilot hole for location instead.
The Mandatory Zero-Rake Angle
Forget HSS versus cobalt. The first variable that decides your success is the angle at the very tip of the drill bit. A standard 118-degree or 130-degree twist drill has a positive rake angle, its cutting edges are ground to slice into material.
A standard 130° twist drill must be re-ground so the cutting face is perpendicular to the surface of the Perspex, creating a zero-rake angle. This geometry scrapes the acrylic away instead of cutting it, preventing the bit from grabbing and cracking the brittle plastic.
On Perspex, that slicing action is the problem. The bit doesn’t cut so much as it grabs and tears, yanking material upward. This generates immediate tensile stress and heat. The Perspex Design Guide from the manufacturer is explicit: re-grind for zero rake.
You have two paths here. You can modify a standard bit yourself on a bench grinder, carefully flattening the cutting face. Or you can buy a bit that’s already ground for acrylics. Brands like Bosch and DeWalt offer acrylic drill bits in their specialty lines.
The difference in feel is immediate. A zero-rake bit requires a bit more feed pressure, but it moves through the material with a steady, controlled scraping sound. There’s no “grabbing” sensation. If your bit is chattering and trying to pull itself into the work, the angle is wrong.
Backing, Speed, and Feed: The Support Trio
With the right bit, your next job is to manage force and heat. Perspex is unforgiving of both.
Backing is non-negotiable. Always clamp your sheet to a sacrificial backing board. Use scrap wood, MDF, or even off-cut Perspex. This supports the exit side completely, preventing the material from flexing and splintering as the bit breaks through. It’s the cheapest insurance policy you have.
Speed kills. Run your drill at its lowest setting. If you’re using a cordless drill, that’s often the “1” setting on the gear selector. For a drill press, start around 500 RPM for bits under 1/4″ and drop to 300 RPM or lower for larger diameters. High speed generates friction heat almost instantly.
Feed rate is about patience. Apply steady, moderate pressure. Let the bit’s scraping action do the work. The moment you try to force it, you’re generating heat and stress.
Where this goes sideways: Drilling without a backing board on thin sheet. The exit-side breakout isn’t just ugly, it creates micro-cracks that propagate into visible stress fractures within days, especially if the part is under any mechanical load.
Here’s how these variables interact for different scenarios:
| Scenario | Critical Setting | Risk If Ignored |
|---|---|---|
| Thin sheet (<3mm) | Max backing support, very low feed pressure | Exit-side breakout and long spiderweb cracks from the hole edge |
| Deep hole (>5mm depth) | Active cooling with water, pause to clear swarf | Heat buildup softens material, causing the bit to gum up and crack the hole wall |
| Large diameter (>12mm) | Hole saw with fine teeth, very low RPM | Tooth grab shatters the surrounding material, leaving a cratered, unusable hole |
| Uns supported edge work | Cone-cut drill or step bit only | Standard drill or hole saw will vibrate the sheet, cracking it before the hole is complete |
Cooling and Swarf Management for Deep Holes
When your drill depth exceeds 5mm, you enter a different regime. The bit is now fully embedded, and the swarf, the acrylic shavings, has nowhere to go. Heat builds in the flutes, and melted acrylic can re-weld inside the hole.
The PLEXIGLAS processing guide states that for material over 5mm thick, you must cool both the bit and the hole. The method is simple: use a spray bottle filled with water.
- Drill for 5-10 seconds.
- Retract the bit completely from the hole.
- Spray water into the hole to cool it and onto the bit to clear swarf.
- Resume drilling.
This isn’t optional for clean results. The water acts as a coolant and a lubricant, carrying away the fine acrylic dust. It also prevents the swarf from melting and clogging the bit’s flutes, which is a primary cause of drill wander and hole wall scoring.
For a production job, a continuous mist system is better. But for the home workshop, the spray-and-pause method works perfectly. The telltale sign you’re going too fast is the swarf itself. It should come out as a continuous, curled ribbon. If it’s powdery or looks melted and globby, you need more coolant and a lower speed.
Drilling Large Holes: Hole Saws vs. Cone-Cut Drills
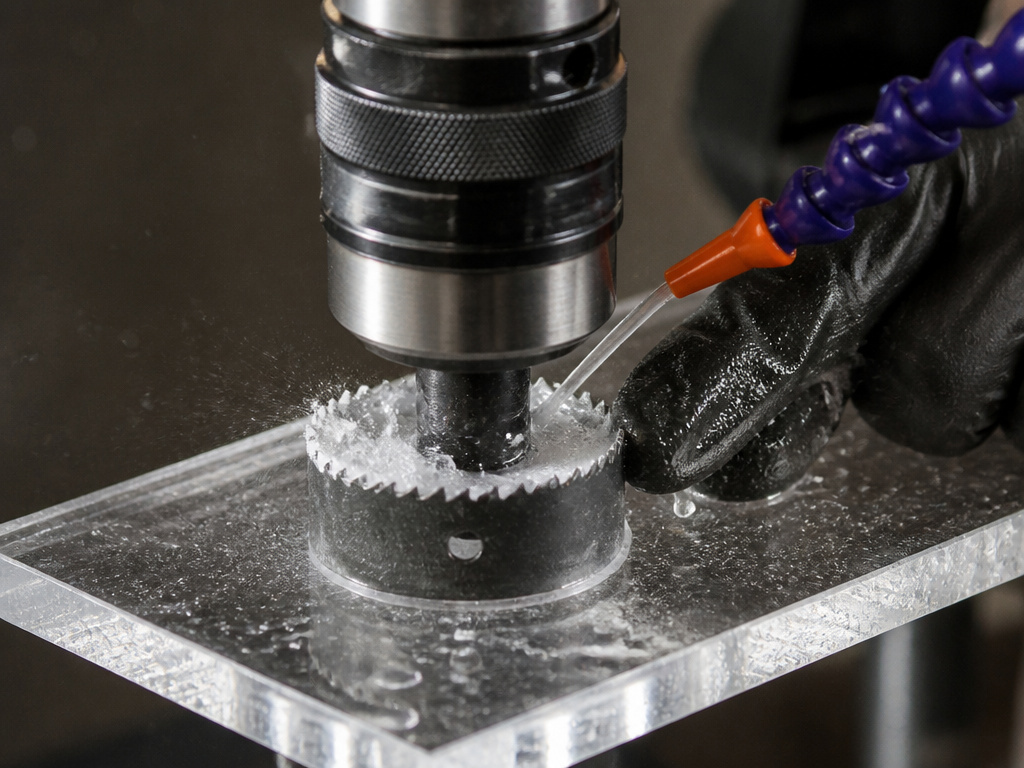
Need a hole bigger than 12mm for a pipe or cable gland? Your standard twist drill won’t work. You have two proven options, each for a specific situation.
Hole Saws are the go-to for most large holes in supported sheet. The rules change, though. You must use a hole saw with a fine tooth pitch. Coarse wood-cutting hole saws will grab and shatter Perspex. Run it at the slowest possible speed, often under 300 RPM on a drill press. Cooling is absolutely critical; spray water into the cut constantly. You must also stop frequently to clear the packed swarf from the saw’s teeth.
Cone-Cut Drills are the specialist’s tool for thin, extruded Perspex sheet, especially when you can’t support the back side. These are conical drill bits that start with a small pilot point and widen gradually. Because they cut with a shearing action across a wider area, they don’t exert the same localized stress that can crack unsupported material. They are perfect for making large holes in the middle of a panel that can’t be backed.
For the cleanest large holes, the process is always: pilot hole first, then the large-diameter tool, with relentless cooling throughout.
The Annealing Safety Net
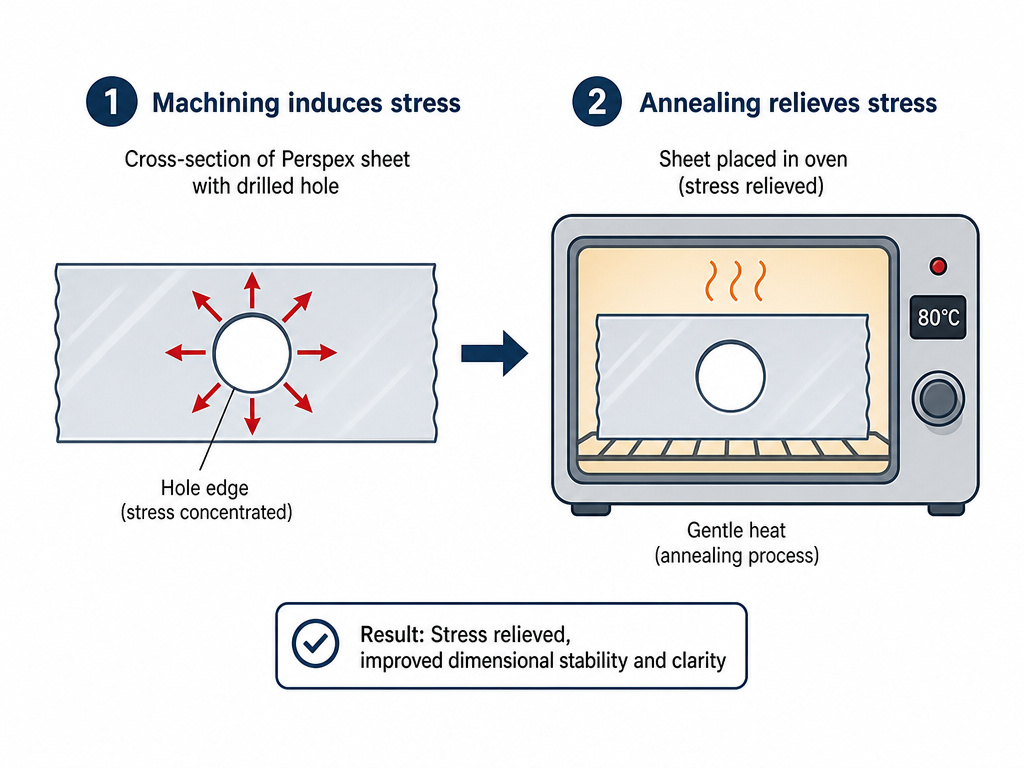
You followed every step. The holes look perfect. You’re still not done if this part needs to be strong or last outdoors. Machining, any machining, induces stress in Perspex. That stress can sit dormant until the part is exposed to sunlight, temperature swings, or chemical contact, then it appears as fine crazing or a full crack.
Worth knowing before you start: Annealing isn’t just for pros. If you’ve drilled more than a couple of holes or done any significant cutting, a simple oven anneal relieves that embedded stress and prevents future cracking.
Annealing is a controlled heat-treating process. For cast Perspex, the manufacturer’s cycle is precise: 1. Place the part in a cold oven. 2. Heat to 90°C at a rate no faster than 18°C per hour. 3. Hold at 90°C for 1 hour (for up to 3mm thick), 2 hours (up to 6mm), 4 hours (up to 12mm), or 6 hours (up to 20mm). 4. Cool back to room temperature at a rate slower than 12°C per hour.
For a DIY shortcut, especially on thinner sheets: preheat your kitchen oven to 80°C. Bake the part for one hour, then turn the oven off and let it cool down inside with the door closed. This rapid cycle isn’t in the official guide, but it’s a reliable field fix that works.
Frequently Asked Questions
Can I use a standard wood drill bit on Perspex?
You can, but you shouldn’t without modifying it. A standard bit has a positive rake angle that will grab and crack Perspex. You must re-grind it to a zero-rake angle first. For a one-off hole, you might get away with it using extreme caution, low speed, and perfect backing, but the risk is high.
What’s the best way to drill a hole in Perspex without a drill press?
Hand-held drill is fine if you take precautions. Clamp your Perspex and its backing board securely to a workbench. Use a bubble level or a speed square to help keep the drill perfectly vertical. The key is eliminating all movement and using very low speed. The lack of a press makes the backing board even more critical.
How do I prevent the drill bit from wandering when starting the hole?
Never use a center punch, it creates a stress point. Instead, use a very small pilot drill bit (1-2mm) to create a positive location guide. Drill the pilot hole first, then follow with your full-sized zero-rake bit. The pilot hole guides the tip and prevents the larger bit from skating across the hard surface.
My Perspex cracked days after I drilled it. Why?
This is classic stress-cracking. The heat and force of drilling created internal stress that didn’t cause immediate failure. Exposure to temperature change, sunlight, or even ambient humidity then triggered the crack. The solution for future work is to anneal the part after drilling, as described above. It relieves that embedded stress.
Is drilling Perspex similar to drilling other plastics like polycarbonate?
No, it’s fundamentally different. Polycarbonate (Lexan) is much tougher and more flexible. It can often be drilled with standard bits, though slow speed is still advised. Perspex is brittle and requires the specific zero-rake geometry. Treating them the same is a sure way to ruin a sheet of Perspex.
Before You Go
Drilling Perspex cleanly comes down to respecting its brittleness. The drill bit must scrape, not cut. The work must be supported, not suspended. The process must be cool, not hot. Get those three things right, zero-rake bit, solid backing, low speed with coolant, and you’ll get clean holes every time.
For one-off holes, buy a dedicated acrylic bit. For a big project, set up your drill press with a sacrificial board, a water spray bottle, and the patience to go slow. And if the part matters, don’t skip the oven anneal. It’s the final step that locks in your good work and keeps it from cracking later.
