
How to Adjust Pressure on an Air Compressor Safely & Easily
This post contains affiliate links. As an Amazon Associate, we earn from qualifying purchases.
To adjust pressure on an air compressor, you work with two different controls: the regulator knob adjusts the air pressure sent to your tool, and the pressure switch (often factory-set) controls the tank’s maximum pressure. Turn the regulator knob clockwise to increase tool pressure, counter-clockwise to decrease it, always adjusting up from zero. Never tamper with a sealed pressure switch, doing so voids warranties and risks tank explosion.
That’s the short answer. The long answer is that most people confuse these two systems, and the mistake costs them a repair bill or worse. The regulator is for your nailer or impact wrench. The pressure switch is for the compressor’s pump motor. Messing with the wrong one doesn’t just give you the wrong PSI, it can break the machine.
What follows: a walkthrough of the two systems, the exact steps for the regulator, the one compressor part you should never touch, and how to match pressure to your tools without guessing.
Key Takeaways
- Two different pressures: The tank pressure (big gauge) is controlled by the pressure switch. The tool pressure (small gauge) is set by the regulator knob.
- Adjust up, not down: Always close the regulator, then open it gradually to reach your target tool pressure. Coming down from a higher pressure wears the regulator diaphragm.
- Some switches are sealed: Many compressors, like Ingersoll Rand’s 2200 series, have non-adjustable pressure switches. Tampering voids the warranty and can cause a tank failure.
- The tank gauge is not for tools: That big dial shows air stored in the tank, not what’s going to your tool. Using it to set tool pressure will over-pressurize and break your equipment.
- Daily draining prevents disaster: Condensation rusts tanks from the inside. A rust-weakened tank can explode under pressure. Drain it after every use.
The Two Knobs: Regulator vs. Pressure Switch
Open the hood of your car and you’ll find a throttle body and a fuel pressure regulator. They work together, but touching one changes acceleration and touching the other changes mixture. An air compressor has the same kind of partnership.
The regulator is the knob you’re meant to turn. It sits on or near the air outlet, usually with a small pressure gauge next to it. Its job is simple: take the high-pressure air from the tank and reduce it to a safe, usable pressure for your specific tool. You adjust it for every job.
The pressure switch is the black box with electrical wires running into it, often mounted on the side of the tank. It has a different job: it tells the compressor’s motor when to start and stop based on the tank pressure. When the tank drops to a “cut-in” pressure (say, 90 PSI), the switch kicks the motor on. When the tank hits the “cut-out” pressure (say, 120 PSI), it shuts the motor off.
The outlet pressure can be adjusted using the knob on the filter/regulator so that the air output is enough for the application, but the output will not exceed the maximum air pressure specified by the application.. MKS ACGP User’s Manual
Confusing these two is the root cause of most air compressor repair calls. If your tool is running weak, you adjust the regulator. If the compressor won’t shut off or not building pressure in the tank, the pressure switch might be faulty, but it’s rarely something you should adjust yourself.
Why You Can’t Always Adjust the Pressure Switch
This is where the manuals get blunt. For many models, the pressure switch is a sealed, pre-set component.
The Ingersoll Rand 2200L5 manual states it clearly: “The Pressure Switch is Pre-set at the required pressure. The range and differential settings ARE NOT adjustable.” It goes further: “Pressure Switch should not be tampered with in any way… This could damage the Switch to the point of failure and/or void any warranty.”
The reason is safety and pump longevity. The switch’s cut-out pressure is set to match the tank’s ASME rating and the pump’s maximum working pressure. Crank it up, and you overwork the pump, over-pressurize the tank, and turn the unit into a hazard. The safety valve is the last line of defense, but it’s not designed for daily overrides.
| Component | What It Controls | User-Adjustable? | Risks of Tampering |
|---|---|---|---|
| Regulator Knob | Output pressure to the tool | Yes, and frequently | Tool damage, poor performance |
| Pressure Switch | Tank fill pressure (cut-in/cut-out) | Often NO (factory-set) | Tank explosion, pump burnout, voided warranty |
| Safety Valve | Absolute maximum tank pressure | NEVER | Catastrophic tank failure |
If you need a different tank pressure range, say, for a specialized application, you need a different compressor or a professional retrofit. Don’t try to be the hero.
Step-by-Step: Adjusting the Regulator
This is the procedure you’ll use for 90% of your work. It’s the same for a Rolair, a California Air Tools, or a Harbor Freight model. The goal is to deliver the right PSI to your tool without stressing the regulator.
Before you start: Wear ANSI Z87.1 eye protection. Ensure the compressor is on a stable surface, and the air hose is securely connected. Confirm the tank has pressure (the big gauge should read something above zero).
- Close the regulator. Turn the knob clockwise until it stops. This shuts off the airflow to the hose. On some models like the Rolair 5520K17A, you may need to lift the knob before turning.
- Power on the compressor. Let it run until it reaches its cut-out pressure and the motor shuts off automatically. The tank is now full.
- Connect your tool. Attach the air hose to your tool. Do not pull the trigger yet.
- Adjust up to your target PSI. Look at the small gauge (the regulator gauge). Slowly turn the regulator knob counter-clockwise. Watch the needle on the small gauge climb. Stop when it reaches the recommended pressure for your tool.
- Lock the setting (if equipped). Many regulators have a locking ring underneath the knob. Once the pressure is set, screw this ring up tight against the knob to prevent accidental bumps.
- Test and fine-tune. Squeeze the tool trigger briefly. You’ll see the small gauge dip and then recover. If it settles too low, open the knob a hair more. The goal is for the tool to run at its correct pressure even under load.
Always adjust up to the required pressure rather than down from a higher pressure.. Sealey SAC5020E110V.V4 Instructions
That last line from the Sealey manual is gold. If you set the pressure too high and then try to dial it back down, you’re forcing the regulator’s internal diaphragm to work against a standing column of high-pressure air. It wears out the diaphragm faster, leading to a regulator that won’t hold a steady pressure. Start at zero and creep up.
What Happens If You Get It Wrong?
Set the pressure too low, and your tool is gutless. A framing nailer won’t sink nails; a die grinder will stall. You’ll blame the tool, but it’s just starved for air.
Set the pressure too high, and you break things. Exceeding the tool’s maximum pressure rating can crack pneumatic housing, blow seals, or turn a paint sprayer into a dangerous misting machine. It also forces your compressor to cycle more often, wearing out the motor and pump.
The fix is always on the regulator, not the pressure switch. If you find yourself constantly maxing out the regulator and still not getting enough power, your compressor is too small for the tool’s CFM requirements. That’s a compressor for tools selection problem, not an adjustment problem.
Matching Pressure to Your Tools
You don’t guess. You read the tool’s manual or its nameplate. The required pressure is always listed, and it’s a maximum, not a suggestion.
Most common air tools operate in a 70-90 PSI range. A finish nailer might need 70 PSI. An impact wrench for lug nuts might call for 90 PSI. Smaller, detailed tools like an airbrush might require as little as 20 PSI.
Here’s a quick reference. These are typical values; always verify with your specific model.
| Tool Type | Typical Pressure Range (PSI) | Critical Note |
|---|---|---|
| Framing Nailer | 70 – 120 | Higher pressure for thicker wood |
| Finish Nailer / Brad Nailer | 70 – 100 | Lower pressure prevents wood splitting |
| Impact Wrench | 90 – 100 | Needs high, consistent pressure to break bolts |
| Die Grinder | 70 – 90 | Pressure affects RPM and cutting power |
| Paint Sprayer (HVLP) | 10 – 30 | Very low pressure; overspray and mess if too high |
| Air Ratchet | 75 – 90 | |
| Tire Inflation | 30 – 50 | Use an inline gauge; the regulator gauge is not accurate enough |
For tasks like inflate tires, never rely solely on the compressor’s small gauge. It measures pressure at the regulator, not at the tire valve. The friction in the hose causes a drop. Use a dedicated tire pressure gauge at the valve stem for an accurate reading.
This is also where understanding SCFM vs CFM becomes practical. Pressure (PSI) is the “push.” CFM is the “volume.” Your tool needs both. A tool that requires 5 CFM at 90 PSI will drain a small 2-gallon compressor in seconds, causing the motor to run continuously. That’s a sign you’ve mismatched tool and compressor, not misadjusted the pressure.
The One Part You Never Touch: Factory Set-Points
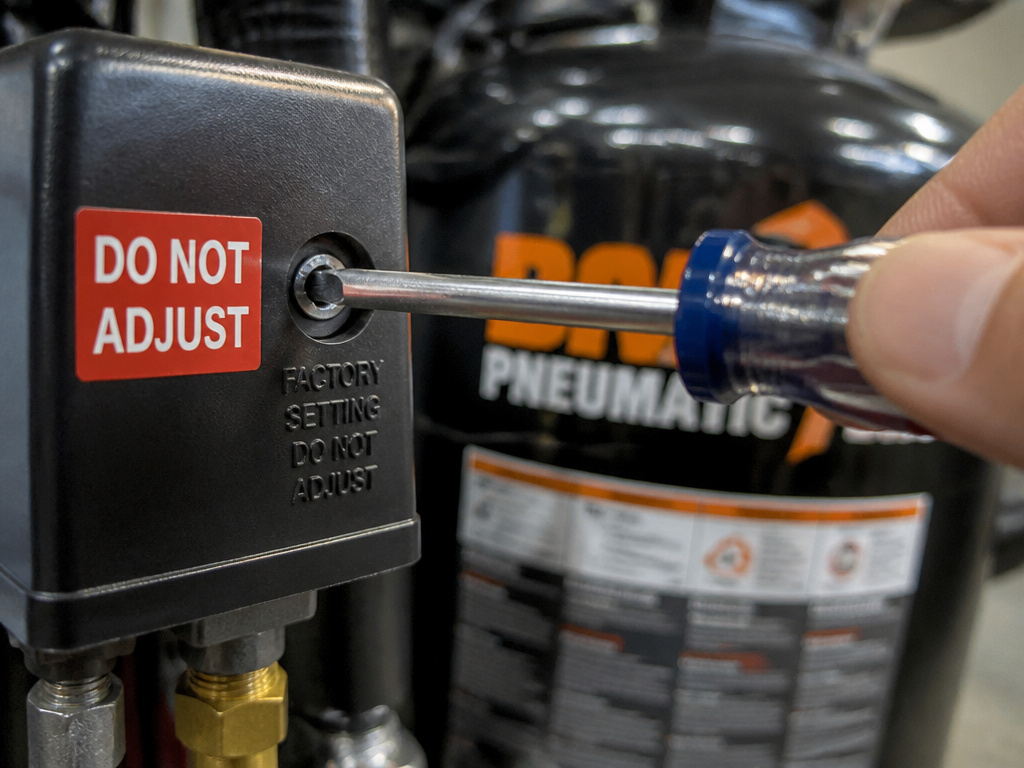
We’ve hinted at it. Now it’s a rule.
Inside your compressor are settings that were calibrated at the factory. The pressure switch’s cut-out is the main one. The safety valve’s blow-off point is another. These are not user-serviceable adjustments.
The Rolair manual states it plainly: “Never make adjustments or parts substitutions to components that control air tank pressure or factory set operating pressures.This legal boilerplate results from engineering tests that determine the safe fatigue limits of the tank and the thermal limits of the pump motor.
If your compressor is not building pressure to its normal cut-off point, the pressure switch might be failing. If it’s won’t shut off, the switch might be stuck. Your move isn’t to open it up with a screwdriver. Your move is to replace the entire pressure switch assembly with an OEM part, or call for service.
Tampering with these creates two paths to the same bad end. First, you void the warranty. Second, you create a hidden stress point. A tank corroded from undrained condensation and then over-pressurized by a tweaked switch is a classic failure scenario. It doesn’t happen immediately. It happens on the 300th cycle, when you’re standing next to it.
Safety and Maintenance: Non-Negotiables

Adjusting pressure is a routine task. The safety steps around it are mandatory. This is a pressure vessel.
- Drain the Tank Daily. Water condenses inside the tank every time you run the compressor. That water sits at the bottom and rusts the steel from the inside out. A rust-thinned spot becomes the failure point. Open the drain valve at the bottom of the tank after every use and let the air and moisture blast out. Do this even if you only ran it for five minutes.
- Check the Safety Valve Monthly. With the tank pressurized, pull the ring on the brass safety valve. You should get a loud blast of air. If it’s silent or just hisses, the valve is stuck shut and must be replaced immediately. This valve is the last thing preventing an over-pressure explosion.
- Respect the Environment. Keep the compressor in a clean, dry, well-ventilated area. Those electrical sparks inside the motor and pressure switch are normal, but they can ignite fumes. This is especially critical if you’re spraying flammable materials like stains or lacquers.
- Use the Right Accessories. Don’t connect a 200 PSI compressor to a hose rated for 100 PSI. Don’t use PVC pipe in your air lines, it can shatter. Use only hose and fittings rated for your compressor’s maximum pressure.
Following these steps does more than keep you safe. It keeps your pressure adjustments accurate and your compressor reliable for years. A well-maintained unit holds its pressure switch calibration and its regulator responds smoothly.
Frequently Asked Questions
Can I adjust the pressure switch myself?
On many consumer-grade compressors, no. The adjustment screws are often sealed with paint or a tamper-proof cover. On some industrial models, it is possible, but it requires a deep understanding of the cut-in/cut-out differential and the use of a separate pressure gauge. The risk of creating an unsafe condition is high. It’s almost always better to replace a faulty switch with a correctly pre-set unit. Our guide on adjust the pressure switch delves into the rare cases where it’s permissible.
What’s the difference between the two pressure gauges?
The larger gauge shows the pressure stored inside the main tank. The smaller gauge, mounted on the regulator, shows the pressure being delivered to your air hose and tool. They are independent. You can have a full tank (120 PSI on the big gauge) but set the regulator to send only 30 PSI to a paint sprayer (shown on the small gauge).
My regulator won’t hold pressure. What’s wrong?
The internal diaphragm is likely worn or torn. This is a common failure if you frequently “adjust down” from a high pressure or if moisture has corroded the parts. The fix is to rebuild or replace the regulator assembly. It’s a relatively inexpensive part.
What is a typical cut-out pressure?
For most portable, single-stage compressor units, the factory cut-out pressure is between 115 and 150 PSI. The cut-in pressure is usually about 20-30 PSI below that. You can often find this exact pressure switch setting on the unit’s data plate or in the manual.
How do I increase the overall power of my compressor?
If you need more airflow (CFM) for longer tool runtimes, you are limited by the pump and motor size. You cannot significantly increase CFM through adjustment. Tricks like adding a larger tank give you more air reserve but don’t change the pump’s output rate. For more power, you need a larger compressor.
Before You Go
Setting the pressure on an air compressor requires knowing which knob to turn. The regulator is your daily dial for tool performance.The pressure switch is a set-and-forget safety component. Mix them up, and you move from fine-tuning to field repairs.
The rhythm is simple: drain the tank, check the safety valve, close the regulator, fill the tank, then adjust the regulator up to your tool’s spec. Do that, and your tools will run right, your compressor will last, and you’ll never have to wonder why that nail didn’t sink or why the motor won’t quit. The right pressure is the difference between a job that flows and one that fights you every step.
