
Sharpen a Forstner Drill Bit: Steps & The 90° Corner Rule
This post contains affiliate links. As an Amazon Associate, we earn from qualifying purchases.
Sharpen a Forstner drill bit by honing only the inside bevel of its rim and the flat face of its chippers, using a fine diamond paddle or small, round and triangular files. Never touch the outside of the rim or the angled back of the chippers, as this changes the bit’s diameter and cutting geometry, guaranteeing a sloppy hole.
The difference between a sharp Forstner bit and a dull one isn’t subtle. A sharp bit cuts a clean, flat-bottomed hole with a whisper. A dull one tears wood fibers, burns the edge, and forces the drill motor to work harder. That burning smell is your signal.
This guide walks through two proven methods: the fast diamond paddle trick for maintenance and the traditional file method for restoration. You’ll learn the three parts of the bit that actually need an edge, the one 90-degree corner that decides cut quality, and how to test your work without ruining a project piece.
Key Takeaways
- Use a fine-grit diamond paddle for quick touch-ups; it’s the fastest way to restore a keen edge without altering geometry.
- The rim and chipper must meet at a crisp 90° corner; a rounded corner from over-filing will not shear wood cleanly.
- Never file the outside diameter of the rim, this reduces the bit’s size and creates a sloppy, undersized hole.
- For badly dulled or hardened steel (HSS) bits, you’ll need small round and triangular files; test with a file first to see if it cuts the metal.
- Always sharpen the centering spur last and only enough to keep it protruding at least 0.005″ beyond the rims.
Why Your Forstner Bit Went Dull (And How to Know)
A Forstner bit doesn’t fail all at once. The decline is gradual. First, you notice it requires more downward pressure. Then, the exit side of your hole starts to splinter. Finally, you see a thin wisp of smoke and smell that acrid, burnt-wood odor. This isn’t just wear; it’s the geometry failing.
The bit works by two primary cutting edges: the outer rim shears the circumference of the hole, and the inner chippers lift out the waste. When the inside bevel of the rim dulls, it rubs instead of slices. The chippers, when blunt, crush fibers instead of lifting them. The result is friction, heat, and a ragged hole.
Where this goes sideways: Assuming all Forstner bits are made from the same soft steel. Many modern bits, especially from brands like Freud, use harder alloys. A standard file will skate right off a hardened steel (HSS) bit, leaving you confused and the bit unsharpened. Test with a file first.
How do you confirm it’s the bit and not your technique? Drill into a piece of scrap pine or soft maple. A sharp bit will produce fine, curly shavings. A dull bit produces dust, requires noticeable effort, and leaves burn marks on the wood’s edge within seconds. If you see those signs, it’s time for the sharpening kit.
The Diamond Paddle Trick (60-Second Sharpening)
For maintenance sharpening, bringing back a slightly tired edge, a diamond paddle is the most foolproof tool. It’s a flat plate coated with fine diamond abrasive, stiff enough to hold the bit’s geometry but abrasive enough to cut hard steels. The Woodsmith article from December 2019 specifically recommends this method for getting bits “back into shape in no time.”
The process is straightforward because you’re only addressing the two critical bevels. The flat surface of the paddle ensures you won’t accidentally round over that vital 90-degree corner between the rim and chipper.
| Step | Tool | Action | What Happens If You Skip It |
|---|---|---|---|
| 1. Secure & Inspect | Bench vise, Safety glasses | Clamp the bit’s shank. Identify the dull inside bevel of the rim and the flat face of each chipper. | The bit moves, leading to an uneven edge or cutting your hand on a sharp chipper. |
| 2. Sharpen the Rim | Fine-grit diamond paddle (600+ grit) | Hold the paddle against the inside bevel. Use 3-5 light, circular strokes along the entire curved length. | The rim continues to rub, generating heat and burning the wood on the next use. |
| 3. Sharpen the Chippers | Same diamond paddle | Place the paddle flat on the chipper’s upward-facing cutting face. Use 2-3 gentle strokes per chipper. | Chippers crush wood instead of cutting it, creating dusty, packed holes that are hard to clean. |
| 4. Test & Repeat | Scrap wood | Drill a test hole. If cutting is smooth and no burning occurs, stop. If not, repeat steps 2-3 once more. | Over-sharpening removes too much metal, shortening the bit’s life prematurely. |
The diamond paddle method is your best bet for a quick refresh. It’s also the only method I recommend for harder alloy bits where a file might not bite. This approach aligns with the broader principles of sharpening drill bits, removing the minimum material needed to restore the edge.
The part nobody mentions: The centering spur is not a primary cutter. Its job is to locate the hole. If you over-sharpen it to a needle point, it can snap off on the next use. A light touch is all it needs.
The Three-Part File Method (For Restoration)
When a bit is truly dull, or if you don’t have a diamond paddle, the traditional file method is your next line of defense. This is the technique detailed in sources like Leonard Lee’s The Complete Guide to Sharpening and the 2009 FineWoodworking article. It requires more patience but can restore a butchered bit to service.
You need two files: a small round file (a 3/16″ chainsaw file works perfectly) for the curved rim, and a small triangular file for the flat chippers and any teeth on toothed-rim bits. The round file matches the inner curve of the rim, preserving its radius.
Step 1: Clean and Clamp.
Remove all pitch and wood residue with a solvent or a stiff brush. Clamp the bit’s shank firmly in a vise. Any movement during filing ruins the edge.
Step 2: Sharpen the Rim.
Place the round file against the inside bevel of the rim. Follow the existing curve. Use smooth, forward-cutting strokes, working from one end of the rim to the other. Count your strokes (e.g., 5 per section) to ensure you remove an even amount of metal from both sides of the bit. This keeps it balanced.
Step 3: Sharpen the Chippers.
Switch to the triangular file. Lay it flat against the upward-angled cutting face of the first chipper. File upward, away from the bit’s body, with 3-4 strokes. Repeat for each chipper. The goal is to refresh the flat face, not to reshape the steep bevel on its back.
Step 4: Address the Centering Spur.
Finally, use a corner of the triangular file to lightly hone the leading edges of the centering spur. The military manual TM 9-867 and other guides specify the spur should extend at least 0.005 inch beyond the rims. File just enough to maintain that proud, pointed profile.
I tried to sharpen a Forstner bit with a Dremel and a grinding stone once. I butchered the geometry in under a minute. The high speed removed metal too fast, and I rounded over the crisp edges the bit needs to cut cleanly. Files force you to go slow, which is why they work.
This hands-on approach is a core skill in sharpening by hand. It translates directly to other tools, teaching you the feel of metal removal and the importance of preserving original angles.
What Not to Sharpen (The Geometry Guards)
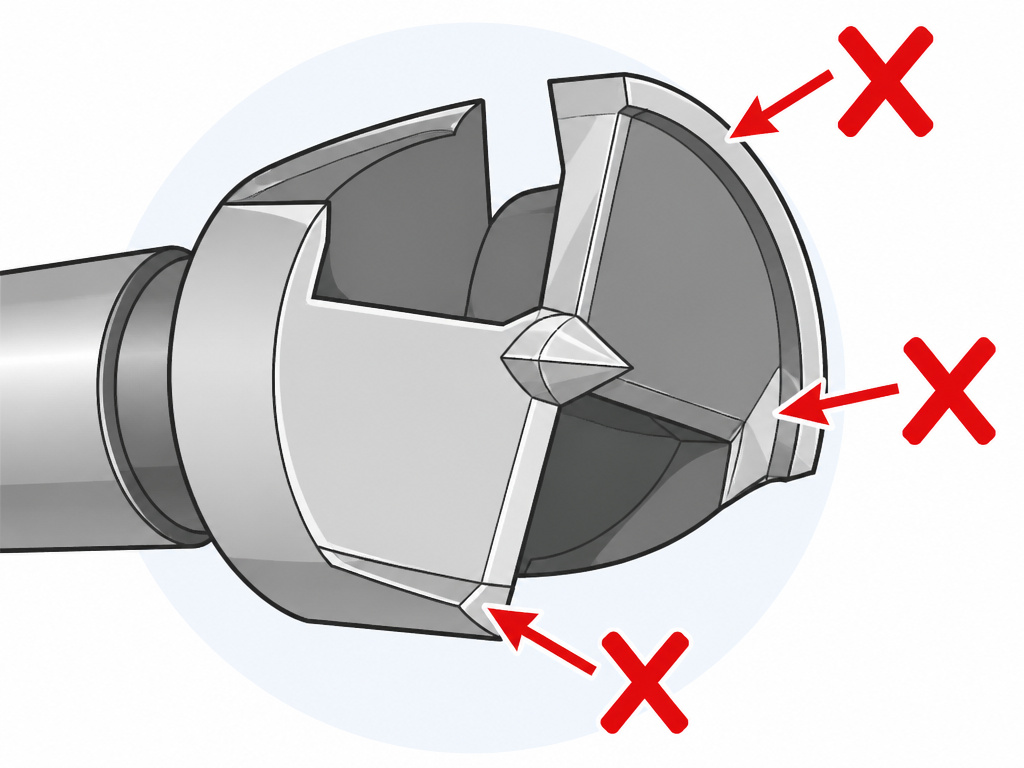
Sharpening a Forstner bit is as much about what you leave alone as what you touch. Alter the following areas, and you will change how the bit cuts, permanently, and usually for the worse.
The Outside of the Rim.
This is the cardinal sin. The outside diameter of the rim defines the size of your hole. If you file or hone it, even slightly, you reduce the bit’s size. A 1-inch bit becomes a 0.99-inch bit, and it will cut a loose, sloppy hole every time. The Sharpening Handbook states this plainly: “Sharpening the outside would reduce the bit’s overall diameter.”
The Angled Back of the Chippers.
Each chipper has a steep clearance angle on its backside. This angle allows the chipper to dive into the wood without binding. If you file this angled surface, you reduce the chipper’s height. Once it becomes significantly shorter than the surrounding rim, it stops cutting altogether. At that point, the bit is trash.
The 90-Degree Corner.
Where the inner edge of the rim meets the side of the chipper, there must be a sharp, inside 90-degree corner. This corner acts like a tiny chisel, severing wood fibers cleanly. If you round this over with a file or sandpaper, you create a blunt nose that tears instead of shears. The FineWoodworking article calls out this “crisp 90º corner” as non-negotiable.
| Area | Why It’s Off-Limits | Consequence of Sharpening It |
|---|---|---|
| Outside Rim Diameter | Sets the exact hole size. | Hole becomes undersized; bit wobbles and cuts inaccurately. |
| Backside of Chippers | Provides clearance so the chipper can cut. | Chipper height reduces, causing it to rub or stop cutting entirely. |
| The 90° Corner | Shears wood fibers cleanly. | Rounded corner tears wood, producing a fuzzy hole edge. |
Understanding these guards is fundamental to using a Forstner drill bit correctly. It’s also what separates this process from sharpening with a grinder for twist drills, where you actively reshape the point.
Choosing Your Tools: Files vs. Diamonds vs. Power
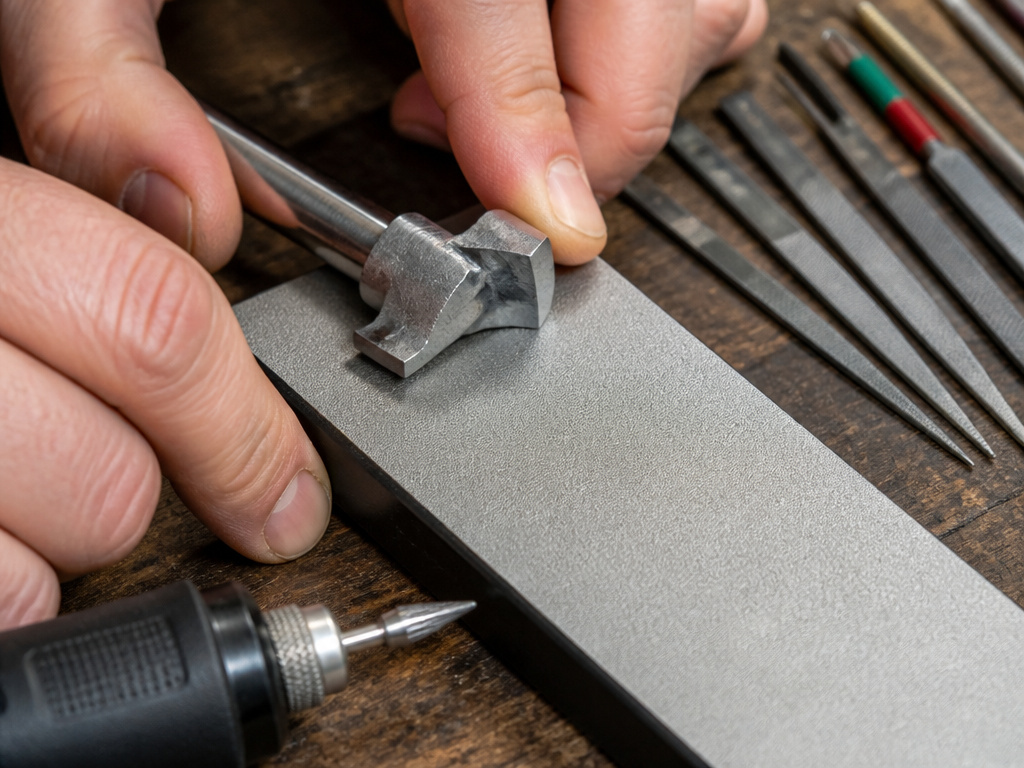
Your sharpening results depend entirely on choosing the right abrasive for the job. Not all tools work on all bits, and using the wrong one can lead to the “butchered bit” scenario.
Diamond Paddles (600 Grit or Finer).
This is the modern solution. A fine-grit diamond paddle cuts all types of steel, including hardened alloys (HSS), without loading up. It’s flat, giving you control, and it’s fast. The Woodsmith article and the WoodnBits guide both point to this as a simple, effective method. It’s my first recommendation for most people.
Small Hand Files (Round & Triangular).
The classic choice. A quality set of Swiss-pattern needle files or dedicated chainsaw files will work on most standard carbon-steel Forstner bits, like those in many homeowner sets. They offer the most tactile feedback. As the iBuildIt guide confirms, if a file cuts the metal easily, you can proceed. This is the essence of sharpening with a file.
Rotary Tools (Dremel) – Use With Extreme Caution.
Power tools are risky. A conical burr in a Dremel can be used to reshape a badly dulled rim, as noted in the Sharpening Handbook. However, the high RPM makes it easy to overheat the steel (destroying its temper) or ruin the geometry. The iBuildIt guide’s author “pretty much butchered the bit” with this approach. If you go this route, use the lowest speed and treat it like a micro grinder.
What to Avoid Completely.
Sandpaper, even glued to a stick, lacks the stiffness to maintain a clean edge. Bench grinders are too large and aggressive for such small, precise surfaces. They are better suited for sharpening on a bench grinder for twist drills, not Forstner bits.
Troubleshooting Common Sharpening Problems
You followed the steps, but the bit still doesn’t cut right. Here’s what likely went wrong and how to fix it.
Problem: The bit burns wood immediately.
You sharpened the wrong surface. Burning is caused by friction, which means a cutting edge is rubbing instead of slicing. Double-check that you only honed the inside rim bevel and the chipper’s face. If you accidentally touched the outside rim, the bit is likely now undersized and may need to be retired.
Problem: The hole edge is fuzzy or torn.
You rounded the 90-degree corner. Inspect where the rim meets the chipper. If that inside corner is smooth and rounded, it lost its shearing ability. Carefully use the corner of a triangular file to re-establish a sharp, square inside corner. Go slowly, you can’t add metal back.
Problem: The file skates over the bit without cutting.
You have a hardened steel (HSS) bit. Standard files are too soft. Switch to a diamond paddle or a dedicated hardened steel file. This is a common issue with higher-end bits like those from Freud, and it’s why testing with a file first is a critical step.
Problem: The bit wobbles or drills an oval hole.
You sharpened the rim unevenly. If you took ten strokes on one side and five on the other, you created an imbalance. The bit’s center of mass is now off-axis. Clamp it in the vise again and use your file or paddle to lightly even out the bevel on the lighter side. This is why counting strokes matters.
Mastering these fixes completes your knowledge of drill bits for wood, letting you maintain every type of bit in your kit.
Frequently Asked Questions
Can you sharpen a Forstner bit with a Dremel?
You can, but it’s high-risk. A Dremel’s high speed can overheat the steel, ruining its hardness, or quickly erase critical geometry. If you must, use a conical burr at the lowest speed setting and treat it as a light touch-up tool, not for major reshaping. Most experienced woodworkers stick to files or diamond paddles.
How do you sharpen the teeth on a large Forstner bit?
Large bits often have a toothed rim instead of a smooth one. The process is similar: use a round file on the rim’s inner curve, then use a small triangular file on each individual tooth. Sharpen only the front face of each tooth, maintaining its original angle. The iBuildIt guide shows this process clearly.
What’s the best way to test a sharpened Forstner bit?
Drill into a piece of scrap softwood, like pine or poplar. A properly sharpened bit will produce thin, continuous shavings with little pressure and no burning. If the bit smokes, requires heavy force, or produces powder, it’s still dull. If the hole is visibly smaller than the bit’s labeled size, you’ve accidentally reduced the outside diameter.
How often should you sharpen Forstner bits?
Sharpen at the first sign of dullness: increased drilling pressure, splintering exit holes, or burning. For frequent use, a light touch-up with a diamond paddle every few projects keeps them cutting cleanly. There’s no set hour count, it depends on the wood species (hardwoods dull bits faster) and your drilling depth.
What’s the difference between sharpening a Forstner bit and a twist drill bit?
The geometry is completely different. A twist drill has a complex point with lips and a chisel edge, often reshaped on a bench grinder. A Forstner bit has flat, defined planes (rim, chipper, spur) that must be preserved. You never reshape a Forstner bit; you only refresh its existing edges.
The Bottom Line
A sharp Forstner bit transforms a chore into a pleasure. The clean, flat-bottomed holes it produces are worth the ten minutes of maintenance.
For most DIYers, a fine-grit diamond paddle is the smartest single tool to buy. It works on any bit steel, is almost foolproof, and fits the proper Forstner bit use ethos of precision over power. If you have older carbon-steel bits, a set of small round and triangular files will serve you for years.
Remember the three rules: never touch the outside rim, keep that 90-degree corner crisp, and let the centering spur just lead the way. Drill a test hole in scrap after sharpening. When it cuts cool, clean, and quiet, you’ve nailed it. Now go put that revived bit to work on a real project.
