
Learn How to Use a Forstner Drill Bit: Techniques and Tips
This post contains affiliate links. As an Amazon Associate, we earn from qualifying purchases.
To use a Forstner drill bit, you must match three things: a drill press for stability, a specific RPM based on the bit’s diameter, and a peck-drilling motion for any hole deeper than the cutting wings. The flat-bottomed, clean hole is the reward for getting all three right.
Most guides stop at “use a drill press and go slow.” That misses the specific numbers that separate a clean cut from a burned, dulled disaster. A 35mm bit at 2000 RPM will scorch soft pine in under ten seconds. The same bit at 600 RPM produces a cabinet-ready hinge pocket.
What follows is the mechanical breakdown: why Forstner bits demand perpendicular force, the diameter-to-RPM chart that prevents burning, and the two scenarios where even a drill press isn’t enough. We’ll cover hinge cup drilling, mortising techniques, and when to switch from standard High-Speed Steel to a Tungsten Carbide Tipped bit.
Key Takeaways
- Speed is non-negotiable. A 35mm Forstner bit runs at 500–900 RPM, not the 2000+ RPM of a twist drill.
- A drill press is strongly recommended. Handheld drilling risks angled holes and off-center cuts due to lateral force.
- Use a peck cycle for depth. Drill no deeper than the wing height (25–30mm), retract to clear chips, then continue.
- Mind the brad point on thin doors. The central spur can pierce the opposite face before the cup reaches full depth on material under 18mm thick.
- Material dictates bit material. For MDF, particle board, or dense hardwoods, a Tungsten Carbide Tipped (TCT) Forstner bit lasts 5–10x longer than standard steel.
What a Forstner Bit Actually Does (And Doesn’t Do)
A Forstner bit is engineered for one primary outcome: a flat-bottomed, clean-walled hole in wood. It doesn’t drill the fastest, and it certainly doesn’t drill the deepest. Its rim cutters score the circumference of the hole before the radial cutters plane out the waste. This sequential cutting action is why it leaves almost zero tear-out, even on plywood or across grain.
Technical Snapshot: A Forstner bit’s cutting action relies on two distinct elements. The sharp, continuous outer rim scores the wood fibers in a perfect circle, preventing splintering. Inside this rim, radial cutters, often with a serrated or wavy design like on the Bosch EXPERT series, then lift and eject the waste material. The central brad point merely provides a pilot, not the primary cutting force.
This design creates its core uses for Forstner bits: hinge cups for European cabinet hardware, precise pocket holes, dowel joints, and any application where a drill bit must stop at an exact depth without a center point poking through. It’s the opposite of a brad point bit, which excels at deep, straight pilot holes but leaves a conical bottom.
The bit’s flat cutting plane is also its greatest weakness. It requires perfectly perpendicular force. Any tilt, and one side of the rim bites deeper than the other. The hole ends up angled, and the bit can chatter or bind. This is the fundamental reason a handheld drill is a gamble.
The Single Biggest Cause of Failure: RPM
You can have a sharp bit, a clamped workpiece, and a drill press. Run the bit too fast, and you’ll still fail. Heat is the enemy. The continuous rim of a Forstner bit is in constant friction contact with the wood. High speed generates heat faster than the ejected chips can carry it away. The wood burns, the bit’s cutting edges lose their temper and dull, and the hole walls glaze over.
The fix is a simple diameter-to-speed chart. These numbers come from cabinet shop practice and industry guides, not guesswork.
| Bit Diameter Range | Recommended RPM | Why This Range Works |
|---|---|---|
| 8–15 mm | 1,200–1,800 RPM | Smaller rim circumference, less friction, faster chip clearance. |
| 16–25 mm | 800–1,200 RPM | Common size for dowels and pockets; balance of speed and control. |
| 26–35 mm | 500–900 RPM | 35mm hinge cup standard. Slow enough to manage high friction. |
| 38–50 mm | 300–600 RPM | Large surface area; slow speed essential to prevent burning. |
| 50–60 mm+ | 200–400 RPM | Maximum caution zone; requires rigid setup and patience. |
If your drill press only has fixed speeds, pick the closest lower setting. Running a 35mm bit at 1200 RPM because that’s your machine’s lowest setting is a guarantee of trouble. In that case, you’re better off with a variable-speed handheld drill you can throttle down, though you’ll trade speed control for stability issues. This is the first major decision in selecting drill bits for a job: matching the tool’s capability to the bit’s physical needs.
Common mistake: Setting RPM by sound or feel. A Forstner bit should cut with a low, steady hum, not a high-pitched whine. If you smell burning wood, you’re already too late, the bit is dulling.
The Drill Press vs. Handheld Dilemma
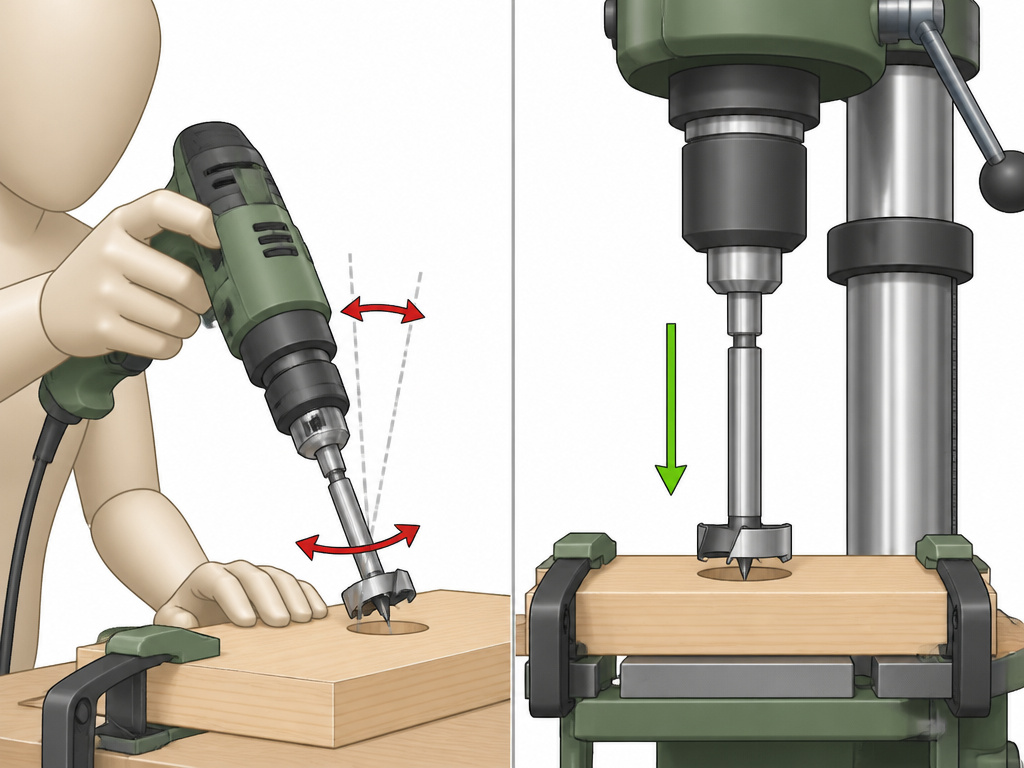
Every rule about Forstner bits points toward a drill press. The requirement for perfect perpendicularity is the main reason. A drill press delivers vertical force along a single, fixed axis. A handheld drill introduces human variance on two axes: side-to-side tilt and front-to-back tilt. Even a slight angle causes the rim to cut unevenly.
The second reason is rigidity. Forstner bits, especially above 25mm, generate significant lateral force as the cutters engage. A drill press’s quill and column absorb this force. A handheld drill transfers it to your wrist and shoulder, leading to wobble and off-center holes.
When is handheld drilling acceptable?
Only for small diameters (under 15mm) in softwood, and only with a dedicated drilling jig. A jig with a bushing guides the bit and enforces perpendicularity. For on-site cabinet installation where a 35mm hinge cup is needed, professionals use a jig. It’s slower than a press, but it works. Without a jig, attempting a hinge cup by hand is a fast track to a ruined door.
The process for using a drill bit in a press applies directly: 1. Secure the workpiece with clamps. Any movement ruins the hole. 2. Set the depth stop. This is critical for repeat holes like hinge cups. 3. Center the bit over your mark. 4. Run at the correct RPM. 5. Feed with steady, moderate pressure. Let the cutters do the work.
Forstner bits don’t self-feed like a twist drill. You must provide the downward force. Too little, and the bit will spin without cutting, generating heat. Too much, and you risk stalling the motor or breaking the bit.
The Peck-Drilling Cycle: How Deep is Too Deep?
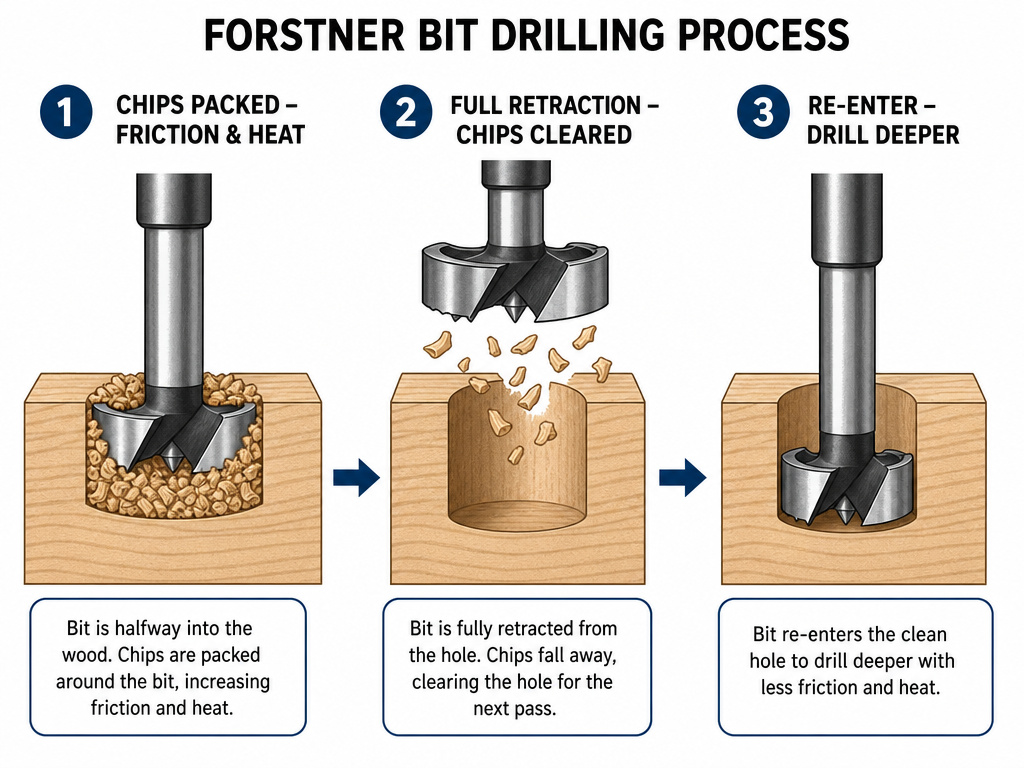
A Forstner bit’s cutting wings have a limited effective depth, typically 25mm into hardwood, 30mm into softwood. Drilling past this depth packs chips against the rim and the body of the bit. These packed chips create intense friction, overheating the bit and the wood. The result is a burned, rough hole and a prematurely dulled bit.
The solution is peck drilling. It’s the same technique used for deep metal drilling, applied to wood. 1. Drill in 5–10mm increments. 2. Retract the bit completely from the hole. 3. Clear the chips from the hole and from the bit’s flutes. 4. Re-enter the hole and drill another 5–10mm. 5. Repeat until you reach final depth.
Where this goes sideways: Skipping the full retraction. Pulling the bit up just an inch leaves chips packed at the bottom. You must bring it all the way out to let the chips fall free. A quick brush of the spinning bit with a scrap of wood knocks chips loose.
This cycle is non-negotiable for deep mortises or any hole deeper than about 1 inch. It adds time, but it saves your bit and guarantees a clean hole all the way down. This is a specific technique that differs from the continuous feed used with a step drill bit in sheet metal.
Two Specialized Applications: Hinge Cups & Mortises
Drilling 35mm Hinge Cups
This is the most common professional use for a Forstner bit. The European concealed hinge requires a flat-bottomed, 35mm diameter cup, usually 12.5mm deep. The process locks in all the previous rules: drill press, 600–800 RPM, depth stop set. But there’s a hidden trap.
The central brad point on a standard Forstner bit protrudes 3–5mm beyond the cutting wings. On a door that’s only 16mm thick, drilling a 12.5mm deep cup means the brad point has only 3.5mm of material left before it pokes through the front face. In practice, it often does, leaving a visible witness mark on the show side of the door.
The fix: For doors 18mm and thicker, a standard Forstner is fine if you set the depth stop conservatively. For 16mm doors, use a dedicated hinge boring bit. These bits have a much shorter brad point or a flat center, designed specifically to avoid breakthrough. It’s a different drill bit type, but it solves the problem cleanly.
Mortising with Overlapping Holes
For creating square mortises, a sharp Forstner bit is superior to a twist drill or spade bit. The technique involves drilling a series of overlapping holes to define the mortise walls.
- Drill a hole at each end of the mortise layout.
- Drill a series of holes between them, overlapping each previous hole by at least a third of the bit’s diameter.
- Continue overlapping until the bit can move freely side-to-side within the mortise channel with the drill press off.
- Clean out the remaining triangular waste sections with a chisel.
The Forstner’s flat bottom and clean walls minimize the chisel work needed, leaving you with square, accurate cheeks. This method is far more controlled than attempting to plunge a core drill bit or using a router freehand.
Material Matters: When to Upgrade Your Bit
Not all Forstner bits are equal. Standard High-Speed Steel (HSS) bits are fine for softwoods and occasional use in hardwoods. But abrasive materials will destroy them.
Skip HCS (High Carbon Steel) bits entirely for shop work. They dull too quickly. The upgrade path is straightforward: – Hardwoods & General Use: HSS bits (like most standard sets). – MDF, Particle Board, Plywood, Dense Hardwoods (oak, maple): Tungsten Carbide Tipped (TCT) bits.
The tungsten carbide edges on a TCT bit resist abrasion. In MDF, which is essentially glued sandpaper, a TCT bit can last 5 to 10 times longer than an HSS bit before sharpening a Forstner bit becomes necessary. The Bosch EXPERT Wood Forstner bits use a proprietary wavy TCT rim design claimed to last 3x longer than their standard line.
The trade-off is cost and brittleness. TCT edges can chip if dropped or used on knotted wood with severe lateral shock. For a cabinet shop running hundreds of hinge cups in MDF, the math favors TCT. For a DIYer drilling occasional holes in pine, HSS is sufficient.
The One Tool You Can’t Substitute
You can sometimes use a hole saw for large diameters, but you’ll spend more time cleaning up the rough bottom and the pilot hole. You can use a spade bit, but tear-out is guaranteed. The Forstner bit’s value is in its finished cut. It’s a precision tool that demands a precision setup.
Your checklist before starting: – Drill Press: Strongly preferred. – Clamps: Always. – RPM Chart: Posted visibly. – Peck-Drilling Discipline: For anything beyond shallow depth. – Bit Material Match: HSS for wood, TCT for composites.
Following these steps turns a potentially frustrating operation into a repeatable, clean process. It’s the difference between a hinge cup that fits perfectly and one that requires filler, or a mortise that accepts a tenon tightly versus one that’s sloppy.
Frequently Asked Questions
Can I use a Forstner bit with a handheld drill?
You can, but results are unreliable for holes over 15mm. The bit requires perfectly perpendicular force, which is hard to maintain by hand. If you must, use a drilling guide jig to stabilize the drill. Expect more tear-out and less consistent depth.
Why does my Forstner bit keep burning the wood?
You are running it too fast or failing to clear chips. Refer to the RPM chart. For holes deeper than 25mm, you must use a peck-drilling cycle, drill a little, retract fully to clear chips, then continue. Burning is a sign of heat buildup from friction.
What’s the difference between a Forstner bit and a countersink bit?
They serve completely different purposes. A Forstner bit drills clean, flat-bottomed holes. A countersink bit creates a conical recess at the top of a pilot hole, allowing a screw head to sit flush or below the surface. You would never use one in place of the other.
How do I prevent the center point from going through my workpiece?
For shallow holes in thin material, this is a real risk. The solutions are: 1) Use a Forstner bit with a very short brad point (some hinge boring bits have this). 2) Set your drill press depth stop to account for the brad point’s extra length. 3) Place a sacrificial backing board underneath your workpiece to protect your workbench and give the point somewhere safe to go.
Can Forstner bits be used on metal?
No. The cutting geometry and material are designed for wood and wood composites. Using a Forstner bit on metal will instantly dull the edges and likely damage the bit. For metal, you need dedicated metal drill bits.
Before You Go
A Forstner bit rewards a methodical approach. Forget speed. Focus on the three pillars: stable setup (drill press), correct speed (slow, according to diameter), and chip management (peck drilling). When you need a flat-bottomed hole that’s clean enough for a hinge or precise enough for a joint, it’s the only bit for the job. Start with a 35mm HSS bit for practice, clamp everything twice, and let the RPM chart be your guide. The clean cut is worth the discipline.
