
A Step-by-Step Guide on How to Sharpen Drill Bits by Hand
This post contains affiliate links. As an Amazon Associate, we earn from qualifying purchases.
Sharpening a drill bit by hand requires matching three precise angles: a 118° point (set your bench grinder’s tool rest to 59°), a centered 55° chisel edge, and a 4-6° relief behind the cutting lip. Get one wrong and the drill walks, burns, or makes an oversized hole. The skill is in the setup, not the pressure.
That 4-6° relief angle is the part every first-timer grinds off. You see the cutting edge get shiny and stop, but the bit still won’t cut because there’s no clearance behind the edge. The steel just rubs.
What follows is the geometry first: why the three angles matter and what breaks when they’re off. Then the physical move — the lift-and-twist that creates the relief. Finally, how to check your work with a three-dollar gauge before you touch metal. This isn’t about making a bit sharp; it’s about making it cut straight.
Key Takeaways
- Set your bench grinder’s tool rest to 59° from the wheel face to create the standard 118° drill point. An adjustable rest is non-negotiable.
- The chisel edge at the very tip must be centered and ground to 55°. An off-center chisel edge is the main cause of a drill “walking” off your punch mark.
- Create a 4-6° relief angle behind the cutting lip by lifting the drill’s handle as you grind. No relief means the bit rubs instead of cuts, overheating immediately.
- Cool the bit in water every 5-6 seconds of contact with the wheel. If the steel turns blue or straw-colored, you’ve lost the temper and must grind past the discoloration.
- For bits over 10mm (about 3/8″), thin the web by grinding the chisel edge vertically on the wheel’s corner to reduce cutting pressure.
The 59° Setup That Prevents Walking
Your bench grinder is the default tool. A 150mm (6-inch) wheel with a 60-grit aluminum oxide stone works. The wheel must be dressed and true. The single most important part isn’t the grinder—it’s the adjustable tool rest.
Setting the tool rest to 59° from the face of the grinding wheel produces the standard 118° included angle on the drill point. This angle is a compromise that works for general-purpose drilling in steel, wood, and plastic.
If your rest is fixed or set to 90°, you cannot sharpen a drill bit correctly. You’ll get a dead-flat face with zero relief, and the bit will only generate heat. An aftermarket adjustable rest for a common grinder like a DeWalt DW758 is a twenty-dollar fix that makes the entire process repeatable.
The 118° point angle is a default, not a universal law. Softer materials like aluminum or plastic can use a sharper 90° point; harder steels sometimes need a blunter 135° point for durability. But for learning hand sharpening, lock in on 118°. Your success with other angles later depends on mastering this one first.
What a Sharp Bit Actually Looks Like
A sharp drill bit has three distinct geometric features working together. Miss one, and the bit is just a warm, shiny stick.
| Feature | Angle / Spec | What Happens If It’s Wrong |
|---|---|---|
| Point Angle | 118° (set by 59° tool rest) | Wrong material cutting performance; too sharp dulls fast, too blunt requires excess pressure. |
| Chisel Edge | 55°, centered on axis | Off-center edge makes the drill “walk” from your punch; unequal edge lengths drill an oversized hole. |
| Relief (Clearance) Angle | 4-6° behind cutting lip | No relief causes immediate rubbing and overheating; too much relief weakens the cutting edge. |
| Lip Height | Both cutting lips equal length | One longer lip drills a hole larger than the bit’s diameter, often by 0.5mm or more. |
The chisel edge is the line at the very tip where the two flutes meet. The GTZ grinding handbook specifies this must be ground to 55° and be exactly centered. This isn’t just trivia. An off-center chisel edge is the primary reason a drill skates across your workpiece instead of biting where you punched it.
The relief angle is the hidden champion. It’s the slight back-taper ground behind the cutting lip that lets the sharp edge actually contact the material. The GTZ manual states flanks should “taper off at 4-6° behind the principal cutting edges.” Grind the face flat against the wheel with no lift, and you’ve created a perfect rubbing surface. The bit will get hot and dull in seconds.
Common mistake: Grinding until the cutting lip is shiny, then stopping. You’ve created a sharp edge with zero relief. The bit will feel sharp to your finger but will only smoke and squeal in the drill press.
The Grind: A Three-Part Move
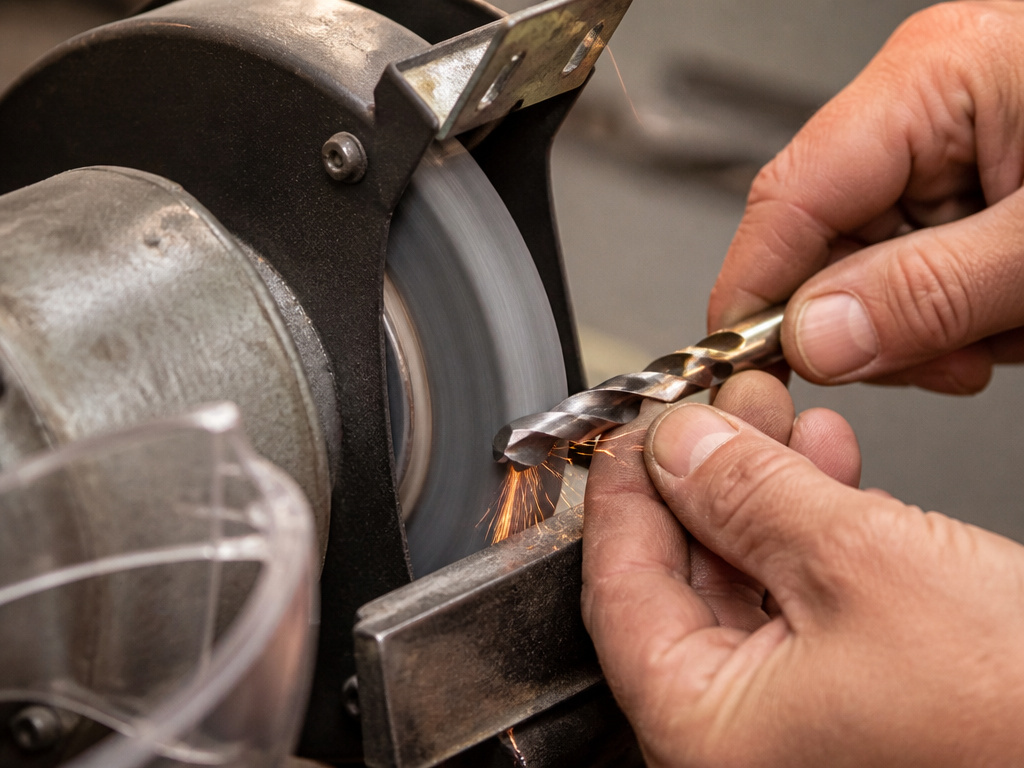 With the tool rest at 59°, put on safety glasses. Hold the drill bit between the thumb and forefinger of your left hand, supporting the body with your other fingers. Your right hand grips the shank. Position the drill so one cutting lip is horizontal and parallel to the rest.
- Contact. Touch the cutting lip to the wheel, keeping the drill body level and the lip horizontal.
- Lift and Twist. In one smooth motion, gently push the drill into the wheel while lifting the shank (your right hand) and twisting the drill clockwise (for the left-hand lip). This upward-and-rotating move is what creates the crucial 4-6° relief angle.
- Cool. After 2-3 seconds of contact, dip the tip in water. Never let the steel change color.
Repeat this motion 3-4 times for that lip. Then, rotate the drill 180° in your hand to present the opposite cutting lip. Do not change your hand position or grip—flip the bit, don’t re-learn the move. Perform the same lift-twist-cool sequence the same number of times.
I learned the lift-twist rhythm on a cheap carbon steel bit. The first time I tried it, I ground a beautiful, shiny edge with no lift. The bit promptly blueed on its first hole in mild steel and was useless. The relief angle isn’t optional. It’s the difference between cutting and polishing.
Why the lift and twist? The lift angles the cutting edge away from the wheel, carving out the clearance behind it. The slight rotation ensures you’re grinding the entire lip evenly, from the outer corner back toward the chisel edge. A straight push only grinds the outer corner, leaving the inner portion dull and changing the point geometry.
Checking Your Work: The Gauge and the Eye Test
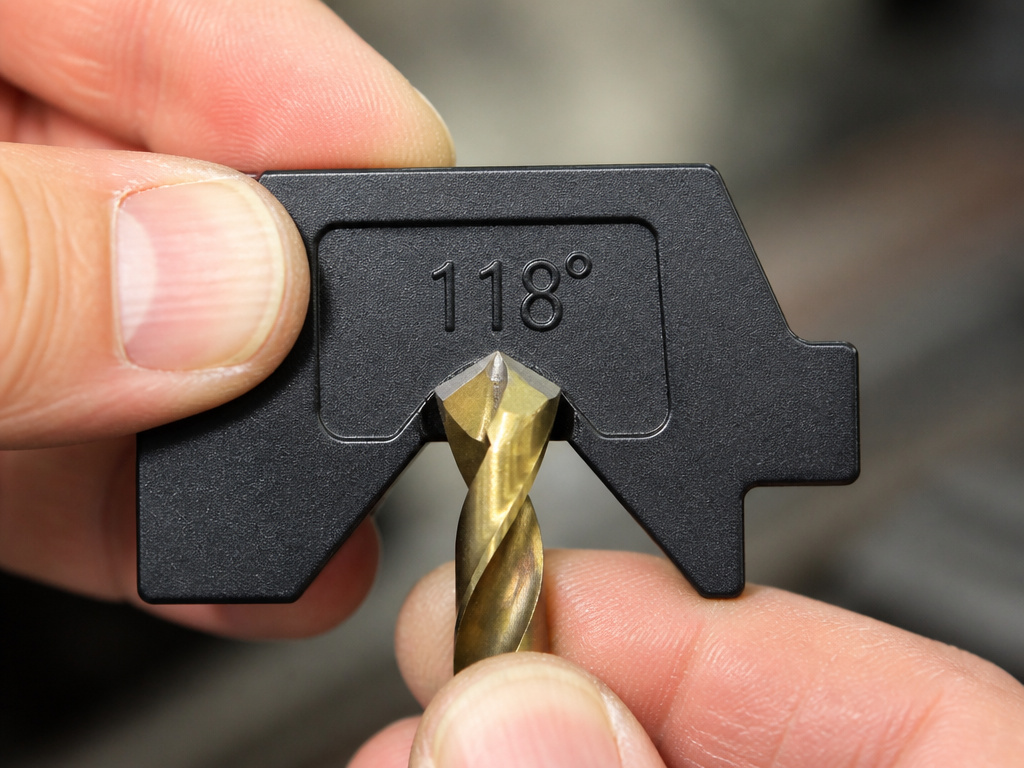 You need feedback before you test the bit in metal. Your fingers aren’t precise enough.
A plastic point gauge is the tool. It costs a few dollars and has two functions: it checks the 118° point angle, and it has a flat back for comparing lip height. Place the freshly ground point into the gauge’s 118° notch. Both cutting lips should make contact along their full length with no light shining through. If one lip is high, you’ve ground the angles unevenly.
Flip the gauge over and use its straight edge as a reference. Hold it against the two cutting lips. The tips of both lips should touch the straight edge simultaneously. If one lip touches first, it’s longer. A lip height difference of even half a millimeter will drill a hole noticeably larger than the bit’s diameter.
For the chisel edge, use a marker. Color the chisel edge with a permanent marker, then give it one very light touch on the corner of the grinding wheel. The grind mark should be centered on the chisel. If it’s off to one side, your drill wasn’t rotated a true 180° between grinds.
When Hand Sharpening Isn’t the Answer
Not every dull bit deserves a second life. Assess before you grind.
- Severely Worn Flutes: If the flutes (the spiral grooves) are worn smooth near the tip, the bit can’t evacuate chips. It will clog and overheat no matter how sharp the point is.
- Carbide Tips: Standard aluminum oxide grinding wheels won’t touch carbide. You need a silicon carbide or diamond wheel. For a single masonry bit, it’s often cheaper to replace it.
- Broken or Chipped Tips: If a significant chunk of the cutting lip is missing, you’ll have to grind so much metal to reform the edge that you’ll drastically reduce the bit’s overall length. For common sizes, replacement is faster.
- Specialist Bits: The geometry on a Forstner drill bit or a split point drill bit is complex. Hand sharpening them freehand is expert-level work; a dedicated jig or a sharpening with a file approach for touch-ups is more reliable.
This is where knowing the different types of drill bits and their common drill bit materials pays off. A cobalt bit is worth the time to sharpen. A black oxide-coated HSS bit from a bulk set might not be.
Drill Bit Sharpening vs. Other Methods
Hand sharpening on a grinder is a core skill, but it’s one option in a toolkit.
| Method | Best For | Precision & Learning Curve |
|---|---|---|
| Hand on Bench Grinder | Regular maintenance, all standard twist bits. | High precision possible, steep learning curve. Requires mastering angles by feel. |
| Dedicated Drill Grinder (e.g., Lisle 91000) | Workshops sharpening many bits; consistent results. | Highest precision. Machine sets angles; operator just feeds the bit. |
| Sharpening with a Hand File | Touch-ups in the field, no power available. | Lower precision, good for removing burrs or minor dullness. Slow for major reshaping. |
| Sharpening Jig for Grinder | DIYers wanting consistency without a dedicated machine. | Good precision. Jig holds the angles, but setup time is required for each bit. |
The Lisle 91000 Drill Grinder, for example, locks in the heel clearance and cutting lip angle with a magnetic gauge. It removes the guesswork but is an investment. For the home shop that goes through a few bits a month, mastering the hand method is more flexible. It also makes you better at sharpening on a grinder for other tools like chisels.
The goal isn’t to choose one forever. It’s to use the right method for the job. A quick file sharpening method can salvage a bit at the jobsite. The bench grinder handles the Sunday afternoon sharpening session. Understanding drill bit angles helps you no matter which tool you use.
Maintaining Sharp Bits
Sharpening is half the battle. Keeping bits sharp longer is the other half.
- Use Cutting Fluid: Even when drilling steel by hand, a drop of oil or dedicated cutting fluid reduces heat and friction at the cutting edge, dramatically extending sharpness.
- Clear Chips: Peck-drill in deep holes. Regularly pull the bit out to clear packed-in chips, which cause abrasive wear on the flutes.
- Store Them Properly: Don’t throw bits loose in a drawer. Use a rack or a labeled index case. HSS and cobalt bits are hard but brittle; banging together dulls the edges.
- Clean Off Gunk: Pitch from wood or softened plastic can build up in the flutes. Cleaning drill bits with a wire brush and solvent keeps them cutting freely. For removing rust, a quick soak in evaporust or a scrub with a scouring pad restores the surface.
- Match the Bit to the Material: Don’t use a wood spade bit on metal. Using the correct drill bit type for the job reduces extreme wear. A split point bit is for metal and starts easier; a brad point is for clean wood holes.
A sharp bit is a safe bit. A dull bit requires excessive pressure, which can lead to the drill binding or the workpiece spinning. The time you spend on maintenance is paid back in cleaner holes, less effort, and longer tool life.
Frequently Asked Questions
Can you sharpen drill bits without a grinder?
Yes, but with limits. You can use a manual file technique for minor touch-ups or to reshape a damaged corner. It’s slow and requires a good file, but it works for emergency field repairs. For complete resharpening of a dull bit, a bench grinder or dedicated sharpener is the practical tool.
How do I know if I overheated the bit?
The steel changes color. A pale straw or blue tint at the cutting edge means you’ve drawn the temper. The steel at that spot is now softer and will wear almost instantly. The fix is to grind back past the discolored area until you see uniform silver metal, then re-establish the angles. This shortens the bit.
Why does my freshly sharpened bit drill an oversized hole?
The two cutting lips are not the same length. Even a difference of 0.5mm will cause the longer lip to cut a wider circle. Use a point gauge to compare lip heights after grinding. This is the most common error after failing to create a relief angle.
What’s the difference between 118° and 135° points?
The 118-degree drill bit is the general-purpose standard. The 135-degree drill bit has a flatter, blunter point. This wider angle makes the cutting lips stronger and less prone to chipping, which is better for hard materials like stainless steel or for aggressive drilling with a cordless impact driver. The trade-off is it requires more downward pressure to start cutting.
How often should I sharpen my drill bits?
Sharpen at the first sign of dullness: increased pressure needed, squealing or smoking, rough hole edges, or the bit producing powder instead of curled chips. Don’t wait until it’s completely useless. A quick touch-up takes a minute; a major reshape takes five.
Before You Go
Hand-sharpening a drill bit boils down to three numbers: 59, 55, and 4-6. Set your rest to 59°. Center a 55° chisel edge. Grind a 4-6° relief with a lift-and-twist. Check symmetry with a gauge.
The skill feels alien for the first dozen bits. Your hands will want to just push straight in. Fight that instinct. The lift creates the clearance, and the clearance is what lets the sharp edge work. Once that motion clicks, you’ve unlocked a maintenance skill that pays for itself on the first avoided trip to the hardware store.
Start with a cheap 1/4″ bit you don’t mind ruining. Grind, check, test, repeat. When that bit drills a clean, straight hole in scrap metal, you’re done. The rest is just practice.
