
The Complete Method for How to Sharpen Drill Bits With a Grinder
This post contains affiliate links. As an Amazon Associate, we earn from qualifying purchases.
Sharpen a drill bit on a grinder by matching three things: the original point angle (usually 118° or 135°), applying a consistent sweep-and-twist motion into the wheel, and quenching the bit before it turns blue. The Lisle 9100 grinder sharpens bits from 1/8″ to 1 1/4″, but a standard bench grinder with a steady hand works for the most common sizes.
That point angle isn’t a suggestion. A 118-degree bit forced into hardened steel will skate, overheat, and dull in seconds. A 135-degree bit in soft pine will grab and splinter. The angle printed on the bit’s packaging or etched on its shank is the first spec you need to verify.
What follows is the method that keeps bits cutting: the three-step hand technique, the jigs that eliminate guesswork, and the two mistakes that crack wheels or ruin temper. By the end, you’ll know whether to freehand it on your Ryobi or bolt on a Drill Doctor.
Key Takeaways
- The point angle dictates the job. Use 118° for wood and soft metals, 135° for stainless steel and hard alloys. Guessing wrong burns out the bit.
- Overheating ruins the temper. If the metal turns straw-colored or blue, you’ve softened the steel. It will dull on the next hole. Dip the bit in water every two seconds.
- A sharpening jig isn’t for beginners, it’s for consistency. The Sealey SMS01 attachment needs a 75mm long bit and sets the clearance angle automatically. It pays for itself after saving a dozen 1/2″ bits.
- Split the point for harder materials. On a Drill Doctor, point splitting is optional for 118° bits but mandatory for 135° bits to prevent “walking” on curved surfaces.
- Cracked wheels come from cold starts. Never slam a cold bit into a stationary wheel. Start the grinder, let it spin up, then make light, initial contact.
The Three-Step Grinder Method (And What Most People Skip)
Do you have a steady hand and a good eye? The freehand method on a bench grinder is fast, but it rewards a light touch. This isn’t about brute force. It’s about a consistent rhythm.
The proper way to sharpen a tool and avoid overheating is to keep the object in constant motion, moving it at an even pace. Never force a tool against the grinding wheel. Keep the tool cool by using a pan of water. The grinding wheel should rotate ‘into’ the object being sharpened. . Ryobi Bench Grinder Operator’s Manual
Step 1: Set the rest and identify the angle. Your bench grinder’s tool rest is your guide. Adjust it so the bit contacts the wheel at the existing point angle. For a common 118° bit, that’s about a 59-degree tilt from horizontal. Many grinders have a V-groove in the rest preset for this. Don’t grind without the rest, your angle will wander instantly.
Step 2: The sweep, twist, and quench. Hold the bit firmly with both hands. Present the first cutting lip to the wheel, maintaining contact with the rest. In one smooth motion, sweep the bit from left to right while gently twisting it clockwise. This replicates the bit’s flute curvature. You should see a tiny, even ribbon of sparks. Do this for two seconds max, then dip the tip in water. Repeat on the second cutting lip.
Step 3: Check for symmetry and a sharp heel. The two cutting edges must be identical in length and angle. Hold the bit up to a light source and look down the point. Any asymmetry means one side is taking more load and will drill an oversized hole. The heel, the trailing edge behind the cutting lip, must be lower. If it’s not, you have zero clearance and the bit will just rub.
| Mistake | What Happens | Timeline |
|---|---|---|
| Skipping the quench | The bit overheats, turning blue. The steel loses temper. | Dulls on the very next hole. |
| Uneven pressure | One cutting lip is shorter. The hole drills oversized. | Noticeable on the first test. |
| Grinding the flutes | You destroy the bit’s ability to eject chips. | Bit binds and snaps in deep wood. |
| Ignoring the wheel’s health | A glazed or out-of-round wheel won’t cut cleanly. | Every sharpening takes longer. |
Where this goes sideways: Rushing the quench. Two seconds of grinding raises the tip to over 300°C. Wait three seconds to dip it, and the temper is already gone. The bit will feel sharp but crumble under load.
The rhythm is grind-dip-check. Grind for two seconds, dip for one, check for color and symmetry. If you see gold or blue, you went too long. That bit is now a candidate for reprofiling with a coarse wheel, not fine sharpening.
Drill Bit Sharpening Attachments & Jigs
Your hands aren’t a CNC machine. For repeatable results on a dozen identical bits, a jig is the only sane choice. These devices lock in the point and clearance angles, turning an art into a repeatable process.
The market splits into two camps: dedicated drill grinders and universal attachments. A dedicated unit like the Lisle 9100 is a complete system. It sharpens bits from 1/8″ to 1 1/4″ and includes fixtures for core drills and flat-bottom bits. You set the lip clearance and point angle via calibrated adjusters. It’s for a shop that goes through bits by the pound.
For the home workshop, an attachment that clamps to your existing bench grinder is more practical. The Sealey SMS01 is a classic example. It fits any standard grinder and handles 3-19mm (1/8″-3/4″) bits. Its rotating neck lets you grind both sides without unclamping, and the angle gauge has presets for specific jobs.
| Attachment Type | Best For | Key Limitation |
|---|---|---|
| Dedicated Drill Grinder | High-volume sharpening, mixed bit types | Significant bench space, higher cost. |
| Universal Bench Grinder Jig | DIYers sharpening common HSS twist bits | Minimum bit length (often 75mm/3″). |
| Tormek Wet-Grinder System | Precision sharpening, no overheating | Slow grinding, system cost, learning curve. |
The Tormek DBS-22 attachment is in its own class. It mounts on a water-cooled sharpening system, so overheating is impossible. It creates a superior 4-facet point that reduces “walking” and thrust force. This is the choice for someone sharpening expensive cobalt or carbide-tipped bits where heat management is critical.
The common failure point with all jigs is ignoring the minimum length rule. The Sealey SMS01 requires a 75mm minimum drill bit length. That excludes short screwdriver bits and stubby masonry drills. Trying to clamp a shorter bit throws off the geometry guarantee.
Point Angles, Clearance, and Split Points Explained
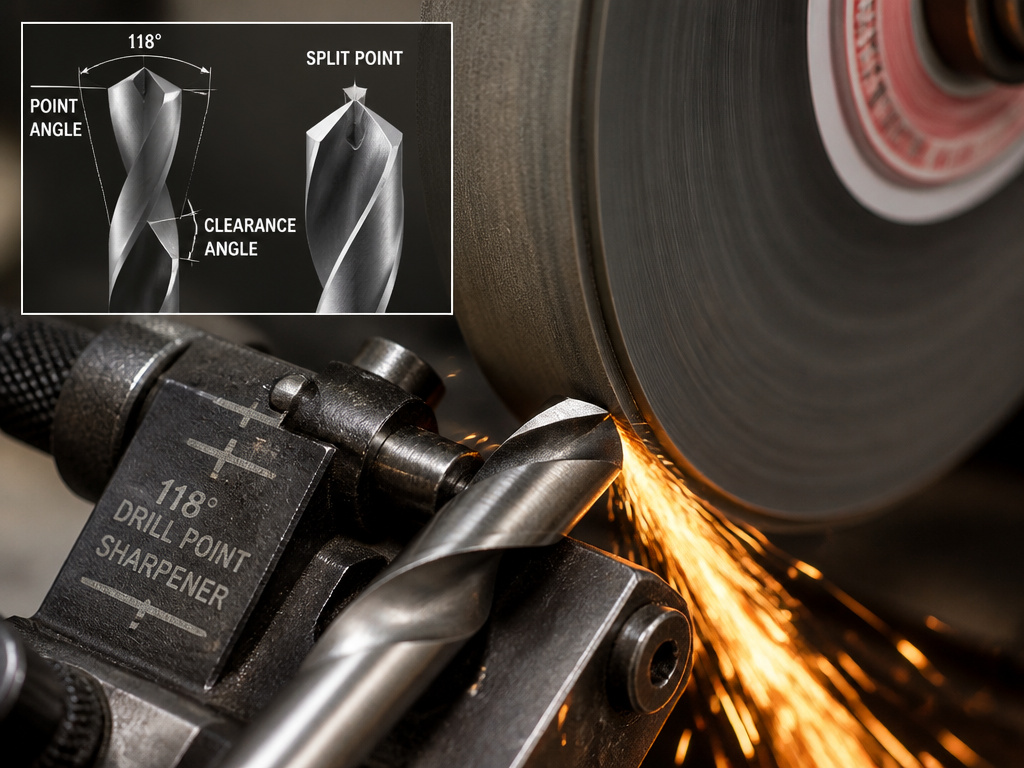 You can’t sharpen what you don’t understand. A drill bit’s geometry is a compromise between strength, cutting efficiency, and material suitability.
The point angle is the included angle at the very tip. A 118° point is sharper and cuts more aggressively in soft materials like wood, plastic, and aluminum. A 135° point is flatter, stronger, and better for hard materials like stainless steel or cast iron. It requires more downward force but is less likely to chip.
Clearance angle is the slope ground behind the cutting lip. It’s what lets the lip actually bite into the material instead of rubbing. The Tormek DBS-22 manual specifies optimal clearance angles from 7° to 14°: harder materials and larger drill diameters need a smaller angle (7°-9°); softer materials and smaller diameters work with a larger angle (11°-14°). Get this wrong, and the bit either chatters violently or generates friction heat without cutting.
Split pointing is a secondary grinding operation that thins the web at the very center of the bit, creating a self-centering tip. For a Drill Doctor DD500X or DD750X, the rule is clear: splitting is optional for 118° bits but mandatory for 135° bits. A split point won’t “walk” on curved or hard surfaces. It’s the difference between starting a hole exactly where you want and having the bit skate across the workpiece.
The part nobody mentions: A split point changes the cutting dynamics. It reduces thrust force by up to 50%, which is why it’s mandatory for hard materials. But on a soft, gummy material like pure aluminum, a split point can sometimes grab too aggressively.
Why does this matter for grinder sharpening? If you’re freehanding, you’re almost certainly recreating a basic cone point. That’s fine for general use. If you need a split point, you need a jig that can perform that operation, like a Drill Doctor. Trying to hand-grind a split point is a recipe for an unbalanced bit.
How to Set Up Your Bench Grinder for Success
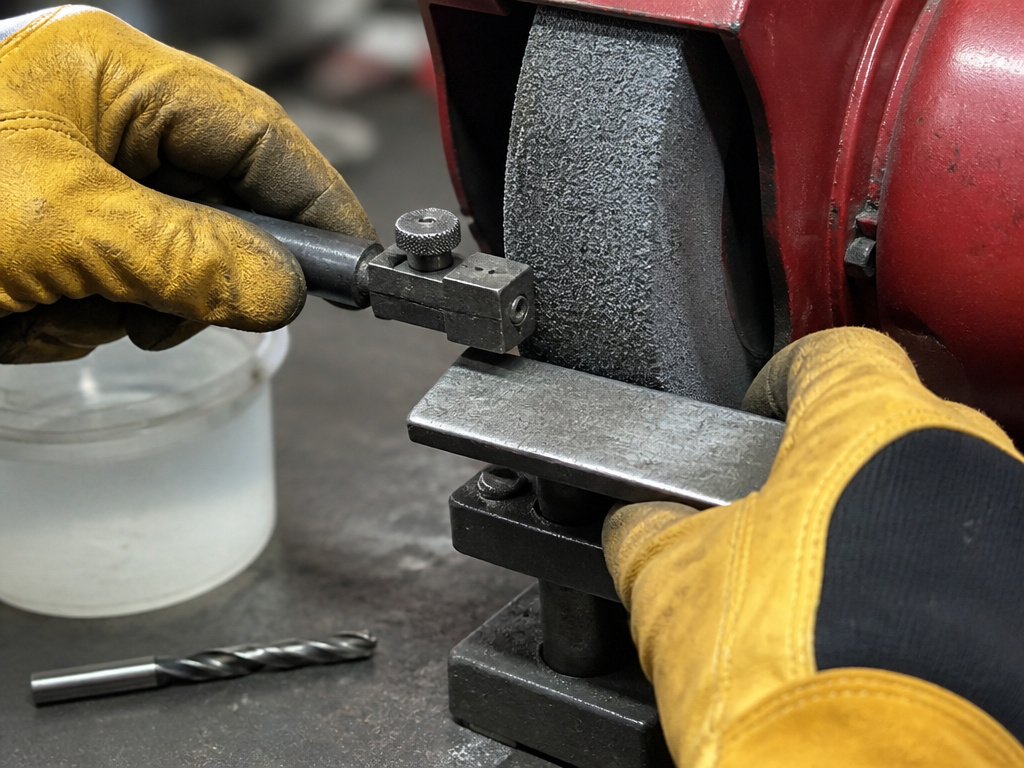 A grinder is a simple machine. Two wheels, a motor, and a pair of tool rests. But its setup dictates your results before you even touch a bit.
Start with the wheels. A general-purpose bench grinder should have a coarse wheel (around 60 grit) for shaping and a fine wheel (100-120 grit) for sharpening. The coarse wheel removes metal quickly to fix a chipped edge or change a point angle. The fine wheel puts the final edge on. Dressing the wheels is non-negotiable. A glazed or loaded wheel won’t cut; it just heats the metal. Use a wheel dresser to expose fresh, sharp abrasive grains.
Secure the grinder. Bolt it to a solid bench. Vibration is the enemy of precision. Adjust the tool rests so they are within 1/8″ of the wheel and perfectly square. The included eye shields are not optional. A shattered wheel or a metal shard travels fast.
Your workspace needs three things within arm’s reach: the grinder, a container of water for quenching, and a good light source. You must see the color of the metal as you grind. Indirect overhead light is useless. Use a flexible LED work light pointed directly at the contact point.
Finally, know your bit material. High-speed steel (HSS) is forgiving and the most common. Cobalt bits run hotter and are more prone to work-hardening if you grind too aggressively. Carbide-tipped bits require a diamond wheel; a standard aluminum oxide wheel will barely touch them. This dictates your wheel choice and grinding pressure before you start.
Safety, Mistakes, and Bit Salvation
A grinder is unforgiving. The mistakes happen in a second; the consequences last for the life of the tool, or your fingers.
Before you start: Wear safety glasses under the face shield. A stray fragment can come around the side. Never wear gloves that can catch in the wheel. Secure loose clothing and tie back long hair. Ensure the wheel guards are in place and the tool rests are tight.
Mistake 1: Overheating. This is the cardinal sin. The sequence is predictable: the metal turns straw, then gold, then blue. At blue (around 300°C), the temper is gone. The bit might still take an edge, but it will lose it immediately in use. The fix is a rhythm: grind, dip, check. Two seconds on, one second off.
Mistake 2: Cracking the wheel. “Excessive pressure on a cold wheel may cause the wheel to crack,” states the Ryobi manual. Always let the grinder reach full speed before making contact. Start with feather-light pressure, then increase slightly. Never jam the bit into the wheel.
Mistake 3: Grinding the wrong part. You sharpen only the cutting lips and the clearance behind them. Never touch the flutes, the spiral part that lifts chips. Grinding the flutes destroys the bit’s geometry and its ability to clear material. The bit will bind and snap.
Can you save a butchered bit? Sometimes. If it’s just overheated, you can re-grind it, but know it will have a shorter life. If the geometry is wildly asymmetrical, use the coarse wheel to grind back both cutting lips evenly until you hit good metal, then re-establish the point and clearance angles. This shortens the bit but saves it from the trash. For a bit with a completely ruined tip, consider if your time is worth more than a new $5 bit.
Frequently Asked Questions
Can you sharpen any drill bit on a grinder?
You can sharpen high-speed steel (HSS) and cobalt bits on a standard aluminum oxide grinding wheel. Carbide-tipped masonry bits require a diamond wheel, which most bench grinders don’t have. Titanium nitride (TiN) coated bits can be sharpened, but you’ll grind off the coating at the tip, which is fine.
What’s the difference between a bench grinder and a Drill Doctor?
Bench grinder is a versatile power tool you use freehand or with a jig. It requires skill to maintain angles. A Drill Doctor is a dedicated, foolproof sharpening machine. You insert the bit, it aligns it, and a cam guides the sharpening and splitting process. It’s faster for consistent results on common bit sizes but less versatile for oddball bits.
How do I know if my drill bit is sharp?
Two tests. Visually, the cutting edges should be bright and meet at a crisp point with no rounding. Functionally, press the tip gently into a piece of softwood. A sharp bit will bite and start a curl immediately. A dull bit will skate or crush the fibers without cutting.
Why does my newly sharpened bit drill oversized holes?
This is almost always caused by uneven cutting lips. One lip is longer or at a slightly different angle, so it cuts a wider arc than the other. The hole becomes egg-shaped or larger than the bit’s diameter. The fix is to re-grind, constantly checking symmetry against a fixed guide or using a jig.
Is it worth sharpening cheap drill bits?
For a single, cheap HSS bit, often not. Your time and wheel wear cost more than a replacement. Sharpening becomes worthwhile when you have a set of quality bits, a specific size you use often, or larger, more expensive bits (1/2″ and up). A sharpening jig turns the economics in your favor after about a dozen bits.
The Bottom Line
Sharpening drill bits on a grinder is a core workshop skill. It turns a consumable into a renewable tool. The freehand method works if you respect the rhythm: find the angle, sweep with the twist, and quench without fail. For precision and repeatability, a Sealey SMS01 jig or a Drill Doctor DD750X is a wise investment.
Remember the two non-negotiables: match the point angle to the material, and never let the metal discolor. A blue bit is a dead bit. Keep your wheels dressed, your rests set, and your light bright. Your bits will cut cleaner, last longer, and your projects will go smoother because of it.
