
Step-by-Step Guide on How to Drill Angled Holes Perfectly
This post contains affiliate links. As an Amazon Associate, we earn from qualifying purchases.
Drilling angled holes requires one of three methods: a drill press with a tilted table or jig, a handheld drill guided by a commercial or shop-made jig, or a specialized angle drill. The Makita DA3010 angle drill manual warns of a “tremendous twisting force” at the moment the bit breaks through the workpiece, which is the leading cause of wrist injury and bit breakage on steep angles. Match the tool to the material and angle—wood over 15 degrees demands a jig, while metal under 30 degrees can sometimes be handled freehand with a punch.
That breakthrough force is not a gentle nudge. It’s a sudden, full-torque kick that tries to wrench the tool from your grip. The steeper the angle and the tougher the material, the harder it hits. This is why every method for angled drilling, from a $50 jig to a $300 specialty tool, is ultimately about controlling that single moment.
What follows is a breakdown of the three proven approaches, the specific tools that make each one work, and the failure timelines you get when you skip a step. We’ll cover the shop-built jig that replaces a shelf full of angled platforms, the handheld drill techniques that actually hold accuracy, and the one material you should never lubricate.
Key Takeaways
- The Makita angle drill manual explicitly warns of “tremendous twisting force” at hole breakthrough; failing to brace for it risks injury and ruins the workpiece.
- For wood at angles steeper than 15 degrees, a drill press with a jig or a guided handheld system is non-negotiable—freehand drilling will wander every time.
- When drilling metal, always start with a center punch except for iron and brass, which must be drilled completely dry without any cutting lubricant.
- Large-diameter holes (over 1/2″) at steep angles (over 30 degrees) are a specialist task; Forstner bits will skate, and hole saws will bind.
- A professional fabrication shop reported that drilling 30-degree holes through 1/8″ stainless steel tube was “extremely time consuming,” requiring pre-drilled pilot holes and a tilted mill head—a reality check for complex metal projects.
The 3 Main Methods for Drilling Angled Holes
Your choice depends entirely on angle, material, and the tools already on your bench. These are not interchangeable recommendations for different budgets—they are different solutions for different problems.
| Method | Best For | Realistic Angle Limit | The Catch |
|---|---|---|---|
| Drill Press + Jig | Repeatable accuracy in wood, precise furniture joints | Up to 45 degrees | Requires building or buying a jig; workpiece size limited by throat depth. |
| Handheld Drill + Guide | One-off holes, onsite work, larger workpieces | Up to 30 degrees (with a quality guide) | Commercial guides cost $40-$100; shop-made versions take time to build accurately. |
| Angle Drill | Tight spaces, electrical/plumbing, shallow angles in metal | Up to 15 degrees (effectively) | Significant torque reaction at breakthrough; not for precision woodworking. |
The drill press is the accuracy king. A jig like the one detailed by Beth Ireland in Fine Woodworking uses a U-shaped cutout that pivots around the drill press column, allowing infinite angle adjustment with simple spacer blocks. This isn’t a minor upgrade. It replaces a shelf full of single-use angled platforms with one fixture.
For handheld work, a commercial portable drill guide like the Milescraft DrillMate or the Rockler Portable Drill Guide provides the rigid reference surface a freehand drill lacks. These are not casual aids. They are essential for any angled hole deeper than a half-inch in wood.
The angle drill, like the Makita DA3010, is a specialist. Its 90-degree head gets into corners a standard drill cannot reach. But its 2,400 RPM motor and 10mm steel capacity come with a specific warning from the manufacturer that most users ignore until it’s too late.
Where this goes sideways: Assuming an angle drill is for precision. It’s for access. The long lever arm of the workpiece magnifies any hand movement, and the off-center grip makes controlling the breakthrough torque a two-handed fight.
Drilling Angled Holes with a Drill Press and Jig
This is how you drill angled holes for chair legs, stool joinery, or any project needing more than one identical hole. The goal is to remove every variable except the drill bit itself.
Start with the jig. The classic design uses a base plate that clamps to the drill press table and a hinged ramp that holds the workpiece. The pivot point is a U-shaped notch that fits around the drill press column. You slide different thicknesses of spacer blocks under the ramp’s free end to set the angle.
- Clamp the jig base to the table. Slide the jig so the column sits in the U-cutout. Pivot the entire jig until a centerline marked on the ramp is directly under the drill chuck. Lock it down with T-bolts or C-clamps. If the jig can shift, the hole will be wrong.
- Set the angle with a spacer. Use a digital angle gauge or a bevel square set to your desired angle. Lift the ramp and insert a wood or metal spacer block that holds that angle. The block doesn’t need a matching angle cut—it just needs the correct height.
- Align and clamp the workpiece. Draw alignment lines on your stock. Place it on the ramp and adjust until the bit’s tip is centered on your mark. Use a clamp at the rear and a stop block at the side. Any movement during drilling turns a clean hole into a slotted mess.
- Drill with a brad-point or Forstner bit. For clean entry in wood, a brad-point bit is the default. For flat-bottomed or large-diameter holes, a Forstner bit is the only choice. Start the drill press at its slowest speed setting and feed steadily.
Skipping the clamping step lets the workpiece ride up with the bit. The result is a tapered, oblong hole that no fastener will hold tightly. This is the most common error in first-time jig use.
For woodworking projects requiring multiple strong, hidden joints, mastering the pocket hole drilling technique on a drill press is a logical next step after angled drilling.
Drilling Angled Holes with a Handheld Drill
When you don’t have a drill press or the workpiece is too large, a handheld drill is your only option. Accuracy here comes from a guide, not from your wrist.
Option A: Commercial Drill Guide
Tools like the Milescraft DrillMate clamp onto your drill’s neck, providing a flat base with adjustable depth stops. You press the base against the workpiece and the drill is forced to follow the set angle. For a handful of holes, this is the fastest path to an acceptable result. The limitation is baseplate size—on a steep angle, a small base can tip.
Option B: Shop-Made Block Jig
Cut a block of hardwood or plywood at your desired angle. Clamp this block to your workpiece. The flat side of the block becomes a reference surface for your drill. This method works well for 45-degree holes in trim or decking.
- Cut the guide block accurately. Use a miter saw or table saw. A one-degree error in the block translates to a two-degree error in the hole over a typical drill bit’s length.
- Clamp the block securely. Use at least two clamps, positioned to avoid the drill’s path. The block must not rock.
- Start the hole with a punch. Even in wood, a center punch or an awl creates a small dimple that captures the bit’s tip and prevents the dreaded “walking” start.
- Use short, sharp bits. A long twist bit will flex, bowing in the middle and exiting at a shallower angle than you started. A stub-length bit or a brad-point bit stays rigid.
The handheld approach fails when you try to drill too deep. As the bit penetrates, it follows the path of least resistance, which is rarely the straight line you intended. For any hole deeper than the bit’s diameter, you are now drilling freehand.
If your project also requires perfectly perpendicular joinery, the principles of drilling straight are the foundation all angled work builds upon.
Drilling Angled Holes with a Handheld Drill
An angle drill is a power tool designed with its head fixed at 90 degrees to the motor body. Models like the Makita DA3010 are built for drilling in tight corners between studs or joists where a standard drill won’t fit. This is not a tool for fine woodworking.
The Makita manual states: “There is a tremendous twisting force exerted on the tool/bit at the time of hole breakthrough. Hold the tool firmly and exert care when the bit begins to break through the workpiece.”
That warning is in the manual because people get hurt ignoring it. The twisting force is amplified by the drill’s offset head. You hold the motor, but the torque acts at the chuck, several inches away. It wants to spin the entire tool.
The procedure for metal is specific:
- Center punch. This is not a suggestion. The manual says: “To prevent the bit from slipping when starting a hole, make an indentation with a center-punch and hammer.” A slipping bit on an angled metal surface scars the workpiece and ruins the bit.
- Select speed and lubricant. Use a slow speed for metal. Apply a cutting lubricant for steel or aluminum. The manual gives a critical exception: “The exceptions are iron and brass which should be drilled dry.” Adding oil to iron or brass creates a gummy paste that clogs the bit’s flutes.
- Clamp everything. The manual is absolute: “Always secure small workpieces in a vise or similar hold-down device.” Your hand is not a vise.
- Feed with steady, moderate pressure. The manual warns: “Pressing excessively on the tool will not speed up the drilling. In fact, this excessive pressure will only serve to damage the tip of your bit, decrease the tool performance and shorten the service life of the tool.”
- Brace for breakthrough. As the bit tip exits the back side, relax your feed pressure slightly and tighten your grip. This is the moment the tool will try to jump.
For basic holes in wood at shallow angles, an angle drill can work. For the complex, deep holes required in metal fabrication, the reality is grim. One architectural shop drilling 30-degree holes in stainless steel tube for cable railings called the process “extremely time consuming,” requiring pre-drilled pilot holes and a milling machine.
Bit Selection for Angled Drilling
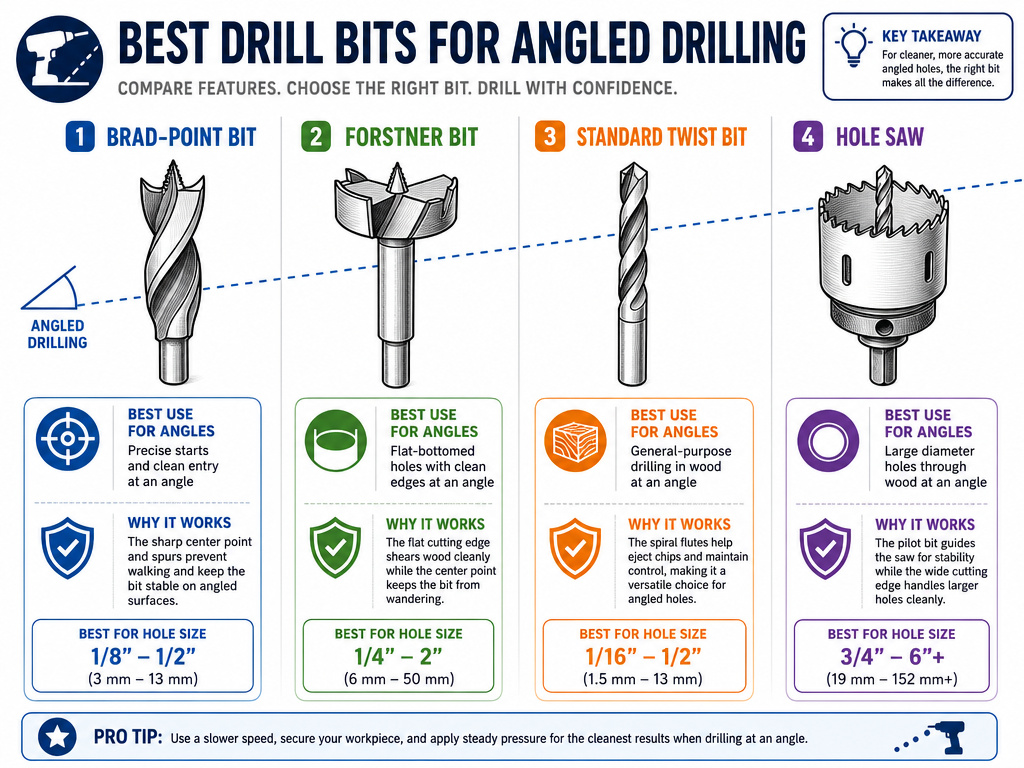 The bit is your cutting interface. A standard twist bit is the wrong choice for most angled work.
| Bit Type | Best Use for Angles | Why It Works | Failure Mode |
|---|---|---|---|
| Brad-Point | Wood, any angle | The sharp central spur grabs instantly, preventing walk. | The spurs can snap if forced on metal or hard knots. |
| Forstner | Wood, flat-bottom holes up to ~30 degrees | Cuts a clean, precise rim before the center engages. | On angles steeper than 45 degrees, the center point has nothing to bite, causing the bit to “skate around.” |
| Standard Twist | Metal, shallow angles | Readily available, good for pilot holes. | The 118-degree tip wants to wander on curved or angled surfaces without a punch mark. |
| Hole Saw | Large diameters in thin material | Cuts a kerf only, less binding than a spade bit. | The pilot bit dictates the angle; if it walks, the entire saw follows. Prone to binding on breakthrough. |
For large-diameter big holes in wood, a Forstner bit is the professional’s choice. But on an angle, its weakness is the center point. As the bit tilts, that point contacts the wood higher up on its side. It can skid across the surface instead of digging in. The solution is to drill a small, straight pilot hole first to give the Forstner’s point a seat.
A hole saw is useful for angled holes in sheet material, like installing a vent pipe through a soffit. The key is to start the pilot bit perfectly perpendicular to the surface, then slowly tilt the drill to the desired angle once the saw’s teeth have engaged. Forcing the angle at the start will break the pilot bit.
Common Mistakes and How to Avoid Them
These errors have predictable, physical consequences. They are not matters of opinion.
Common mistake: Drilling iron or brass with cutting oil. The oil mixes with fine metal particles, creating an abrasive paste that loads the bit’s flutes. The bit overheats, loses its temper, and dulls after a few holes. Drill these metals dry, as the Makita manual specifies.
Mistake 1: Skipping the Center Punch in Metal
The bit tip slides. It gouges a crescent-shaped scar next to your intended hole. Now your starting point is compromised, and the bit is more likely to walk again on the second attempt. The fix is always to punch first. Every time.
Mistake 2: Using a Dull Bit
A sharp bit cuts. A dull bit tears and requires more force. More force on an angle translates to more deflection. The hole goes off-course. If you see burn marks on wood or need to lean heavily on the drill, stop and sharpen or replace the bit.
Mistake 3: Not Clamping the Workpiece
The drill bit rotates at high speed. Friction wants to spin the workpiece with it. Even a slight rotation destroys your angle alignment. For handheld drilling, a bench vise or bar clamps are mandatory. For a drill press, use the jig’s clamps.
Mistake 4: Ignoring Breakthrough Torque
You feel the bit start to push through easier. A second later, the drill jerks in your hand, the bit snaps, or the workpiece splinters. This is the “tremendous twisting force” in action. Ease up on the feed pressure just as the bit exits, but maintain firm control of the tool.
These mistakes compound. A dull bit on an unclamped workpiece without a punch mark is a guaranteed botched job. The angled hole techniques that work isolate these variables one by one.
Frequently Asked Questions
Can you drill an angled hole without a jig?
You can drill a shallow-angled hole in soft material without a jig if you are experienced and use a center punch. For any angle over 15 degrees, any hole in hard material, or any need for precision, a jig is not optional. The human hand cannot reliably maintain a compound angle against the resistance of cutting material.
What is the best drill bit for angled holes in wood?
Brad-point drill bit is the best general-purpose choice. The sharp central spur penetrates immediately and guides the cutting edges, preventing the bit from wandering across the angled surface. For flat-bottom holes, use a Forstner bit, but be prepared for it to skate on angles steeper than 45 degrees unless you drill a pilot hole first.
How do you find the correct angle for drilling?
Use a digital angle finder or a bevel gauge. Place the tool on the reference surface of your jig or directly on the workpiece where the hole is needed. Transfer this angle to your drill press table, jig spacer, or guide block. Guessing by eye introduces error that magnifies over the length of the bit.
Why does my drill bit keep walking when starting on an angle?
The pointed tip of a standard twist bit needs a perpendicular surface to bite. On an angle, it contacts a slope and slides downhill. The fix is to create a perpendicular starting point: use a center punch for metal, or drill a tiny pilot hole with a brad-point bit for wood. This gives the main bit’s tip a socket to sit in.
Is an angle drill the same as a right-angle drill?
Yes, the terms are interchangeable. These are drills with a head permanently fixed at 90 degrees to the motor, like the Makita DA3010 series. They are designed for drilling in confined spaces, not for precision angled drilling across a workpiece. The torque reaction is significant.
Before You Go
Drilling angled holes is a test of preparation. The actual cutting is the last step in a chain of setup: choosing the method, building or setting the jig, selecting the correct bit, securing the workpiece, and marking the start point. Break any link in that chain and the hole will be wrong.
For most woodworking, a drill press with a pivoting jig is the only tool that delivers repeatable accuracy. For metal in tight spaces, the angle drill gets the job done if you respect its breakthrough warning. For everything else, a handheld drill guided by a commercial fixture or a shop-made block is the practical solution. Your first attempts will feel clumsy. That’s normal. The skill is in the setup, not in your wrist.
If your next project involves joining parts with hidden strength, the precision you learn here directly applies to mastering dowel joints or large hole drilling. Start with a simple block jig for a 45-degree shelf support. Feel the bit want to walk, then feel it lock into the punch mark. That’s the lesson.
