
A Step-by-Step Guide on How to Drill a Large Hole in Wood
This post contains affiliate links. As an Amazon Associate, we earn from qualifying purchases.
Drilling a large hole in wood requires matching three things: the correct bit type (Forstner, hole saw, or spade), the right rotational speed (under 500 RPM for diameters above 50mm), and a stable setup (clamped workpiece and a drill guide). Skipping any one leads to splintered exits, burned edges, or a drill that kicks back.
That 50mm mark is the pivot. Below it, you can manage with a handheld drill if you’re careful. Above it, the physics of cutting force and torque demand a drill press or a rigid guide. The hole isn’t just bigger; the risk of the bit grabbing and spinning the workpiece multiplies.
What follows is the breakdown of bit choice, the exact speed settings that prevent burning, and the structural code rules most DIYers don’t know they’re breaking. You’ll also get the step-by-step for through-holes that don’t tear out the backside.
Key Takeaways
- A Forstner bit (like the Bosch Expert series) is the only choice for clean, flat-bottomed blind holes over 25mm.
- Speed kills large bits. For a 50mm Forstner in hardwood, drop to 150–200 RPM. A handheld drill at full speed will burn the wood and dull the bit in one hole.
- Clamp everything. The torque from a 2-inch bit can spin a board out of your hand. A Kreg Drill Guide Pro locks the angle and depth.
- The International Residential Code limits holes in joists and studs. Drilling a 2-inch hole in the middle of a 2×8 floor joist weakens it past the legal limit.
- For through-holes over 30mm, use the double-sided technique: drill until the center point pokes through, flip the board, and finish from the other side.
The 50mm Threshold That Changes Everything
A 10mm hole is a suggestion. A 50mm (2-inch) hole is a commitment. The cutting surface area, and the torque required to turn it, don’t scale linearly. This is where technique separates a clean cut from a ruined workpiece.
Forstner bits above 50mm in diameter require a rotational speed of 150–300 RPM for softwood and 100–200 RPM for hardwood. Exceeding 500 RPM for any bit above 80mm generates enough friction heat to blue the steel and char the wood fibers permanently.
Your cordless drill’s no-load speed is likely between 1500 and 2000 RPM. That’s three to four times too fast. At high speed, the outer rim of a Forstner bit hammers the wood fibers instead of slicing them. You hear a high-pitched whine, smell burning oak, and get a hole with black, glazed edges. The bit is also done, the temper is drawn out of the cutting edges.
The solution is a variable-speed drill with a low gear, or better yet, a drill press. A tool like the Kreg Drill Guide Pro provides the missing stability, clamping your drill and forcing a perfectly perpendicular path. Its manual states it’s rated for bits up to 2-3/4” with a 3/8” shank, which covers most large Forstner and spade bits. Without that guided rigidity, the bit will wobble on entry, producing an oval hole that’s useless for precise joinery.
The Three Bit Types That Actually Work
Not all big bits are for the same job. Picking the wrong one is how you end up with a ragged, conical hole when you needed a flat bottom. Here’s the breakdown of when each one earns its keep.
| Bit Type | Best For Hole Size | Hole Quality | The Catch |
|---|---|---|---|
| Forstner Bit (e.g., Bosch Expert) | 10mm – 80mm+ | Flat bottom, clean walls, no splintering on entry. | Requires very low RPM, stable setup. Useless in a hand drill above 50mm. |
| Hole Saw | 35mm – 150mm+ | Clean cylinder, but a rough bottom with a pilot hole remnant. | Prone to overheating, binds in deep cuts. Needs a powerful drill and frequent clearing. |
| Spade Bit | 12mm – 38mm | Fast, aggressive cut. Tears exit side, leaves a ragged, conical hole. | The “rough-in” bit for wiring and plumbing where finish doesn’t matter. |
Forstner bits are the cabinetmaker’s choice. The Bosch Expert line uses a wave-shaped cutting edge that slices fibers cleanly instead of ripping them. It’s why you use a Forstner for installing concealed hinges or drilling a clean pocket for a lamp base, the finished hole needs no sanding. For general drilling holes in wood, a twist bit is fine. For large, precise holes, this is the only tool.
Hole saws are for volume removal. They’re ideal for running drain pipes or vent lines through studs where the cut edge won’t be seen. The key is managing heat. Drill for 10 seconds, pull out to clear the packed sawdust, and repeat. Let it smoke and you’ll weld the blade to the arbor. Knowing how to attach a hole saw securely is non-negotiable; a loose saw spins inside the arbor and ruins both.
Spade bits are fast and cheap. They’re for drilling through floor joists to run Romex or PEX where appearance is irrelevant. The pointed tip wanders less than a twist bit, but the flat blades tear out the back of the workpiece spectacularly. If you need a clean through-hole, a spade bit is the wrong tool.
Common mistake: Using a spade bit for a finished furniture project. The exit tear-out will force you to plug the hole with a dowel, and the conical bottom won’t seat a flat-mounted hardware correctly.
Speed, Pressure, and the Sound of a Good Cut
You can’t muscle a large bit. Forcing it feeds it too fast, jams the flutes, and stalls the drill. The right feed pressure is just enough to maintain a steady chip flow. Listen for a consistent, low-pitched cutting sound, a high-pitched squeal means you’re going too fast or the bit is dull.
Here’s the hard rule: the larger the diameter, the slower the speed, and the lighter the pressure. Use this as your starting point:
- 25–35mm bit: 700–1000 RPM (softwood), 500–700 RPM (hardwood)
- 36–50mm bit: 300–500 RPM (softwood), 200–300 RPM (hardwood)
- 51–80mm bit: 150–300 RPM (softwood), 100–200 RPM (hardwood)
If your drill doesn’t have a speed dial, you’re not equipped for this job above 35mm. Buy a variable-speed router speed controller to plug your drill into, or use a drill press. This isn’t a suggestion, it’s the difference between one perfect hole and a burned, dulled bit.
The Step-by-Step for a Clean Through-Hole
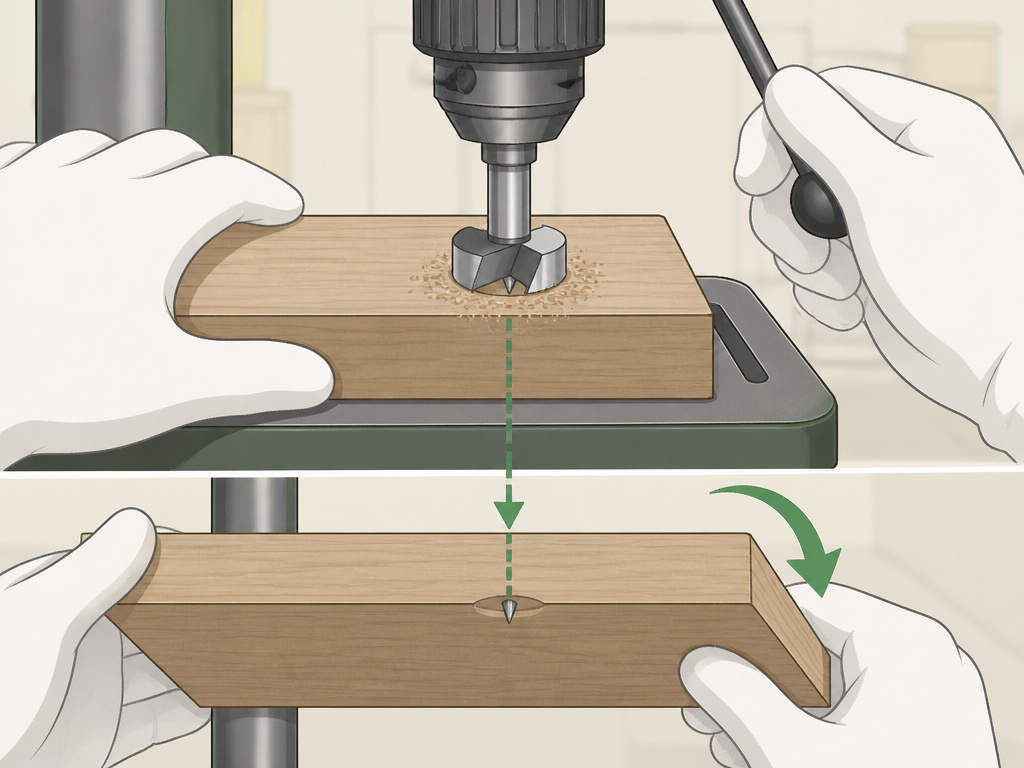
This sequence assumes you’re using a Forstner bit in a drill press or rigid guide. It’s the method for a hole that looks machine-cut on both sides.
- Mark and Punch. Draw intersecting lines at the center. Use a center punch to make a definitive dent. For a large bit, this pilot dent keeps the center spur from skating across the grain.
- Clamp the Workpiece. Use bar clamps or a vise to secure the wood to your drill press table or workbench. Your hand is not a clamp. The torque from a stuck bit can break a wrist.
- Set Depth and Speed. For a through-hole, set the drill press depth stop so the bit’s center spur just protrudes through the back. Set your speed per the chart above.
- The Double-Sided Drill (Critical for through-holes). Drill from the face side until the center spur just pokes through the back. Stop, retract the bit. Flip the workpiece, locating the small center spur hole in your punch mark. Complete the hole from the back side. This severs the wood fibers cleanly at the midpoint, preventing the massive tear-out that happens when the bit’s outer rim blows through the last 3mm of material.
- Clear Chips Frequently. Every 10–15mm of depth, retract the bit fully to clear the flutes. Packed sawdust creates friction heat and can crack the workpiece.
Skipping step 4 is the most visible error in DIY woodworking. The back of the board splinters out in a ragged sunflower pattern. The double-sided technique eliminates it completely.
When You’re Drilling Into a Wall or Floor Joist
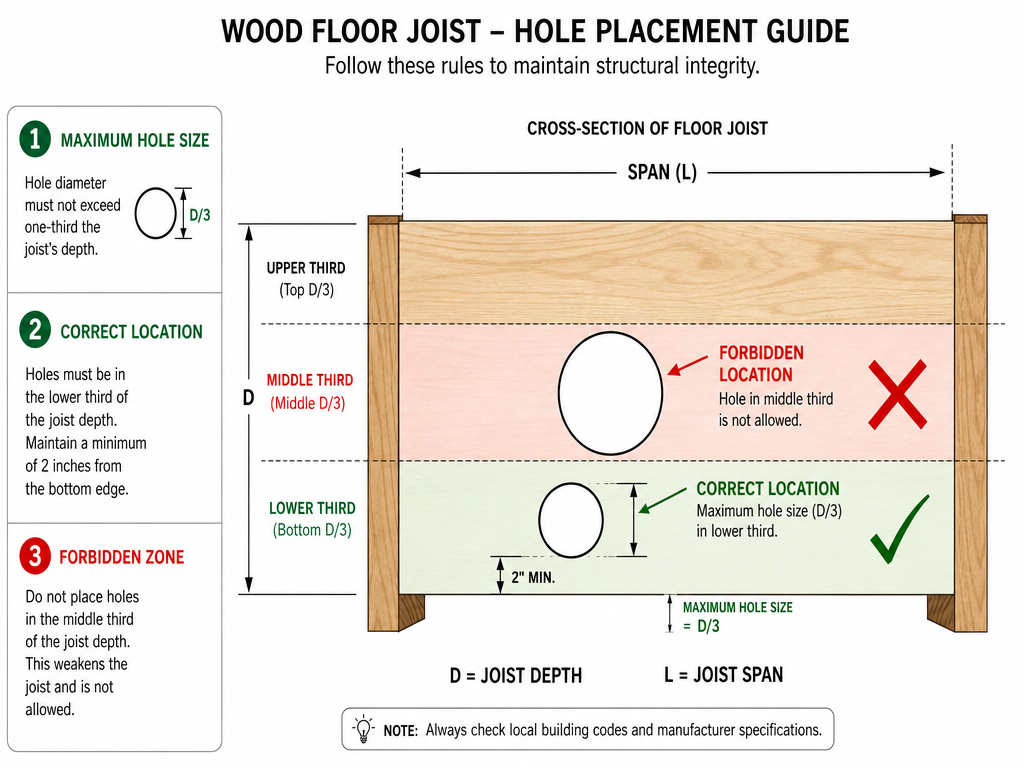
This is where the workshop meets the building code. That 2×8 joist in your basement ceiling isn’t just wood; it’s a structural member with legal limits on how much you can cut out.
The ICC CodeNotes on drilling summarize the International Residential Code rules. For a solid lumber joist or rafter: – A bored hole cannot be larger than one-third the depth of the member. – It cannot be closer than 2 inches to the top or bottom edge. – It cannot be in the middle third of the span.
Where this goes sideways: Drilling a 2.5-inch hole dead-center in a 2×8 (actual depth 7.25 inches) for a drain pipe. You’ve just removed over a third of the wood’s depth in the highest-stress part of the span. The joist will sag, the floor above will bounce, and an inspector will flag it.
For top plates of walls, if you notch or drill away more than 50% of the width, the code requires a galvanized metal tie bolted across the cut. This isn’t trivia. Violating these rules can void your homeowner’s insurance in the event of a structural failure. If your project involves framing, look up the guide before you cut.
The Tools That Prevent Wobble and Wander
A handheld drill is a lever. The farther the bit extends from the chuck, the more it can deflect. For achieving perfectly straight holes, you need to remove the human variable.
A Drill Press is the gold standard. It provides vertical rigidity, precise depth control, and a built-in speed adjustment. If you drill large holes more than once a year, this is the tool that pays for itself in saved lumber and frustration.
The Kreg Drill Guide Pro is the portable solution. It’s a guided jig that clamps your handheld drill into a rigid frame. It’s not as stable as a 200-pound floor press, but for on-site work like installing door hardware or drilling shelf pins in a cabinet, it’s a game-changer. It turns a cordless drill into a precision boring machine.
A Backup Board is the free fix. For through-holes, always clamp a sacrificial piece of scrap wood to the back of your workpiece. The bit exits into the scrap, splintering that instead of your good material. It’s a universal trick for drilling large holes with any bit type.
Frequently Asked Questions
Can I use a hole saw without a pilot bit?
No. The pilot bit centers the saw and provides the primary cutting action to start the kerf. Running a hole saw without it will cause the saw teeth to skate across the surface, damaging the workpiece and likely injuring you.
Why does my large Forstner bit keep burning the wood?
You’re spinning it too fast and/or not clearing chips. Burning is a friction symptom. Drop the RPM by half, and retract the bit every 10mm to clear packed sawdust from the hole. For hardwood, start at the lowest speed your drill can manage.
What’s the difference between a Forstner bit and a spade bit?
Forstner bit cuts a flat-bottomed, clean-walled hole with a rim that severs fibers before the center clears them. A spade bit is a crude excavator, it hogs out material fast, leaves a conical bottom, and violently tears out the exit side. Use a Forstner for finish work, a spade for rough framing.
How do I drill a large hole at an angle?
This is an advanced technique that demands a jig. A standard drill guide for angles or a commercial angled drilling jig is required. Freehanding an angled hole with a bit over 25mm is nearly impossible to control and dangerously prone to kickback.
Is a pilot hole necessary for a large bit?
Often, yes. For a Forstner bit over 40mm, pre-drilling a 3-4mm pilot hole for the center spur eliminates the initial wobble that can ruin your starting point. It’s a simple step that guarantees accuracy, especially when drilling a pilot hole is quick and easy.
The Bottom Line
Drilling a large hole in wood is a test of patience, not power. Match the bit to the job: a Bosch Expert Forstner for precision, a hole saw for pipes, a spade bit only for hidden rough-ins. Slow your drill down, way down. Clamp your work to the table. And if you’re cutting into anything that holds up your house, open the building code drilling standards first.
The clean hole is the one where you controlled every variable before the bit ever touched the wood. That’s the difference between a professional result and a piece of firewood.
