
The Complete Guide on How to Drill Dowel Holes Correctly
This post contains affiliate links. As an Amazon Associate, we earn from qualifying purchases.
To drill a dowel hole, you need three things matched: a sharp brad-point bit sized for a firm press-fit, a hole depth at least 1/2″ deeper than the dowel’s embedded length, and a perfectly perpendicular entry. For structural concrete dowels like the Ancon E-HLD, the hole diameter must be 5mm larger than the dowel (e.g., 23mm hole for an 18mm dowel) and cleaned with oil-free air per the OEM spec. Missing any one of these three factors turns a strong joint into a wobbly failure.
That 5mm clearance in concrete is the space the two-part resin needs to fully encapsulate the steel and transfer shear load from a new slab to an existing wall. In wood, the tolerance is tighter, often just the bit’s own diameter, but the principle is the same: the hole exists to hold the adhesive, not just to grip the dowel.
What follows is the breakdown of that three-part match: bit selection, diameter and depth specs, and the perpendicular technique. We’ll cover the woodworker’s method and the concrete pro’s spec, because the stakes change but the geometry doesn’t.
Key Takeaways
- Use a brad-point bit for wood. Its center spur and outer spurs cut a clean, round hole that won’t burnish the sides and block glue absorption.
- The hole must be 1/2″ deeper than the dowel length that will be embedded. This creates a relief chamber for excess glue and prevents hydraulic pressure from splitting the wood or pushing the dowel back out.
- For a firm press-fit in hardwood, the drill bit diameter should match the dowel diameter. For a glue-reliant joint in softwood, you can drill 1/64″ over. Never go under.
- In structural concrete, follow the manufacturer’s drilled hole table exactly. An 18mm Ancon E-HLD dowel requires a 23mm hole, cleaned four times with oil-free air and a steel brush.
- A drill press or a dowel centering jig is non-negotiable for strength-critical joints. Hand-drilling a dowel hole for a shelf bracket is fine; hand-drilling one for a chair leg is how you get a wobbly chair.
The 3-Step Trade-Off That Decides Strength
A dowel joint fails in one of three ways: the dowel breaks, the glue bond fails, or the wood around the hole crushes. Your drilling choices directly target which failure you get.
The part nobody mentions: A dowel hole that’s too tight creates a hydraulic seal. When you insert the glue-coated dowel, trapped air and glue have nowhere to go. The pressure either splits the workpiece along the grain or prevents the dowel from seating fully, leaving a visible gap. Drill the relief depth.
What’s the Best Drill Bit for a Dowel Hole?
The bit defines the hole’s quality. A burned or ragged hole wall gives the glue nothing to grip.
| Bit Type | Best For | The Catch |
|---|---|---|
| Brad-point | All wood doweling | Must be sharp; a dull brad-point wanders more than a twist bit. |
| Forstner | Flat-bottomed, deep holes | Requires a drill press; handheld use almost guarantees a bell-mouthed entry. |
| Standard twist | Emergency use only | Tends to wander and produces a rough wall that can burnish, blocking glue. |
The brad-point bit wins for doweling. The center spur keeps it from walking, and the outer spurs score the circumference before the cutting lips engage. This shears the wood fibers cleanly instead of tearing them. A clean hole wall has open pores for glue to soak into, creating a mechanical bond stronger than the wood itself.
A Forstner bit is brilliant for a stopped hole where the dowel must sit on a flat surface at the bottom. But its wide, flat cutting rim demands absolute perpendicular force. Without a drill press, the bit will chatter and cut an oval.
You can drill a hole in wood with a twist bit in a pinch. For a dowel joint that bears weight, it’s a gamble. The bit’s tendency to follow the softest grain path means your mating holes might not align.
Diameter and Depth: The Specs That Aren’t Guesses
This is where DIY advice diverges from structural engineering specs. Both are right for their context.
For woodworking, the rule is simple: the hole diameter should match the dowel diameter for a firm press-fit. A 3/8″ dowel gets a 3/8″ hole. If you’re using modern resin glue and want a guaranteed glue line, drill 1/64″ oversized. Never drill undersized, forcing the dowel compresses the wood fibers, which then spring back and push the dowel out over a few hours.
Depth is non-negotiable. The hole must be deeper than the dowel’s embedded length.
Drill the hole at least 1/2 inch deeper than the length of dowel that will go inside it. This creates a reservoir for excess glue and relieves hydraulic pressure. Skip this, and you’ll see glue squeeze-out that looks like a small volcano, or hear a faint crack from inside the joint as the wood splits.
For structural concrete dowels, the specs are exact and published. According to the Ancon E-HLD installation guide, an 18mm diameter stainless steel dowel requires a 23mm diameter hole drilled 130mm deep. That 5mm radial gap is filled with a specific two-part resin. The PNA Diamond Dowel System master specification calls for plates meeting ASTM A 36 steel standards and a minimum concrete cover of 2 ¼ inches. These are the calculated conditions for the joint to carry the design shear load.
Perpendicularity: Why “Close Enough” Isn’t
A dowel hole drilled at even a 2-degree angle introduces a shear force the moment the joint is assembled. In wood, this shows up as a project that looks square in the clamps but twists when you release them. In concrete, it misaligns the load path.
Your tools for perpendicularity are a drill press, a doweling jig, or a sharp eye with a combination square. A drill press is the gold standard. A good doweling jig, like the Dowl-it or a self-centering model, is a close second for on-site work.
Hand-drilling can work for non-critical joints if you use a dowel center. Drill the hole in the first piece, insert the center, press the two pieces together to mark the spot, then drill. It transfers the angle error from the first hole, guaranteeing alignment even if both holes are slightly off-plumb.
The techniques for drilling straight holes apply directly here. If you’re working without a jig, use a combination square held against the drill chuck as a visual guide. Start the hole with a punch or a brad nail tapped by a hammer to give the bit a positive location to start.
The Step-by-Step Process for Clean, Strong Holes
Gather a sharp brad-point bit, a drill with good speed control, a depth stop, and a means of clamping the workpiece. The process is the same whether you’re joining two boards or creating strong pocket hole joints as part of a larger assembly.
- Mark the center with a punch. Use a center punch for metal or concrete. For wood, a sharp awl or the tip of a utility knife is better than a pencil; it severs fibers so the drill bit doesn’t wander. For through-holes, mark both sides.
- Set your depth stop. Measure the dowel length that will be embedded. Add 1/2 inch. Set the stop on your drill or drill press collar to that measurement. If you’re using a drill press, lower the quill to the workpiece to double-check.
- Clamp the workpiece. Never hold it with your hand. Even a slight shift during drilling bell-mouths the entry. Use a bench vise or clamps to a stable surface.
- Drill at a medium speed with steady pressure. For a 3/8″ bit in wood, a medium-high RPM is fine. Let the bit’s flutes clear the chips. If you see smoke, you’re going too fast or the bit is dull. Withdraw the bit partially to clear chips on deep holes.
- Blow out the hole. Use compressed air or a shop vacuum to remove all dust from the hole. In wood, residual dust mixes with glue to form a weak paste. In concrete, per the Ancon spec, you blow four times with oil-free air, then brush four times with a steel brush, then blow again.
- Test the fit before gluing. Insert the dry dowel. It should slide in with firm hand pressure. If you need a hammer, the hole is too small. If it drops in loosely, the hole is too big, you’ll be relying entirely on glue, which is acceptable if you planned for it.
Where this goes sideways: Testing the fit after applying glue. If the dowel doesn’t fit, you now have a sticky, time-sensitive problem. Always do a dry assembly.
For drilling large holes in wood for oversized dowels, the process is the same but requires more care. Use a lower RPM to prevent burning, and be extra vigilant about clearing chips to avoid binding.
Concrete vs. Wood: When the Rules Change Drastically
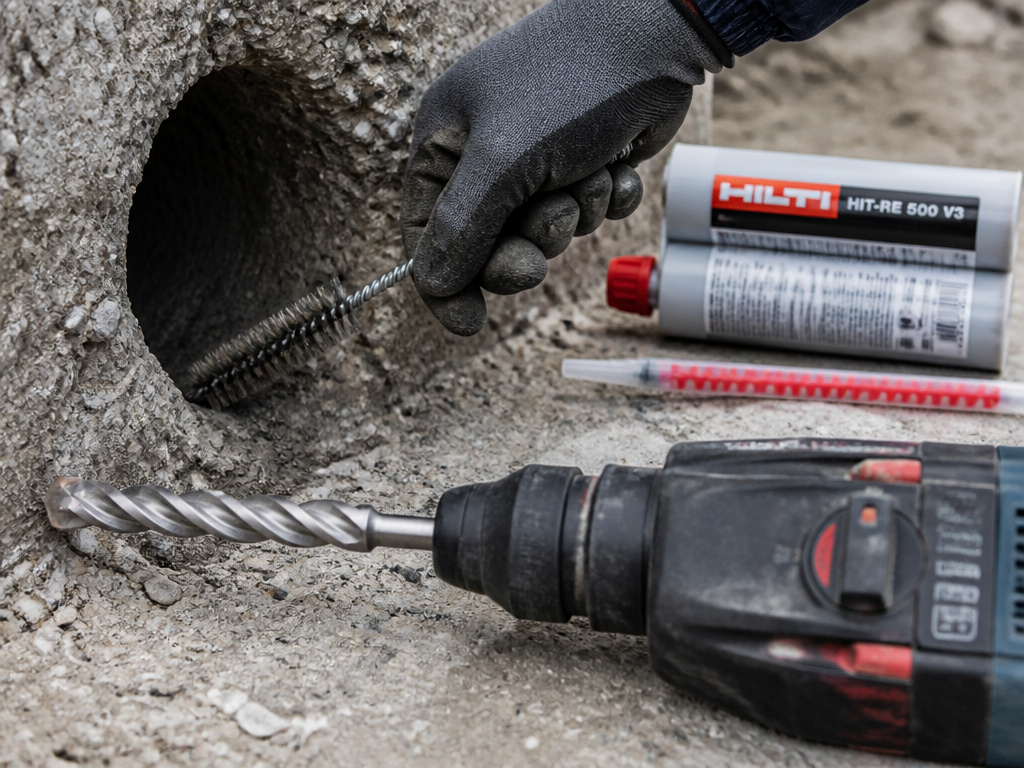 The principles of alignment, clean holes, and correct diameter are universal. The execution and stakes are not.
Wood Doweling is forgiving. A slightly loose hole can be shimmed or filled with thickened glue. The failure mode is usually gradual, a joint gets progressively looser. Your tools are a shop drill, brad-point bits, and standard wood glue.
Structural Concrete Doweling is not forgiving. A failed dowel in a slab-to-wall connection can lead to catastrophic shear failure. The specifications are legal documents. The Ancon guide mandates checking concrete strength and temperature before injection, as resin cure time varies from 36 minutes at 30-40°C to 24 hours at -5°C.
The hole cleaning procedure is exhaustive: blow, brush, blow. The resin must be a consistent grey color when extruded; off-color resin won’t cure and must be discarded. If excess resin emerges after inserting the dowel, you adjust the amount on the next hole. These are the specifics that separate a functional connection from a liability.
| Aspect | Wood Doweling (DIY) | Structural Concrete Doweling (Pro) |
|---|---|---|
| Hole Tolerance | 0″ to +1/64″ | +5mm (per Ancon E-HLD 18mm dowel spec) |
| Hole Cleaning | Blow out dust | 4x oil-free air, 4x steel brush, 4x air again |
| Adhesive | PVA wood glue, epoxy | Specific two-part structural resin (e.g., FIS V 360 S) |
| Cure Time | 24 hours for full strength | 36 minutes to 24 hours, strictly temperature-dependent |
| Consequence of Error | Wobbly furniture, repairable | Structural compromise, potentially requiring demolition |
This shows that “drilling a dowel hole” scales with the job. The same care you use to drill a straight hole for a bookcase is the baseline a pro multiplies by ten when anchoring a slab.
The Tools You Actually Need (And One You Don’t)
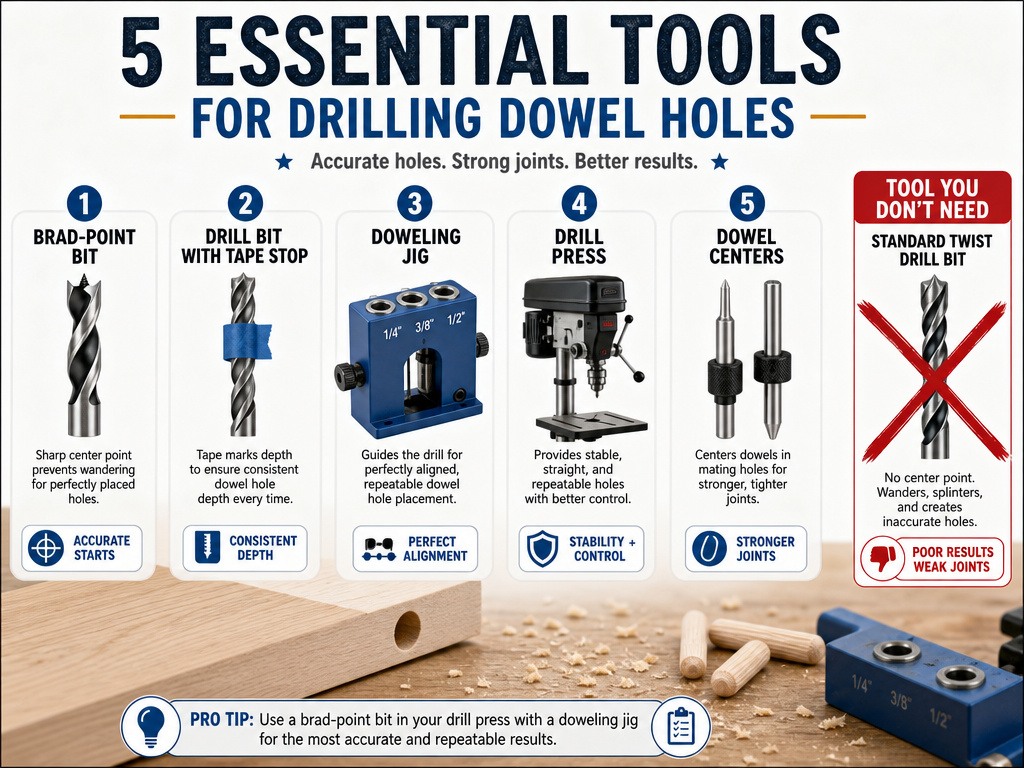 You can drill a perfectly adequate dowel hole with a hand drill, a sharp bit, and a steady hand. For repeatability or critical joints, specific tools remove the variables.
- A Sharp Brad-Point Bit. This is the one tool you shouldn’t compromise on. A cheap, dull bit makes every other step harder. The Freud 3/8″ brad-point is a standard for a reason.
- A Depth Stop. This can be a collar on your drill bit, a stop on a drill press, or a piece of tape wrapped around the bit. Accurate depth is free strength; guesswork is hidden weakness.
- A Doweling Jig. For joining two boards edge-to-edge, a self-centering jig is faster and more accurate than marking and drilling freehand. It guarantees the holes align.
- A Drill Press. The ultimate tool for perpendicular, consistent-depth holes. If you’re making a set of chairs or a large cabinet, it’s worth setting up.
- Dowel Centers. These cheap metal punches are magic for transferring hole locations between parts. They’re essential for hand-drilling matching holes.
The tool you don’t need is a dedicated “dowel drilling bit” that isn’t a brad-point. Marketing aside, the physics don’t change. A good brad-point bit and the knowledge of drill bit types covers 99% of doweling tasks.
Frequently Asked Questions
Can I use a regular twist bit for dowel holes?
You can, but you shouldn’t for a joint that needs strength. A twist bit is designed for rapid material removal, not hole quality. It’s prone to wandering, especially on end grain, and leaves a rough, sometimes burnished wall that glue doesn’t penetrate well. Use one only for rough positioning or in softwood where ultimate strength isn’t critical.
How deep should a dowel hole be?
The hole must always be deeper than the dowel length that will be inside it. The standard rule is to add 1/2 inch of extra depth. This provides space for excess glue and relieves hydraulic pressure. For a 2-inch long dowel, drill a 2.5-inch deep hole. For a through-hole, the dowel should protrude slightly, so your depth is simply the thickness of the material.
What if my dowel hole is too big?
If the hole is only slightly oversized (1/64″ or so), use a gap-filling adhesive like epoxy or polyurethane glue. These don’t rely on a tight mechanical fit and can fill small voids. If the hole is significantly oversized, you have two choices: plug the hole with a wooden dowel and a matching plug cutter, then re-drill, or switch to a larger diameter dowel. Drilling for large-diameter holes requires planning from the start.
How do I drill a dowel hole at an angle?
Angled dowel holes, common in chair and table leg assemblies, require a jig or very careful layout. You can build a simple angled block jig to guide your drill, or use an adjustable angle drilling guide attachment for your drill. Marking the angle on two adjacent faces of the workpiece helps you visualize the drill’s path before you start.
Why is my dowel not going in all the way?
Two main reasons: the hole isn’t deep enough, or it’s not clean. First, check your depth. If it’s correct, the hole is likely packed with compacted dust at the bottom. Use a vacuum or blast of air to clear it. Finally, the hole diameter might be slightly too small, or the dowel might have swelling from ambient humidity. A light sanding of the dowel can help.
Before You Go
Drilling a proper dowel hole comes down to respecting a simple trade-off: a clean, correctly sized hole gives glue a surface to bond to, and that bond is what actually carries the load, not the friction of a tight fit.
Match the bit to the material, brad-point for wood, masonry bit for concrete. Match the hole size to the dowel, exact for press-fit, slightly oversized for glue-dominated joints in softwood, and exactly to the manufacturer’s spec for structural resins. And match your technique to the stakes, a jig or press for furniture, the full OEM cleaning protocol for a concrete connection.
The difference between a wobbly joint and a permanent one is about five minutes of setup and one sharp bit. Spend the time.
