
How to Drill Pocket Holes: The Complete Step-by-Step Guide
This post contains affiliate links. As an Amazon Associate, we earn from qualifying purchases.
To drill a pocket hole, you set the jig’s drill guide and stop collar to match your workpiece thickness, clamp the board securely, and drill at full speed until the collar contacts the jig. The critical step most guides omit: withdraw the drill bit about 1/4 inch (6mm) after the tip touches the wood, then start the drill. This prevents the bit from skating and ensures a clean entry.
That 1/4-inch withdrawal is straight from the Kreg K4 owner’s manual. Skip it, and the stepped bit can grab and tear the wood grain instead of cutting it. The rest of the process hinges on matching three settings: the guide height, the collar depth, and the screw length. Get one wrong and the joint is weak or the screw pokes through.
What follows is the setup most woodworking projects need. We’ll walk through the Kreg K4 and KPHJ720 jigs step-by-step, explain why coarse and fine thread screws matter, and show you how to fix the four most common pocket-hole mistakes before they ruin a piece.
Key Takeaways
- Withdraw the drill bit 1/4 inch (6mm) after touching the workpiece before starting the drill. This prevents tear-out and is a mandatory step in the K4 manual.
- Match your screw thread to your wood: #8 coarse-thread for softwoods and plywood; #7 fine-thread for hardwoods like oak and maple to prevent splitting.
- For a strong joint, the screw must penetrate the second board by at least 1/2 inch. Use the material thickness gauge to set the stop collar correctly.
- If not using a vacuum, partially withdraw the bit several times while drilling to clear chips. A clogged hole leads to burning and a poorly formed pocket.
- Place pocket holes at least 1 inch from the board’s edge to prevent splitting. For panels over 3.5 inches wide, space holes every 6 to 8 inches.
Why Pocket Holes Beat Glue and Clamps for Speed
Pocket hole joinery is a fast, strong way to connect wood without the wait time of glue or the complexity of traditional joints. The angled screw pulls boards together with mechanical force, creating a bond that’s ready for handling immediately. For face frames, cabinet boxes, and simple furniture, it’s the most efficient method in the shop.
The strength comes from geometry. The 15-degree angle gives the screw a long path through the first board, and the flat washer head sits flush in the pocket, pulling the joint tight. When you combine it with glue, the joint becomes permanent. But for most DIY builds, the screws alone provide more than enough holding power.
For a strong joint, the screw should exit close to the center of the drilled workpiece. Adjust the drill guide so the mark matching your material thickness aligns with the top edge of the guide socket. This centers the screw in the second board for maximum bite.
The real advantage is repeatability. Once the jig is set, you can produce identical, strong joints in seconds. This turns a multi-hour glue-up into a 20-minute assembly. It’s the reason pocket hole jigs are a staple in professional cabinet shops and home workshops alike.
The 7-Step Pocket Hole Process (K4 & KPHJ720 Models)
The steps are consistent across Kreg’s benchtop jigs. The goal is to align the drill guide, set the depth collar, and clamp everything down before the bit ever spins.
- Measure and Set the Drill Guide. Use the material thickness gauge or a ruler. Loosen the drill-guide locking pin on the K4, then slide the guide up or down until the etched line matching your thickness aligns with the top of the guide socket. Tighten the pin. On the KPHJ720, you’ll slide the material thickness stop to the correct setting.
- Set the Stop Collar on the Bit. Slide the windowed stop collar onto the Kreg Easy-Set drill bit. Align the etched line on the bit that matches your material thickness with the edge of the collar. Tighten the set screw with the included hex wrench. This collar is what stops the drill at the perfect depth.
- Adjust the Clamp Pressure (If Needed). Place your board in the jig. If the clamp doesn’t hold firmly or is too hard to press down, adjust it. On the K4, unclamp the toggle and rotate the clamp pad slightly; re-clamp to test. On the KPHJ720, the handle must press down to its travel limit—if it’s difficult, decrease the clamp pressure.
- Position and Clamp the Workpiece. Align the board so the pocket hole will be at least 1 inch from the end. Use the centering marks (A, B, C) on the K4 for boards up to 3.5 inches wide. For wider panels, place the first hole 2 inches from the edge. Clamp it securely. An unsecured board will vibrate and create a ragged, oversized hole.
- Drill with the 1/4-Inch Withdrawal. Insert the drill bit into the guide until the tip touches the wood. Withdraw it about 1/4 inch. Now, start your drill at full speed. A variable-speed drill should be on its fastest setting. Feed the bit smoothly into the wood until the stop collar contacts the drill guide. Stop.
- Clear Chips During the Cut. If you have a shop vacuum connected to the jig’s port, drill in one continuous motion. If not, partially withdraw the spinning bit 2-3 times during the cut to eject chips. This keeps the hole clean and prevents the bit from overheating and burning the wood.
- Withdraw the Bit After It Stops. Wait for the drill to stop spinning before pulling the bit out of the guide. Pulling a spinning bit out at an angle can damage the stepped cutting edges of the Kreg bit. This wears the bit prematurely and leads to poorly formed pockets.
| Step | Kreg K4 Specifics | Kreg KPHJ720 Specifics |
|---|---|---|
| Guide Setting | Adjust drill guide height, align etched line. | Slide material thickness stop to numbered setting. |
| Clamp Adjustment | Rotate clamp pad; secure with jam nut. | Adjust pressure dial; handle must reach travel limit. |
| Chip Clearing | Manual withdrawal without vacuum; port available. | Designed for integrated vacuum attachment. |
| Best For | High-volume, repetitive drilling on the bench. | Larger stock, added stability with extension wings. |
The process is simple but precise. Rushing the setup is how you end up with screws that don’t grab or pockets that blow out the back of your board.
Choosing the Right Screw: It’s Not Just About Length
Kreg screws are specialized. They have a self-tapping auger point, a flat washer head, and a deep square drive. Using a standard wood screw in a pocket hole is a recipe for a stripped head, a split board, or a joint that won’t pull tight.
The two critical choices are length and thread type.
Screw length is determined by your material thickness. The rule is simple: the screw must penetrate the second piece of wood by at least 1/2 inch for strength. Kreg provides charts, but here’s the logic. If you’re joining a 3/4-inch board to another 3/4-inch board, you need a screw long enough to go through the first board and 1/2 inch into the second. That’s about 1-1/4 inches of grip. A 1-1/4 inch screw is the standard choice.
Where this goes sideways: Using a 1-1/2 inch screw in 3/4-inch material. The screw tip will protrude from the second board, ruining the surface. If your workpiece is at the thin end of a jig’s range (like 1-inch stock), drop down to the next screw size (e.g., use 1-inch screws).
Thread type is about the wood you’re drilling into. * #8 Coarse-Thread Screws: Use these for softwoods (pine, cedar, poplar) and composite materials (plywood, MDF, particle board). The large, aggressive threads grip the fibrous material for maximum holding power. * #7 Fine-Thread Screws: Use these for hardwoods (oak, maple, walnut, cherry). The finer threads reduce the chance of splitting the dense, brittle wood. They provide plenty of hold without the wedge effect of a coarse thread.
Mixing them up causes problems. A coarse thread in oak can split a board along the grain. A fine thread in pine might not bite deeply enough, resulting in a weak joint that strips out under load.
The 4 Common Pocket Hole Mistakes (And How to Fix Them)
Even with the right steps, things go wrong. These are the failures you’ll likely encounter first.
1. Tear-Out on the Exit Side.
The drill bit blows out a chunk of wood as it exits the back of the board. This weakens the area around the pocket. * Cause: Drilling too fast, using a dull bit, or not supporting the wood. * Fix: Use a backer board clamped behind your workpiece. The backer supports the wood fibers as the bit exits. Also, ensure you’re using the 1/4-inch withdrawal technique to start the hole cleanly.
2. Loose, Wobbly Joints.
The screw drives in but the joint still has play. * Cause: The stop collar is set for a thicker material, so the pocket hole isn’t deep enough. The screw bottoms out in the pocket before it can pull the joint tight. * Fix: Double-check your material thickness and re-set the stop collar. Ensure you’re drilling until the collar firmly contacts the jig. A common error is stopping a millimeter short.
3. The Screw Won’t Drive to Full Depth.
The screw stops before the head is flush with the pocket, or the driver bit cams out. * Cause: The drill’s clutch is set too low, or you’re not using a square-drive driver bit. The Kreg screw’s deep square drive requires the matching Kreg driver bit or a high-quality #2 square bit. * Fix: Switch to a dedicated pocket-hole driver bit. Adjust your drill’s clutch to a higher setting. For final tightening, a hand-driven screwdriver often provides better feel than a power tool.
4. Burning and Smoking.
The drill bit overheats, producing smoke and a burnt smell. * Cause: Dull bit, drilling too slowly, or failing to clear chips. Packed wood chips create immense friction. * Fix: Withdraw the bit several times to clear chips if you don’t have a vacuum. Run your drill at its highest speed. Sharpen or replace the stepped bit if the edges are rounded over. Learning proper drilling holes in wood technique applies here too.
Jig Setup for Different Projects
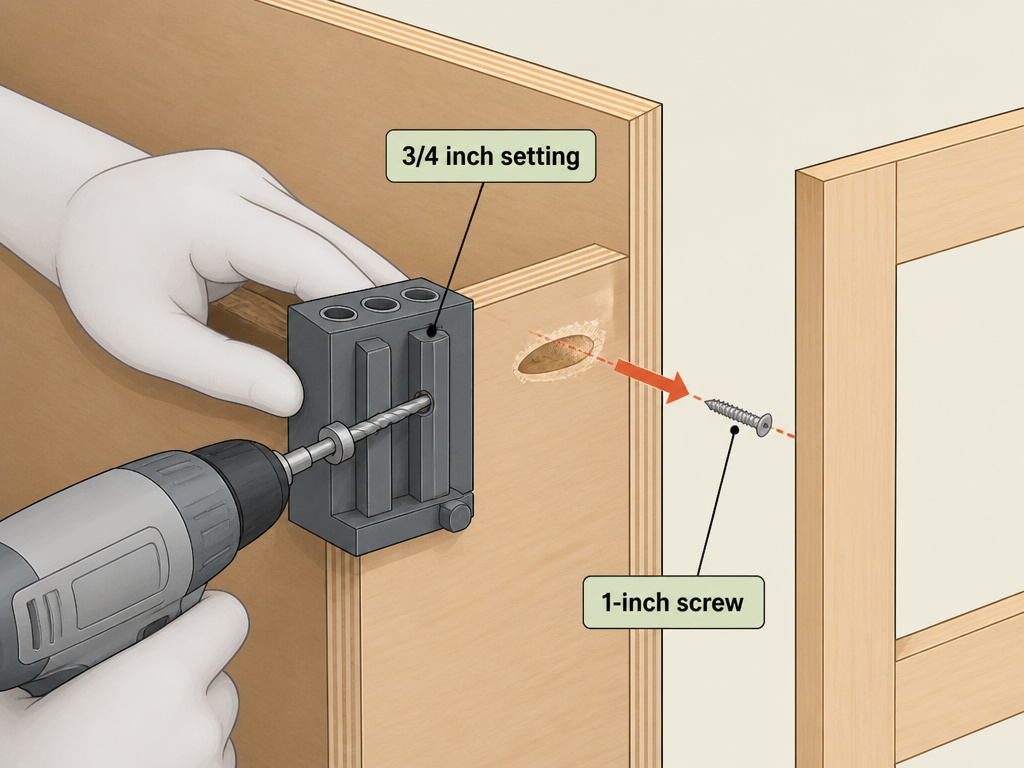
The basic settings change based on what you’re building. A face frame isn’t the same as a tabletop.
Face Frames (1-1/2 inch to 2-inch stock):
Use the 1-1/2 inch range on the jig. Set the stop collar to the 1-1/2 inch marking. Use 1-1/4 inch coarse-thread screws. Place the pocket holes on the back side of the frame rails so they’ll be hidden inside the cabinet. For extra strength on wide stiles, use two pockets instead of one.
Cabinet Boxes (3/4 inch plywood):
Use the 3/4 inch setting. Set the stop collar to the 3/4 inch line. Use 1-inch coarse-thread screws. Drill the pockets on the outside of the cabinet box. This drives the screw into the face frame from the outside in, which provides better support for the plywood edge and hides the holes behind the adjacent cabinet or a cover panel.
Mitered Corners & Picture Frames:
Pocket holes reinforce a glued miter perfectly. Use the jig’s 3/4 inch setting for standard frame stock. Place the pocket hole as close to the inside corner of the miter as possible. This hides the hole on the back of the frame. Use 1-inch fine-thread screws for hardwoods. Clamp the miter tightly before driving the screw.
For unique situations like drilling in a tight space where the full jig won’t fit, Kreg manuals show how to remove the material thickness stop and clamp the jig directly to the workpiece, or even secure it with screws.
Frequently Asked Questions
Can you drill pocket holes without a Kreg jig?
You can, but consistency and strength are hard to guarantee. It involves carefully drilling angled holes freehand and using a standard drill bit to create a shoulder for the screw head. For a one-off repair, it’s possible. For any project requiring multiple, strong joints, the jig is a necessary investment. We cover alternative pocket hole methods in detail.
How close to the end of a board can I drill a pocket hole?
Keep pocket holes at least 1 inch from the end of a board. Drilling closer risks splitting the wood along the grain because there isn’t enough material to contain the screw’s outward pressure. This is a fundamental rule of drilling into wood under stress.
What’s the difference between a pocket hole and a pilot hole?
Pilot hole is a straight, small-diameter hole that guides a screw and prevents splitting. A pocket hole is a specialized, angled hole that includes a larger counterbore for the screw head and a pilot hole for the screw shaft, all created by a stepped bit. You never need to drill a pilot hole separately when using a Kreg system.
Can I use pocket holes on 2×4 lumber?
Yes, for structural joints like building a workbench base. Use the jig’s 1-1/2 inch setting (for the 3.5-inch actual width of a 2×4, you’d join to its face). You’ll need longer screws, typically 2-1/2 inch coarse-thread screws. The principles of drilling large holes for heavy-duty joinery apply here regarding torque and chip clearance.
Do I need to use glue with pocket holes?
For most indoor furniture, no. The mechanical joint is strong enough. For exterior projects, projects that will undergo extreme stress, or when using plywood, adding wood glue to the joint before screwing is recommended. The glue seals the joint and provides additional shear strength.
Before You Go
Drilling pocket holes is a skill that removes the intimidation from woodworking. The key is respecting the specifics: that 1/4-inch withdrawal, the correct screw thread, and the mandatory full-depth drill stop. Your first few holes might be hesitant. By your tenth, the rhythm is automatic.
Keep the Kreg Easy-Set bit sharp. A dull bit makes every problem worse—tear-out, burning, poorly formed pockets. When the cutting edges lose their crisp line, replace it. The joint is only as good as the hole that holds it.
For the home workshop, the Kreg K4 is the default. It’s simple, durable, and handles 90% of projects. If you’re constantly joining wide panels or want integrated dust collection, the KPHJ720 platform is the step up. Start with the basics, master the seven steps, and you’ll build things that last.
