
How to Tell Masonry Drill Bit | The 3-Step Visual ID Check
This post contains affiliate links. As an Amazon Associate, we earn from qualifying purchases.
A masonry drill bit has a wide, flat, arrowhead-shaped tip made of tungsten carbide, a thick spiral flute for dust removal, and either a round shank for standard drills or an SDS+ shank for rotary hammers. This combination is designed to grind, not cut, through hard materials like brick, concrete, and stone.
That flat tip is the dead giveaway. It’s not a sharp point like a wood bit or a split-point like a metal bit. It’s a blunt, hard plate meant to pulverize masonry under hammering action. Spot that, and you’re most of the way there.
The rest of this guide walks you through a three-second visual check, explains why the shank type changes everything, and shows you what happens when you grab the wrong bit for the job. By the end, you’ll be able to sort through any bit box and pick out the masonry tools without a second guess.
Key Takeaways
- The flat, arrowhead-shaped carbide tip is the primary identifier, it’s designed for grinding, not cutting.
- Thick, slow-spiral flutes clear pulverized concrete dust; thin, high-spiral flutes are for metal chips.
- Shank type dictates the drill: round shanks fit standard chucks; SDS+ shanks require a rotary hammer and allow a sliding action.
- Using a general masonry bit for anchor installation can reduce pull-out strength by 20%; precision ANSI-tolerance bits like the Relton REL207 are required.
- Never use a masonry bit on wood, it clogs the flutes, overheats, and splinters the workpiece.
The 3-Step Visual ID Check
Forget part numbers and packaging. You can identify a masonry bit with your eyes and fingers in under ten seconds. This check works on any bit, new or used.
Step 1: Examine the Tip. Run your finger across the very end. A masonry bit’s tip is flat and wide, often resembling an arrowhead or a chisel. The material is tungsten carbide, which looks like a dull, greyish-silver plate brazed onto the steel body. If the tip is a sharp, pointed cone or has a split-point geometry, you’re holding a bit for metal or wood.
Step 2: Look at the Flutes. The spiral grooves that wind up the bit are called flutes. Masonry bits have relatively thick, slow-spiral flutes. Their job is to evacuate pulverized concrete dust, which is granular and heavy. Compare that to a metal drill bit, which has thin, high-spiral flutes designed to lift long, stringy chips. The difference is obvious side-by-side.
Step 3: Check the Shank. The shank is the end that goes into the drill. If it’s perfectly smooth and round, it’s for a standard keyed or keyless chuck. If it has two deep grooves and looks like it has been milled with slots, it’s an SDS-plus (SDS+) shank, which only fits a rotary hammer. Getting this right is non-negotiable for both safety and performance.
Common mistake: Confusing a carbide-tipped masonry bit with a solid carbide bit. The first has a carbide plate brazed to a steel body; the second is carbide from end to end, used for precision machining, not hammer drilling. The brazing line is visible about a quarter-inch up from the tip on a masonry bit.
The Shank Tells the Story
The shank isn’t just about what drill you own. It dictates how energy is transferred from the tool to the work surface. Picking the wrong one doesn’t just mean it won’t fit, it means you’ll burn out drills and break bits.
Round Shanks are the universal fit. They work in any standard drill, cordless or corded, with a three-jaw chuck. The chuck grips the smooth metal along its entire length. All the hammering impact from a hammer drill travels through those chuck jaws into the shank. This works, but it’s inefficient and wears out the chuck mechanism over time. For light-duty work like drilling a few holes for plastic anchors in brick, a round-shank bit in a hammer drill is fine.
SDS+ Shanks are for rotary hammers. The shank has two open grooves and two locking slots. It slides into the SDS+ chuck and locks with a twist, no key required. During operation, the bit can slide back and forth slightly within the chuck. This lets the hammer mechanism deliver its impact directly to the bit’s tail, not through the chuck jaws. The result is more efficient energy transfer, less wear on the tool, and the ability to handle sustained, heavy concrete drilling. You cannot fit an SDS+ bit into a standard drill chuck without an adapter, which defeats the entire purpose.
| Shank Type | Fits In | Energy Transfer | Best For |
|---|---|---|---|
| Round Shank | Standard drill chuck (keyed/keyless) | Impact travels through chuck jaws | Light-duty brick, block, occasional use |
| SDS+ Shank | Rotary hammer SDS+ chuck | Impact delivered directly to bit tail | Heavy concrete, reinforced concrete, professional use |
The choice here often comes down to your tool inventory. If you’re buying a drill for anything more than hanging a shelf, an SDS+ rotary hammer and matching bits are worth the investment. The difference from regular bits isn’t just the tip, it’s the entire system.
What Happens If You Use the Wrong Bit?
This isn’t about minor inefficiency. Using the wrong bit for the material or task leads to broken tools, failed projects, and sometimes safety hazards. Here are the three most common missteps and their predictable outcomes.
Using a Masonry Bit on Wood. You can physically do it, but you shouldn’t. A masonry bit grinds. In wood, it tears and splinters, leaving a ragged, ugly hole. Worse, the soft wood doesn’t break into dust; it forms long, gummy chips that clog the bit’s flutes. The bit overheats, the hardened steel loses its temper, and the tungsten carbide tip can crack from thermal stress. Your project looks terrible, and you ruin a good bit. For clean holes in wood, you need a bit designed to slice fibers, like a brad-point or a standard twist bit. The differences between masonry and wood bits are fundamental.
Using a General Masonry Bit for Anchor Installation. This is a critical, often invisible error. When you install a wedge anchor or sleeve anchor, the hole diameter must be precise. The anchor expands to grip the concrete, and its holding power is calculated for a specific hole size. A standard masonry bit has looser manufacturing tolerances. A hole drilled even a few thousandths of an inch oversize can reduce an anchor’s pull-out strength by 20 percent or more.
For this job, you need a precision anchor-setting bit manufactured to ANSI B212.15 tolerance, like the Relton REL207. These bits guarantee a hole within a tight diameter spec. Don’t substitute.
Using a Rotary-Only Bit in Hammer Mode. Some specialized bits, like the Relton Rebar Eater, are designed to shear through rebar under pure rotation. Their carbide cutters are vulnerable to impact. If you leave your rotary hammer in hammer-drill mode, you’ll shatter the cutter on the first impact. The manual is not a suggestion. Always match the drill’s action to the bit’s design.
Matching the Bit to Your Actual Job
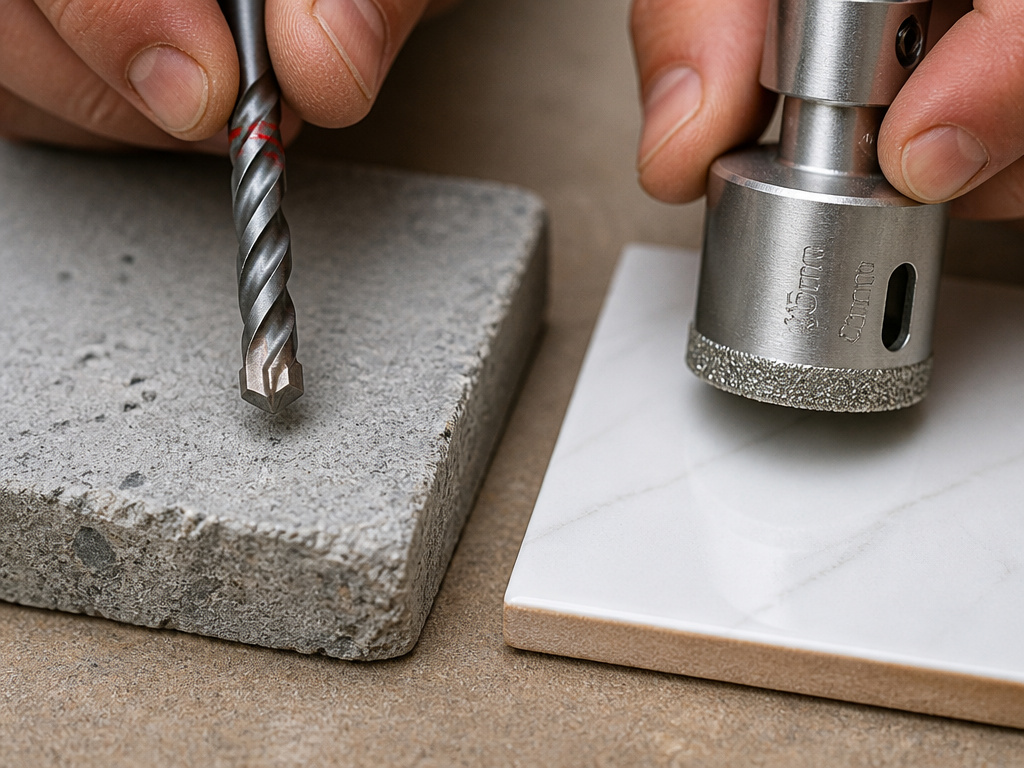
Knowing how to identify the bit is half the battle. The other half is picking the right one from the start. Your material and desired outcome narrow the field immediately.
For Concrete, Brick, and Block: A standard carbide-tipped masonry bit works. Match the shank to your drill. For deep holes or reinforced concrete, step up to an SDS+ system.
For Precision Anchor Installation: Skip the general-purpose bits. You need an ANSI-tolerance anchor bit. The Relton REL207 series is the benchmark here. Match the bit diameter exactly to the anchor diameter called for in the instructions.
When You Hit Rebar: Stop. Do not force a standard masonry bit through steel. You’ll dull the carbide instantly. Switch to a rotary-only rebar cutting bit, like the Relton RELRB. Drill through the steel in rotary mode, then switch back to a standard masonry bit in hammer mode to finish the concrete hole.
For Tile or Ceramics: A standard masonry bit will likely crack the glaze. You want a spear-point or diamond-grit hole saw designed for glass and tile. The cutting action is completely different.
Where this goes sideways: Using a hammer drill on tile. The percussion will shatter it. For tile, you use a variable-speed drill in rotary-only mode, with steady pressure and often water for cooling.
Your first step before any project should be a guide to drill bit selection. It forces you to consider material, hole size, and depth, three variables that dictate the correct tool.
How to Read the markings and Buy the Right One
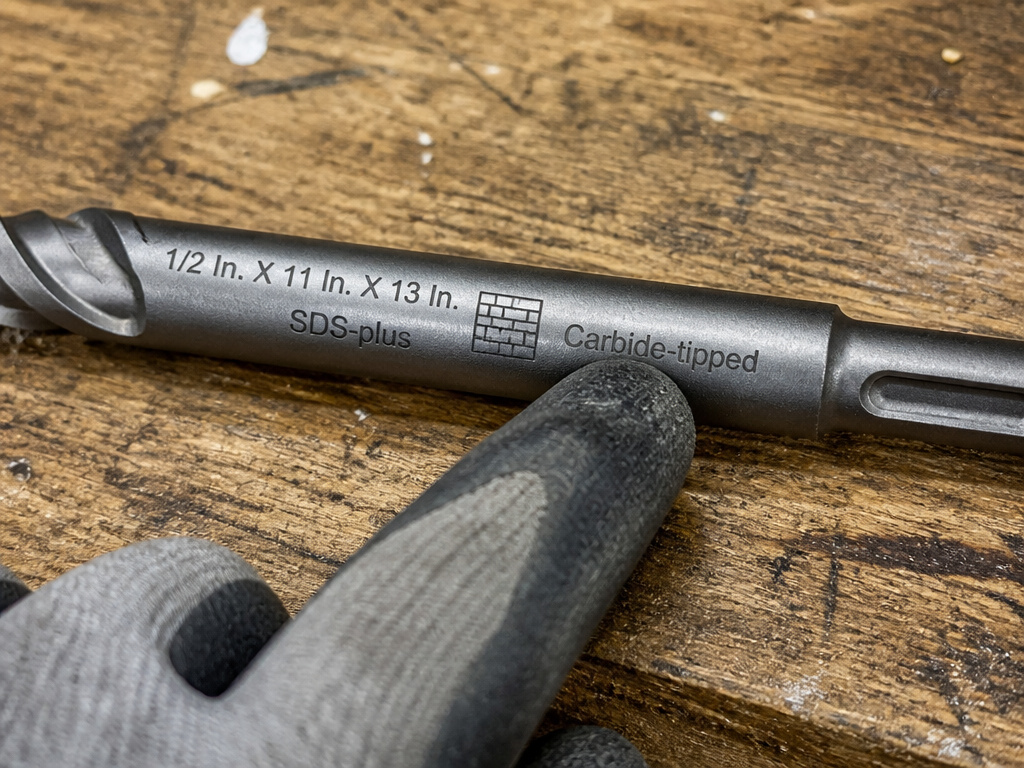
Bits are labeled, but the markings assume you know the code. Here’s how to decipher them.
Diameter and Length. You’ll see two numbers, like “1/4 in. X 6 in.” The first is the diameter (1/4 inch). The second is the total length (6 inches). Sometimes a third number denotes the working length, how deep it can actually drill. For example, a Bosch Professional BM2016 is labeled 1/2 In. X 11 In. X 13 In., that’s a 1/2-inch diameter, 11-inch working length, and 13-inch total length. Always buy a bit with a working length greater than your required hole depth.
Material Designation. Look for “carbide-tipped” or “tungsten carbide tip.” Some bits are marked for specific materials: “For masonry,” “For concrete,” or have a pictogram of a brick wall. Bits marked with PGM certification are professional-grade SDS+ bits tested for boring in reinforced concrete.
Shank Specification. It might say “SDS-plus” or just “SDS+”. Round shanks are rarely labeled because they’re the default. If you’re unsure, the physical features of concrete bits include those distinct SDS+ grooves.
When buying, don’t just grab the cheapest pack on the shelf. For occasional use, a mid-tier brand like Bosch or DeWalt offers a good balance. For professionals or frequent concrete work, invest in a system from Hilti, Milwaukee, or buy dedicated ANSI-tolerance bits like the Relton series. The initial cost is higher, but the per-hole cost and reliability are far better.
Frequently Asked Questions
Can I use a masonry bit with a regular drill?
Yes, but only for very soft masonry like old, crumbly brick or some types of cinder block. You must use a carbide-tipped masonry bit (not an SDS+ bit) and apply firm, steady pressure. It will be slow, and the bit will dull quickly. For any substantial concrete work, a hammer drill or rotary hammer is required.
What’s the difference between SDS+ and SDS Max?
Both are shank types for rotary hammers, but SDS Max is larger and designed for heavier-duty tools and larger diameter bits (typically 1/2 inch and up). SDS+ is for light to medium-duty rotary hammers. The shanks are not interchangeable.
How can I tell what size a masonry drill bit is?
Use a drill bit gauge, or measure the diameter of the shank (not the fluted section) with calipers. The shank diameter on round-shank bits is usually the same as the cutting diameter. The size is also often stamped or laser-etched on the shank. For a full breakdown, see our guide on methods for telling drill bit size.
Why did my masonry drill bit stop cutting?
The tungsten carbide tip is either dull or broken. Masonry bits don’t cut; they grind, and the abrasive concrete slowly wears down the carbide. If you hit rebar or a rock at an angle, the tip can also chip. Dull bits overheat, smoke, and make slow progress. They can be sharpened with a diamond wheel, but it’s a specialized skill. For most DIYers, replacement is more cost-effective.
Is there a standard for masonry drill bit dimensions?
Yes. The ISO 5468:2017 specifications cover dimensions for rotary and rotary impact masonry drill bits with hardmetal tips, defining diameters from 4 mm to 25 mm and standard lengths. This ISO masonry drill bit standard ensures interchangeability between brands and is a key reference for manufacturers.
The Bottom Line
Identifying a masonry drill bit comes down to three physical traits: the flat carbide tip, the thick spiral flute, and the shank type. Get in the habit of doing the ten-second visual check before every project. It saves bits, saves drills, and saves you from failed installations.
Remember the one rule that overrides all others: match the bit to the exact task. Drilling a through-hole for a pipe is not the same as setting a structural anchor. The first needs a general masonry bit; the second demands a precision ANSI-tolerance bit. Getting that right is what separates a lasting repair from a callback.
When in doubt, lean toward the higher-quality, purpose-made bit. A Relton anchor bit or a professional-grade SDS+ system costs more upfront, but it drills faster, lasts longer, and doesn’t fail when you’re depending on it. Your drill is only as good as the bit you put in it.
