How to Sharpen a Hole Saw: Essential Techniques for Any Type
This post contains affiliate links. As an Amazon Associate, we earn from qualifying purchases.
Sharpen a hole saw by matching the original bevel angle on each tooth’s cutting face, using a correctly sized round file for bi-metal saws or a diamond abrasive for carbide-tipped saws. Apply light pressure with consistent strokes, cool the teeth frequently to avoid overheating, and finish by removing the burr from the back of each tooth.
Most people grab a bench grinder or the wrong file and ruin the temper in thirty seconds. They see a dull edge and think brute force is the answer. It isn’t. The geometry is everything, and heat is the enemy. Get those two things wrong and you’ve turned a $30 saw into scrap metal.
This guide walks through the two reliable methods: the hand file for control and the rotary tool for speed. We’ll cover the specific tools for bi-metal and carbide saws, the step-by-step motions that actually work, and the real-world signs that tell you it’s time to sharpen, or time to replace.
Key Takeaways
- Only sharpen the angled cutting face of each tooth, never the flat backside. Sharpening the back destroys the cutting geometry and the saw will wander.
- For bi-metal (HSS) teeth, use a 3/32-inch round file. For carbide-tipped teeth, you must use a diamond-coated file or a diamond grinding bit, a standard steel file will crumble the carbide.
- Dip the saw in water after sharpening every 3-4 teeth. If the metal turns blue from heat, you’ve already ruined the temper and that tooth will dull after one cut.
- A sharp hole saw cuts with a steady, moderate pitch and produces small, consistent chips. A dull one screams, smokes, and requires all your body weight to push through.
- If more than two teeth are chipped off or broken, stop. Replacement is cheaper than the time spent trying to salvage a compromised saw.
Before You Start: Safety Isn’t Optional
Before you start: This process creates sharp metal filings and abrasive dust. Safety glasses are non-negotiable, a filing fragment to the eye is a hospital trip. Wear snug-fitting gloves to protect your hands from the saw’s sharp teeth and the file’s tang. If using a power tool, add hearing protection. Secure the saw in a vise; a slipping saw with a file or grinder is a guaranteed laceration.
Tools You’ll Need for the Job
You don’t need a machine shop. The right hand tools are cheaper than a new saw and give you more control. Here’s the short list.
- Bench Vise or Heavy-Duty Clamp: The saw cannot move. A wobbling saw means inconsistent angles and a ruined edge.
- Safety Glasses & Work Gloves: See above.
- Light Source: A headlamp or bright shop light. You need to see the microscopic edge you’re recreating.
- Cleaning Supplies: A stiff brush (a drywall brush works) and solvent (mineral spirits for pitch, WD-40 for metal dust).
- Magnifying Loupe or Glass: Optional but huge. A 5x loupe shows the burr you need to remove.
The sharpening tool depends entirely on your saw type. Using the wrong one is the most common fatal mistake.
| Saw Type | Cutting Teeth | Correct Sharpening Tool | What Happens If You Use the Wrong Tool |
|---|---|---|---|
| Bi-Metal | High-Speed Steel (HSS) | Round file (3/32″ for standard teeth) | A diamond file will work but is overkill. A flat file will ruin the tooth profile. |
| Carbide-Tipped | Carbide welded to steel body | Diamond file or diamond grinding bit | A standard steel file skates off, dulls instantly, and can fracture the brittle carbide tips. |
| Carbide Grit | Grit edge, no teeth | Diamond grinding wheel/dresser | Any attempt to “file” it destroys the abrasive matrix. It must be dressed, not sharpened. |
How to Tell If Your Hole Saw Needs Sharpening
Don’t guess. A saw gives you clear physical signals. Wait until you see three of these, and the job becomes urgent.
- The Sound Changes: A sharp saw has a steady, medium-pitched zzzt-zzzt. A dull one screams a high-pitched screech or labors with a low groaning sound. Your ears will tell you before your hands do.
- The Feed Pressure Skyrockets: You’re leaning into the drill with your shoulder, not just guiding it. The drill motor bogs down or the cordless battery dies halfway through a single hole.
- The Cut Quality Degrades: The exit side of the wood is splintered and torn, not clean. In metal, the edge is ragged with a heavy burr, or the saw wanders and creates an oval, not a circle.
- Excessive Heat and Smoke: The workpiece smokes, and the saw body is too hot to touch within 30 seconds of starting. This is the saw rubbing, not cutting.
- Visible Tooth Damage: Under a light, the tips of the teeth look rounded over, not pointed. You might see tiny chips missing from the cutting edge.
A hole saw that requires body-weight pressure to cut is already damaging your drill’s gearbox. The strain costs more in potential tool repair than a sharpening session or a new saw.
Choosing Your Sharpening Method
You have two proven paths. Your choice depends on your tools, patience, and the saw’s value.
The Hand File Method is slow, quiet, and foolproof. It’s my default for any saw worth more than $20. The file can’t generate enough heat to damage the steel, and the feedback through your fingers teaches you the angle. This is the best approach for saw blade sharpening fundamentals.
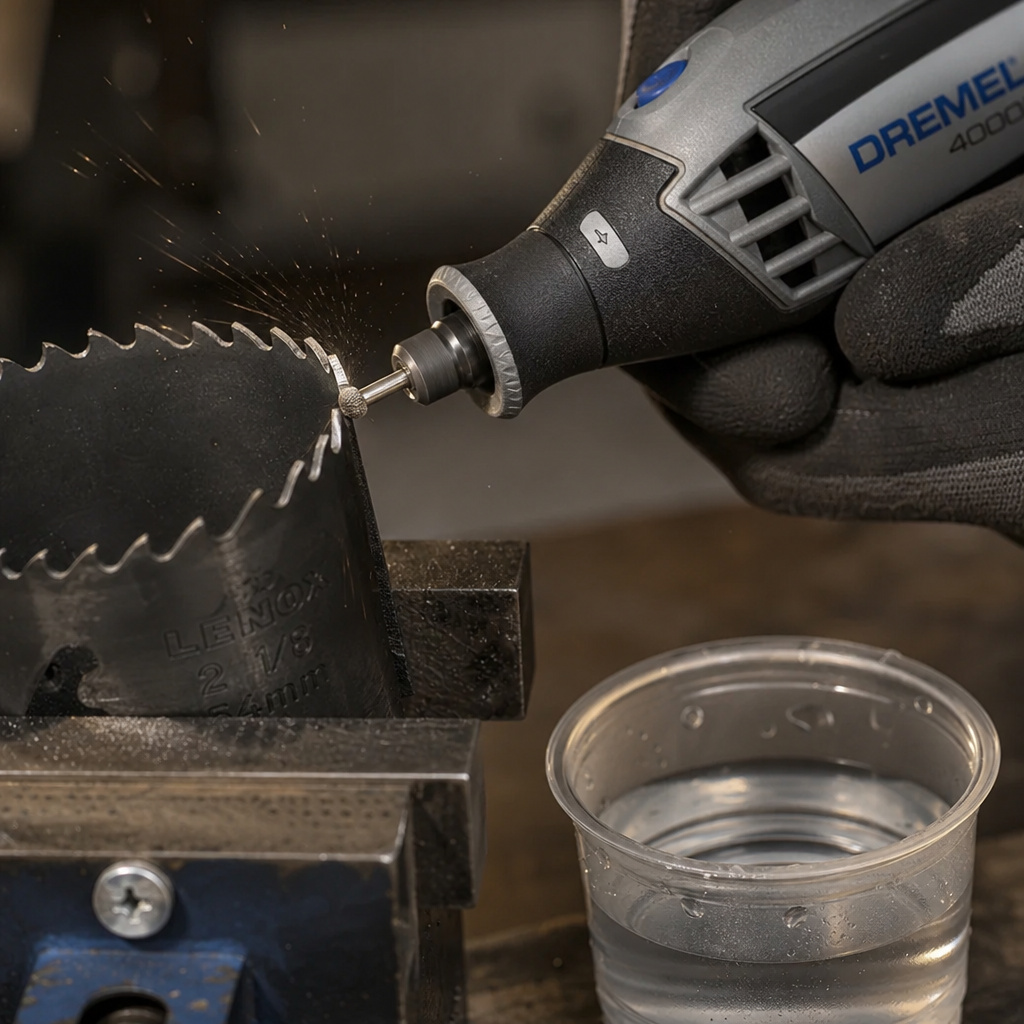
The Dremel/Rotary Tool Method is faster but riskier. It’s excellent for carbide-tipped saws where a diamond file would take all day. The catch is the lightest touch generates intense localized heat. You must be disciplined with cooling. It’s a power-assisted method, not an automatic one.
I learned this the hard way on a nearly-new Lenox carbide-tipped saw for cutting steel strut. Impatient, I used a standard abrasive grinding point in my Dremel. It cut fast. Too fast.
Two teeth later, I saw the dreaded blue temper color on the steel behind the carbide. Those two teeth were dead soft. They wore away to nothing on the very next hole, leaving gaps that made the whole saw vibrate and crack two more teeth. A $45 saw, junked in five minutes. Now I use only diamond bits and a cup of water right next to the vise.
Step-by-Step: How to Sharpen a Hole Saw with a Hand File
This is the core skill. Master this, and the power tool method is just a variation.
Step 1: Clean and Secure the Saw
This step is non-negotiable. Pitch and metal chips hide the cutting edge and clog your file. Brush out every gullet. For stubborn wood pitch, a quick soak in mineral spirits softens it. Dry the saw completely. Clamp the saw’s arbor (the central pilot bit holder) vertically in your vise. The teeth should be stable and at a comfortable working height.
Step 2: Identify the Cutting Angle and Pick Your File
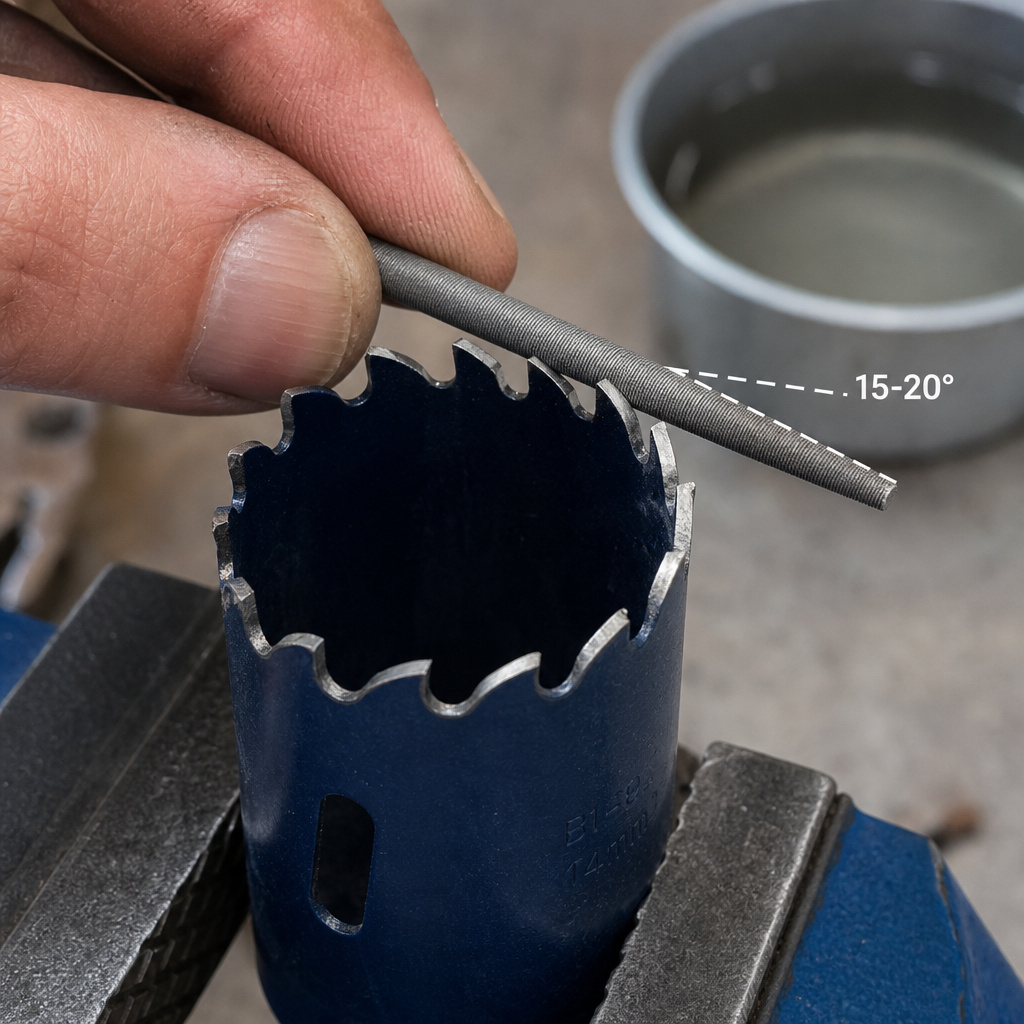
Look at a tooth. The part that does the cutting is the angled face sloping towards the center of the hole. The back is flat or slightly curved. Your job is to sharpen that angled face only.
The original bevel angle on most bi-metal hole saw teeth is between 15 and 20 degrees. Your goal is to match it, not reinvent it. Changing the angle alters the cutting aggression and usually makes the saw bind.
For most common hole saws (like a Diablo 1-1/4 inch), a 3/32-inch diameter round file is the perfect match for the tooth curvature. A smaller file won’t contact the whole face; a larger one will dig into the gullet and weaken the tooth.
Step 3: The Sharpening Stroke
Place the file against the angled face. Match the angle visually. Now, push the file forward along that angle in one smooth, controlled motion. You are trying to shave a tiny ribbon of metal off the entire face. Lift the file off the tooth on the return stroke. Dragging it back rounds the edge you just created.
Count your strokes. Do three firm strokes on the first tooth. Then do three on every single tooth that follows. Consistency is king. Uneven teeth pull the cut to one side.
Step 4: Cool and Deburr
After every three or four teeth, dip the saw’s teeth in a small container of water. This keeps the temperature down. HSS loses its hardness around 600°F, which is easy to reach with friction.
Once all teeth are sharpened, you’ll feel a rough wire edge or burr on the back of each tooth. This is normal. Lay your file flat against the back of the teeth and give it one or two light, flat strokes.
You’re not sharpening, just knocking off the burr. This final step is often skipped, but it’s what makes the difference between a sharp saw and a clean-cutting sharp saw. It’s similar to the final step in cleaning saw blades after a sharpening session.
Step 5: Test Your Work
Don’t assume it’s perfect. Clamp a scrap of the material you cut (wood, PVC, thin metal) to your bench. Run the saw slowly. It should bite immediately with minimal pressure and produce small, curled chips. If it chatters or still requires force, one of two things happened: the angle is off, or you missed the deburr step. Re-clamp and inspect.
Step-by-Step: How to Sharpen a Hole Saw with a Dremel
This method is for the confident, the impatient, or the owner of a carbide-tipped saw. The principles are the same, angle, consistency, cooling, but the margin for error shrinks.
Before you start: Fit your rotary tool with a 1/8-inch diameter diamond grinding point (for carbide) or a standard aluminum oxide grinding stone (for HSS). Wear a face shield in addition to safety glasses. The tool will throw sparks and grit.
Secure the saw exactly as before. Set your tool to a medium speed, around 15,000 RPM is a good start. High speed creates heat instantly.
The motion is a touch, not a grind. Bring the spinning tip to the angled face and kiss it for no more than one second. Pull it away. Look. You should see a fresh, shiny surface. If the metal around the grind spot starts changing color to straw or blue, you’re cooking it. Dip the tooth in water immediately.
Never grind the back of a carbide tooth. The shock can crack the carbide weld. The diamond bit is only for refreshing the front cutting face. If a carbide tip is chipped, it’s a replacement job, not a repair.
Work your way around, one-second touches, cooling frequently. The deburr step is the same: a light touch with the side of the grinding point or a few strokes with a diamond hand file. This process shares the need for a steady hand and clean setup, much like the precision required for changing a saw blade safely.
Bi-Metal vs. Carbide-Tipped: Critical Differences
They look similar but are worlds apart. Treating them the same wastes money.
Bi-Metal (HSS Teeth): The workhorse. The steel teeth are tough but can be sharpened with common tools. They lose their edge faster in abrasive materials but are forgiving to sharpen. Heat is the main killer.
Carbide-Tipped: The specialist. The carbide tips are incredibly hard and wear-resistant, perfect for fiberglass, abrasive woods, or stainless steel. But carbide is brittle. You cannot bang it around, and you must use diamond abrasives. Sharpening is more about careful maintenance than major restoration.
| Aspect | Bi-Metal Hole Saw | Carbide-Tipped Hole Saw |
|---|---|---|
| Best For | Wood, plastic, soft metals, general DIY | Hard/abrasive materials (tile backer, stainless, composites) |
| Sharpening Tool | Round file (3/32″, 1/8″) | Diamond file or diamond rotary bit |
| Heat Sensitivity | High – will lose temper and soften | Very High – thermal shock can crack carbide |
| Cost-Benefit of Sharpening | High – often 1/10th the cost of a new saw | Very High – a $60+ saw can be saved multiple times |
| When to Give Up | Multiple broken teeth, severe corrosion | Missing or fully shattered carbide tips |
How to Maintain Your Hole Saw to Avoid Frequent Sharpening
Sharpening is recovery. Maintenance is prevention. Do these three things and you’ll triple the time between sessions.
- Use Cutting Fluid or Lubricant: In metal, this is non-negotiable. A squirt of tapping fluid or even WD-40 dramatically reduces heat and friction. In wood, the sap is the lubricant, just don’t let it build up.
- Clear the Plug Frequently: The biggest cause of overheating is a packed core. Drill for 10-15 seconds, pull out to clear the chips and the center plug, then continue. A choked saw can’t cut.
- Store It Clean and Dry: After use, brush it out. A quick spray of light oil (like 3-in-1) on the teeth prevents rust, especially for HSS saws. Hang it or store it so the teeth aren’t banging into other tools. This is part of the broader discipline of circular saw maintenance.
When to Sharpen vs. When to Replace
This is the economic question. Sharpening a $15 big-box saw might not be worth 20 minutes of your time. Sharpening a $70 carbide saw absolutely is.
Sharpen It If:
- The teeth are dull but intact.
- There’s minor chipping on one or two teeth that can be blended in.
- The saw is a quality brand (Lenox, Diablo, Milwaukee) and costs over $25.
Replace It If:
- Three or more teeth are missing or broken off at the base.
- The steel body is cracked or bent (check the weld seam).
- It’s a cheap, no-name saw and your time is worth more than the $12 replacement.
- The carbide tips are more than 50% worn down or have large chunks missing.
Think of it this way: if the repair requires you to fundamentally reshape the tooth to compensate for damage, you’re building a new saw from a broken one. It won’t cut right. Toss it and apply the lesson to your next one. Knowing using a hole saw correctly from the start is the best way to avoid early replacement.
Frequently Asked Questions
Can you sharpen a hole saw with a bench grinder?
You can, but I don’t recommend it for anyone but a practiced metalworker. A bench grinder removes metal aggressively and generates intense heat instantly. It’s incredibly easy to overheat and ruin the temper, or worse, grind the tooth down to a nub. The hand file or a controlled rotary tool is safer and gives better results.
How many times can you sharpen a hole saw?
quality bi-metal saw can be sharpened 5-8 times before the teeth become too short to be effective. Each sharpening removes a small amount of material. Carbide-tipped saws can be touched up many more times, 10-15 or more, because you’re only refreshing the very edge of the ultra-hard tip, not reshaping the whole tooth.
Why does my newly sharpened hole saw still cut poorly?
Two likely culprits. First, an unseen burr. Run your finger lightly across the back of the teeth; if it feels rough, deburr again.
Second, inconsistent angles. One tooth cut at 25 degrees while its neighbor is at 15 degrees will cause the saw to wobble and bind. Go back with a marker, color the cutting face of each tooth, and take one light filing pass. The marker will show you exactly where the file is contacting.
What’s the best lubricant when cutting metal with a hole saw?
For non-ferrous metals like aluminum, WD-40 or a dedicated cutting wax works well. For steel, a sulfur-based cutting oil (like Tap Magic) is far superior. It reduces heat, lubricates, and helps carry chips away. The difference in cutting smoothness and tool life is dramatic.
The Bottom Line
Sharpening a hole saw isn’t a mystery. It’s a simple, mechanical process of observation and repetition. Match the angle. Use the right tool. Control the heat. The hand file method is the true teacher, forcing you to learn the tool’s geometry. The power tool method is a useful shortcut once you’ve earned it.
A sharp hole saw is a pleasure to use, it feels confident in the cut. A dull one fights you every step. Keep a 3/32-inch round file and a diamond file in your toolbox.
The twenty minutes you spend bringing an old saw back to life saves you a trip to the store and thirty bucks. More importantly, it teaches you how the tool actually works. That knowledge outlasts any saw, sharp or dull.