Master Your Wet Saw: A Complete Guide on How to Use It
This post contains affiliate links. As an Amazon Associate, we earn from qualifying purchases.
Using a wet saw correctly requires matching three things: the right diamond blade for your tile material, a steady water flow over the cut, and a slow, patient feed rate that lets the blade do the work. You’ll get a clean, chip-free cut every time if you follow those three rules.
Most people rush the feed. They see the blade spinning and push the tile through like they’re slicing bread. That’s how you chip the glaze on a $10-per-square-foot porcelain tile and turn a 30-second cut into a trip back to the home center. Force creates vibration, vibration cracks the tile edge, and you’re left with a piece that won’t fit tight against the wall.
This guide walks through setting up the saw, choosing the right blade, and executing every type of cut from straight lines to complex notches. It also covers what to do when things go wrong, because they will.
Key Takeaways
- Water is non-negotiable. Running the saw dry for even 30 seconds overheats the diamond matrix, glazing the blade and ruining its cutting edge. The pump must be submerged.
- Feed speed dictates finish quality. Porcelain and glass require a crawl; ceramic can handle a steady walk. If you hear the motor bog down, you’re pushing too hard.
- The blade’s condition matters more than the saw’s price. A fresh DeWalt DW4724 continuous-rim blade on a $200 QEP saw will out-cut a worn-out blade on a $1000 DeWalt D24000S every time.
- Clean the slurry out after every use. Let that gritty paste dry inside the pump housing once, and the impeller vanes will wear down within a month. The pump will fail.
- Wear the gear. Safety glasses stop the one-in-a-thousand ceramic shard. A dust mask stops the silica you don’t see. Gloves keep your hands from going numb in cold slurry.
Wet Saw Setup and Safety Checklist
Getting the machine ready is 80% of the job. A wobbly stand or a half-filled reservoir guarantees a bad cut before you even turn it on.
A wet saw uses a diamond-impregnated blade rotating at 3,000–4,500 RPM. Water pumped over the cutting edge cools the blade and tile, reduces friction, and suppresses hazardous silica dust. The blade does not cut; it grinds the material away through abrasion. Proper setup ensures the water flows over the exact point of contact between the blade and the tile, preventing overheating and chipping.
Start with a truly level surface. I use a pair of heavy-duty sawhorses with a sheet of 3/4-inch plywood across them. The factory stand on most contractor-grade saws flexes. That flex translates into blade wobble, which shows up as a chipped edge on the finished side of your cut. Check it with a 4-foot level, front to back, side to side.
Fill the reservoir with clean water until it covers the pump intake, usually marked by a line or screen. Don’t overfill it. Water will slosh out when you feed a tile, and you’ll be mopping your garage floor instead of cutting.
Now plug it into a GFCI outlet. If you don’t have one, use a GFCI extension cord. This isn’t optional. You’re mixing 120 volts with a stream of water; the GFCI is the only thing standing between you and a trip to the emergency room.
Before you start: The blade is exposed, the water is conductive, and the slurry is abrasive. Wear ANSI Z87.1-rated safety glasses, not shop glasses. Wear a basic N95 dust mask. Tie back long hair and sleeves. Keep your cord dry with a drip loop. And never, ever reach near the blade while it’s spinning, even if the saw is off. It takes a full minute to stop.
| Step | Tool/Check | What Happens If You Skip It |
|---|---|---|
| Level the Saw | 4-foot level, sturdy work surface | Cuts drift, tiles chip, blade wears unevenly. |
| Fill Reservoir | Clean water to pump line | Blade overheats in <30 sec, diamonds glaze over, cut quality plummets. |
| Power Safety | GFCI outlet or extension cord | Risk of fatal electrocution if water contacts a live fault. |
| Blade Check | Ensure blade is tight, arbor nut snug | Loose blade wobbles, ruins cuts, and can detach at speed. |
| Fence Square | Speed square against blade and fence | Every cut will be off by 1–2 degrees, compounding over a floor. |
The fence is your guide for every straight cut. Take 60 seconds to square it to the blade with a speed square. Loosen the locking knobs, hold the square against the blade and fence, tighten the knobs. Do this once at the beginning of the project. A fence that’s off by even half a degree will give you a trapezoid instead of a rectangle by the tenth tile.
Choosing the Right Blade for Your Tile
Not all diamond blades are the same. The wrong blade will either cut too slow, overheat, or shatter the tile.
You have two main choices: continuous-rim and turbo. A continuous-rim blade has a solid, unbroken edge of diamonds bonded in metal. It’s the go-to for ceramic and porcelain because it leaves the cleanest edge with the least chipping.
The trade-off is speed, it cuts slower because there’s no space for debris to clear. A turbo blade has serrated segments with gaps between them. Those gaps let slurry and water flow through, which keeps the blade cooler and allows for a faster cut. That speed comes at a cost: the segmented edge can chip softer materials like ceramic, and it’s brutal on glass.
I bought a cheap segmented blade for a bathroom floor project because the store was out of continuous-rim. It cut the porcelain fast, but every single piece had a tiny, ragged chip along the glazed edge. I spent three extra hours with a diamond file smoothing 40 linear feet of cuts. The $30 I saved on the blade cost me an afternoon.
For glass tile, you need a specific glass-cutting blade. They’re usually labeled as such and have an ultra-fine diamond grit. A standard masonry blade will pulverize glass mosaic sheets. The blade should be dedicated to glass, too. Once you cut ceramic with it, the pores load with clay and it’ll start chipping glass.
Here’s the simple rule: Ceramic and porcelain get a continuous-rim blade. Natural stone and thick pavers get a turbo blade. Glass gets a specialty glass blade. Write that on a piece of tape and stick it to the saw’s motor housing.
| Tile Material | Recommended Blade Type | Feed Speed | Risk with Wrong Blade |
|---|---|---|---|
| Ceramic | Continuous-rim diamond | Steady, moderate pace | Turbo blade will chip glazed edge. |
| Porcelain | Continuous-rim diamond | Slow, patient crawl | Turbo blade causes micro-cracks, weakens tile. |
| Natural Stone (Slate, Marble) | Turbo/segmented diamond | Moderate pace | Continuous-rim loads up, overheats, glazes over. |
| Glass / Mosaic | Specialty glass-cutting blade | Very slow, no pressure | Any other blade shatters sheets. |
| Concrete Pavers | Turbo/segmented diamond | Slow, with pauses | Continuous-rim cuts too slow, wears out prematurely. |
Blade diameter matters for depth of cut. A 7-inch blade on a standard tabletop saw will cut about 2 inches deep. That’s fine for wall tile and most floor tile.
If you’re tackling 3cm (about 1.25-inch) thick stone, you need a 10-inch bridge saw or you’ll be flipping the tile. Don’t guess. Measure your tile’s thickness and check the saw’s spec sheet for maximum cutting depth.
Cutting Straight Lines and Squares
This is the fundamental cut. Get this wrong and nothing else fits.
Mark the tile on the face, the shiny, finished side, with a carbide-tipped pencil or a china marker. A regular pencil wears off in the water. A marker bleeds.
The carbide scribe leaves a fine, permanent line. Use a metal straightedge or a speed square. For long cuts, clamp a level or a straight board to the tile as a guide.
Now, account for the kerf. The blade is about 1/8-inch thick. If you cut directly on your line, the finished piece will be 1/16-inch too small.
Always cut on the waste side. I make a small “X” on the part I’m throwing away. That visual reminder saves a tile.
Position the tile on the saw table with the marked face down for a tabletop saw, face up for a bridge saw. The side that hits the blade first gets the cleanest edge. On a tabletop saw, the blade comes up through the tile, so the face-down side is your finished edge.
On a bridge saw, the blade comes down onto the tile, so the face-up side is finished. This is the single most common mistake DIYers make. They cut face-up on a tabletop saw and wonder why the top chipped.
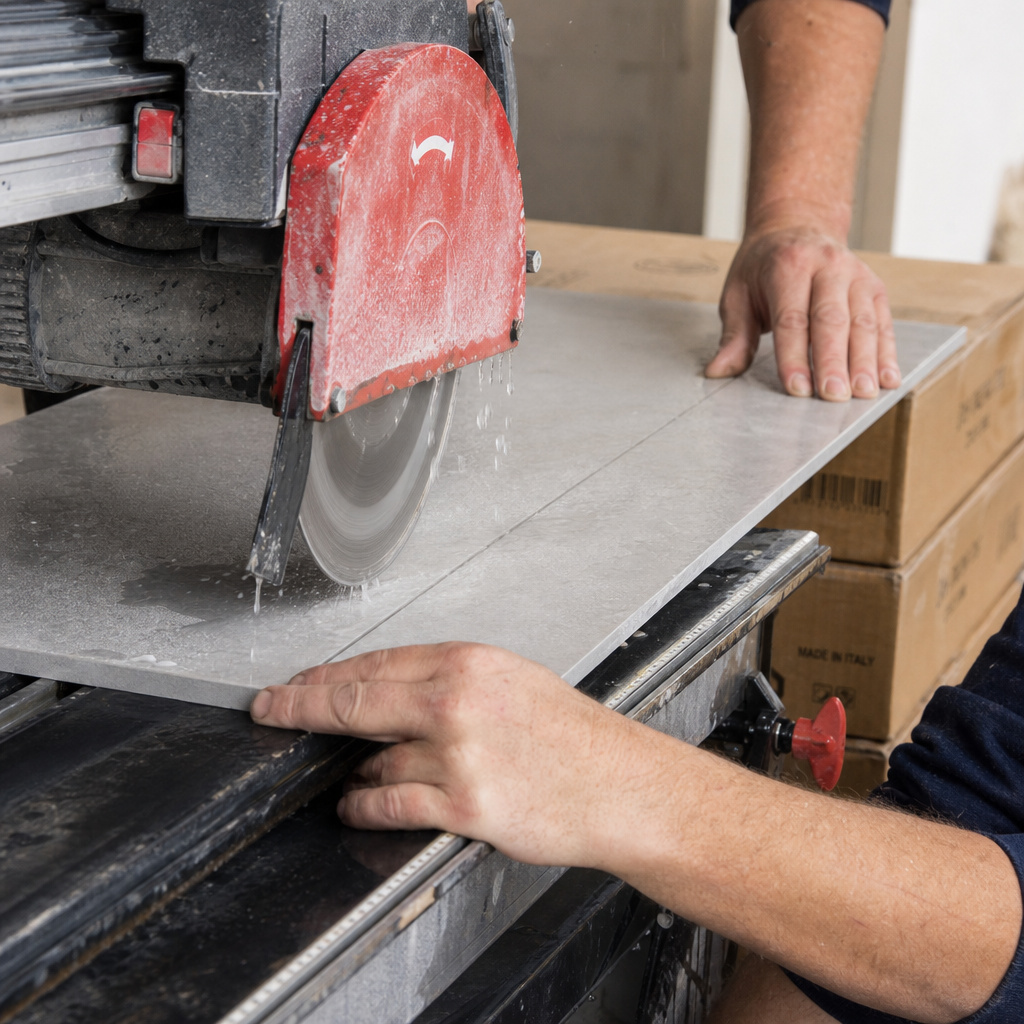
Start the saw and let the blade reach full speed. You’ll hear the water sloshing. Guide the tile into the blade with both hands, keeping firm pressure against the fence.
Let the blade do the work. You should feel a steady, gentle resistance. If you have to push, the blade is dull or you’re feeding too fast. If the tile seems to pull itself through, that’s perfect.
For the last two inches, use a push stick, a scrap of wood works. This keeps your fingers away from the blade and prevents the off-cut from pinching and snapping. That snap sends a shard flying. It happens fast.
After the cut, inspect the edge. A good cut is smooth with a slight burr on the back. That burr is easily knocked off with the flat of your finger or a quick pass with a diamond file.
If the edge is chipped or ragged, your blade is dull, your feed was too fast, or you used the wrong blade type. Stop and diagnose before ruining more material. For more on making accurate cuts with other saws, check out our guide on straight cutting techniques.
How Do You Cut Angles and Notches?
Tiles rarely fit a room perfectly. You’ll need L-cuts, U-cuts, and curves for pipes.
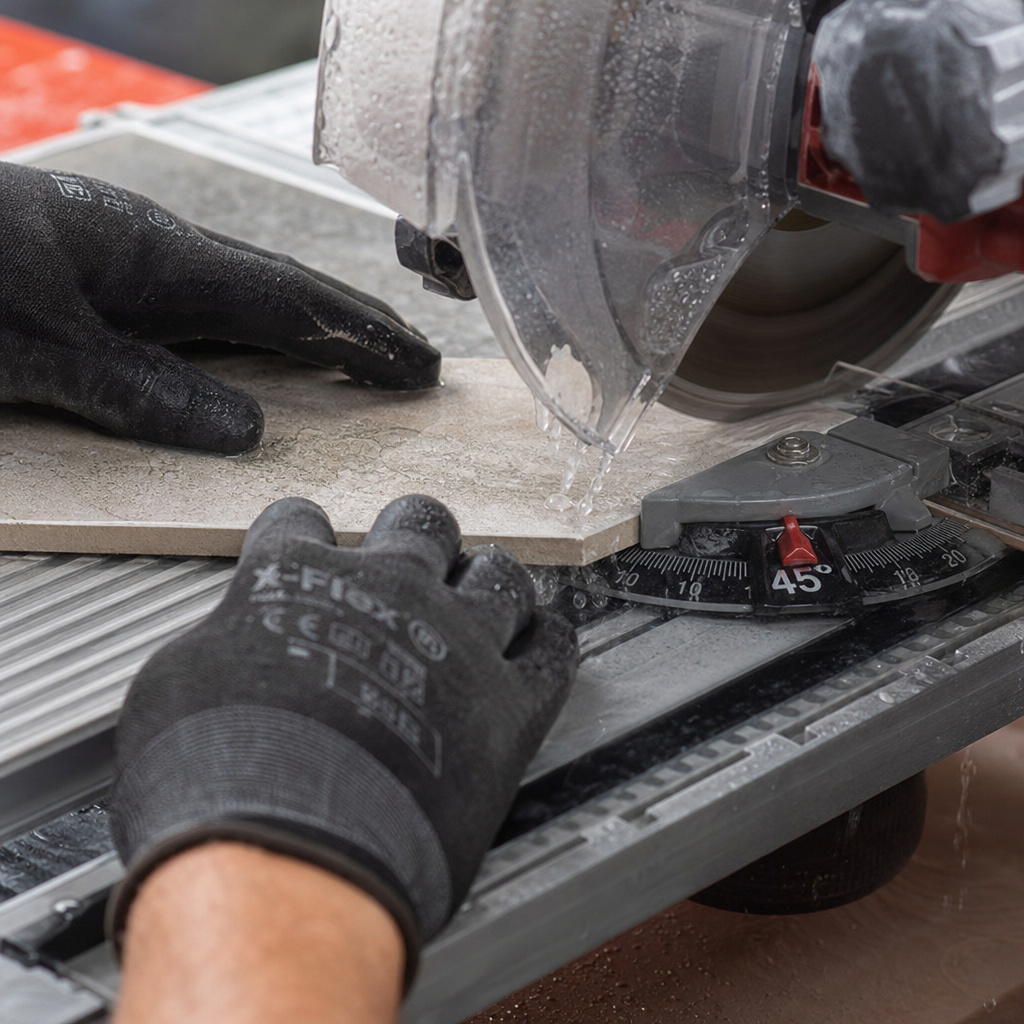
For a simple 45-degree miter, like for a baseboard tile edge, you use the saw’s miter gauge. Set it to 45 degrees, lock it, and treat it like a straight cut. The trick is supporting the tile so it doesn’t tip. Hold it flat against the fence and the table. A wobbly miter is a chipped miter.
L-cuts (a notch removed from a corner) are two cuts. Make the first cut along your marked line, stopping about 1/4 inch from the intersecting line. Back the tile out, turn it 90 degrees, align the second line, and make the second cut until it meets the first.
The small corner piece should fall away. If it doesn’t, a gentle tap with a tile nipper will snap it clean. Don’t try to force the saw to turn a corner, it can’t.
U-cuts (a channel for a pipe) are three cuts: two parallel cuts and a third connecting them. Same principle. Cut the two parallel lines first, then the connecting cut. The key is patience. Rushing the connecting cut will cause the tile to break unevenly.
For round holes for pipes, you have two options. The first is a series of small, straight cuts around the circumference, a technique called nibbling. It’s slow and leaves a rough edge you’ll need to file. The second, better option is a plunge cut. You don’t start at the edge of the tile.
You lower the spinning blade directly onto the tile’s surface inside your marked circle. This takes a steady hand and a saw with a plunge feature or a liftable blade guard. Go slow. Let the blade grind its way through. It’s loud and throws slurry, but it’s the cleanest way to make an interior cut without a hole saw. For other specialty cuts, like 45-degree angle cuts on different tools, the principle of precise setup is the same.
Never try to cut a radius or a tight curve freehand on a wet saw. The blade wants to go straight. You’ll bind it, crack the tile, and likely stall the motor. For curves, use a tile nipper or an angle grinder with a diamond blade after the wet saw roughs out the shape.
Working with Glass, Mosaic, and Large-Format Tiles
Different materials demand small adjustments. Ignore them and you’ll waste money.
Glass tile is brittle. Use a dedicated glass blade and cut face-up on a bridge saw, face-down on a tabletop saw. Apply almost zero feed pressure. Let the blade’s weight and rotation do the cutting.
If you push, you’ll crack the entire sheet. Support the tile fully on the table, any overhang flexes and snaps. For mosaic sheets held together by a mesh backing, keep the backing on during the cut. It provides stability. You can also tape the face with painter’s tape to prevent the small tiles from shifting.
Large-format tiles, anything over 16×16 inches, are a challenge on a small saw. The overhang off the back of the table wants to tip. Support it with an outfeed table.
I use a second worktable or a stack of cardboard boxes set to the exact height of the saw table. This support is critical for the last third of the cut when most of the tile’s weight is off the saw. Without it, the tile pivots, binds the blade, and snaps. It’s a sickening sound.
Stone tiles like slate or travertine are softer but can delaminate. Use a turbo blade and a medium feed rate. Too slow and the blade heats up. Too fast and you’ll rip layers apart. Always cut stone with the grain if there is one.
What Are the Most Common Wet Saw Mistakes?
Everyone makes them. Knowing what they are lets you avoid the expensive ones.
Mistake 1: Running the saw dry. This isn’t a minor error. A dry diamond blade overheats in seconds. The metal bond that holds the diamonds softens, the diamonds fall out, and the blade glazes over. It’ll still spin, but it won’t cut, it’ll just burn and smoke. The fix is a new blade. There’s no salvaging it.
Mistake 2: Forcing the feed. This is the urge to fight the tool. You think pushing harder will cut faster. It doesn’t. It deflects the blade, creates heat, and chips the tile. The motor’s sound is your guide. A smooth hum is good. A groaning strain means stop.
Mistake 3: Not cleaning the slurry. The gritty paste of water and tile dust is abrasive. If you leave it in the pump or on the tray, it dries into a cement-like crust. That crust wears out the pump seals and bearings. It also settles on the blade, unbalancing it. After your last cut, unplug the saw, pull the drain plug, and hose out the tray and reservoir. Wipe the blade down with a wet rag. Five minutes of cleanup saves a $100 pump.
Mistake 4: Using a dull blade. A dull blade doesn’t just cut slow. It heats the tile, causing thermal stress cracks that might not show up until after installation. You’ll see increased chipping and a ragged edge. A sharp blade should cut through standard ceramic with the sound of light grinding, not heavy dragging. If you’re working harder than you were at the start of the project, change the blade.
Mistake 5: Skipping the practice cut. Always run a scrap piece of tile first. It confirms your setup is square, your blade is sharp, and your technique is sound. It’s cheaper than ruining your first showpiece tile.
Cleaning and Maintaining Your Wet Saw
Maintenance isn’t optional. A neglected wet saw is a broken wet saw.
After each use, drain the slurry. Don’t pour it down a sink, the sediment will clog your pipes. Let it settle in a bucket overnight, pour off the water, and throw the sludge in the trash. Rinse the saw’s tray and reservoir with a garden hose. A stiff brush helps dislodge caked-on gunk.
Check the pump intake screen for debris. A clogged screen starves the pump of water, leading to overheating. I clean mine every third project.
Wipe down the blade with a damp cloth to remove dried slurry. Inspect it for cracks or missing segments. Store the saw under a cover or in a shed. Leaving it outside rusts the bearings and motor shaft.
Every 50 hours of use, check the blade arbor and motor bearings for play. Grab the blade (unplugged!) and try to wiggle it side-to-side. Any noticeable movement means the arbor nut is loose or the bearings are worn. A wobbly blade ruins cuts and is dangerous. For other saw maintenance tasks, like sharpening saw blades, the principle of regular care is the same.
I left slurry in my saw tray over a weekend in the garage once. By Monday, it had hardened into a concrete-like layer. Chiseling it out scratched the aluminum tray. Worse, the pump impeller was coated and unbalanced. It sounded like a rock tumbler on the next project and failed within a month. Now I hose it out the minute I’m done.
Lubricate the sliding tray rails with a silicone spray, not WD-40. WD-40 attracts dust and gums up. Silicone spray stays slick and doesn’t attract abrasive particles.
Troubleshooting Common Problems
Things will go wrong. Here’s how to fix them without buying new gear.
Problem: Blade won’t cut, just glazes the tile.
Cause: Blade is glazed from running dry or cutting too hard a material.
Fix: Dress the blade. Run a concrete patio block or a soft brick through the saw a few times. This abrades the glazed surface and exposes fresh diamonds. If that doesn’t work, the blade is done.
Problem: Water isn’t reaching the blade.
Cause: Clogged pump, kinked hose, or low water level.
Fix: First, check the water level covers the pump. Then, check the water feed tube for kinks. Finally, disconnect the hose from the pump and blow through it. If it’s clear, the pump impeller might be worn or clogged.
Problem: Cut is drifting, not following the line.
Cause: Fence is out of square, blade is loose, or tile is not held firmly against the fence.
Fix: Re-square the fence to the blade. Tighten the blade arbor nut. Use a push block to keep even pressure along the entire cut.
Problem: Excessive chipping on the finished edge.
Cause: Dull blade, wrong blade type, or feed speed too fast.
Fix: Switch to a continuous-rim blade for ceramic/porcelain. Slow your feed rate to a crawl. If chipping persists, replace the blade.
Problem: Motor strains or bogs down.
Cause: Feeding too fast, blade is dull, or tile material is too dense for the blade.
Fix: Immediately stop feeding. Let the blade clear. Resume with half the pressure. If it continues, check the blade. For stone, you may need a turbo blade.
Frequently Asked Questions
Can you use a wet saw without water?
No. Running a wet saw dry destroys the diamond blade in under a minute by overheating the metal bond. It also creates a cloud of hazardous silica dust. The water is essential for cooling, lubrication, and dust control.
What’s the difference between a tabletop and a bridge saw?
tabletop saw has a fixed blade; you slide the tile into it on a moving tray. It’s best for smaller tiles and DIYers. A bridge saw (or overhead saw) has a sliding arm that carries the blade over a stationary tile. It handles larger, heavier tiles more easily. For face-up cuts on delicate materials like glass, a bridge saw is superior.
How often should you change the water in a wet saw?
Change the water when it turns thick and milky-white, usually after 20-30 minutes of cutting. Cutting with dirty slurry reduces cooling and leaves a gritty residue on your cuts. For a full-day project, plan on draining and refilling the reservoir 3-4 times.
Can a wet saw cut wood or metal?
No. Wet saws are designed for masonry materials, tile, stone, brick. The diamond blade will gum up with wood resin and become ineffective. Cutting metal is dangerous and can damage the blade. Use a different saw.
Why is my wet saw blade wobbling?
wobbling blade is usually caused by a loose arbor nut, a bent blade, or worn motor bearings. First, ensure the saw is unplugged and tighten the arbor nut with the wrench provided. If the wobble persists, the blade might be damaged or the saw’s spindle might be bent.
How do you make a plunge cut with a wet saw?
Only attempt this on a saw with a plunge feature or a liftable blade guard. Mark your cut location on the tile. Start the saw and let it reach full speed. Slowly lower the spinning blade onto the tile surface within your marked area. Apply light, steady downward pressure until the blade cuts through. Support the tile fully to prevent cracking.
The Bottom Line
A wet saw seems intimidating until you respect its three rules: match the blade to the material, keep the water flowing, and feed with patience. Rushing any of these ruins tile and wastes money. Set up on a level surface, square the fence, and do a test cut on scrap. That five-minute investment saves hours of frustration. Keep the slurry cleaned out and the blade sharp. The saw will last for years and your cuts will look professional. Now go cut something straight.