How to Clean Saw Blades & Extend Their Life the Right Way
This post contains affiliate links. As an Amazon Associate, we earn from qualifying purchases.
Cleaning a saw blade requires three things: the right solvent for the gunk (pitch, rust, or sap), a non-abrasive scrubbing tool that won’t damage the teeth or coating, and a thorough drying and oiling step to prevent flash rust after the wash.
Most people grab whatever harsh chemical is under the sink. That’s how you strip anti-stick coatings and weaken the brazing that holds carbide teeth in place. The blade might look clean, but it’s secretly compromised.
This guide walks through the safe solvents, the step-by-step scrub, and the one thing you must do after drying that most tutorials forget. We’ll cover wood pitch, metal rust, and the specific cleaners that work without wrecking a good blade.
Key Takeaways
- Skip oven cleaner and lye-based solutions. They attack the brazing cement on carbide-tipped blades and can cause teeth to pop off under load.
- Dry the blade completely within five minutes of rinsing. Flash rust starts as a faint orange haze in under ten minutes if you leave water on the steel.
- Match the brush to the blade: brass bristles for bare steel, nylon or a toothbrush for blades with Teflon or other friction-reducing coatings.
- Clean after every 4-5 hours of cutting softwoods like pine or cedar. Their high sap content gums up teeth faster than hardwoods.
- If the blade smells like burnt toast even after cleaning, the carbide is glazed. Cleaning won’t fix it, you need a professional sharpening.
Before You Start: Safety First
Before you start: Saw blades are sharp even when dirty. Wear cut-resistant gloves when handling them. The solvents can irritate skin and lungs, use nitrile gloves and work in a ventilated area, not a closed garage. Always disconnect the saw from power or remove the battery before removing the blade.
What Are You Actually Cleaning Off a Saw Blade?
The gunk on your blade isn’t just dirt. It’s a baked-on composite of wood resins, sap, glue, and fine sawdust, fused by the heat of cutting. This pitch acts like an insulator. The blade can’t dissipate heat, so it runs hotter. Hotter blades warp faster, and the carbide teeth lose their temper, they go soft and dull permanently.
You’ll see the evidence in your cuts. Burn marks on the wood edge, more resistance as you push the saw, and a visible black or amber glaze on the teeth. That glaze isn’t steel discoloration. It’s literally cooked sap.
A clean blade should feel slick to the touch, with visible metal on the body and a sharp, reflective edge on each carbide tooth. If it feels sticky or looks cloudy, it’s not clean.
What’s the Best Saw Blade Cleaner?
The best cleaner is the one that dissolves your specific gunk without harming the blade. There is no universal “best.” Your choice depends on whether you’re dealing with pine pitch, dried glue, or surface rust.
Commercial pitch removers like Rockler Pitch & Resin Cleaner or Simple Green Pro HD are water-based and formulated to break down wood resins without damaging carbide brazing or blade coatings. They are the safest, most effective option for regular maintenance.
Here is the breakdown of when to reach for each type.
| Cleaner Type | Best For | Do NOT Use On | Soak Time |
|---|---|---|---|
| Commercial Pitch Remover (Rockler, Simple Green Pro HD) | Sticky pitch and sap from softwoods (pine, cedar) | No restrictions—safe for all blades | 15–30 minutes |
| Dish Soap & Hot Water (Dawn Platinum) | Light dust and debris; general cleaning after hardwood use | Heavy, baked-on pitch (it won’t cut it) | 10–15 minutes |
| Mineral Spirits | Dried glue, adhesive residue, grease | Blades with painted logos or thin coatings (can strip them) | 5–10 minutes |
| Rubbing Alcohol (90% Isopropyl) | Quick wipe-down between cuts; light sap | Heavy buildup (ineffective) | No soak—wipe only |
| Dedicated Rust Remover (WD-40 Specialist Rust Remover) | Surface rust and oxidation | Blades with heavy pitting (replace instead) | Follow product label |
I keep a spray bottle of Simple Green Pro HD and a small parts washer tub in the shop. For a 10-inch 60-tooth blade gummed up with pine, a 20-minute soak lets the gunk wipe off with a rag. No scrubbing required. That’s the goal.
Avoid oven cleaner and toilet bowl cleaner. They contain sodium hydroxide (lye). It does dissolve organic gunk, but it also attacks the copper brazing that holds carbide teeth in place. A blade cleaned with oven cleaner might lose a tooth on its next hard cut. I learned that the expensive way with a Freud Industrial blade.
Step-by-Step Blade Cleaning
This process works for circular saw blades, table saw blades, miter saw blades, and band saw blades. The principles are identical.
Step 1: Remove and Inspect the Blade
Unplug your saw. Loosen the arbor nut (remember, most saws have reverse threads, righty loosey, lefty tighty). Lay the blade on a flat, protected surface. Look for obvious damage: chipped or missing carbide teeth, cracks in the steel plate, or severe rust. Cleaning won’t fix those. If you see more than one or two minor chips, plan on replacing a circular saw blade soon.
Step 2: Soak to Loosen Buildup
Pour your chosen cleaner into a shallow plastic container just deep enough to submerge the blade. A disposable aluminum roasting pan works. Place the blade in the solution, ensuring all teeth are covered. Set a timer.
- If using a water-based cleaner: 15-30 minutes is ideal.
- If using mineral spirits: 5-10 minutes max in a well-ventilated area. Prolonged soaking can swell plastic components in some blade guards.
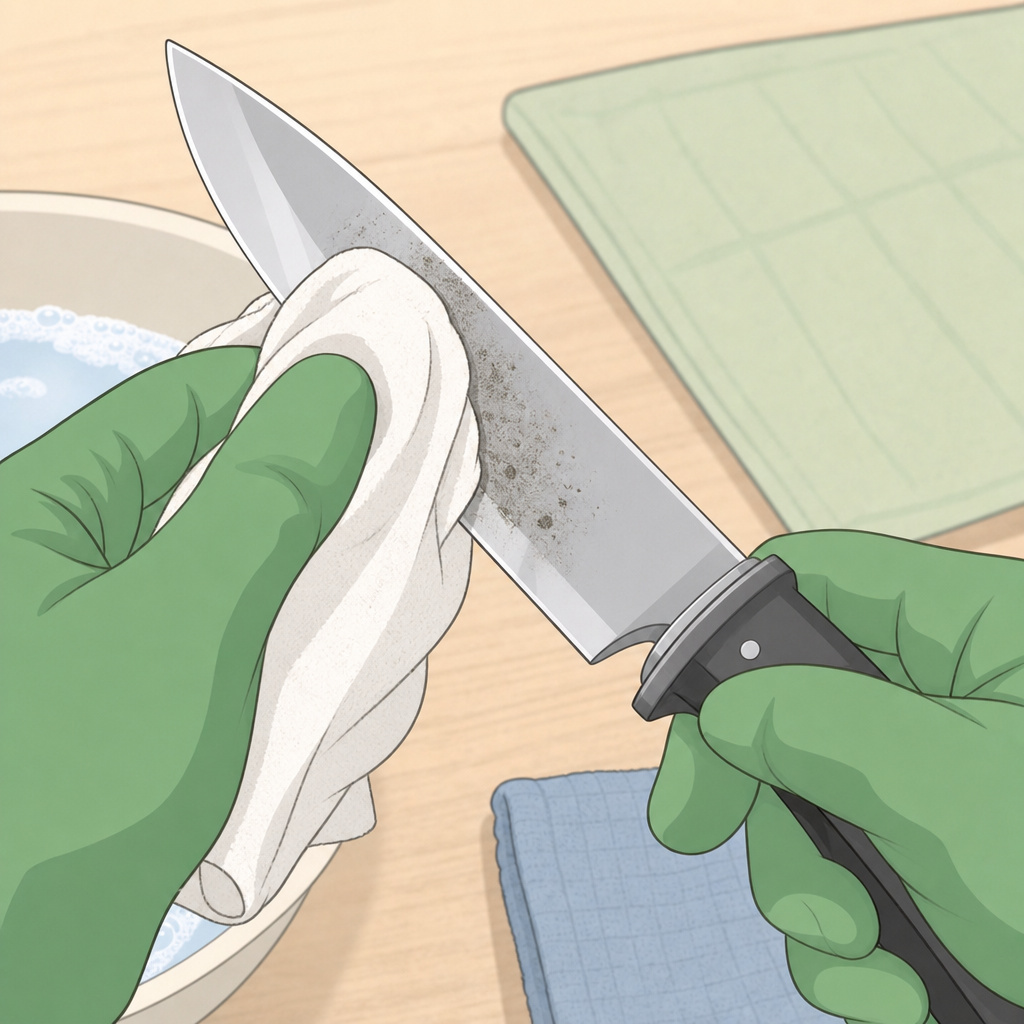
Step 3: Scrub the Blade
Remove the blade. Wear your gloves. Use your brush to scrub every tooth, working from the center of the blade outward. Scrub in the direction of the tooth’s cutting edge, not against it. This preserves the sharp micro-bevel.
For the blade body, use a nylon scrubbing pad or rag. If you have a blade with a non-stick coating (often gold or black Teflon), use a soft toothbrush. A brass or steel brush will scratch the coating off, making the blade stickier next time.
Step 4: Rinse and Dry Immediately
This is the critical step most people botch. If you used a water-based cleaner or soap, rinse the blade under warm running water. If you used mineral spirits, you can let it evaporate or wipe with a clean rag dampened with fresh spirits.
Now, dry it completely and fast. Use clean, dry microfiber cloths to wipe down both sides. Then, use compressed air to blast water out of the tiny expansion slots and from around the arbor hole. Any remaining moisture will cause flash rust. I’ve seen it form in the time it takes to answer a text message.
Step 5: Protect and Store
Once bone-dry, apply a thin, even coat of a protectant. Camellia oil, 3-in-1 oil, or even a silicone spray work. A light mist is enough. Wipe off any excess. This oil barrier prevents rust during storage. Store the blade in its original sleeve or a dedicated blade holder, not loose in a drawer where it can knock against other tools.
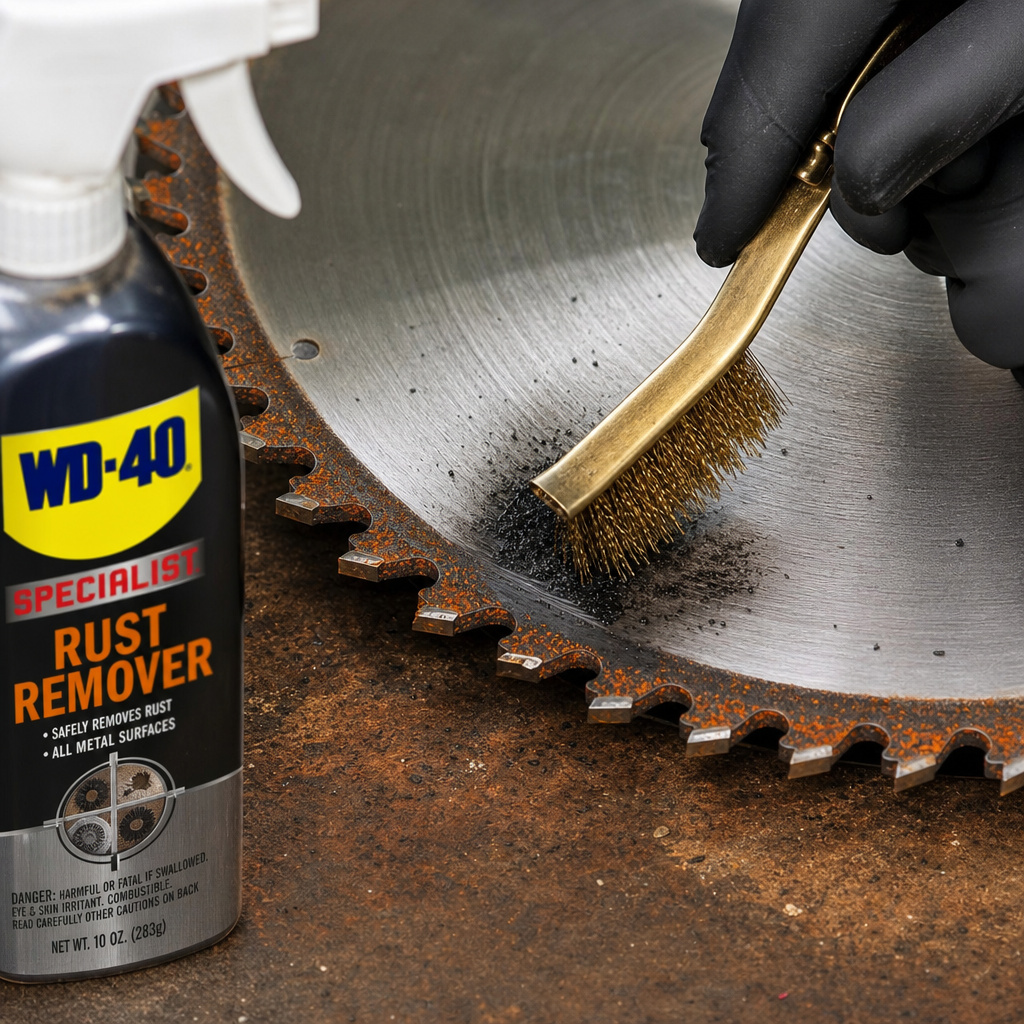
How to Remove Rust from a Saw Blade
Surface rust is a different enemy than pitch. It’s oxidation, not buildup. The goal is to convert or remove the iron oxide without removing healthy metal.
For light, powdery “orange” rust:
1. Spray the blade with a dedicated rust dissolver like WD-40 Specialist Rust Remover.
2. Let it sit for the time specified on the label, often 5-10 minutes.
3. Scrub gently with a brass brush or fine steel wool (0000 grade). The rust will turn black and wipe away.
4. Rinse, dry, and oil immediately, as described above.
For heavy, pitted rust:
Honestly, consider replacement. You can sand it off, but you’ll likely remove enough material to throw the blade out of balance. An unbalanced blade vibrates, makes terrible cuts, and is hard on your saw’s bearings. The time and risk aren’t worth it for a moderately priced blade.
A blade with deep rust pits is a safety liability. The pits act as stress concentrators. Under the centrifugal force of a 5000 RPM spin, a crack can propagate from a pit. I retired a blade for this reason after noticing a hairline crack emanating from a rust spot near the arbor. It’s not common, but it’s a real failure mode.
When to Clean vs. When to Sharpen
Cleaning and sharpening are distinct maintenance tasks. You clean to remove obstructions. You sharpen to restore a worn cutting edge.
Clean your blade if:
- Cuts are producing burn marks on the wood.
- You see visible pitch or sap on the teeth.
- The blade feels sticky or drags more than usual.
- You’ve been cutting soft, sappy wood for a couple of hours.
Sharpen your blade if:
- Cuts are tearing out wood fibers, leaving a rough, fuzzy edge even on clean, dry stock.
- The blade requires significantly more pushing force than when it was new.
- The carbide tips, when clean, have visibly rounded edges instead of sharp points.
- You’ve cleaned it and performance doesn’t improve.
Sharpening requires specialized equipment or a professional service. For most DIYers, sending blades out is the practical choice. The process for sharpening circular saw blades involves precise jigs and diamond files to match the original tooth geometry.
How Often Should You Clean Your Saw Blades?
There’s no fixed schedule. It depends entirely on what you’re cutting.
| Material Cut | Cleaning Frequency | Why |
|---|---|---|
| Pressure-Treated Lumber, Pine, Cedar | After every 2-3 hours of cutting | Extremely high resin and sap content. Buildup is rapid and hardens like cement. |
| Oak, Maple, Poplar (Dry Hardwoods) | After every 8-10 hours of cutting | Minimal sap. Buildup is mostly fine dust, which is less insulating but still abrasive. |
| Plywood with Glue Lines | After each major project (e.g., building a cabinet) | The glue from the laminations melts and coats the teeth, reducing cutting efficiency fast. |
| MDF or Particle Board | Immediately after use | The binder is essentially glue. Let it cure on the blade and you’ll need a solvent soak. |
The easiest rule? Clean the blade when you notice a change in cutting sound or effort. A clean blade should cut with a steady, crisp zip. A dirty blade sounds labored and dull.
Frequently Asked Questions
Can I use vinegar to clean my saw blade?
You can, but only for rust removal. Soaking a blade in white vinegar will dissolve rust over several hours. However, vinegar is also a mild acid that can attack the steel plate itself if left too long. For pitch and sap, vinegar is largely ineffective. It’s a niche solution, not a general cleaner.
How do I clean a blade with a non-stick coating?
Use extra care. Avoid abrasive brushes, steel wool, and harsh solvents like acetone or lacquer thinner. Soak in a water-based pitch remover or hot soapy water.
Use a soft-bristled toothbrush for scrubbing. The goal is to lift the gunk without scratching the coating. A scratched coating loses its non-stick properties.
What’s the best way to store blades long-term?
After cleaning, drying, and oiling, place each blade in an individual blade sleeve (cardboard or plastic). Store them vertically in a blade rack or toolbox in a climate-controlled space. Avoid damp basements or unheated garages where temperature swings cause condensation. For very long-term storage, consider a vapor-corrosion inhibitor (VCI) bag.
Can a dirty blade damage my saw?
Yes, indirectly. A heavily gummed-up blade creates excessive drag, making the saw motor work harder and overheat. It also increases the chance of kickback because the blade can’t cut efficiently, causing it to bind. Regular cleaning is part of essential saw maintenance.
Is it worth cleaning a cheap blade?
It depends on its condition. If it’s a basic steel blade (no carbide tips) that’s rusted or heavily gummed, your time is better spent buying a new, better-quality blade. Cleaning is most valuable for preserving the life of higher-end carbide-tipped blades, where a $10 cleaning can extend the life of a $80 blade by years.
The Bottom Line
Cleaning your saw blades isn’t a deep, technical mystery. It’s a simple habit that pays off in smoother cuts, longer blade life, and less strain on your tools. Find a cleaner that works for your common materials, commit to a quick scrub and dry after messy jobs, and always finish with a light coat of oil.
Your blades will cut better, your projects will look cleaner, and you’ll avoid the frustration of a blade that’s dull from gunk, not from wear. Keep a bottle of cleaner and a brass brush on your shelf. The next time a cut starts to burn, you’ll know exactly what to do.