How to Sharpen a Saw Blade: A Complete Step-by-Step Method
This post contains affiliate links. As an Amazon Associate, we earn from qualifying purchases.
Sharpening a saw blade by hand requires matching four things: the correct file size to the teeth per inch (TPI), the right filing angle for the tooth pattern (rip or crosscut), a consistent jointing pass to level the teeth, and a final stoning to remove the burr. The goal is to remove just enough metal to restore a keen edge to every tooth without altering its shape.
Most people grab a file and start grinding, thinking sharp teeth are the only goal. They skip the setup, cleaning, jointing, checking the set, and end up with a blade that cuts worse than before. It binds, it wanders, it feels like it’s fighting the wood.
This guide walks through the full four-step process. You’ll learn how to inspect a blade, when to adjust the set, how to file rip teeth versus crosscut teeth, and the one final step that makes the difference between a usable edge and a glassy-smooth cut.
Key Takeaways
- A sharp saw cuts under its own weight. If you have to push down hard, it’s dull.
- Match your taper file size to the saw’s teeth per inch (TPI). Using the wrong file rounds over the gullets and ruins the tooth geometry.
- Jointing, filing the teeth flat, isn’t optional. It’s the reference surface that tells you when each tooth is sharp.
- The final stoning pass removes the wire edge burr left by filing. Skip it, and the saw will feel sharp for two cuts before the burr folds over and dulls the edge.
- Sharpening is a subtractive process. You can’t add metal back. Three precise strokes are better than ten rushed ones.
What Tools Do You Need to Sharpen a Saw Blade?
A stable vise is non-negotiable. A saw wobbling in a bench vise will ruin your filing angle before you finish the first tooth. I use a machinist’s vise bolted to a stand at chest height, the ergonomics matter after the twentieth tooth.
The blade should be clamped with the teeth about a quarter-inch above the jaws. Any higher and it chatters. Any lower and you’ll file the vise.
The file choice is specific. For jointing, you need a 6-inch mill file. For sharpening the teeth, you need a taper file. The size of the taper file is determined by the saw’s teeth per inch.
A 4-inch slim taper file is for fine saws (14 TPI and above). A 5-inch regular taper file fits most panel saws (8-12 TPI). A 6-inch extra-slim taper file is for coarse saws (5-7 TPI). Using a file that’s too large rounds the gullet and weakens the tooth. Using one that’s too small won’t contact the full face of the tooth.
You’ll also need a saw set, a plier-like tool that bends the teeth sideways to create kerf width. A fine India stone or a #600-grit diamond stone handles the final stoning. Have mineral spirits and a rag for cleaning, and a light oil or paste wax for protecting the blade after the work is done.
| Tool | Purpose | What Happens If You Skip/Substitute |
|---|---|---|
| Saw Vise | Holds blade rigid during filing | Blade flexes, filing angle varies, teeth become uneven. |
| Taper File (Correct Size) | Cuts new edges on teeth | Wrong size rounds gullets or leaves flats; saw won’t cut cleanly. |
| 6-inch Mill File | Joints teeth to uniform height | Teeth remain uneven; filing will sharpen some teeth, miss others entirely. |
| Saw Set | Adjusts side-to-side set of teeth | Saw binds in kerf (too little set) or cuts a rough, wasteful channel (too much set). |
| Fine Sharpening Stone | Removes burr after filing | Burr folds over on first cut, creating a dull, rolled edge. |
Before you start, put on safety glasses. Those tiny metal filings fly. Gloves protect your hands from the sharp teeth and the file’s tang. Work in good light. Dull light hides the jointing flat and you’ll over-file.
How Do You Know If Your Saw Blade Needs Sharpening?
A sharp hand saw or backsaw requires almost no downward pressure. The weight of the saw itself should pull it through the wood on the push stroke. If you find yourself leaning into the cut, the teeth are dull. Another sign is a change in sound, a sharp saw has a crisp, clean zing. A dull one sounds more like a scratch or a tear.
Visually, look at the teeth in good light. Sharp teeth have distinct points and clean, polished-looking facets where they’ve been filed. Dull teeth appear rounded over at the tips, and the cutting edges might look polished smooth from abrasion.
For power saw blades like a table saw or circular saw blade, the test is in the cut quality and motor strain. A sharp blade leaves a smooth surface with minimal tear-out. A dull blade burns the wood, leaves heavy blade marks, and makes the saw motor labor audibly.
Before you start: The teeth are sharp. The blade is spring steel. Always cut away from your body and hands. Secure the saw in a vise, never hold it in your lap. Wear cut-resistant gloves when handling the blade and safety glasses throughout. Filing creates fine metal dust; a dust mask is a good idea for longer sessions.
Inspect the blade for physical damage first. Look for teeth that are bent sideways, chipped, or missing. A single bent tooth can often be straightened with pliers and a block of wood.
Several bent teeth, or a cracked plate, usually means the saw isn’t worth the time to sharpen. Clean the blade thoroughly with mineral spirits to remove all pitch, sap, and rust. A dirty blade hides problems and clogs your file.
How Do You Sharpen a Saw Blade Step-by-Step?
The process has four distinct phases: setting the teeth, jointing them level, filing the edges, and stoning off the burr. You can’t jump to filing. The sequence exists because each step sets up the next.
Step 1: Check and Adjust the Set
The set is the slight sideways bend of the teeth, alternating left and right. It creates a kerf wider than the blade so it doesn’t bind. First, check if you need to adjust it. Run your fingernail lightly across the teeth. You should feel a consistent, slight offset on each side.
If the teeth feel straight or the set is uneven, use a saw set. Match the anvil of the set tool to the TPI of your saw (it’s usually stamped on the tool). Place the set over each tooth and squeeze the handle gently.
The goal is minimal, consistent bend. For a fine backsaw used in joinery, you want just enough set to prevent binding, almost imperceptible. For a coarse crosscut saw for lumber, a more pronounced set helps clear chips. Over-setting makes the saw cut a wide, rough kerf and requires more effort to push.
Step 2: Joint the Teeth
Clamp the saw securely in the vise. Take your 6-inch mill file and, holding it perfectly perpendicular to the blade, make two or three light passes down the entire length of the teeth. Use even pressure. You’re not trying to remove much metal, just kiss the tips of every tooth.
This creates a tiny, shiny flat spot on the point of every single tooth. That flat is your guide. When you file later, you’ll file each tooth until this flat just disappears. If you skip jointing, your teeth are all at different heights. You’ll sharpen the tall ones and never touch the short ones, and the saw will never cut evenly.
Step 3: File the Teeth
This is the main event. Match your taper file to the saw’s TPI. The chart below is your cheat sheet.
| Saw Type / Use | Typical TPI Range | Recommended Taper File |
|---|---|---|
| Fine Backsaw (Dovetail, Tenon) | 14 – 20 TPI | 4-inch Slim Taper |
| Panel Saw (General Crosscut) | 8 – 12 TPI | 5-inch Regular Taper |
| Rip Saw (Cutting with the grain) | 5 – 7 TPI | 6-inch Extra-Slim Taper |
| Coarse Crosscut (Green lumber) | 4 – 6 TPI | 6-inch Extra-Slim Taper |
Start at the heel of the saw (the end closest to the handle). The filing angle is everything. For a rip saw, the teeth are like little chisels. File straight across the blade, at a 90-degree angle to the length of the saw.
The file should be horizontal. For a crosscut saw, the teeth are like little knives. File at a bevel, typically between 15 and 25 degrees. Most saws have this angle pre-formed; just follow the existing angle.
Place the file in the first gullet (the valley between teeth). The file should sit square in the gullet and contact both the front of one tooth and the back of the next. Use light, full-length strokes.
Count your strokes, three to five consistent strokes per tooth is a good start. Your goal is to file until the shiny flat spot from jointing is just gone from that tooth. Move to the next gullet, skipping every other tooth because they face the opposite direction.
After filing all the teeth leaning one direction from one side of the saw, flip the saw in the vise. You are now filing the backs of the teeth you just did, and the fronts of the ones you skipped. Repeat the same process, same number of strokes. Consistency is key. Uneven strokes create teeth of different heights and the saw will cut in a wavy line.
I learned the hard way on an old Disston panel saw. I was in a hurry, didn’t count strokes, and just “felt” when the tooth was sharp. The result was a saw that cut a hard left curve every time. It took another full jointing and filing session to fix it. Now I count. Every time.
Step 4: Stone the Sides
Filing leaves a tiny, wire-like burr on the sides of the teeth. If you don’t remove it, the burr folds over on the first cut and instantly dulls the edge. Take your fine sharpening stone, a #600-grit diamond stone works perfectly, and hold it flat against the side of the teeth. Make two or three very light passes down the entire length of the blade. Flip the saw and do the other side.
You’re not trying to sharpen here. You’re deburring. You should feel a slight catch as the stone knocks off the burr. After stoning, wipe the blade down with a lightly oiled rag to prevent rust.
What’s the Difference Between Sharpening a Rip Saw and a Crosscut Saw?
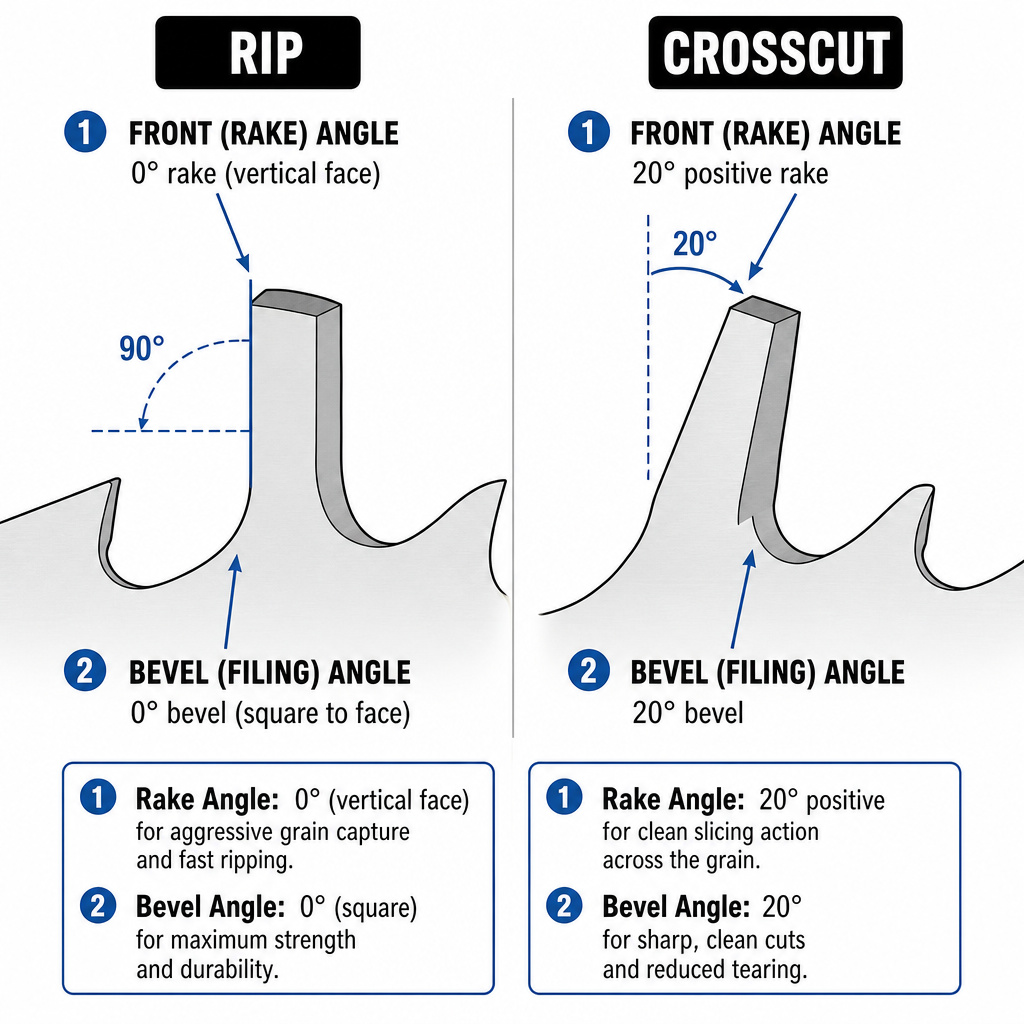
The difference is in the tooth shape, and therefore, the filing angle. A rip tooth is designed to scrape out wood fibers along the grain, like a chisel. A crosscut tooth is designed to slice across the grain, like a knife.
- Rip Saw Teeth: Filed at 90 degrees to the blade. The front face of the tooth is vertical. The cutting action is purely scraping. The rake angle (the angle of the tooth face relative to a line perpendicular to the blade) is typically more aggressive, around 5 to 10 degrees.
- Crosscut Saw Teeth: Filed at a bevel, usually 15 to 25 degrees. The teeth are alternating bevels, creating a knife-like edge that severs wood fibers. The rake angle is shallower, around 15 degrees.
Filing a crosscut saw with a rip saw’s 90-degree angle will make it tear wood instead of slicing it. Filing a rip saw with a crosscut bevel will make it inefficient and slow. Always match the file angle to the existing tooth pattern. If you’re restoring a saw with worn teeth, you may need to re-establish the pattern using a triangular file before sharpening with a taper file, a more advanced technique.
What Are the Most Common Sharpening Mistakes?

The quickest way to ruin a saw is to ignore the fundamentals. Here’s what to avoid.
- Using the wrong file. This is the top mistake. A file that’s too large won’t fit in the gullet and rounds over the cutting edges. A file that’s too small doesn’t contact the full tooth face, leaving it dull.
- Skipping the jointing step. Filing unjointed teeth means you’re sharpening based on guesswork. The tallest teeth get filed, the shortest ones are ignored, and the saw never cuts straight.
- Over-filing. Once the jointing flat disappears, stop. Continuing to file makes the tooth shorter and shallows the gullet, reducing chip clearance. A shorter tooth cuts less wood per stroke.
- Inconsistent set. Squeezing the saw set too hard on some teeth and lightly on others creates a kerf that’s wider in some spots and narrower in others. The blade will bind and release, causing a rough, chattering cut.
- Forgetting the burr. That final stoning step takes 30 seconds. Skipping it means your freshly sharpened teeth have a built-in failure point that gives out after the first few inches of cutting.
A blade that chatters, binds, or cuts a curved line almost always points to one of these five errors. The fix is usually to go back to jointing and start over, paying close attention to the mistake you made.
When Should You Sharpen vs. Replace a Saw Blade?
For a quality hand saw or a high-end carbide-tipped power saw blade, sharpening is almost always worth it. The steel is good, and the cost of professional sharpening is a fraction of a replacement. For a cheap, stamped-steel power saw blade that costs under twenty dollars, replacement is often more economical than your time.
Consider replacement if:
* The blade has multiple carbide teeth chipped or missing (on a power blade).
* The plate is bent or kinked.
* The teeth are so worn from repeated sharpening that the gullets are almost gone.
* It’s a low-quality hand saw with soft steel that won’t hold an edge.
For a mid-range table saw or circular saw blade sharpening, the calculus changes. A professional sharpening service might cost $25-$40. A new blade of similar quality might be $50-$80. If the blade has life left in the carbide, sharpening it twice can double its lifespan. Learning to maintain your own blades, like cleaning a table saw blade regularly, stretches that investment even further.
Frequently Asked Questions
How often should I sharpen my hand saw?
It depends on use. For frequent woodworking, check it every few months. A saw used occasionally might only need it once a year. The real test is performance. When it requires pressure to cut and the kerf looks torn, it’s time.
Can I sharpen a carbide-tipped circular saw blade at home?
You can, but it requires a diamond file or a dedicated bench grinder with a diamond wheel. Carbide is much harder than steel. Most DIYers find it more practical to send carbide blades to a professional sharpening service. The cost is reasonable and they have the equipment to maintain the precise angles.
What’s the best way to clean a saw blade before sharpening?
Soak a rag in mineral spirits and wipe both sides of the blade thoroughly. For heavy pitch buildup, let the solvent sit for a few minutes. Dry completely. This reveals the true condition of the teeth and prevents gumming up your file.
Why does my newly sharpened saw cut to one side?
This is called “leading” or “steering.” The most common cause is uneven filing, one side of the teeth has been filed more than the other, creating more set on that side. To fix it, you need to re-joint the teeth lightly and carefully re-file, ensuring an equal number of strokes on each set of teeth. An uneven burr from skipping the stoning step can also cause temporary steering.
Is a saw vise absolutely necessary?
Yes. You cannot hold a saw steady enough by hand to file accurately. Even a small wobble changes the angle. If you don’t have a dedicated saw vise, you can modify a machinist’s vise with wooden jaw covers. The key is absolute rigidity.
The Bottom Line
Sharpening a saw is a systematic skill, not a mystery. It boils down to four steps in order: set, joint, file, stone. Get the right file for the tooth count, clamp the blade rock-solid, and let the jointing flat be your guide. The saw will tell you when it’s sharp, it’ll glide through wood with the sound of tearing paper, not dragging sand. Your first attempt might feel slow. Your third will be methodical. By the fifth, you’ll have a tool that cuts better than the day it was bought, and you’ll never look at a dull saw the same way again.