
How to Change a Circular Saw Blade: The Complete DIY Guide
This post contains affiliate links. As an Amazon Associate, we earn from qualifying purchases.
Changing a circular saw blade is a straightforward five-minute job that requires matching three things: the right blade for your saw, the right tools, and the right sequence. You need a blade that matches your saw’s arbor size (usually 5/8″ or 20mm) and diameter (commonly 7-1/4″), the wrench that came with the saw, and a clean work surface.
Most people get this wrong by focusing on the blade itself. The real friction point is the arbor nut. It’s reverse-threaded on the side where the blade spins, so you’re fighting the saw’s own torque if you turn it the wrong way. That’s why the nut feels welded on, and why people strip the wrench or the bolt trying to muscle it off.
This guide walks through the physical steps and the reasoning behind each one. You’ll learn how to remove a stuck blade, why blade direction matters, and what to check before you make your first cut with the new blade.
Key Takeaways
- Power is the first and last step. Unplug the cord or pull the battery before you touch the blade. Test the trigger after you’re done to confirm it’s dead.
- The arbor nut loosens in the direction the blade spins. For a standard right-side blade saw, that’s counterclockwise. For a left-blade worm-drive saw, it’s clockwise.
- Blade teeth must point up at the front of the saw. Installing it backward will burn the wood, smoke, and can violently kick the saw back at you.
- Never use an impact driver or power tool to tighten the arbor nut. Hand-tighten with the wrench, then a final quarter-turn for security. Overtightening warps the flange and strips the threads.
- Clean the arbor shaft and flanges before installing the new blade. Built-up pitch and sawdust prevent the blade from seating flat, causing wobble and uneven cuts.
What You’ll Need to Change a Circular Saw Blade
You don’t need a workshop full of tools. You need exactly three things, and one of them is probably in the saw’s base or handle.
The blade wrench that came with your saw is the only tool designed for the job. It’s a flat piece of stamped steel, often with two ends: one fits the arbor nut, the other fits a hex bolt on the saw’s shoe for depth adjustments. If you lost it, a correctly sized hex key or a small adjustable wrench will work.
A 10mm or 13mm wrench often fits. Don’t use pliers. They round off the nut’s corners, and you’ll need a grinder to get it off next time.
The new blade is the critical part. Match the diameter first, a 7-1/4″ blade for a 7-1/4″ saw. Then match the arbor hole. The two most common sizes are 5/8-inch (0.625″) for most corded sidewinders and 20mm (0.787″) for many cordless models and some worm-drive saws.
The size is laser-etched on the blade’s center plate. A blade with a 1-inch arbor will not fit a 5/8-inch shaft. Some blades come with a reducing ring; keep it. It’s a plastic or metal bushing that adapts a larger hole to a smaller arbor.
A clean rag is non-negotiable. Sawdust and resin buildup on the arbor shaft and the inner flange act like sandpaper under the new blade. It creates microscopic runout, the blade doesn’t sit perfectly perpendicular to the shaft. That translates to a wobbling cut, burned edges, and extra strain on the saw’s motor bearings. Wipe both surfaces until they’re metal-shiny.
Work gloves are optional but smart. Freshly used blades are sharp and hot. The teeth can give you a nasty slice even when the saw is off.
How to Tell When Your Blade Needs Changing
A dull blade doesn’t just cut poorly. It works harder, heats up the wood, and stresses the saw’s motor. You’ll know it’s time when you see one of these signs.
The most obvious is visual. Look at the carbide teeth. If they’re rounded over, chipped, or missing chunks, the blade is done.
A blade that’s been used to cut nail-embedded lumber will have flat spots. Burn marks on the wood are another giveaway. The blade rubs instead of shears, creating friction heat that chars the cut line.
Performance tells the real story. You’ll feel the saw laboring, bogging down in cuts it used to breeze through. It might start producing more smoke than sawdust, especially in hardwoods.
The cut quality degrades. You get more tear-out on plywood, ragged edges on dimensional lumber, and the saw tends to wander off your pencil line. Listen to it. A dull blade makes a higher-pitched whine and induces more vibration in the handle.
Here’s a quick diagnostic table. If you see two of these, stop and swap the blade.
| Symptom | Likely Cause | Immediate Consequence |
|---|---|---|
| Burning smell & scorched wood | Dull teeth or pitch buildup | Ruined workpiece, fire risk in dusty shops |
| Saw bogs down, requires pushing | Lost tooth sharpness | Motor overheats, brushes wear prematurely |
| Rough, splintered cut edges | Worn or damaged carbide tips | Need extra sanding, poor joint fit |
| Blade wobbles visibly at speed | Bent blade or dirty arbor | Dangerous kickback, inaccurate cuts |
| Increased vibration & noise | Missing teeth or uneven wear | Premature bearing failure in the saw |
A clean, sharp blade is a safety feature. It cuts with less force, which means you have more control. For common crosscuts and rip cuts, following a basic circular saw operation guide with a fresh blade is the difference between a clean line and a fight.
Step-by-Step: Removing the Old Circular Saw Blade
This is where people rush and get hurt. The sequence matters.
Step 1: Disconnect All Power
For a corded saw, pull the plug from the wall outlet. Don’t just turn off the switch on the saw. For a cordless model, remove the battery. I’ve seen a DeWalt 20V Max battery hold enough charge to spin the blade a quarter-turn when the trigger was bumped. That’s enough to take off a fingertip. After the battery is out, pull the trigger once to discharge any residual current in the capacitor. You should hear and see nothing.
Step 2: Retract the Blade Guard and Lock the Arbor
Set the saw on its side with the blade facing up. Pull the lower blade guard back with your free hand, it’s the spring-loaded plastic or metal hood that covers the blade. Hold it retracted. Now locate the arbor lock button. It’s usually a black plastic button on the saw’s body near the blade. Press and hold it in. You might need to wiggle the blade slightly until the lock pin engages a hole in the blade. You’ll feel a solid clunk. Keep holding that button.
Step 3: Loosen the Arbor Nut
Place the wrench on the arbor nut. This is the critical directional step. The nut is threaded to tighten against the blade’s rotation. To loosen it, you must turn it in the direction the blade spins during a cut.
- For a standard right-blade saw (blade on the right side of the motor, like a DeWalt DWE575 or Bosch CS5), the blade spins clockwise. Therefore, you loosen the nut by turning it counterclockwise.
- For a left-blade worm-drive saw (like a Skilsaw SPT77WML or Milwaukee 6390-21), the blade is on the left and spins counterclockwise. You loosen the nut by turning it clockwise.
If it won’t budge, don’t hammer the wrench. The lock might not be fully engaged. Release the button, wiggle the blade, and press it again. If it’s just stuck from pitch, a single drop of penetrating oil on the threads can help.
Let it sit for a minute. Sometimes tapping the wrench handle with a mallet breaks the initial bond. Once loose, spin the nut off by hand. Set it and the outer washer (called the flange) aside in a place you won’t lose them.
Step 4: Remove the Blade and Clean the Arbor
With the nut and outer flange off, the blade should slide off the arbor shaft. If it’s stuck, it’s usually because of resin or rust. A gentle side-to-side rocking motion will free it. Pull it straight off.
Now, take your clean rag and wipe the arbor shaft. Get all the sawdust and gunk off. Then wipe the flat surface of the inner flange, the fixed metal plate the blade sits against. This is a core part of essential saw maintenance. A dirty mating surface is the number one cause of new blade wobble.
Installing the New Circular Saw Blade Correctly
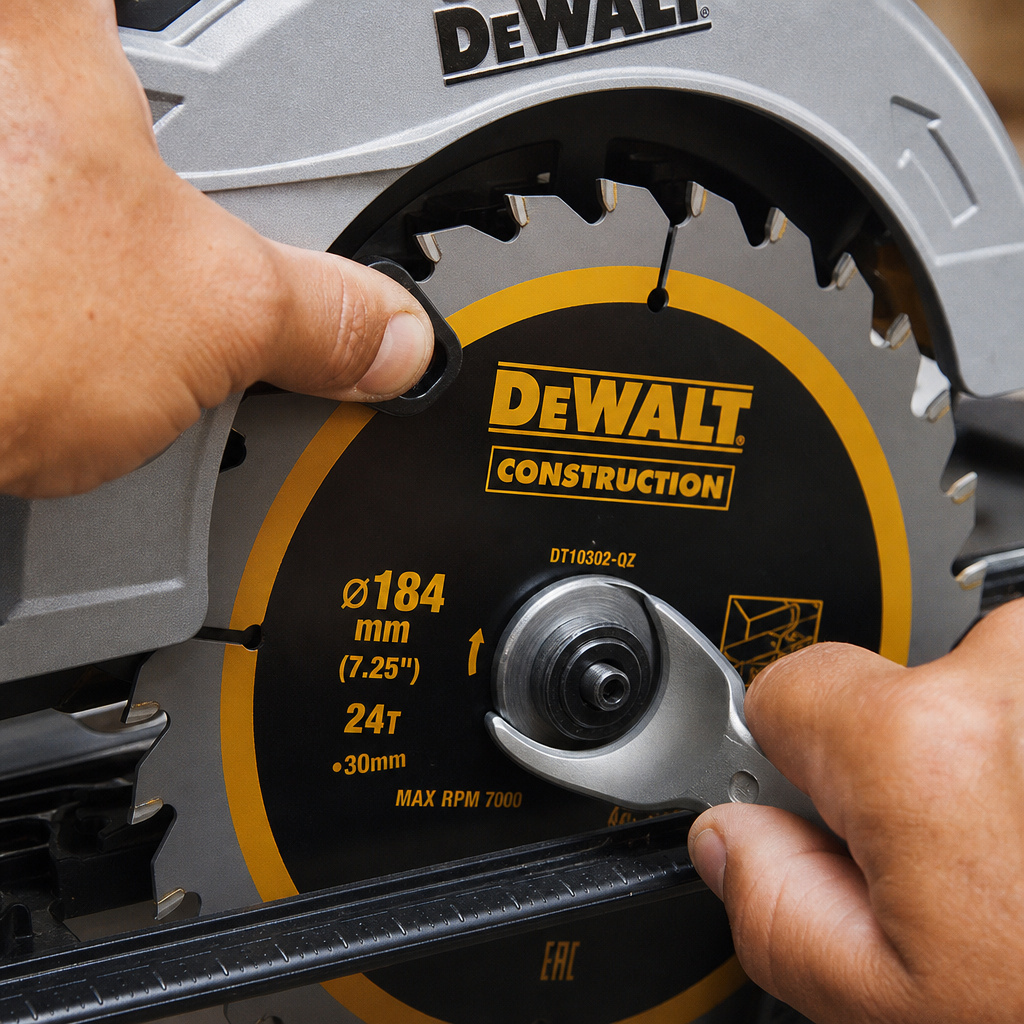
Putting the new blade on seems simple, but two mistakes here will ruin your work or your saw.
Step 1: Check Blade Direction
Look at the new blade. The teeth near the front of the saw (the part that contacts the wood first) must point upward. There’s an arrow on the blade guard indicating rotation direction; the teeth should follow that arrow. Almost every blade has text printed on one side, “This side toward saw” or just an arrow. That side faces out, away from the saw’s motor. Installing it backward turns the carbide teeth into dull, friction-generating hooks. The cut will be ragged, the saw will smoke, and the kickback risk is high.
Step 2: Seat the Blade and Replace the Washer & Nut
Slide the new blade onto the clean arbor shaft. It should slide on smoothly. If it binds, don’t force it. Check for debris or a mismatched arbor size. Next, slide the outer flange back on. It only fits one way, usually with a raised ridge that matches a groove on the arbor. Then thread the arbor nut on by hand until it’s finger-tight.
Step 3: Final Tightening
Re-engage the arbor lock button. Use the wrench to tighten the nut. Turn it in the opposite direction you used to loosen it. For a right-blade saw, that’s clockwise. Tighten it firmly. You want it snug, but you’re not trying to win a strongman contest. A good rule is hand-tight plus a quarter-turn with the wrench. The friction of the flange against the blade is what holds it, not extreme torque.
I once overtightened the arbor nut on a jobsite saw after a blade change. Two days later, I went to change it again and the threads were galled. The nut wouldn’t come off without vise grips, which ruined it. The replacement arbor nut and bolt set cost more than the blade. Snug is enough.
Spin the blade by hand. It should rotate freely without touching the blade guard. If it rubs, the blade might be bent, or there’s debris trapped. Don’t power it up until it clears.
Choosing the Right Replacement Blade
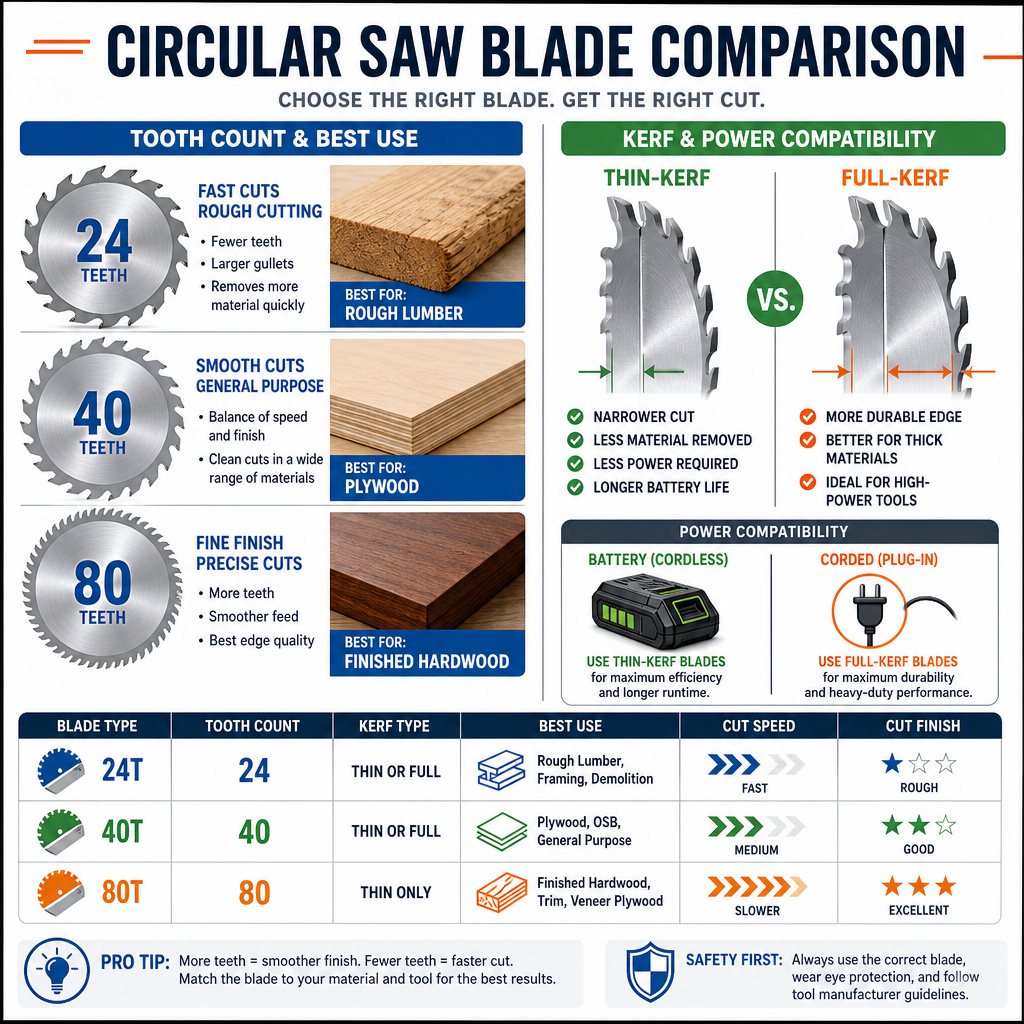
Grabbing any 7-1/4″ blade off the shelf is a mistake. The tooth count and design dictate what you can cut cleanly.
A 24-tooth framing blade (like a Freud LU83M010) is for fast, rough cuts in construction lumber. The large gullets clear chips quickly. It will tear up plywood.
A 40-tooth combination blade (like a Diablo D0740X) is the workhorse for crosscuts and rip cuts in sheet goods and dimensional lumber. For fine finish work in hardwood or melamine, you need 60 to 80 teeth. More teeth mean a smoother cut but a slower feed rate and more heat buildup.
The blade’s kerf, the width of the cut it makes, also matters. A thin-kerf blade (often 0.095″) removes less material, so it strains the motor less. It’s great for cordless saws or older corded models with less power. A full-kerf blade (0.125″) is more rigid and resists deflection, giving you straighter cuts in thick hardwoods, but it demands more from the saw. Understanding saw blade kerf helps you match the blade to your saw’s capability.
| Blade Type | Tooth Count | Best For | Avoid Using For |
|---|---|---|---|
| Framing / Rip | 18–24 | Fast cuts in 2x4s, dimensional lumber | Plywood, finished cuts, melamine |
| Combination / General | 40–50 | Crosscuts, rip cuts, sheet goods | Fine finish work, hard metals |
| Finish / Plywood | 60–80 | Veneer plywood, hardwood, trim | Framing, pressure-treated lumber |
| Thin-Kerf | 40–60 | Cordless saws, low-power motors | Thick, hard materials (can bend) |
| Diamond / Abrasive | N/A | Masonry, tile, cement board | Any wood or plastic (will destroy it) |
Carbide-tipped blades are standard. They stay sharp longer than steel teeth. For cutting pressure-treated lumber, use a blade with anti-stick coating (often labeled “ATB” or with a non-stick coating). The chemicals in PT lumber accelerate corrosion.
Troubleshooting Common Blade Change Problems
Sometimes it doesn’t go smoothly. Here’s what to do.
The Arbor Nut Won’t Budge
First, confirm you’re turning it the right way. If it’s correct and still stuck, try these steps in order:
1. Tap the end of the wrench handle sharply with a rubber mallet. The impact can break the bond.
2. Apply a drop of penetrating oil (like Liquid Wrench) where the nut meets the threads. Wait five minutes.
3. If you have access, use a piece of pipe as a cheater bar over the wrench handle for more leverage. Go slow. If it still won’t move, the threads may be corroded or cross-threaded. At that point, you might need a professional to drill out the arbor bolt.
The Blade Wobbles After Installation
This means the blade isn’t seated flat. Power down immediately.
* Did you clean the arbor and both flanges? Residual grit is the usual culprit.
* Is the outer flange on correctly? It often has a flat side and a raised side. The raised side should face the blade.
* Is the blade itself bent? Set it on a flat surface and look for gaps. Even a slight bend causes wobble.
The New Blade Burns the Wood Immediately
You probably installed it backward. The teeth are dragging, not slicing. Stop, unplug, and flip the blade. Also, check that you’re not forcing the cut. Let the blade do the work. For more on achieving clean results, see our guide on straight cut techniques.
The Saw Makes a Grinding Noise
The blade might be contacting the inner blade guard. Or, you forgot to remove the blade’s plastic protective cover before installation. It happens.
Safety Precautions You Can’t Skip
This isn’t a gentle hobby. The consequences of rushing are permanent.
Before you start: The blade is sharp even when stationary. Always wear work gloves when handling it. The arbor nut and blade can be hot if the saw was recently used. Give it ten minutes to cool. Never, under any circumstance, attempt to change a blade while the saw is plugged in or has a battery installed. I’ve watched a seasoned carpenter nick his thumb because a coworker bumped the cord, completing the circuit just enough to jerk the blade.
After you finish the change, with the saw still unplugged, pull the trigger to ensure it’s truly dead. Then, with the blade guard retracted, spin the blade by hand a full rotation. Listen for any scraping against the guard. Look for any lateral wobble. Only when it spins cleanly should you reconnect power.
Make your first test cut in a scrap piece of the same material you’ll be working with. This confirms the blade is cutting correctly and gives you a feel for its feed rate. A fresh, sharp blade will pull itself into the cut with minimal pressure. If you’re pushing hard, something is wrong.
Frequently Asked Questions
Which way do you turn the bolt to loosen a circular saw blade?
You turn it in the same direction the blade spins during a cut. For the common right-blade saw, the blade spins clockwise, so you turn the arbor nut counterclockwise to loosen it. For a left-blade worm-drive saw, the blade spins counterclockwise, so you turn the nut clockwise to loosen.
Can I use a different brand blade on my saw?
Absolutely. The critical specs are diameter and arbor size, not the brand. A DeWalt saw can use a Makita, Diablo, or Freud blade as long as the hole in the center (the arbor size) matches. Always check the maximum RPM rating on the blade to ensure it meets or exceeds your saw’s speed.
How tight should the circular saw blade be?
Tighten the arbor nut firmly by hand, then give it a final quarter-turn to a half-turn with the wrench. You should not need to put your full body weight on it. Overtightening can warp the outer flange, strip the threads on the arbor bolt, or make the blade impossible to remove next time.
Why does my new blade vibrate and make noise?
The most common cause is sawdust or a wood chip stuck between the blade and the inner flange. The blade isn’t sitting flat. Unplug the saw, remove the blade, and clean both surfaces again. Also, check that the blade itself isn’t bent or damaged.
How often should I change my circular saw blade?
Change it when it’s dull, not on a schedule. A blade cutting clean softwood can last for years of homeowner use. A blade hitting nails in reclaimed lumber might last one project. Signs of dullness include burning the wood, requiring more force to push, and rough, splintered cuts. Regular blade cleaning methods can extend its life between sharpening sessions.
The Bottom Line
Changing a circular saw blade is a basic skill that pays off in cleaner cuts, less saw strain, and greater safety. Get the direction right, loosen in the direction of blade spin. Keep the mating surfaces clean. And tighten the nut just enough. A five-minute swap with the right blade turns a frustrating job into clean, accurate work. Your next project, whether it’s cutting wood for a deck or trimming plywood, will be faster and safer. Keep a sharp blade on hand, and you’ll never go back to fighting a dull one.
