
How to Remove a Stuck Drill Bit | The Manual’s 3-Step Fix
This post contains affiliate links. As an Amazon Associate, we earn from qualifying purchases.
To remove a stuck drill bit, first unplug the drill. For a keyed chuck, use the chuck key and turn it counter-clockwise. For a keyless chuck, grip it firmly and turn counter-clockwise. If it’s stuck in the workpiece, lock the spindle and use pliers or a wrench on the bit’s shank, turning counter-clockwise to back it out. Never use the drill’s power to try and loosen a stuck bit, that’s how chucks get ovaled and drills get broken.
The manual’s three-step method is the only safe starting point. Every manufacturer says the same thing: unplug, insert key, turn. They also warn against using a wrench on that key. The problem starts when you’ve followed those steps and the chuck still won’t budge. That’s when you move from following instructions to applying physics.
What follows is a breakdown of why bits stick, the correct order of operations from manual to last resort, and the specific tools that apply enough force without turning your drill into a paperweight.
Key Takeaways
- Unplug first, every time. A drill that kicks on while your hand is on the chuck breaks fingers.
- The chuck key is not a lever. Manufacturer manuals explicitly warn against using a wrench on it; doing so strips the gear teeth inside the chuck.
- Binding happens when torque exceeds friction. A bit stuck in wood or metal is wedged by its own flutes; you need to overcome that wedging force by locking the spindle and applying leverage directly to the bit.
- A strap wrench is the professional’s first upgrade. It applies even, crushing force around the chuck body without damaging the knurling, giving you more torque than your hands alone.
- If the chuck distorts, you’ve lost. A chuck forced into an oval shape will never hold a bit straight again. That’s the line between a saved bit and a dead drill.
Why Drill Bits Get Stuck in the First Place
A bit doesn’t just freeze up. It’s held by one of two mechanical actions, and which one tells you how to fix it.
A stuck chuck is almost always a friction problem. On a keyless chuck, hand-tightening uses a geared mechanism that can over-rotate and bind. On a keyed chuck, over-tightening with the key crushes the jaws past their designed grip point. Heat from extended drilling expands the metal, and as it cools, everything contracts just enough to lock. The fix is about applying more rotational force to the chuck body than the binding friction.
The Bosch DDH181X-01 manual (BM 2610032842) states that if a drilling bit binds, you should release the trigger, reposition the handle, set the drill to reverse, and then slowly pull the trigger to free the bit. This procedure assumes the bit is stuck in the material, not the chuck.
A bit stuck in the workpiece is a wedging problem. The drill’s flutes are designed to pull material up and out. In dense wood, metal, or when you hit a nail, the cuttings can jam in the flutes. The bit acts like a screw, and the workpiece becomes the nut. The drill motor stalls, but the bit stays put. Here, the chuck might spin freely, the problem is between the bit and the hole. The fix requires holding the chuck (or spindle) stationary and applying reverse torque directly to the bit itself.
Skipping the diagnostic step is how you break things. If you apply chuck-loosening force when the bit is wedged in oak, you’ll just spin the chuck on the bit and gall the shank. Then you have two problems.
The 3-Step Manual Method for a Stuck Chuck
This is the baseline. If your chuck moves after these steps, you’re done. If not, you have a confirmed problem and can escalate without guessing.
Step 1: Disconnect All Power.
Pull the plug from the wall or remove the battery. This isn’t just good practice; it’s the first line in every drill manual’s bit-removal section. A cordless drill with a trigger lock should have its battery removed. You need absolute certainty the tool cannot start.
Step 2: Identify Your Chuck Type and Use Its Intended Tool.
- Keyed Chuck: Find the chuck key. Insert it fully into one of the three holes on the chuck body. The manual for a generic 1/2″ hammer drill warns, “Do not use a wrench on the chuck key. You may damage the key or the chuck.” The key is a precision fit; cranking it with pliers strips the internal gears.
- Keyless Chuck: Grip the knurled sleeve firmly with your hand. The Ryobi PSBDD01 manual shows arrows on the chuck indicating direction, turn it counter-clockwise.
Step 3: Apply Steady, Firm Pressure.
For a keyed chuck, press the key down and turn. For a keyless chuck, squeeze hard and turn. Use your whole hand, not just your fingertips. If it doesn’t move, stop. Do not jump or jerk the tool. This is where the manual’s advice ends and your judgment begins.
Common mistake: Using the drill’s own motor to try and loosen a stuck chuck. A manual for a 7.8-amp hammer drill explicitly warns: “Never hold the chuck body with one hand and use the drill power to rotate the drill body to loosen or tighten bits. Serious injury may result.” This can oval the chuck instantly.
The First Escalation: Gaining Mechanical Advantage
When hand strength fails, you add leverage. The goal is to multiply your force without damaging the chuck’s mechanism or exterior.
Tool 1: The Strap Wrench.
This is the cleanest option. A strap wrench wraps a nylon or rubber strap around the chuck body. When you pull the handle, the strap tightens evenly, applying a huge amount of rotational force without marring the metal. It’s the professional method because it works on keyed and keyless chucks and doesn’t risk crushing the chuck out of round. Keep one in your toolbox.
Tool 2: Channel-Lock Pliers or a Pipe Wrench.
Use these as a last resort before destructive methods. Wrap the chuck jaws in a rag or leather to protect the finish. Grip firmly and turn. You will likely scratch the chuck. The risk is applying uneven pressure, which can deform the chuck body. If you feel the metal give or see the chuck warp, stop immediately, you’re about to ruin it.
What about the “Two Wrench” Method?
In extreme cases, a DIYer might use two strap wrenches, one on the chuck, one on the drill’s spindle housing, to apply opposing force. This is the nuclear option described in a community forum where a user noted the chuck “distorted into an oval” on a high-quality drill before the bit freed. Consider the bit a write-off if you reach this point.
| Tool | Best For | Risk If Used Wrong |
|---|---|---|
| Chuck Key | Keyed chucks, normal removal. | Stripping internal gears if forced with another tool. |
| Hand (Keyless) | Keyless chucks, light binding. | Not enough force for a truly stuck bit. |
| Strap Wrench | Any chuck, first escalation. | Minimal if strap is rated for the torque. |
| Channel-Lock Pliers | Keyless chucks, no strap wrench available. | Crushing/deforming the chuck, leaving tool marks. |
| Two-Strap-Wrench Opposing Force | Severely overtightened chucks (last resort). | Permanently warping or ovalizing the chuck. |
What to Do When a Bit is Stuck in the Workpiece
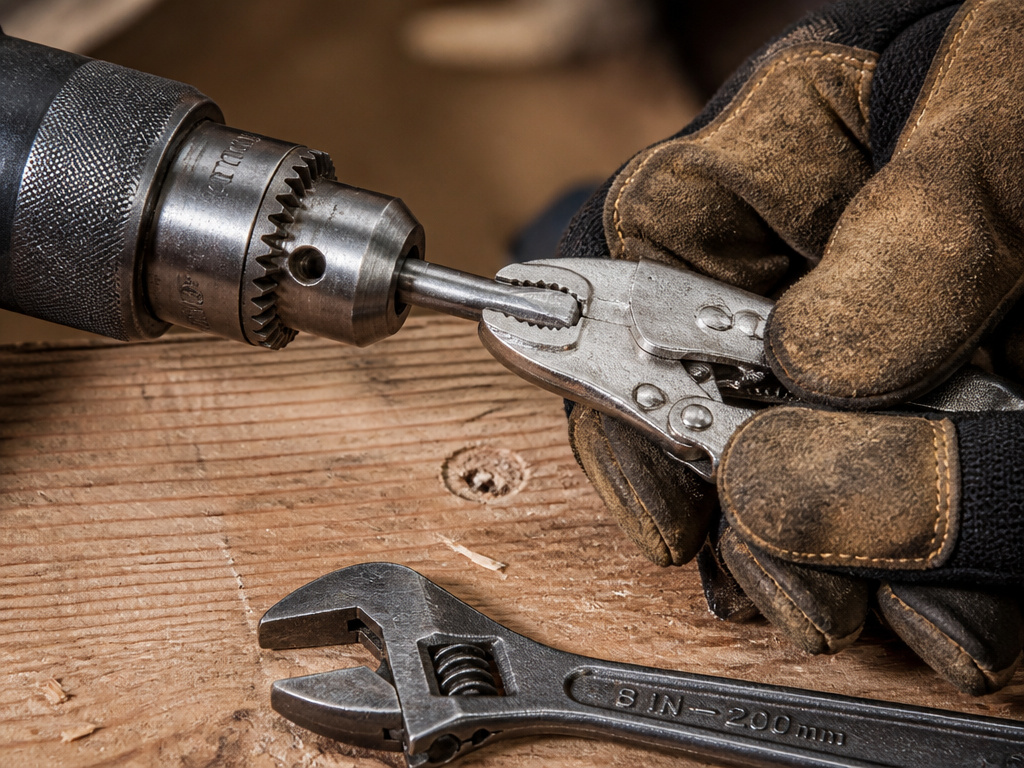 This changes the game. The chuck isn’t the problem; the bit is mechanically bound in the material. Your hands are now useless. You need to lock the drill’s rotation and attack the bit.
Step 1: Lock the Spindle.
On most drills, you can lock the spindle by setting the gear selector between numbers or engaging a specific lock. On a corded drill, the plug is already out. On a cordless, remove the battery. The goal is to prevent the chuck from spinning when you apply force to the bit.
Step 2: Grip the Bit with the Right Tool.
Use locking pliers (Vise-Grips) or a small adjustable wrench. Grip the bit’s smooth shank as close to the workpiece as possible. Clamping on the flutes will dull them. If you have a broken drill bit deeper in the hole, you’ll need an extractor.
Step 3: Apply Counter-Clockwise Torque.
With the spindle locked, turn the tool counter-clockwise. You are essentially “unscrewing” the bit from the hole. If it’s truly wedged, you may need to tap the wrench handle with a mallet to shock it loose. This is where understanding drill bit basics pays off, knowing how the flutes work tells you why it’s stuck.
Where this goes sideways: Trying to force the drill in reverse while the bit is bound. This can trigger the drill’s safety clutch or anti-kickback feature (like Bosch’s Active Response Technology), which cuts power. It also risks snapping the bit, turning a simple extraction into a much harder job of extracting a broken drill bit.
Advanced Extraction: When Standard Tools Fail
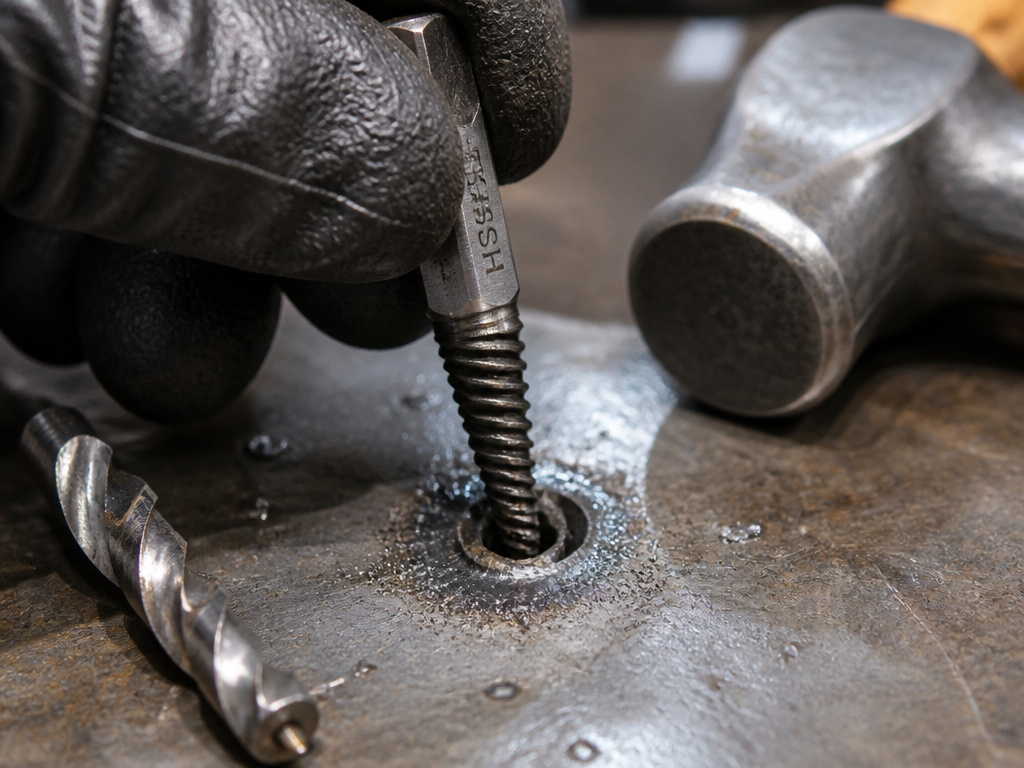 Sometimes, the bit is seized, the chuck is damaged, or the bit has snapped off below the surface. This is specialist territory.
For a Seized Bit in a Chuck: If the chuck turns but the bit doesn’t, the jaws are stripped or the bit’s shank is galled. You may need to remove the drill chuck entirely to access the spindle. This usually requires a 5/16″ hex key (as specified in one manual) to remove the retaining screw inside the chuck, followed by a hammer and punch to shock the chuck off its threads.
For a Broken or Deeply Embedded Bit: This is a job for extraction tools. – Left-Hand Drill Bits: These drill counter-clockwise. As they bite into the broken drill bit, the rotational force often unscrews the remnant before you drill through it. It’s a clever, non-destructive first attempt. – Screw Extractors (Speed-Out Bits): You drill a small pilot hole into the stuck bit, then tap in the tapered, left-spiraled extractor. Turning it counter-clockwise grips and removes the remnant. Using a speed-out bit requires a steady hand and the right pilot hole size.
| Problem | Tool/Method | Mechanism | Success Rate |
|---|---|---|---|
| Bit stuck in chuck | Strap wrench | Even circumferential force | High |
| Bit stuck in workpiece | Locking pliers on shank | Direct torque on bit | Medium-High |
| Stripped chuck jaws | Chuck removal | Bypass chuck entirely | High (but invasive) |
| Broken bit flush | Left-hand drill bit | Reverse drilling torque | Medium |
| Broken bit below surface | Screw extractor | Tapered grip in pilot hole | Low-Medium |
Safety and Damage Prevention
Getting a stuck bit out is pointless if you ruin your drill or hurt yourself. These aren’t suggestions.
Wear Eye Protection.
Any manual, like the one for the 1/2″ hammer drill, mandates safety goggles that comply with ANSI Z87.1. When metal is under high stress, it can snap. A flying chuck key or metal shard moves faster than you can blink.
Never Use a “Power Loosen” Technique.
This is the most dangerous advice that circulates. The idea is to grip the chuck and hit the trigger in reverse. Every manufacturer’s warning against this exists because the sudden torque can wrench the drill from your hands, break your wrist, or cause the drill to spin violently. It also almost guarantees a distorted chuck.
Know When to Stop.
If you’ve applied reasonable force with proper tools and nothing moves, the cost of continuing may exceed the value of the bit or the drill. A new chuck costs almost as much as a new budget drill. A dull drill bit isn’t worth a trip to the emergency room. For complex extractions, seeking advice from a community workshop thread like this Dallas Makerspace drill bit removal thread can provide real-world, tested solutions before you take a hammer to your tool.
Prevent It Next Time.
- Don’t over-tighten. Snug is sufficient.
- Clean the chuck jaws and bit shanks occasionally to remove dust and grit that increase friction. A guide on removing rust from drill bits can help if corrosion is the culprit.
- Use sharp bits. A dull bit requires more pressure, heats up, and is more likely to bind. Knowing how to choose a drill bit for the material also prevents binding.
Frequently Asked Questions
Can WD-40 loosen a stuck drill bit?
Sometimes, but not always. If the bit is stuck due to corrosion or light binding in the chuck, spraying a penetrating oil like WD-40 into the chuck jaws and letting it sit for 10 minutes can help. It won’t do anything for a bit mechanically wedged in wood or metal. Don’t expect miracles.
Why did my drill bit get stuck in metal?
Drilling metal generates heat and fine, stringy chips. These chips can weld themselves to the bit’s flutes (called “work hardening”) or jam in the hole, effectively locking the bit in place. Always use cutting fluid, drill at a slow speed, and frequently retract the bit to clear chips.
Is it safe to use a hammer drill setting to loosen a bit?
No. The hammering action is designed to pulverize masonry, not to impart rotational force. Using it on a stuck bit can damage the drill’s internal hammer mechanism and will not help free the bit. Keep the drill in standard rotary mode.
What if the chuck itself is spinning but the bit isn’t coming out?
This means the chuck’s internal jaws are stripped or the bit’s shank is severely damaged. The chuck can no longer grip. Your only real fix is to remove the entire chuck from the drill spindle and replace it. Forcing it will make the problem worse.
How much force is too much force?
If you’re using a cheater bar (a pipe over a wrench) or a hammer, you’re in the destructive force range. If the chuck body visibly deforms or you hear a cracking sound from the drill’s gearbox, you’ve passed the point of no return. The bit isn’t worth the drill.
The Bottom Line
Start with the manual’s method: unplug, use the right key, turn. When that fails, a strap wrench is your best next tool. For a bit stuck in the material, lock the spindle and attack the bit’s shank with pliers. The line between a successful extraction and a broken tool is patience. If you rush, you’ll end up needing a new chuck, a new bit, or both. Keep your goggles on, your wits about you, and remember that sometimes the smartest move is to drill a new hole and let the old bit rest in peace.
