
Making Holes in Plastic Without a Drill: Simple Techniques
This post contains affiliate links. As an Amazon Associate, we earn from qualifying purchases.
To make a hole in plastic without a drill, you apply localized heat or focused cutting force. A heated nail or soldering iron melts a clean hole in thermoplastics like ABS and polypropylene. For thin sheets, a sharp hole punch or a utility knife scored in a circle works. Thicker, brittle plastics like acrylic require a hand-powered rotary tool with a carbide bit. The method depends on the plastic type, thickness, and the required hole size and finish.
The choice between heat and cutting isn’t random. Thermoplastics soften with heat, so melting is clean. Thermosets and some reinforced plastics won’t melt; they crack. You must identify your material first.
What follows is a breakdown of five proven methods, each matched to a specific plastic scenario. We’ll cover the tools you already own, the exact steps to avoid cracking, and the one setup mistake that ruins most DIY attempts.
Key Takeaways
- Heat-based methods (soldering iron, hot nail) work only on thermoplastics like PET, ABS, and polypropylene, they will shatter acrylic if misapplied.
- Always back the plastic with a scrap wood block. An unsupported exit is the leading cause of spiral cracks and blowout.
- For holes under 1/4 inch, a manual hole punch or a heated nail is faster and cleaner than trying to force a cutter.
- A rotary tool (Dremel) with a carbide cutting bit is the only reliable non-drill method for hard, brittle plastics like acrylic or polycarbonate.
- Drilling plastic without a drill is about control, not power. High speed or force generates heat and stress that fractures the material hours later.
Plastic 101: Why “No Drill” Changes the Game
You can’t pick a method until you know your plastic. The wrong choice doesn’t just fail, it destroys the workpiece.
Plastics fall into two families: thermoplastics and thermosets. Thermoplastics soften when heated and harden when cooled. You can re-melt them. Polyethylene (milk jugs), polypropylene (food containers), ABS (legos, electronic housings), and PET (soda bottles) are thermoplastics. Thermosets, like epoxy resins or melamine, undergo a chemical change when cured. They don’t melt; they char and burn under heat.
The Mitsubishi Chemical Group machining guide states coolants are not necessary for most plastics, but are recommended when drilling or parting-off, processes that generate high frictional heat. This is why uncontrolled cutting force fails.
Forget the “universal” approach. Your method must match the material’s response to heat and stress. A heated nail glides through a shampoo bottle but will splinter a sheet of Plexiglas. That split second of thermal shock is enough.
| Plastic Type | Common Examples | Best “No Drill” Method | Will Crack If You Use… |
|---|---|---|---|
| Polyethylene (PE) | Milk jugs, detergent bottles | Hot nail, soldering iron | Shearing force from dull punches |
| Polypropylene (PP) | Food containers, lids | Soldering iron, rotary tool | Excessive bending during punch |
| ABS | Electronic housings, LEGO | Soldering iron, rotary tool | Cold punching without backing |
| Acrylic (PMMA) | Display cases, light covers | Rotary tool with carbide bit | Any direct heat application |
| Polycarbonate (PC) | Bullet-resistant glass, CDs | Rotary tool, step-by-step scoring | Drill-style twisting pressure |
The table functions as a failure map rather than a simple list. Cross the lines and the plastic tells you immediately.
The Hot-Nail Method: Controlled Heat for Small Holes
This is the simplest tool you own. You need a common nail, a heat source, pliers, and a scrap wood block.
The physics are straightforward: you transfer enough heat into a small metal point to locally melt the plastic’s polymer chains. The material flows away from the tip rather than fracturing. It works only on thermoplastics.
Step 1: Select and heat the nail. A 4d (1.5 inch) finish nail works for holes up to 1/8 inch. Hold the nail head with pliers. Heat the tip in a gas stove flame, with a propane torch, or even a cigarette lighter for 30-45 seconds. The tip should glow dull red.
Step 2: Prepare the workpiece. This step is non-negotiable. Place the plastic flat on a scrap wood block. The wood supports the plastic during penetration and gives the hot nail a clean exit path. Clamp the plastic if possible. Mark your hole center with a permanent marker.
Step 3: Pierce and clear. Holding the nail with pliers, press the hot tip straight down on the mark. Do not twist or hammer. Apply steady, moderate pressure. You’ll feel a slight drop as it punches through. Hold it in place for one second, then withdraw straight out.
Where this goes sideways: Using a nail that’s too large or not hot enough. A lukewarm nail pushes and stresses the plastic, causing a stress crack that radiates from the hole. If the nail doesn’t slide through with steady pressure, stop and reheat it.
The hole will have a slight raised lip of melted plastic around the edge. Let it cool for ten seconds, then you can easily scrape that lip smooth with the edge of a utility knife blade. The result is a clean, slightly tapered hole.
This method excels for quick wiring holes in plastic project boxes or adding drainage to plastic pots. It’s fast, requires no special tools, and leaves no plastic dust.
Soldering Iron as a Precision Melting Tool
 A soldering iron gives you temperature control and a shaped tip. It’s the best method for creating neat, larger, or oddly shaped holes in thermoplastic enclosures.
You need a standard soldering iron (25-40 watt), a well-ventilated space, and that same scrap wood backing. The fume extractor isn’t for show. Melting plastic releases fumes you shouldn’t inhale.
Start with a clean, tinned tip. Wipe off any old solder on a damp sponge. The fresh metal conducts heat faster. If you’re making a round hole, use the conical point of the tip. For a slot, use the chisel edge.
Common mistake: Trying to melt through in one plunge. This overheats the area, causing the plastic to sag and deform. You get a messy, oversized hole.
Touch the tip to the marked spot and apply gentle pressure. Let the heat do the work. As the tip sinks in, slowly rotate it to widen the hole to the desired diameter. Lift the iron frequently to check your progress and prevent excessive heat buildup. For holes larger than 1/4 inch, “walk” the tip around the circumference to melt a circle, then push the center plug out.
The advantage here is detail. You can melt precise notches for switches or create a series of vent holes exactly where you need them. It’s the go-to method for customizing electronic cases or creating drainage holes in seed trays. The downside is speed and the permanent smell of burnt plastic on your iron tip. Designate an old iron for this work.
Punching & Cutting: Shear Force for Thin Sheets
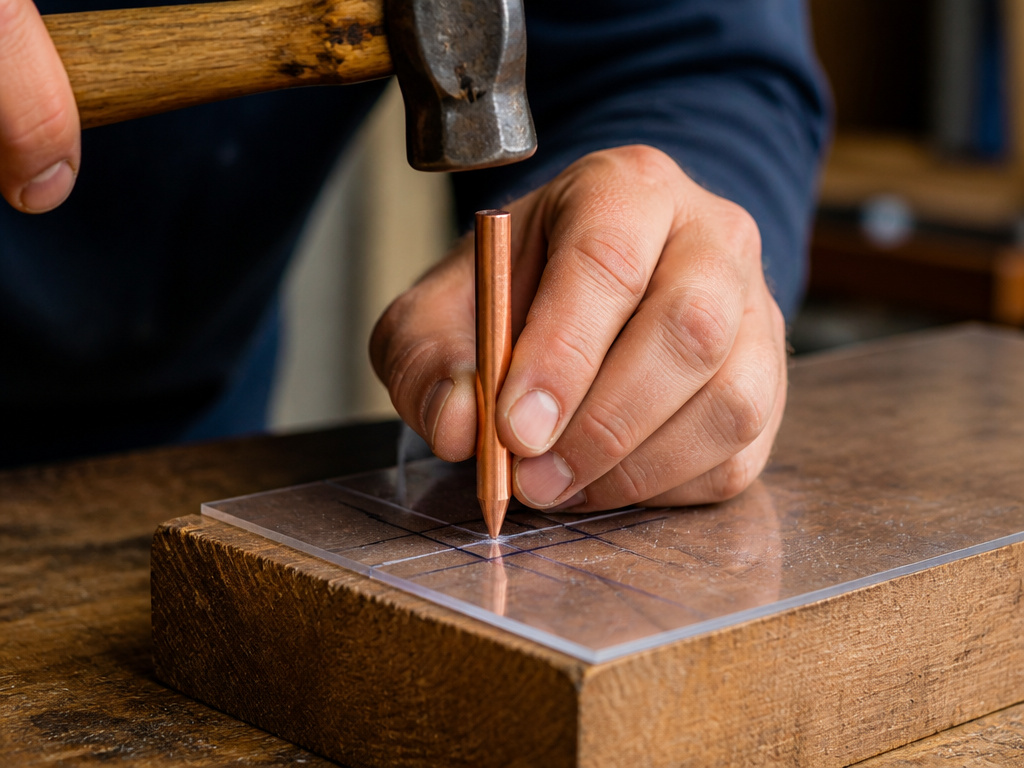 When you need a perfectly round, clean-edged hole in thin plastic film or sheet (under 1/16 inch), cutting is better than melting. The tools are a manual hole punch, a sharp utility knife, or even sharpened metal tubing.
A standard office hole punch works on plastic folders, report covers, and thin packaging. Its leverage provides a clean shear cut. The limitation is reach, you can only punch near an edge.
For holes in the middle of a sheet, you need a different approach. The circle cutter or compass cutter technique is reliable.
- Secure the plastic sheet to your wood backing with double-sided tape.
- Use a compass or a template to scribe your desired circle deeply with a utility knife. Score it multiple times; you want to cut through at least half the thickness.
- Place a small wood block inside the scored circle and give it a sharp tap with a hammer. The plug should snap out cleanly at the score line.
For softer plastics like PVC or vinyl, you can use a sharpened piece of metal tubing as a punch. File the end of a short length of copper or steel tubing to a sharp, flat edge. Place it over your mark on the backed plastic and strike it squarely with a hammer. It will cut a clean plug out.
The part nobody mentions: The backing material matters. Use end-grain wood or a sheet of high-density rubber. Particle board or soft pine will compress, allowing the plastic to deform and tear instead of shearing cleanly.
These methods are ideal for crafting, model-making, or modifying plastic containers for storage. They produce no heat, no fumes, and very little mess.
The Rotary Tool Workaround: Abrasion Over Drilling
For hard, brittle plastics like acrylic, polycarbonate, or fiber-reinforced materials, cutting and melting are out. These materials are notch-sensitive, a tiny crack will propagate. Your only option is abrasive removal using a rotary tool.
A Dremel or other rotary tool fitted with a carbide cutting bit (like their #561 multipurpose bit) or a small diamond-coated burr becomes a hand-held milling machine.
Before you start: This creates fine plastic dust. Wear safety glasses and a dust mask. Secure the workpiece in a vise or with clamps.
The technique is pecking, not drilling. Do not press the spinning bit straight down. That generates friction heat and will melt or crack the plastic. Instead, hold the tool at a slight angle and use the side of the bit to gently “nibble” away material at the hole’s perimeter. Work your way around in a circle, deepening the groove gradually. Retract the tool every few seconds to clear dust.
| Bit Type | Best For | Risk If Misused |
|---|---|---|
| Carbide Cutter (High-Speed) | Acrylic, Polycarbonate | Melts plastic, causing bit to gum up and snap |
| Diamond-Coated Burr | Fiberglass-reinforced plastics | Slow cutting; can delaminate layers if forced |
| Reinforced Cutting Wheel | Cutting slots or large openings | Can grab and shatter thin sheet |
This method is slow and requires a steady hand, but it’s the only way to get a clean, controlled hole in difficult materials without a drill. It’s also the same process you’d use for making holes in wood or soft metals when precision is key. For larger holes, use the rotary tool to cut a starter hole, then switch to a hand file to smooth and enlarge to the final size.
What Not to Do: The Fastest Path to Failure
Some methods are repeated online but are practically guaranteed to ruin your project. Recognize these dead ends.
Never use a standard wood or metal twist drill bit in a hand chuck. The geometry is wrong. The sharp, angled lips are designed to chip and lift material. In plastic, they grab, crack, and spin the workpiece violently. Even with immense care, the result is a jagged, stressed hole.
Avoid open flames for direct melting. Using a lighter or torch to melt a hole directly is uncontrollable. It soots the plastic, creates toxic fumes, and causes uneven heating that warps thin sheets. You get a charred, irregular mess.
Don’t skip the backing support. This is the cardinal sin. Whether punching, melting, or cutting, an unsupported plastic sheet will flex. Upon breakthrough, that flex releases as a shock, creating a spiderweb of micro-cracks around the hole exit. They may not be visible until you apply pressure days later.
Forget about “drilling” with a heated screw. A screw lacks the sharp point and thermal mass of a nail. It takes longer to heat, transfers heat poorly, and its threads act like a reamer, stressing the plastic and creating a torn, threaded hole. It’s the worst of both worlds.
Your goal is a clean aperture, not just an opening. These banned methods create openings that compromise the structural integrity of the plastic around them.
Frequently Asked Questions
Can I use a hammer and a cold nail?
No. A cold nail acts as a blunt punch. It deforms and stretches the plastic until it tears, creating a ragged hole with significant stress and cracking around the edges. This method works for very soft, thin films like garbage bags but fails on any rigid plastic.
What’s the best method for a very large hole, say 2 inches?
For large holes in thermoplastic sheets, the soldering iron method is your best bet. Melt a series of small holes around the circumference of your marked circle, close together. Then, use the tip to melt through the webs between them. You can clean up the edge with a file or sandpaper. For acrylic, you must use a rotary tool with a circle-cutting guide attachment.
How do I smooth the rough edges left by melting?
Let the plastic cool completely. Then, use fine-grit sandpaper (220-grit or higher) wrapped around a dowel or your finger. Sand in a circular motion, applying light pressure. For a polished edge on acrylic, you can progressively sand up to 2000-grit and then use a plastic polishing compound.
Will these methods work on a plastic car bumper?
Yes, but with caution. Most bumpers are made from thermoplastic polyolefin (TPO) or polypropylene. The hot-nail or soldering iron method will work. Test on an inconspicuous area first, as some bumpers have paint or coatings that can blister. Always back the area from behind with a wood block if possible.
Is there a risk of toxic fumes?
Yes. All thermal methods release fumes as the plastic decomposes. Always work in a well-ventilated area, outdoors or near an open window with a fan blowing the fumes away. Do not inhale the smoke. Abrasive methods (rotary tool) produce dust, which is also an irritant and should be masked.
The Bottom Line
Making a hole in plastic without a drill involves selecting the correct physical process for your specific material. For everyday thermoplastics, a soldering iron or hot nail provides a fast and clean method using heat.For brittle acrylics, the controlled abrasion of a rotary tool is your only safe choice.
The scrap wood backing block is the single most important item in your toolkit. This piece of pine or plywood absorbs the exit shock, supports the material, and turns a risky operation into a controlled one.Forget it, and you’ll spend more time fixing cracks than making holes.
Start by identifying your plastic. Match it to the method. Secure your work. The hole will be there when you’re done, clean and ready, with the piece still intact around it. That’s the whole goal.
