
Methods to Put Holes in Plastic Pots Without a Drill Quickly
This post contains affiliate links. As an Amazon Associate, we earn from qualifying purchases.
You can put holes in plastic pots without a drill by melting through the plastic with a heated metal object like a skewer or nail, or by puncturing it with a sharp tool like an awl or utility knife. The heated method creates cleaner, more durable holes, especially for thicker plastics, while sharp tools work for thin, flexible pots.
The difference between a melted hole and a punctured one isn’t just about looks. A melted edge is fused and smooth, which resists cracking as the pot flexes under soil weight. A punctured edge is a stress point that can spider-crack outward after a few freeze-thaw cycles or if you drop the pot. That’s the mechanical reason you pick one method over the other.
What follows: a run-down of the two main approaches (heat vs. Force), the exact tools that work for each, and the specific mistakes that crack pots or leave you with a clogged soldering iron. You’ll also get a size chart for how many holes your pot actually needs, because one pencil-sized hole in a 10-inch pot is a recipe for root rot.
Key Takeaways
- A heated metal skewer or soldering iron melts clean, reinforced holes and is the default for most plastic pots, particularly thicker ones.
- For thin, flimsy nursery pots, a sharp utility knife or awl is faster and avoids fumes, but the holes are more prone to cracking over time.
- Always support the pot from the inside with a scrap of wood when using any puncturing method to prevent the plastic from flexing and cracking.
- Match the number and size of holes to your pot’s diameter: a 6-inch pot needs 4-6 holes about 1/2 inch wide.
- Never use a soldering iron on a pot already filled with soil; the residue will ruin the tip for future electronics work.
Before You Start: Safety First
Before you start: Melting plastic releases fumes you shouldn’t inhale. Work outside or in a garage with the door open. Wear gloves—the metal stays hot longer than you think, and melted plastic droplets stick to skin and burn. Have a fire extinguisher or a bowl of water nearby if using an open flame to heat your tool.
The Two Ways to Make Holes: Melt or Puncture
Your choice comes down to the plastic’s thickness and what you have on hand. Heat wins for durability and control on anything thicker than a disposable water bottle. Force works in a pinch on thin, flexible plastic.
Think of it like this: melting reforms the plastic around the hole, leaving a smooth, thickened rim. Puncturing fractures it, leaving a weak edge that can split.
| Method | Best For Plastic That Is… | Tool Examples | Biggest Risk |
|---|---|---|---|
| Melting (Heat) | Thick, rigid, or thermoplastic | Soldering iron, metal skewer, nail | Fumes; residue on tools; holes too large if overheated |
| Puncturing (Force) | Thin, soft, or flexible | Utility knife, awl, screwdriver | Cracking; jagged edges; hand injury from slippage |
The rest of this guide walks through each method step-by-step, including the why behind every instruction.
The Heated Skewer Method (Step-by-Step)
This is the most accessible heat method. You need a metal skewer, a heat source, and pliers.
What You’ll Need
- A metal skewer, long nail, or thick sewing needle
- Pliers or an oven mitt
- Heat source: gas stove burner, propane torch, or even a candle
- Scrap piece of wood (a 2×4 cut-off is perfect)
- Marker
The Process, With Reasons
- Mark your holes. Turn the pot upside down and mark dots where you want holes. Place them at least an inch from the edge and space them evenly. For a standard 8-inch pot, you’ll want 6-8 holes.
- Support the pot. Place your scrap wood inside the pot, directly under your first mark. This is non-negotiable. It prevents the plastic from deforming when you press, which would create an uneven, weak hole.
- Heat the skewer. Hold the skewer in the flame of your stove or torch until the tip glows red-hot. This takes about 60 seconds on a high flame. Use pliers to hold the cool end.
- Melt, don’t push. Position the hot tip directly over your mark. Apply gentle, steady pressure. Let the heat do the work—you’re melting through, not stabbing. The skewer will sink through in 2-3 seconds.
- Withdraw straight. Pull the skewer straight back out. If you wiggle it, the hole becomes oval and weak.
- Clean the tip. Wipe any melted plastic off the skewer with a rag before reheating for the next hole. This keeps the heat transfer efficient.
Where this goes sideways: Heating the skewer too long. The metal holds excess heat, and if you linger even a second too long after penetration, you’ll melt a crater instead of a clean hole. The hole ends up twice the size you wanted, weakening the pot base.
Why the wood block matters: Plastic is brittle under point pressure. The wood distributes the force across a wider area, so the energy goes into melting a clean cylinder, not cracking a starburst pattern around the entry point.
Using a Soldering Iron for Precision
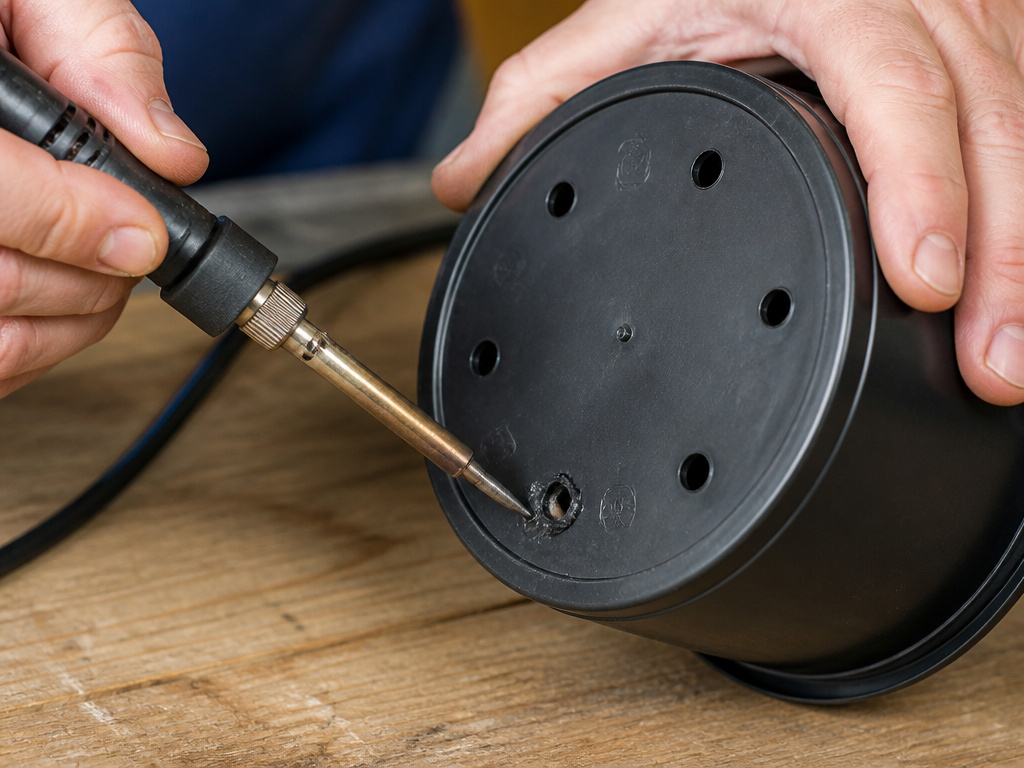
A soldering iron gives you pinpoint control and consistent heat. It’s the tool you use when you have a dozen pots to do.
How It Differs From a Skewer
A soldering iron maintains a constant temperature (usually between 350°C and 400°C). You aren’t fighting against a cooling tool, so you can work methodically. The tip is also smaller, allowing for smaller holes if you’re working with seedling trays.
Step 1: Prep the iron. Plug it in and let it reach full temperature. A cheap 30-watt iron is sufficient.
Step 2: Work on a empty pot. This is critical.
Common mistake: Using a soldering iron on a pot with soil or debris inside. The plastic residue that builds up on the tip is nearly impossible to remove completely, and it will contaminate future electronics soldering joints, causing weak connections. Dedicate an old iron to crafts, or only use it on pristine pots.
Step 3: Melt with a tap. With the pot supported on wood, touch the hot tip to your mark. You’ll feel almost no resistance. Hold it for one second, then lift. The hole is formed.
Step 4: Clean the tip immediately. While the iron is still hot, wipe the tip quickly on a damp sponge or brass wool to remove plastic residue before it carbonizes.
Soldering Iron vs. Skewer: Which to Choose?
| Factor | Soldering Iron | Heated Skewer |
|---|---|---|
| Hole Consistency | Perfect, uniform holes every time | Can vary as the skewer cools |
| Speed for Many Holes | Faster (constant heat) | Slower (re-heat each time) |
| Tool Cost / Dedication | Requires a dedicated tool | Uses kitchen/grill tools |
| Best For | High volume, small pots, precision | Occasional use, larger holes |
The Sharp Object Method: Awls, Knives, and Nails
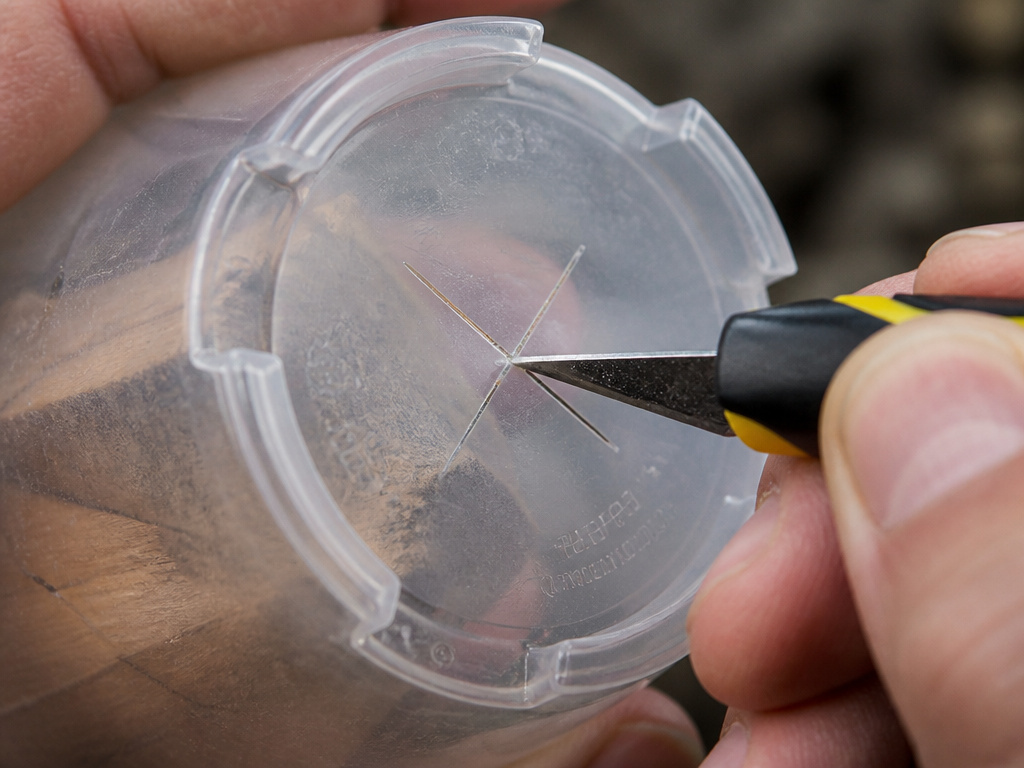
When you have a thin, flimsy nursery pot—the kind that comes with a $5 plant—melting is overkill. A sharp puncture is faster.
Tools That Work (And One That Doesn’t)
- Utility Knife: The best choice. Use the tip to score an X, then poke the center out.
- Awl or Ice Pick: Ideal for a clean, round puncture. Twist as you push.
- Screwdriver: Only use a Phillips head, not flat. The pointed center gives a starting point.
- Hand Drill: This is the one to avoid. The twisting action of a hand drill or a manual drill generates tremendous shear stress on brittle plastic, almost guaranteeing a crack that radiates out from the hole.
The process: Support the pot from the inside with wood. Position your tool at a 90-degree angle. Apply firm, controlled pressure with a twisting motion if using an awl. Don’t hammer a nail through—the shock impact cracks thin plastic every time.
The part nobody mentions: The holes you make this way are permanent stress concentrators. If this pot will live outdoors through winter, water will get in the holes, freeze, and expand. Those tiny cracks will grow each season. For outdoor pots, melted holes last years longer.
How Many Holes Does Your Pot Actually Need?
One tiny hole isn’t drainage; it’s a bottleneck. Here’s a baseline guide for creating drainage holes that actually work.
| Pot Diameter | Minimum Number of Holes | Recommended Hole Size | Why This Ratio Works | | :— | :— | :— | | 4″ – 6″ (Seedlings) | 3 – 4 holes | 1/4″ | Prevents waterlogging in shallow soil. | | 6″ – (Standard) | 4 – 6 holes | 1/2″ | Allows excess water to escape quickly after heavy watering. | | 8″ – 10″ (Large) | 6 – 8 holes | 1/2″ – 3/4″ | Matches the larger soil volume’s need for airflow and drainage. | | 10″+ (Trees/Shrubs) | 8+ holes | 3/4″ | Handles deep watering without the bottom third of soil staying soggy. |
These numbers are a starting point. If you live in a very rainy climate, add 2-3 more holes. For succulents or cacti, go to the higher end of the count.
Placement matters: Put most holes in the center of the pot base, not just the edges. Water tends to pool in the middle. Adding a few holes partway up the side of the pot (about an inch from the bottom) also helps with aeration, allowing air into the root zone from the sides.
Troubleshooting: When It Doesn’t Go As Planned
Even with the right method, plastic can be unpredictable.
Problem: The plastic is cracking, not cutting.
- Cause: The plastic is too cold (brittle), or you’re using a twisting drill motion.
- Fix: Bring the pot indoors to warm up for an hour. Switch to a pure melting method (soldering iron) or a straight-puncture tool (utility knife).
Problem: Melted plastic is forming ugly globs around the hole.
- Cause: The tool was too hot, or you held it in place too long.
- Fix: Use less heat (a smaller flame) or shorter contact time. For a soldering iron, a lower wattage model (25W) often works better than a high-power one.
Problem: The hole is jagged and rough.
- Cause: You used a dull tool or didn’t support the plastic.
- Fix: Always use a sharp blade or a fresh, hot tool. The wood block inside is mandatory for clean punctures.
Problem: The soldering iron tip is now coated in black, hard plastic.
- Cause: You let the residue cool and carbonize on the tip.
- Fix: While the iron is still hot, try wiping it with plastic welding rod remover or gently scraping with a brass brush. It may be permanently damaged for electronics use.
Frequently Asked Questions
Can I use a regular drill bit if I don’t have a special one?
You can, but you must drill slowly with minimal pressure. Standard twist drill bits are designed for metal and wood; their aggressive cutting edges can grab and crack plastic. If you must use one, clamp the pot securely, start at a very low speed, and let the bit’s tip score the plastic before increasing speed.
Will making holes weaken my plastic pot?
For standard drainage holes (1/4″ to 3/4″), the pot’s strength is virtually unaffected. You’re removing less than 2% of the base material. The pot fails from UV degradation or impact long before a few small holes matter.
What’s the best method for very thick plastic, like a 5-gallon bucket?
For thick, high-density polyethylene (like buckets), heat is the only good option. A soldering iron may struggle to transfer enough heat. A propane torch used to heat a large nail or a dedicated plastic hole cutter bit in a drill (run slowly) are the right tools for the job.
Is the melting method safe for all types of plastic?
Most plant pots are made from polypropylene (PP) or polyethylene (PE), which melt cleanly. Avoid melting PVC pots (less common, often harder and more brittle) as they can release more toxic fumes. If in doubt, use the sharp object method.
Can I use a wood-burning tool instead of a soldering iron?
Yes, a wood-burning tool works identically to a soldering iron for this purpose. They often come with interchangeable tips, so you can choose a larger tip for bigger holes. The same rule applies: dedicate the tip to plastic work, as it will be ruined for fine woodburning.
Before You Go
If you only do this once: use a heated metal skewer. It’s the single most reliable, low-cost method that works on the majority of plastic pots. The holes are clean, the rim is reinforced, and you don’t need to buy a thing.
For the gardener modifying a dozen nursery pots every spring, a basic 30-watt soldering iron is worth the small investment. The speed and consistency pay off fast, and you can set up a safe, ventilated workstation.
Remember that hole size and count matter as much as the method. A handful of properly sized holes turns a cheap plastic container into a lasting home for your plants. Skip that step, and you’re just moving the root rot problem from one pot to another.
