
How to Make Drainage Holes in Pots Without Using a Drill
This post contains affiliate links. As an Amazon Associate, we earn from qualifying purchases.
You can make holes in pots without a drill using heat, sharp impact, or manual abrasion. For plastic pots, a heated metal tool like a soldering iron melts clean holes in seconds. For ceramic or terracotta, a hammer and masonry nail or punch creates a starter hole you can widen. The method is dictated by the pot material and the hole size you need.
The core challenge isn’t force, it’s controlled failure. You’re asking a brittle material to crack or melt in one specific spot without shattering the entire piece. That’s why the universal advice to just “use a drill” fails when you don’t have one; a drill bit’s rotation and downward pressure are a precise kind of violence most hand tools can’t replicate.
What follows breaks down the four workable paths, matched to the pot on your workbench. You’ll get the step sequence, the tool you actually need, and the one mistake that turns a five-minute job into a trip to the trash can.
Key Takeaways
- A soldering iron or heated metal skewer is the fastest, cleanest way to make holes in thermoplastic pots, but the heat can warp the hole larger in cold workshops.
- For ceramic, terracotta, or clay pots, a hammer and masonry nail or center punch creates a controlled fracture point; follow-up with the nail’s shaft to gently widen the hole.
- You can puncture thin plastic with a sharp utility knife or awl by rotating it under firm pressure, but this only works for pots under 3mm thick.
- Never attempt to make holes in glazed ceramic, glass, or porcelain pots without a drill and a diamond-tipped bit; the risk of a catastrophic, jagged break is near 100%.
- If your pot is already full of soil, the heated metal method is your only real option, it melts through without displacing material and cracking the container.
The Heated Metal Method (For Plastic Pots)
This isn’t about burning, it’s about localized melting. A soldering iron or a metal skewer heated over a stove transfers heat directly to a small point on the plastic pot. The polymer chains break down and flow away from the tip, leaving a smooth, fused hole without cracks or stress points.
The Technical Snippet: Using a heated metal implement, such as a soldering iron tip or a metal skewer heated to approximately 300–400°C, creates drainage holes in thermoplastic pots through localized melting. The heat liquefies the polymer, allowing the tool to penetrate without generating the shear forces that cause cracking. This method produces a hole with a fused, smooth rim that does not require deburring.
The process is straightforward, but the results hinge on temperature control and pot composition.
What you’ll need:
- Soldering iron (25–40 watt) or a metal skewer/screwdriver
- Pliers or a vise grip (if using a skewer)
- Safety glasses
- Well-ventilated workspace
Step-by-step:
- Mark your hole locations. Use a permanent marker on the inside bottom of the pot. Space holes at least an inch apart and an inch in from the wall.
- Secure the pot. Place it upside down on a heat-resistant, stable surface like a scrap piece of wood or concrete.
- Heat your tool. Plug in the soldering iron and let it reach full temperature. If using a skewer, heat the tip over a gas burner until it glows dull red, then grip the cool end with pliers.
- Apply steady, vertical pressure. Position the hot tip directly on your mark. Do not push hard. Let the heat do the work. You’ll feel a slight give as it penetrates.
- Withdraw cleanly. Once through, pull the tool straight out. Rotating it can create an uneven, ragged hole.
Where this goes sideways: Using a tool that’s too hot or holding it in place too long. On a cold day in an unheated garage, the surrounding plastic stays brittle while the melt zone expands, resulting in a hole twice the intended size. Touch the tip to the mark for three seconds, then check progress.
This method is uniquely useful for pots already filled with dirt. Because it melts rather than pushes, you can create a hole without removing the plant or soil, avoiding root disturbance. Just work from the outside in, and be prepared for a wisp of steam.
For most DIYers, a basic soldering iron like the Weller SP23NKUS 25-Watt is perfect. It heats fast, is easy to control, and the pencil grip prevents hand fatigue. If you’re only doing one pot, the skewer-over-flame method works, but the temperature is inconsistent and the risk of burning yourself is high.
| Plastic Type | Best Heated Tool | Risk if Skipped |
|---|---|---|
| Nursery Pots (PP/PE) | Soldering Iron | Hole edges remain stringy, clog easily with soil. |
| Rigid Planters (PVC) | Heated Skewer | Requires more heat; a cold tool will just dent the surface. |
| Thin Seed Trays | Low-wattage Iron | Tool melts through too fast, creating an irregular, oversized hole. |
Hammer & Punch for Ceramic & Terracotta
You cannot melt clay. You must break it with precision. A hammer and a hardened steel point, a masonry nail, a center punch, or even a large Phillips screwdriver tip, concentrate the impact force onto a single grain of material. That grain shatters, and the fracture propagates in a cone directly below your strike, creating a starter hole.
The first tap is the only one that matters. A glancing blow or a strike on an unsupported pot sends shockwaves through the entire vessel, resulting in a spiderweb crack.
What you’ll need:
- Hammer (16 oz claw hammer is ideal)
- Masonry nail or center punch
- Safety glasses and work gloves
- Soft support: a sandbag, a pile of towels, or a grassy patch of earth
The process:
- Support the pot. Place it upside down on your soft support. The entire rim and the area around your target must be cradled to absorb shock.
- Position the punch. Set the tip of your masonry nail or punch on the marked spot. Hold it perfectly vertical.
- Strike once, with control. A single firm, square hit is better than three tentative taps. You want to pierce the glaze and the first millimeter of clay.
- Widen the hole. Remove the punch. Insert the shaft of the masonry nail into the starter hole and rotate it gently, applying side pressure. The clay will crumble inward, cleanly enlarging the hole.
Common mistake: Trying to punch the full hole size in one go. A 1/4-inch punch on a 1/2-inch hole creates radial cracks. Punch a small pilot, then gradually work up.
This method works for unglazed terracotta and clay. The moment you see a glossy, ceramic glaze, stop. Glaze is a glassy coating under immense tension. A focused impact doesn’t create a clean hole, it releases that tension catastrophically. For glazed pots, use them as a cachepot (an outer decorative pot) and place a plastic nursery pot with holes inside.
Manual Puncture for Thin Plastic & Fiberglass
When the plastic is thin and flexible, think nursery flats, seedling six-packs, or cheap fiberglass planters, a sharp, pointed tool can displace material without cracking it. The key is a slicing, rotating motion, not just brute stabbing force.
A utility knife with a fresh blade, an awl, or even a large Phillips screwdriver can work. The goal is to separate the material’s fibers, not tear them.
Why it works on thin materials only: Thick plastic has too much cross-sectional area. The force required to push a tool through creates bending stress around the hole, which manifests as a long crack radiating outward. Under 3mm thick, the material can deform around the tool tip without reaching its fracture point.
Steps for a clean puncture:
- Score a starter point. Use the tip of your utility knife to carve a small X on your mark. This gives the tool a place to seat without skating.
- Apply downward pressure and rotate. Press the tool tip into the X and begin turning it back and forth, like using a hand drill. Keep the pressure constant.
- Feel for the breakthrough. There will be a sudden drop in resistance. Stop pushing immediately to avoid over-penetrating and damaging your work surface.
- Clean the hole. The backside may have a burr or a flap of material. Trim it flush with the knife blade.
This method is slow and requires decent hand strength, but it requires no heat or electricity. It’s the ultimate low-tech solution for a single, small hole.
The Tools You Already Own (And One You Should Buy)
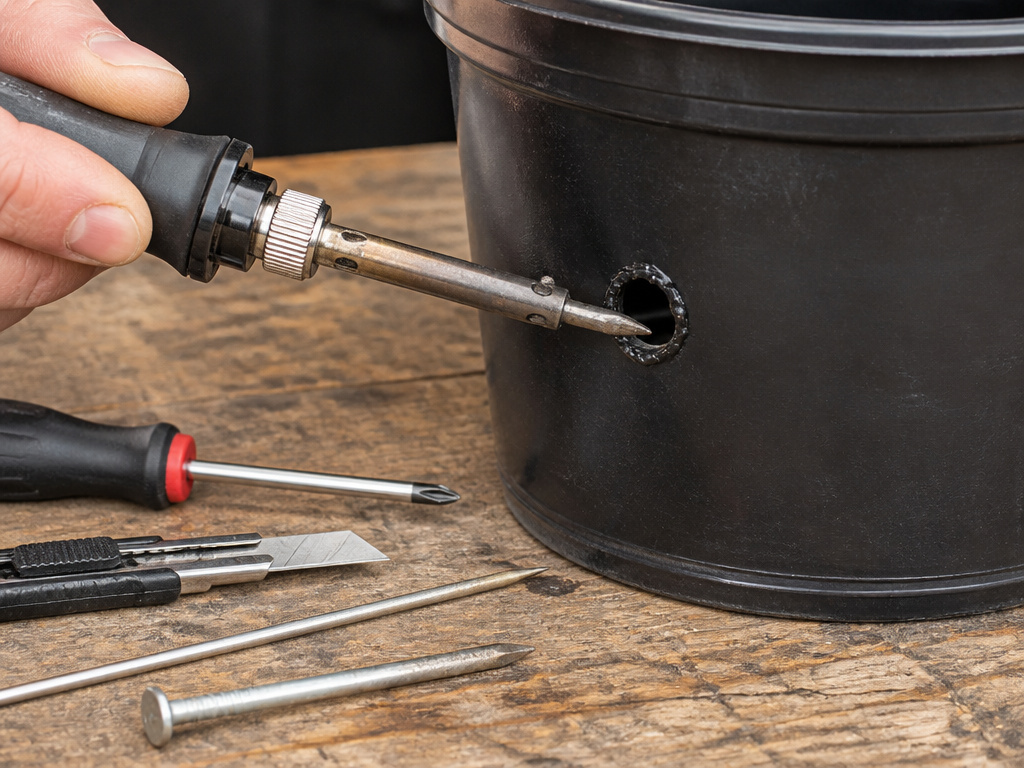 Your toolbox probably holds a workable solution. This table matches common household items to the job they can actually handle.
| Tool | Best For | Critical Limitation |
|---|---|---|
| Phillips Screwdriver & Hammer | Starter holes in terracotta. | Screwdriver tip can deform; not for final hole widening. |
| Utility Knife | Puncturing thin plastic trays. | Blade can snap under torsional stress; wear cut-resistant gloves. |
| Metal Skewer & Stove | Melting holes in soft plastic. | Impossible to control exact temperature; high burn risk. |
| Nail & Hammer | Thin plastic only. | Nail will bend before piercing rigid PVC or thick polypropylene. |
| Soldering Iron | All thermoplastic pots, any thickness. | Requires an outlet; the only tool that works on a full pot. |
The soldering iron is the only dedicated tool on this list worth buying for this task. A basic 25–30 watt model is a $15 investment that turns a frustrating, risky job into a five-second, one-handed operation. It also has a hundred other uses in a workshop, from repairing wiring to shaping plastic parts.
For ceramic work, a masonry nail is superior to a common nail. Its hardened steel tip is designed to crumble masonry, and it will outlast a box of standard nails when punching through clay. Keep a few in your fasteners jar.
Why Your Pot Material Dictates Everything
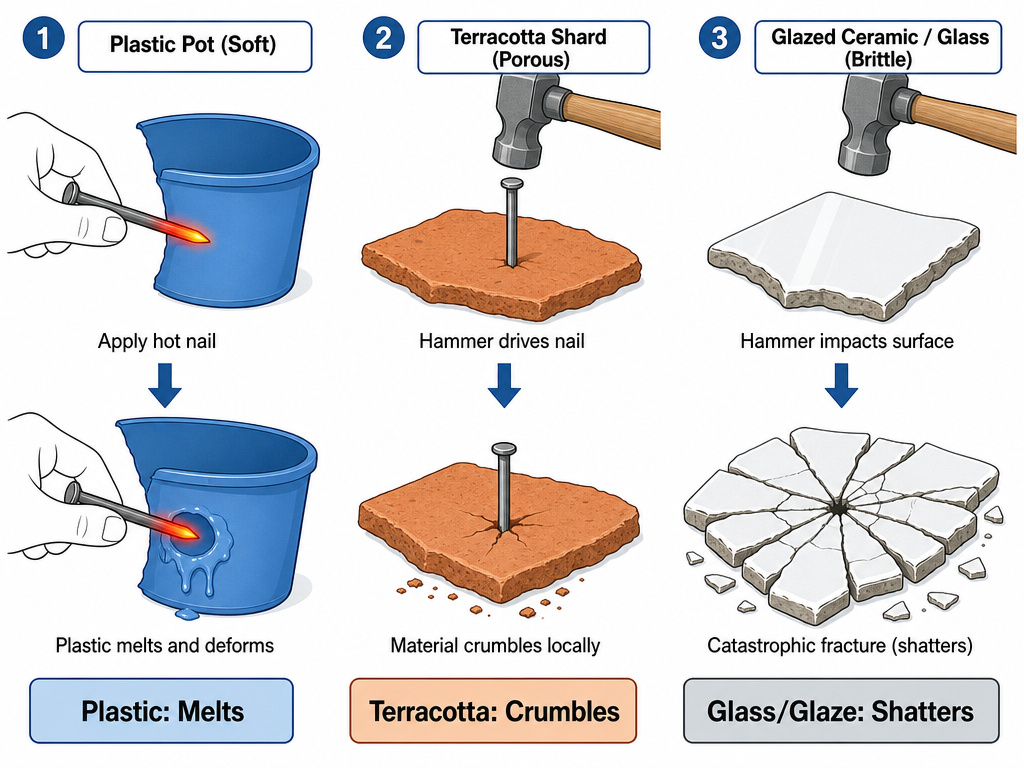 Choosing the wrong method doesn’t just fail, it destroys the pot. The physics of failure for plastic, terracotta, and glass are completely different.
Plastic (Polypropylene, PVC, HDPE): These are thermoplastics. They soften and melt with heat, and they’re relatively ductile. They fail well to the heated metal or puncture methods. You can cut them with a knife or melt them with heat.
Terracotta & Unglazed Clay: A porous, brittle ceramic. It has high compressive strength but very low tensile (pulling) strength. It fails by cracking. You must crush it with a focused impact, not shear it.
Glazed Ceramic, Porcelain, Glass: These are vitreous materials. The glaze is a layer of glass under compression. A localized impact creates a tensile shockwave that travels faster than the material can deform. They shatter. Do not try.
Skip this if: Your pot is a family heirloom, has sentimental value, or is made of glass. The risk of ruin is not worth the experiment. Use it as a cachepot.
This is the single most important filter. Look at the pot. Tap it with your fingernail. A dull thud is likely plastic or thick clay. A sharp ping is glazed ceramic or porcelain. That sound tells you which section of this guide to re-read before touching a tool.
Frequently Asked Questions
Can I use a regular drill bit by hand?
You can, but it’s an exercise in frustration and blisters. A twist drill bit is designed to cut via rotation. Turning it by hand generates very little cutting force and immense friction. On plastic, it will gum up and stall. On ceramic, it will skate and scratch the surface without biting. A hand-powered hand drill (the old-fashioned brace-and-bit style) works, but a modern power drill bit in your fingers does not.
How many holes should I make?
For a standard 8- to 12-inch diameter pot, start with four to six holes, each about 1/4 to 3/8 inch in diameter. Space them evenly around the center of the pot bottom. Too few holes, or holes that are too small, will clog with soil and render them useless. It’s better to have several adequate holes than one large one.
What if I accidentally make the hole too big?
For plastic pots, a hole that’s too large is a permanent flaw. You cannot shrink melted plastic. Your best fix is to place a piece of plastic window screen or landscape fabric over the hole on the inside of the pot before adding soil. This will hold the soil in while still allowing water to drain through. For terracotta, you can mix a small amount of waterproof epoxy or silicone sealant and fill the oversized hole from the outside, then poke a smaller, correct-sized hole through the curing sealant with a nail.
Is it safe to make holes in a pot that’s already planted?
It is only safe with the heated metal method. The melting action does not jar the root ball or displace soil. For any other method, hammering, punching, cutting, you must empty the pot. The physical shock and vibration will severely damage roots and compact the soil.
Why do all my terracotta pots crack when I try this?
You are likely missing one of two things: proper support or the right punch tool. Hitting a terracotta pot resting on a hard surface like concrete transmits the shock through the entire structure, cracking it. It must be on a soft, energy-absorbing surface. Also, using a soft steel nail will deform the tip instead of concentrating force; a hardened masonry nail or center punch is non-negotiable.
Before You Go
Making a hole without a drill is a test of finesse, not strength. Match the tool to the material’s failure mode: melt plastic, crush clay, pierce thin sheets. The soldering iron method is the king for plastic, it’s fast, clean, and works on a full pot. For everything else, support the pot properly and let the tool do the work at its own pace.
Your next step isn’t a store run. Check your toolbox for a screwdriver, a hammer, and a nail. That’s enough to start a hole in a terracotta pot sitting on a bag of potting soil. If you have a candle and a metal skewer, you can melt a hole in a plastic container. The tools are already there. The method is just a different kind of pressure.
