
A Guide on How to Drill a Hole in Plastic Safely and Cleanly
This post contains affiliate links. As an Amazon Associate, we earn from qualifying purchases.
To drill a hole in plastic cleanly, you need three things matched: a sharp, correctly ground drill bit, a slow rotational speed with firm feed pressure, and a plan for chip clearance. Use a standard HSS twist drill with a 118° point angle for holes under 1 inch. For anything larger, switch to a two-step drill-and-bore process to prevent the heat and stress that crack notch-sensitive materials like PET or glass-reinforced plastic.
The bit’s geometry is the whole game. A standard metal-cutting bit grabs and melts plastic, leaving a torn edge that fractures weeks later. The right grind shears a clean curl instead.
What follows: the exact drill point specs that work, the speed table nobody remembers, and the non-negotiable rule for holes deeper than three times the bit’s diameter. We’ll also cover when you must pre-heat the plastic before you even turn the drill on.
Key Takeaways
- A standard 118° point angle on a sharp HSS twist drill works for most plastics, but you must thin the web and dub off the rake to prevent grabbing.
- Drilled holes come out smaller than your bit, for a 6mm target, you may need a 6.2mm drill. Plan for this undersizing, especially in elastic materials like polyethylene.
- For any hole 1 inch (25mm) or larger, skip drilling to final size. Drill a smaller pilot, then bore to dimension with a carbide tool to avoid cracking.
- Reinforced or glass-filled plastics require pre-heating to about 120°C (250°F) for one hour per 10mm of thickness before machining to relieve internal stress.
- Acrylic expands and contracts with temperature. Any fastener hole must be oversized by at least 1/16 inch to allow for movement without cracking.
The Right Drill Bit for Plastic
Forget the specialty plastic drill bit aisle. A standard high-speed steel (HSS) twist drill works if you regrind it correctly. The factory grind for metal is wrong.
A twist drill for plastic should have a point angle of 118 degrees, a lip clearance of 9 to 15 degrees, and a lip rake that has been dubbed off (ground flat). The web should also be thinned to reduce cutting pressure and heat. (Source: Manufacturer machining guidelines)
The goal is a cutting edge that slices a thin, continuous chip. A sharp point with positive rake digs in and melts the plastic. A dubbed-off rake and wider clearance angle shears it cleanly. If you don’t have a grinder, buy a bit advertised for plastic or acrylic, it will have this geometry from the factory.
For holes larger than 1/2 inch, a carbide-tipped hole saw often beats a twist drill. The intermittent cutting action generates less heat, and the carbide edge stays sharp longer against abrasive fillers. Start with a pilot hole for the saw’s arbor.
The one bit type to avoid: spade bits or auger bits. Their aggressive screw tip and wide paddles create far too much friction and will almost certainly crack or melt your workpiece.
Speed, Feed, and Coolant
Plastic is a thermal insulator. The heat you generate at the cutting edge stays right there, trapped. Speed and feed manage that heat.
Run the drill slow. Too fast, and the friction melts the plastic instead of cutting it. You’ll get a gummy, fused edge that looks smooth but is structurally weakened. Too slow with too little pressure, and the bit rubs and generates heat through abrasion.
Feed the bit with steady, firm pressure. Let it cut. If you’re making dust instead of a curled chip, you’re either too slow or your bit is dull. A sharp bit at the right speed produces a tight, continuous ribbon.
| Drill Diameter | Recommended Speed (RPM) |
|---|---|
| 1/8 inch (3mm) | 3,500 |
| 1/4 inch (6mm) | 1,800 |
| 1/2 inch (13mm) | 900 |
| 1 inch (25mm) | 450 |
When coolant is mandatory: any time the hole depth exceeds three times the drill diameter. The chips have nowhere to go, packing the flutes and insulating the cut. Use water or a water-soluble coolant as a lubricant. It flushes chips and dissipates heat. For acrylic, water is perfect; it also keeps the surface clear.
Common mistake: Drilling dry on a deep hole. The packed chips insulate the bit, the plastic melts around it, and when it cools it contracts and locks the bit in place. You’ll either break the bit or crack the workpiece trying to reverse it out.
The Two-Step Process for Large Holes
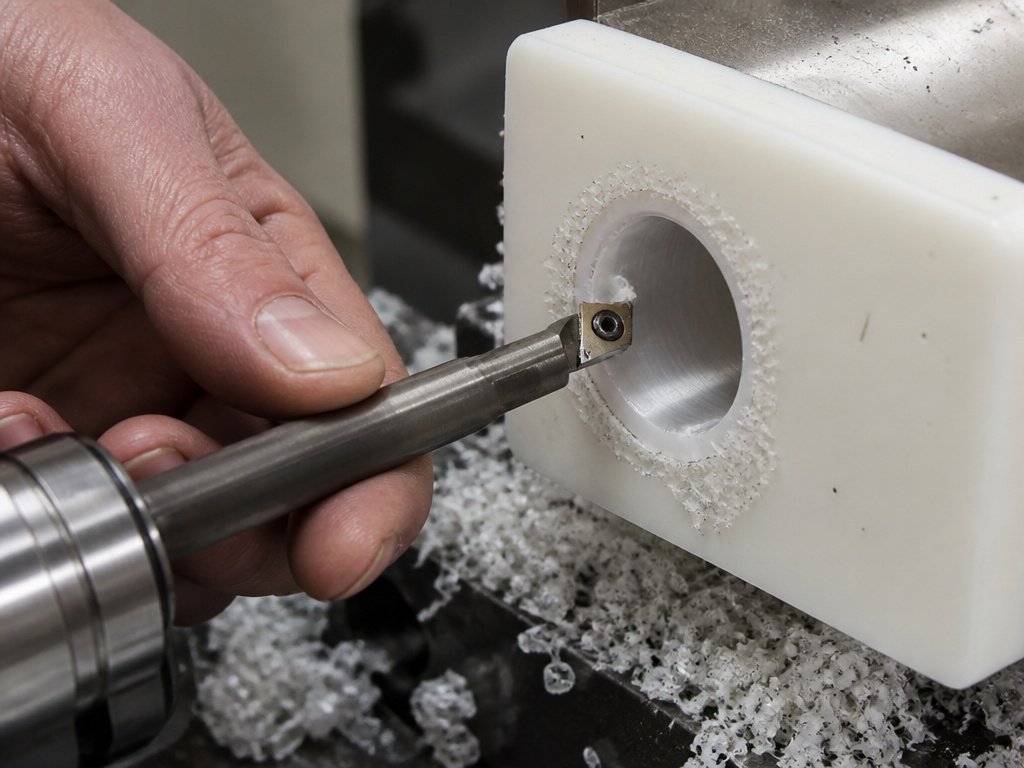 You cannot drill a 1.5-inch hole in plastic in one shot. The surface speed at the outer edge of the bit is enormous, generating instant melting. The core of the bit pushes material instead of cutting it, creating massive stress.
The professional fix is a two-step process: drill, then bore.
- Drill a undersized pilot hole. Use an insert drill or a standard twist drill at the lower end of the speed range (500-800 RPM) with a moderate feed (0.005-0.015 inches per revolution). This removes the core material.
- Bore to the final diameter. Use a boring bar with a carbide insert that has a 0.015-0.030 inch radius. Run at 500-1000 RPM with a light feed (0.005-0.010 inches per revolution). The single-point tool creates minimal pressure and a fine finish.
This is non-negotiable for notch-sensitive materials like Ertalyte™ PET or any glass-reinforced plastic. Their low impact strength means a stress riser from a rough hole becomes a full crack under minimal load. The boring step eliminates that stress.
If you don’t have a lathe or milling machine, you can simulate this with a hole saw followed by careful filing or sanding to clean the ID. It’s less precise, but it follows the same principle: remove bulk material first, then finish the wall.
Supporting the Workpiece and Preventing Breakout
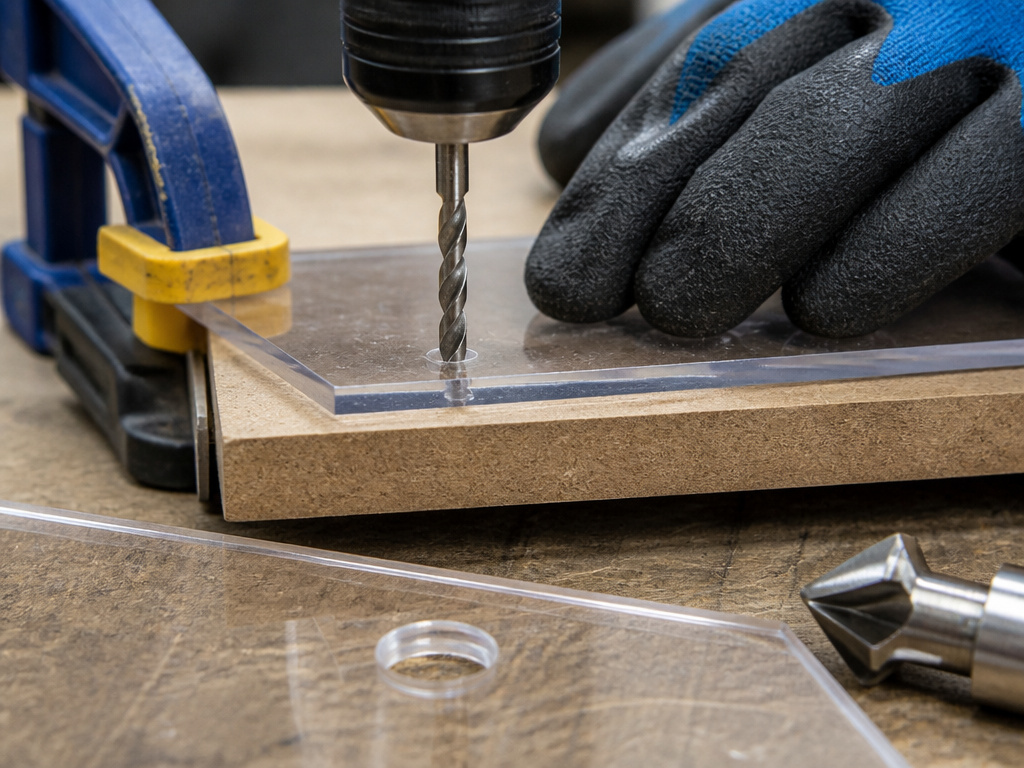 Plastic is brittle at the exit point. A standard drill pushes material ahead of it, and as it breaks through the back side, it can tear out a large chip. This “breakout” ruins the part.
Clamp your workpiece to a sacrificial backing board. Use acrylic, MDF, or plywood. Drill through the plastic and into the backing. The backup material supports the fibers until the very last second, resulting in a clean exit hole.
For thin sheet plastic, this is the only way to get a clean hole. Trying to drill freehand on a bench top guarantees a splintered underside.
Deburr the hole immediately. The rough edge left from drilling is a stress concentrator. A countersink or a larger drill bit run lightly by hand can chamfer the edge. For holes under stress, a counterbore is better, it creates a smooth shoulder for a fastener head to seat against, distributing load.
Material-Specific Warnings and Procedures
Not all plastics drill the same. The generic rules break down with engineering-grade materials.
Acrylic (PMMA) is prone to cracking from internal stress and thermal expansion. It can expand or contract up to 1/16 inch per foot with temperature change. * Always oversize fastener holes. The hole must be larger than the screw or bolt shank. * Never use countersunk flat-head screws. They create a wedging action. Use round-head or pan-head screws with a smooth shank and a washer. * For clean edges, consider drilling acrylic with a dedicated acrylic bit or a lubricated hole saw.
Glass-Reinforced Plastics (FRP, GRP) and Polyamides (Nylon, PA6/6) have high residual stress from molding. * Pre-heat before machining. Heat the workpiece to about 120°C (250°F) for one hour per 10mm of cross-sectional thickness. This relieves internal stress and prevents the part from splitting along the drill path. * Use carbide tools. The glass fibers will dull a standard HSS bit in seconds, leading to excessive chipping and delamination.
Polyethylene (PE) and Polypropylene (PP) are gummy and elastic. * Expect significant hole shrinkage. A 6mm drill may produce a 5.7mm hole. You’ll need to drill oversize or ream to final dimension. * Use very sharp tools with high clearance angles. These materials want to deform rather than cut.
Why Your Hole is the Wrong Size
You measured your drill bit at 6.0mm. You drilled the hole. Your calipers read 5.8mm. This isn’t a mistake; it’s material physics.
Plastic is elastic. As the drill cuts, the material deflects inward, springing back after the bit passes. A peer-reviewed industrial hole processing determination research quantified this. For 6–7mm holes in various plastics, the drilled diameter was 0.1mm to 0.3mm smaller than the drill bit, a 1.5% to 4.4% reduction.
The amount of undersizing depends on the plastic’s modulus and the cutting conditions. A stiff material like acetal (POM-C) might only shrink 0.1mm. A soft, elastic polyethylene might shrink 0.3mm.
The fix: if you need a 6.8mm hole, start with a 7.0mm or 7.1mm drill bit. Test on a scrap piece first. This is critical for press-fit parts or precise mechanical assemblies.
Troubleshooting: Melted Plastic, Cracks, and Ragged Holes
Your hole looks bad. Here’s what caused it and how to fix it next time.
| Problem | Most Likely Cause | The Fix |
|---|---|---|
| Melted, gummy edges | Drill speed too high / bit dull | Drop RPM by 30%. Use a sharp bit. Apply water coolant. |
| Long, stringy chips | Feed rate too slow / bit rubbing | Increase feed pressure. Ensure bit is sharp with correct geometry. |
| Crack radiating from hole | Stress in material / no pre-heat | Pre-heat reinforced plastics. Use two-step drill & bore for large holes. |
| Chipped or blown-out exit | No backup board / excessive feed | Clamp to sacrificial backing. Slow feed rate just before breakthrough. |
| Hole is not round | Drill wobble / starting on a curve | Use a drilling straight holes guide or drill press. Start with a center punch. |
Where this goes sideways: Using a drill bit ground for metal. The sharp, pointed rake angle acts like a wood screw, pulling the bit in and generating tremendous friction heat. The plastic melts around the flutes, and when it re-solidifies, it locks the bit in place. You’ll snap the bit or crack the workpiece trying to get it out.
If you’re repeatedly cracking acrylic, remember the expansion rule. A tightly-fitted screw in an acrylic sheet on a hot day has nowhere to go. The stress has to relieve itself, and it does so by cracking from the hole outward. Oversize the hole. Use a washer.
Frequently Asked Questions
Can I use a regular metal drill bit on plastic?
You can, but you shouldn’t. A standard 118° metal bit will work in a pinch if it’s brand-new and sharp, but it’s far more likely to grab and melt the plastic. For consistent results, use a bit ground for plastic (with a dubbed-off rake) or a carbide-tipped hole saw.
What is the best drill speed for plastic?
Start slow. For a 1/4-inch (6mm) bit, 1,800 RPM is a safe target. Larger bits need slower speeds: 900 RPM for 1/2-inch, 450 RPM for 1-inch. If you see melting, drop the speed. If you’re getting dust instead of chips, you might be too slow, increase feed pressure.
How do I prevent plastic from cracking when drilling?
Support the back of the workpiece with a scrap board. Use sharp tools with the correct geometry. For large holes (over 1 inch), use a two-step drill-and-bore process. For reinforced or glass-filled plastics, pre-heat the material to 120°C (250°F) before drilling to relieve internal stress.
Why does my drill bit keep getting stuck in the plastic?
This is classic melting and re-solidification. Your speed is too high, your bit is dull, or you’re not clearing chips. The plastic melts around the flutes of the bit and cools, forming a solid plastic sleeve that locks it in place. Stop, let everything cool, and try again with lower speed, a sharper bit, and coolant.
How much should I oversize a hole for a screw in acrylic?
Oversize by at least 1/16 inch for the screw shank. Acrylic expands and contracts significantly with temperature. A tight hole doesn’t allow for this movement, creating stress that leads to cracks. Always use a washer under the screw head to distribute the clamping force.
Can I drill plastic without a drill press?
Yes, but a hand drill requires more care. The key is preventing wobble, which widens the hole and creates a rough finish. Use a center punch to make a solid starting dimple. Consider a drilling straight holes guide attachment for your drill to keep it perpendicular. For thick plastic, a drill press is vastly superior.
The Bottom Line
Drilling plastic cleanly comes down to managing heat and stress. Match a sharp, correctly ground bit to a slow spindle speed. Support the workpiece to prevent breakout. For any hole over an inch, commit to the two-step drill-and-bore process, it’s the only way to avoid cracking expensive stock.
Remember the material specifics. Acrylic needs room to move. Reinforced plastics need pre-heating. If a hole comes out undersized, that’s normal; drill oversize on your next piece. This isn’t like drilling wood, where you can be casual. Get the variables right, and the plastic cuts like butter. Get them wrong, and you’re buying a new sheet.
