
How to Drill Stainless Steel Successfully: A Complete Guide
This post contains affiliate links. As an Amazon Associate, we earn from qualifying purchases.
To drill stainless steel successfully, you must control three things: bit material (cobalt or titanium-coated HSS), speed/feed (start at the middle of the manufacturer’s range and adjust), and continuous lubrication/cooling. The British Stainless Steel Association (BSSA) states the drill’s point angle must be around 135 degrees, and you must maintain feed pressure to cut through the work-hardened layer, dwelling ruins the bit.
The 135-degree angle is non-negotiable because it produces a thinner, more manageable chip. A standard 118-degree bit from your drill index will skate, glaze the surface, and snap. This isn’t about having a fancy drill press; it’s about matching the tool geometry to the metal’s tendency to harden under heat and pressure.
What follows: the exact drill specs that matter, the speed and feed numbers from machine-shop manuals that home-garage guides skip, and the step sequence that keeps a 6mm bit alive past the third hole. You’ll learn why a conical center punch is your first mistake and how to read the swarf to know you’re winning.
Key Takeaways
- Use a cobalt or titanium nitride-coated HSS drill bit with a 135-degree point angle. A standard 118-degree bit will fail.
- Start with the middle value on the manufacturer’s speed/feed chart (per Haas CNC guidance) and adjust based on chip color and sound.
- Apply continuous cutting fluid; dry drilling creates enough heat to work-harden 304 or 316 stainless in under ten seconds.
- For holes deeper than 3x the bit diameter, use the BSSA’s peck drilling sequence: first peck 3-4x diameter, then 2x, then 1x for all subsequent pecks.
- Never use a conical center punch. A three-corner pyramid punch minimizes the initial work-hardened spot that deflects the bit.
The Bit is Everything: Cobalt, Coatings, and Geometry
Your standard black-oxide high-speed steel (HSS) bit is the wrong tool. It will dull on contact, the heat will transfer into the metal, and you’ll create a glass-hard spot that no subsequent bit can penetrate. The fight is won or lost before the chuck is tightened.
You need a bit designed for the alloy’s abrasiveness and heat retention. For the home shop, that means one of two paths: a solid cobalt bit (like those from Milwaukee or DeWalt’s cobalt line) or a titanium nitride-coated HSS bit. Cobalt bits, often labelled M42 or M35, integrate cobalt steel into the alloy for better heat resistance and wear life. Titanium nitride (the gold-colored coating) is a surface treatment that reduces friction on an HSS core; it’s a step up from basic HSS but won’t last as long as solid cobalt in repeated use.
Where this goes sideways: Using a general-purpose HSS drill bit on austenitic stainless like 304. The bit blunts on the work-hardened layer, you push harder, more heat transfers, and the hole becomes impossible within 30 seconds. You’ll smell burnt steel before the bit snaps.
But material is only half the spec. Geometry dictates how the chip forms and exits. The British Stainless Steel Association’s training notes specify a point angle of around 135 degrees for drilling austenitic stainless steels. The larger angle produces a thinner, more curled chip that clears the flutes easily. A common 118-degree bit, designed for softer steel and wood, presents a steeper cutting edge that tends to dig, rub, and generate the thick, stringy chips that jam and overheat.
The web, the central metal spine between the flutes, should be about 1/8th of the drill’s diameter. A thicker web adds rigidity for small diameters, but it impedes chip flow. A thinner web eases chip removal but can flex and break. When you re-sharpen a bit, you must also thin the web back to this proportion, or it becomes a blunt plunger at the hole’s bottom.
| Drill Bit Type | Best For | Failure Mode If Wrong |
|---|---|---|
| Cobalt (M42) | Repeated holes, thicker stock (>3mm) | Heat builds in the bit, edge de-tempers, dulls silently |
| TiN-Coated HSS | Occasional holes, thin sheet metal | Coating wears through, HSS core dulls on next hole |
| Standard HSS | Mild steel, aluminum | Skates, glazes surface, snaps within first 1mm of cut |
For most DIY jobs on stainless, a cobalt drill bit is the default. The Milwaukee Cobalt Red Helix or DeWalt Pilot Point Cobalt are common picks. If you’re drilling one or two holes in a thin bracket, a titanium nitride bit will get you through. Forget the rest.
Speed, Feed, and the Myth of “Slow and Steady”
The old advice to run “slow and steady” is incomplete. Too slow, and the bit rubs instead of cuts, instantly work-hardening the surface. Too fast, and the bit’s cutting edges overheat, lose their temper, and deform. The correct starting point is the middle of the recommended range.
Machine-tool documents like the Haas CNC “Carbide Drills, Inox” guide explicitly advise starting with a middle/average value for cutting speed (Vc in m/min) and feed (mm/rev), then adjusting based on conditions. For a 6mm (1/4 inch) cobalt bit in 304 stainless, that might mean starting at around 1,000 RPM on a drill press and a firm, consistent feed pressure that produces a steady curl of chip.
Feed pressure is not optional. The BSSA states you must “maintain the feed to cut through the work hardened layer generated as the metal is cut.” Dwell or rubbing must be avoided. This means committing to the cut with enough pressure to keep the bit’s edges engaged beneath the hardened surface it’s creating. Hesitation is destruction.
The first sign you’re too slow is a high-pitched squealing sound and silver dust instead of a coiled chip. The first sign you’re too fast is a blue or purple chip and a burning smell. Aim for a continuous, tightly wound chip with a straw-yellow tint.
Lubrication is what makes this possible. Drilling dry is a guarantee of failure. You need a cutting fluid or paste (like Tap Magic or a generic sulfur-based cutting oil) to reduce friction, carry heat away in the chip, and prevent the stainless from galling and welding to the bit’s edges. Apply it liberally at the start and re-apply every peck.
The 135-Degree Point Angle and Other Critical Drill Specs
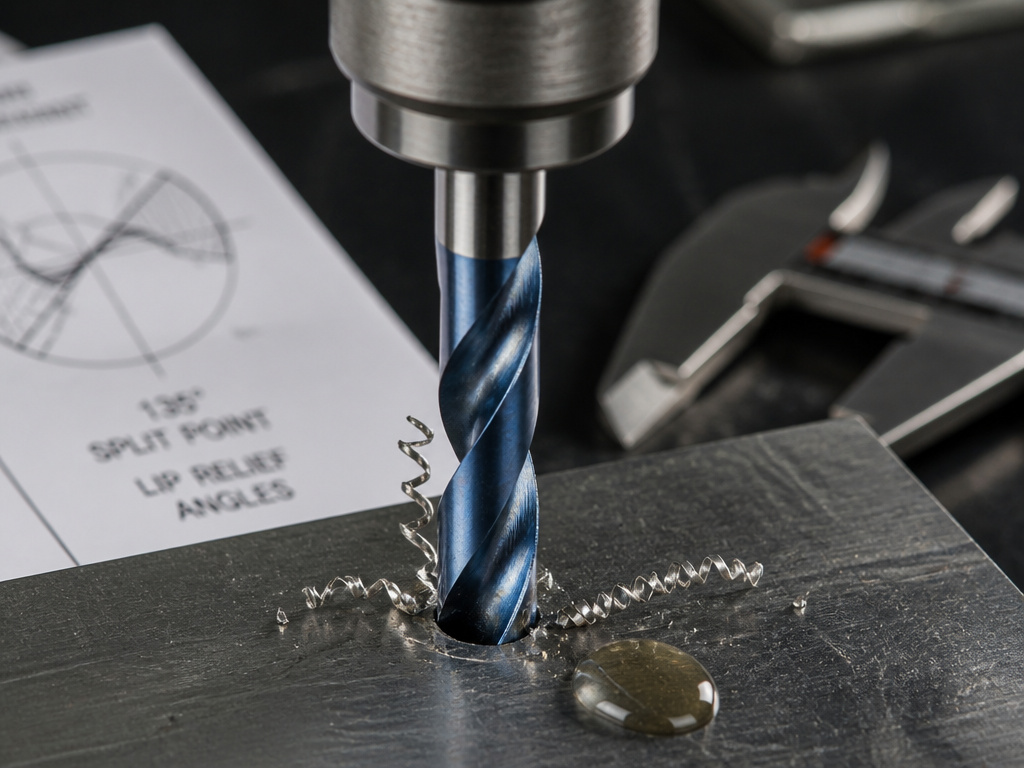 The point angle is the leading actor, but the supporting specs are what keep the bit tracking straight and the hole round. After material and angle, focus on lip relief and flute type.
Lip relief angle is the clearance behind the cutting edge. Too little, and the drill’s heel rubs against the hole wall, creating heat and friction. Too much, and the cutting edge becomes weak and can dig in or chip. For a 6mm drill, a lip relief angle of 9–12 degrees is typical. If you’re experiencing excessive feed pressure or the drill is squealing with a sharp bit, insufficient relief is the likely culprit. If the bit is grabbing and jerking the drill forward, the angle might be too aggressive.
Spiral flute design affects chip evacuation. A standard “jobber” length bit is fine for holes up to about 3x its diameter. For deeper drilling, a 135-degree split-point cobalt bit with a parabolic flute is superior. The parabolic shape provides more room for chip clearance, preventing clogging that leads to heat and breakage.
Technical Snippet: Per the British Stainless Steel Association, the drill web thickness should approximate 1/8th of the drill diameter, increasing rigidity for small diameters but requiring thinning during re-sharpening. The cutting edges must be symmetrical in length and angle to the centerline; asymmetry produces mixed chip sizes and induces walk.
Your checklist before drilling: cobalt or TiN-coated bit, 135-degree point, sharp symmetrical edges, appropriate lip relief, and cutting fluid on hand. Skip one, and you’re relying on luck.
The Pecking Order: How to Drill Deep Holes
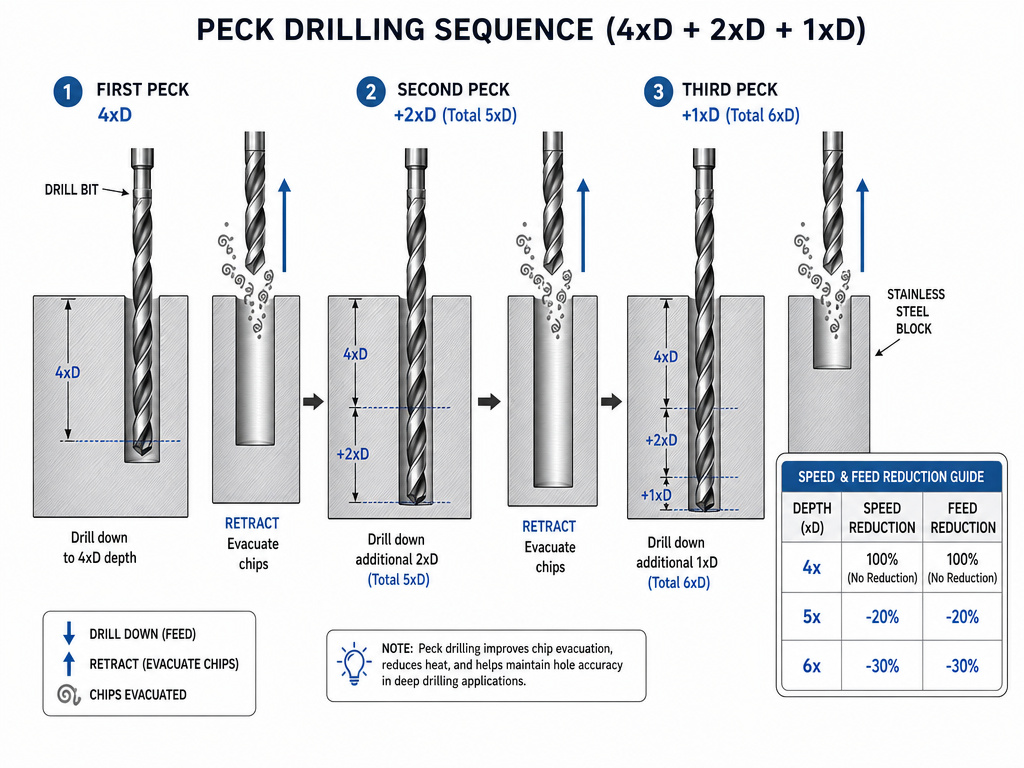 A “deep” hole in stainless is anything deeper than three times the drill’s diameter. At 4x diameter, you must reduce speed and feed. At 5x or 6x, the reduction is significant. The BSSA provides a clear adjustment table and a pecking sequence that prevents chip packing and allows coolant to reach the cut.
Here is the BSSA’s recommended peck drilling sequence for a deep hole: 1. First peck: 3–4 times the drill diameter. 2. Second peck: 2 times the drill diameter. 3. Third and all subsequent pecks: 1 times the drill diameter.
This progressive shortening helps clear the bulk of the chips early when the hole is shallow and there’s less friction, then minimizes the volume of chip generated in the confined, deeper section of the hole. After each peck, retract the bit completely to clear chips and flood the hole with fresh coolant.
| Hole Depth (x drill diameter) | Speed Reduction | Feed Reduction |
|---|---|---|
| Up to 3x | None | None |
| 4x | 20% | 10% |
| 5x | 30% | 20% |
| 6x | 35% | 20% |
For a through-hole, always use a sacrificial backing plate (a block of wood or scrap soft metal) clamped behind the workpiece. As the bit breaks through the back side, it can grab and tear out a chunk of stainless, ruining the hole and likely breaking the bit. The backing plate supports the thin remaining material for a clean exit.
The rhythm is: peck, retract, clear chips, cool, repeat. Impatience here, trying to power through in one go, is the most common cause of seized and snapped bits in deep holes.
Work Hardening: What It Is and How to Beat It
Work hardening is stainless steel’s defense mechanism. As the metal is deformed (by cutting, drilling, or bending), its crystalline structure changes, becoming harder and more resistant to further deformation. Austenitic grades like 304 and 316 are particularly prone to it. This is why you can drill 2mm into a piece, get stuck, and find that no bit, no matter how new, will cut further.
The primary cause is heat from friction. A dull bit, insufficient coolant, or a dwell in feed all pump heat into a very localized area, hardening it instantly. The secondary cause is the initial marking. Using a conical center punch (the common 90-degree point) concentrates enough cold deformation to create a small hardened dimple. The drill tip then skates on this hardened spot, generating more heat and hardening a larger area.
The fix starts before the drill spins. Use a three-corner pyramid punch (a 120-degree center punch). It distributes the deformation more evenly, minimizing that initial hardened zone. Then, ensure everything else is optimized to minimize heat: sharp bit, correct speed, adequate feed pressure, and abundant coolant.
If you do encounter a hardened spot, stop. Do not continue drilling with increasing pressure. You must remove the hardened material by grinding or milling it away, or drill a new hole in a different location. A carbide bit might power through, but for the cost of a carbide bit, you can often replace the workpiece.
Clamping, Pilot Holes, and Managing Deflection
Stainless steel is tough, and a handheld drill is a recipe for deflection, walk, and an oval hole. For any hole over 3mm, clamp the workpiece securely to a bench or drill press table. The goal is zero movement.
For holes larger than 6mm (1/4 inch), a pilot hole is not a suggestion. It’s a guide that ensures the larger bit tracks truly and reduces the cutting load and heat generation. The pilot should be 50-60% of the final hole’s diameter. Drill the pilot hole using all the same rules (bit type, speed, feed, coolant), then follow immediately with the final bit without moving the workpiece.
When using a drill press, set the depth stop to prevent plunging into the table on through-holes. For hand drilling, a drill guide, a jig that holds the drill vertical, is a worthwhile investment for precision work. Deflection isn’t just about a ugly hole; an off-angle drill bit experiences uneven edge loading, dulls quickly, and increases the risk of snapage.
Frequently Asked Questions
Can I use a regular drill bit on stainless steel?
You can, but you shouldn’t. A regular high-speed steel (HSS) bit lacks the heat resistance and wear characteristics needed. It will dull rapidly, generate excessive heat, and likely work-harden the stainless, making the hole impossible to finish. For a one-time, small-diameter hole in thin material, a titanium nitride-coated HSS drill bit might survive, but a cobalt bit is the reliable choice.
What is the best speed for drilling stainless steel?
There is no single “best” speed; it depends on the bit diameter and material grade. Start in the middle of the manufacturer’s recommended range. For a 1/4-inch (6mm) cobalt bit in 304 stainless, start at about 1,000 RPM on a drill press. Listen and look: a steady, curled chip and a consistent cutting sound mean you’re close. Adjust speed or feed slightly to achieve that.
Why does my drill bit keep breaking when drilling stainless?
The most common reasons are, in order: 1) Using a bit with the wrong point angle (118-degree instead of 135-degree). 2) Inadequate or no cutting fluid, causing heat buildup and work hardening. 3) Dwell or hesitation in feed pressure, allowing the bit to rub instead of cut. 4) Attempting to drill too deep in one go without pecking to clear chips.
Is a drill press necessary for drilling stainless steel?
No, but it is highly recommended. A hand drill can succeed on thin material with small bits if you are meticulous with clamping, angle, and feed pressure. However, a drill press provides the consistent speed, perpendicular alignment, and controlled feed pressure that dramatically increase your success rate and bit life, especially for holes larger than 3mm or deeper than 6mm.
What does work hardening look like?
Initially, you might see the drill stop making progress while the motor strains. The bit may start to squeal. Upon inspection, the area around the hole may have a bluish or straw-colored tint from overheating. If you try a new, sharp bit in the same spot, it will skate on the surface without biting. The metal in that localized zone has become harder than the drill bit’s cutting edge.
Can I use water as a coolant when drilling stainless?
No. Water does not have the lubricating properties needed and can promote rust. Use a dedicated cutting oil or fluid. These fluids are formulated to reduce friction, protect the tool, and carry heat away in the chip. For stainless, a sulfur-based cutting oil is particularly effective as it also helps prevent material galling.
Before You Go
Drilling stainless steel isn’t a mystery, but it is a discipline. The metal punishes approximation. Win by selecting the right cobalt or coated bit with a 135-degree point. Win by starting at the middle of the speed/feed range and committing to a steady feed under a stream of cutting fluid. Win by pecking deep holes using the BSSA’s sequence and backing up your through-holes.
The alternative is a collection of broken bits, a scarred workpiece, and the conviction that the job is impossible. It’s not. The specs are just tighter, and the margin for error is smaller. Get those three things right, bit, speed/feed, coolant, and the hole appears exactly where you intended.
