
The Right Way to Drill into Mortar | Techniques and Tips
This post contains affiliate links. As an Amazon Associate, we earn from qualifying purchases.
Drilling into mortar requires a hammer drill, a carbide-tipped masonry bit sized for your anchor, and a cleaning protocol of blow-blow-brush-blow-blow. The mortar joint is softer than brick or block, so the bit walks easily if you don’t start with a pilot punch. Clean the hole until no dust puffs out, then inject adhesive mortar bubble-free from the bottom up.
The blow-blow-brush-blow-blow sequence isn’t a suggestion. It’s the manufacturer’s minimum for load-bearing capacity, and skipping a single blow-out drops the anchor’s grip by a measurable percentage. Mortar dust re-absorbs moisture from the air and from the adhesive, turning your anchor into a plug of weak, crumbly paste.
What follows: the drill setting that cracks hollow bricks, the one cleaning tool that actually works, and the injection mistake that voids the warranty on every major brand’s adhesive cartridge. We’ll walk the specs from the CMHA and manufacturer sheets so you know what the numbers on the package mean for your wall.
Key Takeaways
- Use hammer mode only on solid bricks; switch to rotary-only for hollow or perforated units to avoid cracking the surrounding masonry.
- The fischer FIS V Plus manual mandates a cleaning sequence of “2 x blow out + 2 x brush + 2 x blow out”, fewer steps guarantee a weak anchor.
- Inject adhesive from the bottom of the hole. If excess mortar doesn’t ooze out the top when you insert the rod, pull it out and start over; the bond is already compromised.
- Double all curing times if the mortar or substrate is damp. A wet base at 50°F needs 24 hours where a dry one needs 12.
- Match your drill bit diameter (d0) to the anchor’s specified size, not the screw size. A 1/4″ screw often needs a 3/8″ hole.
Mortar Isn’t Concrete (Why Your Usual Method Fails Here)
Mortar is the glue between bricks or blocks. It’s designed to be porous, slightly flexible, and weaker than the units it binds. That last point is where most DIY drills go wrong.
You can drive a concrete screw straight into a concrete wall. Try that with mortar and the threads just chew a wider hole, spinning freely long before they’re tight. The joint crumbles instead of gripping. Your anchor needs a full sleeve of adhesive, epoxy or vinyl ester, that bonds to the irregular, dusty walls of the hole. That bond depends entirely on two things: how clean the hole is, and how completely you fill it.
Common mistake: Using a concrete drill bit at too high an RPM. Mortar is abrasive but soft. A standard masonry bit will cut, but it loads up with dust faster and overheats the carbide tip. You’ll smell burning dust before you see the tip glow orange.
The testing standard for mortar in the field, ASTM C780, is about evaluating workability and consistency, not structural strength. That tells you something. You’re drilling into a material whose official test is “how easy is it to spread?” Treat it with a light touch.
The Right Drill and Bit
This isn’t a job for your everyday cordless drill. You need impact energy.
A hammer drill is the default choice. It pounds the bit forward while spinning it, chipping the mortar away. For solid brick mortar joints, you run it in hammer mode. For hollow bricks, cinder blocks, or any perforated unit, you switch to rotary-only mode. The hammer action can crack the thin webs inside the block, leaving you with a hole three times the size you wanted.
The Hilti HIT-HY 170 technical sheet explicitly calls this out: hammer for solid brick, rotary for hollow. Ignoring that turns a simple anchor into a structural repair.
Your bit choice matters more than the drill. You need a carbide-tipped masonry drill bit. The tip is the widest part, and it’s marked with a diameter. That number must match the nominal drill bit diameter (d0) listed for your adhesive anchor system. If you’re using a 1/2″ anchor sleeve, the bit is likely 5/8″. Guessing here strips the hole and the anchor won’t seat.
| Drill Type | Best For | Risk If Used Wrong |
|---|---|---|
| Hammer Drill (Hammer) | Solid brick mortar joints | Bit walks, hole widens, anchor spins |
| Hammer Drill (Rotary) | Hollow block, cinder block, perforated brick | Cracks internal webs, anchor has no side support |
| Rotary Hammer | All mortar, especially deep embedments | Overkill for most DIY jobs, can blow out back |
| Cordless Drill | Light duty, plastic anchors in shallow joints | Stalls, overheats, burns out motor on 3rd hole |
For a detailed breakdown of tool differences, our guide on the hammer drill vs drill clarifies the torque and impact settings.
Where this goes sideways: Using a wood or metal drill bit. The flutes are wrong, the tip angle is wrong, and the steel is too soft. You’ll ruin the bit on the first hole and likely damage your drill’s chuck. If you’re unsure about your bits, our article on how to tell a masonry drill bit has the visual identifiers.
The 7-Step Mortar Anchoring Process
Follow this sequence verbatim. Changing the order is how anchors pull out under hand-tight pressure.
1. Mark and Punch Your Pilot
Mortar is soft. A drill bit will skate across the surface like it’s on ice if you don’t give it a divot to start in.
Use a nail set or a center punch to make a small dent exactly where you want the hole. Hit it firmly once. This gives the carbide tip a place to bite without jumping.
2. Drill to the Exact Depth
Depth matters more than diameter. The effective embedment depth (hef) is the length of anchor inside the hole that actually provides hold. For a fischer FIS V Plus M8 anchor, that’s a minimum of 60mm in solid brick.
Wrap a piece of tape around your drill bit at the required depth. Drill slowly, letting the hammer action do the work. Don’t force it. If you hit a brick edge, stop. Back out, reassess your location. Drilling into the brick itself changes the game, you can follow our guide for drilling into brick if that happens.
The part nobody mentions: Blow dust out of the hole every 1/2 inch of depth. If you wait until the end, the dust compacts at the bottom into a hard plug no brush can remove. The anchor sits on a cushion of powder and fails under load.
3. Clean Like the Manual Says
This is the step every DIYer rushes. It’s also the one that decides whether your anchor holds 200 pounds or 20.
The fischer FIS V Plus manual is unambiguous: “Blow out at least 2 x + brush 2 x + blow out 2 x.” They state plainly: “Poor cleaning = reduced load-bearing capacity!”
You need a hand blower bulb (not your mouth, moisture ruins the bond) and a nylon drill hole brush the same diameter as your hole. The process is mechanical, not visual. 1. Blow out hard. Wait for the dust cloud to clear. 2. Blow out a second time. 3. Brush vigorously, scraping the sides all the way to the bottom. Twist it. 4. Brush a second time. 5. Blow out. 6. Blow out one final time.
The hole is clean when you blow and no dust puffs out. If you see anything, repeat the sequence.
4. Mix and Inject the Adhesive
Cartridge-based systems like Hilti HIT-HY 170 or fischer FIS V Plus use a static mixer nozzle. Follow the priming instructions: squeeze out a 4-inch bead until the mortar color is uniform. If it’s streaky, the chemicals aren’t mixed and it won’t harden.
Attach the nozzle extension tube if your hole is deeper than 150mm or in a tight corner. You must fill bubble-free from the bottom up. Insert the tube all the way to the back of the hole, then squeeze the trigger as you slowly withdraw it. This prevents air pockets.
For holes without a sleeve, fill about two-thirds of the volume. The anchor rod will displace the rest.
5. Set the Anchor Rod
Insert the rod, bolt, threaded rod, sleeve, with a slow, twisting motion. Push it all the way to the bottom. This is the moment of truth.
If no excess mortar oozes out the top of the hole, you have failed. The hole wasn’t filled completely. An air pocket surrounds the anchor. Immediately pull the rod out, discard the old adhesive, and inject a fresh batch. There is no fix after it cures.
6. Let It Cure (And Double If Wet)
Adhesive cures by chemical reaction, not drying. Temperature and moisture control the speed.
The Hilti HIT-HY 170 data sheet provides a table: at a base material temperature between -5°C and 0°C (23°F to 32°F), curing time is 12 hours. But there’s a critical footnote: “Curing times must be doubled in wet base material.”
A damp mortar joint in a cold garage needs 24 hours, not 12. A rainy day outside means waiting two full days before loading the anchor. No shortcuts.
7. Torque to the Specified Setting
Once cured, attach your fixture and tighten the nut. Use a torque wrench if the manual gives a value (e.g., max. Tinst = 10 Nm for M8 in solid brick). Over-tightening can shear the adhesive bond inside the hole. Snug is enough.
TL;DR: Punch, drill, clean six times, inject from the bottom, watch for ooze, wait double if wet. Miss one, and the anchor is decorative.
Wet Mortar vs. Dry Mortar: The Cure-Time Multiplier
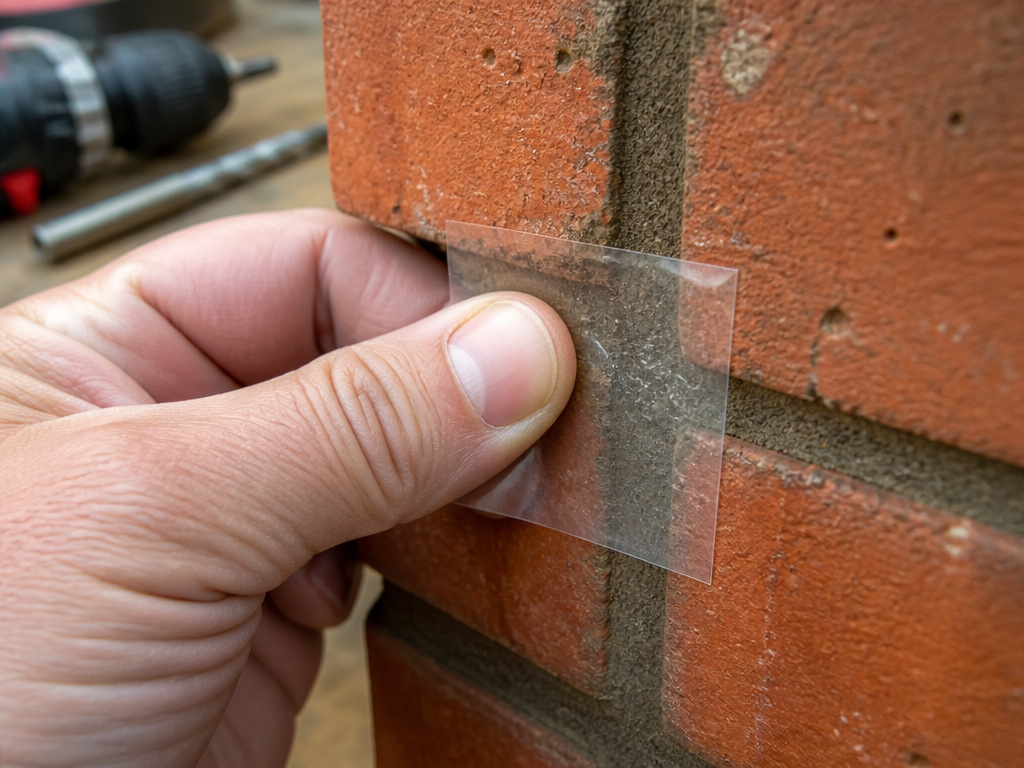 Mortar is hygroscopic, it absorbs moisture from the air. A joint that looks dry can still be holding enough water to slow the adhesive’s cure.
The rule from both Hilti and fischer is absolute: double the published curing time if the substrate is wet. This isn’t a recommendation. It’s a condition of the product’s rated strength. An anchor loaded after 12 hours in a wet hole is at half its holding capacity.
How do you know if it’s wet? Stick a piece of clear tape over the joint overnight. If moisture beads under it in the morning, the joint is damp. Wait for a dry day, or plan for a 48-hour cure.
Worth knowing before you start: Some injection mortars are moisture-sensitive. If water leaks into the hole after injection but before curing, the adhesive can turn to a gel that never fully hardens. Protect the hole until the cure is complete.
Choosing Your Anchor System: Sleeve vs. Direct-Bond
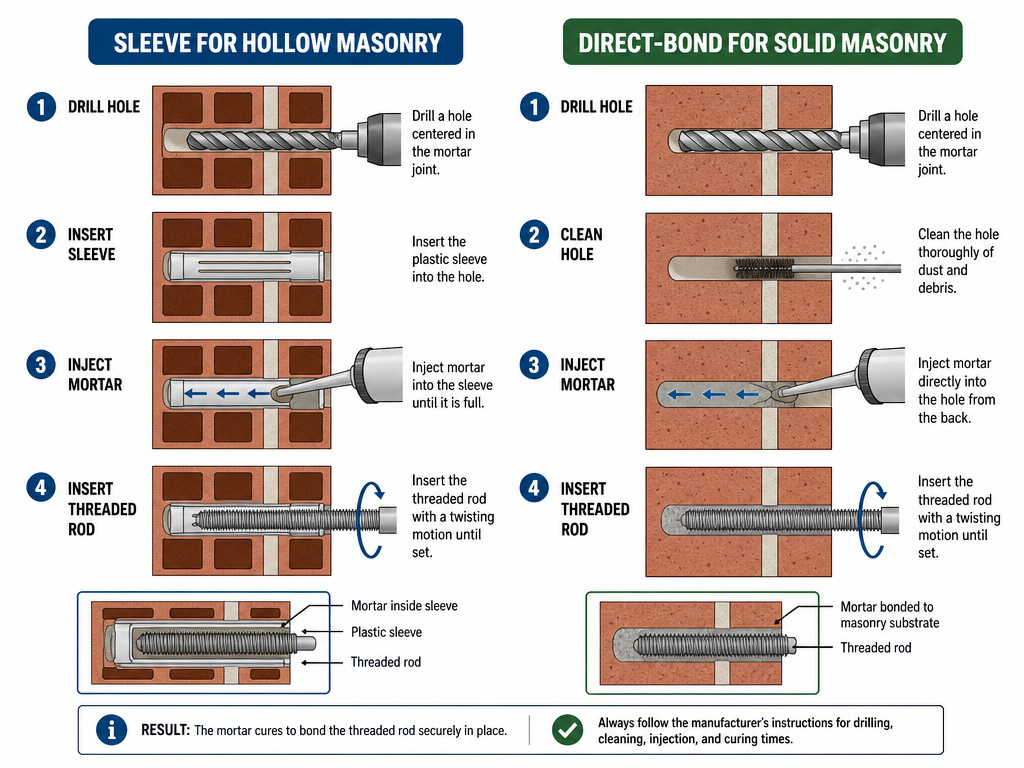 You have two main paths, and the mortar type decides which one.
Anchor Sleeves (like those used with fischer FIS V Plus in perforated brick) are plastic tubes you insert into the hole first. You then inject mortar into the sleeve. The sleeve holds the mortar in place within hollow blocks, preventing it from draining into the cavities. Use sleeves for cinder block, hollow brick, or any masonry with large voids.
Direct-Bond Anchors involve injecting mortar directly into the drilled hole in solid material (solid brick, solid concrete, natural stone). The adhesive bonds to the substrate and to the rod. This method is stronger in solid materials but impossible in hollow ones.
| Anchor Type | Best For | Installation Key |
|---|---|---|
| Injection Mortar + Sleeve | Hollow masonry, block walls | Seat sleeve flush, inject until mortar fills all voids |
| Injection Mortar Direct | Solid brick, stone, concrete | Clean hole perfectly, fill 2/3, ensure ooze-out |
| Mechanical Anchor | Light duty, non-structural | Not recommended for mortar — low holding power |
For solid concrete applications, the principles are similar but the drilling is harder; our guide on drilling into concrete covers the power and bit requirements.
The One Tool You Didn’t Know You Needed
Every guide lists a drill, bits, and a brush. They skip the hand blower bulb.
Your compressor is too powerful, it can blow debris deeper into the hole or spray oil into it. Your lungs introduce moisture and oils. A simple rubber blower bulb gives a sharp, dry puff of air exactly when you need it. It’s the only way to reliably satisfy the “blow out 2x” step without contaminating the hole. Buy one with a narrow nozzle tip.
For related techniques in other masonry, see our articles on drilling into stucco and drilling into cinder block, which have their own cleaning quirks.
Frequently Asked Questions
Can I use a regular drill for mortar?
You can, but you shouldn’t for anything structural. A cordless drill lacks the hammer action to efficiently chip through mortar. It will take longer, overheat the bit, and strain the motor. For a few small, shallow holes for plastic anchors, it’s possible. For anchor bolts or heavy fixtures, use a hammer drill.
What size drill bit for a 1/4″ anchor in mortar?
Don’t match the bit to the anchor diameter. Match it to the manufacturer’s specification for the adhesive system. For a 1/4″ (M6) threaded rod using fischer FIS V Plus, the required drill bit diameter (d0) is 8mm (about 5/16″). Always check the technical data sheet for the product you’re using. Our resource on drill bit selection explains how to read these specs.
How deep should I drill into a mortar joint?
Drill to the minimum effective embedment depth (hef, min) specified for your anchor size and material. For example, an M8 anchor in solid brick requires 60mm. The total hole depth will be slightly deeper to account for dust. Never drill deeper than the thickness of the mortar joint plus the brick behind it, you’ll lose holding power. If you need deeper embedment, you’re likely in the brick itself, which requires a different approach as outlined in our guide for drilling screws into brick.
Why did my adhesive anchor pull out easily?
Two likely reasons: incomplete hole cleaning or under-filling. Dust at the bottom acts as a lubricant, preventing bond. An air pocket around the rod creates zero grip. If you didn’t see mortar ooze out when inserting the rod, that’s your answer. The only fix is to drill a new hole in a different location.
Is mortar stronger than brick to drill into?
No. Mortar is specifically designed to be weaker and more flexible than the brick or block. It’s easier to drill but provides less inherent grip. That’s why you must use adhesive anchors, they create a new, stronger composite material inside the hole. For attaching to the brick itself, refer to techniques for drilling into cement or fastening screws in concrete, which rely on the material’s hardness.
The Bottom Line
Drilling into mortar is a test of patience, not strength. The soft joint forgives a wandering bit but punishes a dirty hole. Your drill needs a hammer setting, your bit needs a carbide tip, and your process needs the six-step clean.
Remember the multipliers: wet conditions double your wait, and hollow bricks demand a rotary setting. When the CMHA mortar testing technical note discusses evaluating consistency, it’s a reminder that you’re working with a malleable, variable material. Your anchor is only as good as the pocket of perfect adhesive you create inside it.
Get the cleaning brush, get the blower bulb, and follow the manual’s sequence like a recipe. One missed blow-out is all it takes.
