
How to Drill into Cement: A Step-by-Step Guide for Success
This post contains affiliate links. As an Amazon Associate, we earn from qualifying purchases.
To drill into cement, you match three things: the hole size, the tool’s power, and the bit’s cutting edge. For holes under 1/2-inch, a hammer drill with a carbide-tipped masonry bit works. For holes up to 1-1/2 inches, you need a rotary hammer with an SDS-plus bit. For anything larger, or for clean, precise holes, a diamond core drill is the only tool that won’t burn out or crack the material.
Cement is the binder that holds concrete together. Drilling into it means dealing with a hard, abrasive paste full of sand and stone aggregate. A standard drill spins; it doesn’t hammer. That spinning generates heat, melts the bit’s brazing, and leaves you with a shiny, useless piece of steel stuck halfway in.
The rest of this guide walks the choice between hammer drill, rotary hammer, and core drill—with the specific models and bit specs each one is actually rated for. By the last section you’ll know which tool to rent, which bit to buy, and the one mistake that glazes a diamond core in under thirty seconds.
Key Takeaways
- Cement is not concrete. Drilling into pure cement requires a sharp, abrasion-resistant bit; concrete adds aggregate that demands a hammering action to fracture.
- Bit diameter decides the tool. Under 3/8″: hammer drill. 3/8″ to 1-1/2″: rotary hammer. Over 1-1/2″: diamond core drill. Cross these lines and you burn out motors.
- Water is non-negotiable for core drilling. The Husqvarna DM 200 owner’s manual specifies 1.1 to 2.4 liters per minute to cool the diamond segments and flush debris. Dry drilling destroys a $200 bit in one hole.
- Feed pressure is a feel, not a force. Push until you hear a consistent crunching sound. Push harder and the bit glazes, the motor stalls, and the hole stops progressing.
- Maintenance intervals are in the manual. The U.S.SAWS Core Pro gear oil change at 300 hours and the Eibenstock ESD 200 gearbox oil at 150 hours aren’t suggestions. Miss them and the gearbox seizes.
The 3-Step Decision: Tool, Bit, and Technique
Your first move is looking at the hole you need to make before picking up a drill. The diameter tells you everything about the force required and the tool that delivers it.
The Technical Snippet: For handheld drilling into cement and concrete, tool capacity is defined by bit diameter and drilling method. Hammer drills (e.g., Makita HP2050) are for impact drilling with bits under 1/2″. Rotary hammers (e.g., RIDGID RB-3W) use a piston mechanism for bits up to 1-1/2″. Diamond core drills (e.g., Husqvarna DM 200) rotate a hollow diamond-encrusted bit for precise holes from 1.2″ to over 12″, requiring continuous water cooling.
Hole size is the dictator. A 1/4-inch hole for a plastic anchor is a different universe from a 4-inch hole for a plumbing pipe. The smaller hole needs high-speed impact to pulverize aggregate. The larger hole needs a grinding cut that removes a solid core. Use a hammer drill on a 3-inch hole and the motor will smoke before you get a half-inch deep. Use a core drill on a 1/4-inch hole and you’ll spend $500 to do a $5 job.
The material’s age and composition change the game. New, green cement is softer but more likely to spall and crack around the edges. Old, cured cement is harder and more abrasive, wearing down bit edges faster. If you’re drilling into a foundation, assume there is rebar. Your bit must be rated for steel, or you need a diamond core bit that cuts through it.
| Hole Diameter | Primary Tool | Bit Type | Key Limitation |
|---|---|---|---|
| Up to 3/8″ (10mm) | Hammer Drill | Carbide-Tipped Masonry | Overheats in 60 seconds without frequent pull-out to clear dust. |
| 3/8″ to 1-1/2″ (10-38mm) | Rotary Hammer | SDS-Plus Carbide | Handheld dry drilling max is 5.2″ (132mm) per the RIDGID RB-3W instruction manual. |
| 1-1/2″ and larger | Diamond Core Drill | Diamond Core Bit | Requires continuous water supply (1.1-2.4 L/min) or a certified dust extractor. |
Tool Deep Dive: From Hammer Drills to Core Rigs
You have three mechanical paths. Each works by breaking the cement matrix differently.
The Hammer Drill: For Small Anchors and Fasteners
A hammer drill is your basic corded or cordless drill with a special clutch that makes the chuck pulse forward as it spins. It’s a jackhammer in miniature. This is the tool for hanging shelves, installing outlet boxes, or securing handrails into a cement block wall.
The Makita HP2050 is a classic example. Its manual states it’s for “impact drilling in brick, concrete and stone.” That’s its ceiling. The hammering action is strong enough to break up the sand and cement bond, but it relies on a sharp bit to do the actual cutting.
Where this goes sideways: Using a hammer drill with a dull bit. The drill hammers away, but the bit isn’t cutting. All you get is heat, dust, and a slowly widening hole that won’t hold an anchor tight. The bit’s tip turns blue, then silver, and it’s done.
For most DIYers, a quality hammer drill for concrete like the Makita or a DeWalt DWD520 is the right starting point. If you’re drilling more than a dozen holes, step up to a rotary hammer. Your wrists will thank you.
The Rotary Hammer: The Professional’s Choice for Medium Holes
A rotary hammer doesn’t just tap. It uses an internal piston to drive the bit forward with real force. It also has a “hammer-only” mode for light chiseling. This is the tool for running conduit, installing large lag shields, or drilling into a thick foundation.
The mechanism is why it wins. The bit (almost always an SDS-plus shank) moves independently in the chuck, allowing a longer, more powerful stroke. This lets it power through aggregate that would stall a hammer drill.
Rotary hammer vs. Hammer drill: The rotary hammer wins on holes over 3/8″ every time. It’s faster, causes less operator fatigue, and is less likely to bind. The hammer drill wins on portability and cost for small, infrequent jobs. For drilling screws into concrete, you always start with a rotary hammer to make the pilot hole.
Maintenance is the catch. These tools have grease-packed gearboxes. The manual for the Eibenstock ESD 200 mandates gearbox oil replacement after the first 150 hours of operation. Ignore that and the gears wear down, the hammering action weakens, and you’re left with an expensive paperweight.
The Diamond Core Drill: For Precision and Large Diameters
When you need a clean, round hole for plumbing, electrical, or ventilation, you core it. A diamond core drill rotates a hollow barrel with diamond-embedded segments on the rim. It grinds a perfect cylinder out of the material, leaving a solid core inside the bit.
The Husqvarna DM 200 is a standard handheld core drill. Its spec sheet is specific: maximum drill diameter in concrete is 80mm (3.1 inches). It also mandates a water flow of 1.1 to 2.4 liters per minute, depending on bit size. The water cools the diamonds and flushes the slurry.
Common mistake: Forcing the core bit. The RIDGID RB-3W manual’s troubleshooting section identifies this exactly: “If the diamond core glazes and eventually stops… It could be due to forcing the core bit too hard.” Let the diamonds do the cutting. You provide steady pressure, not brute force.
For big jobs, like a 12-inch hole for a dryer vent, you move to a rig-mounted drill like the U.S.SAWS Core Pro HD-12. That 65-pound unit runs at 410, 620, or 830 RPM to match the bit size. It’s a different beast, but the principle is the same: sharp diamonds, plenty of water, and patience.
The Right Bit for the Job
The tool provides the action. The bit does the cutting. A mismatch here fails every time.
Carbide-tipped masonry bits are for hammer drills. Look for a sharp, spear-shaped tip. The flutes should be deep to carry dust out of the hole. For drilling into brick or mortar, these are sufficient. For cement, they dull quickly.
SDS-plus carbide bits are for rotary hammers. The shank has grooves that lock into the tool’s chuck, allowing that piston action to transfer directly to the bit’s tip. They are thicker and more robust. Always choose a bit length that exceeds your hole depth.
Diamond core bits are measured by their outer diameter and the length of the diamond segment. A longer segment lasts more holes. They are specific to wet or dry drilling. A wet bit has channels for water flow. A dry bit requires a vacuum dust extractor—using one without the other ruins the bit.
| Bit Type | Best For | Critical Spec | What Happens If Wrong |
|---|---|---|---|
| Carbide Masonry | Hammer drills, holes < 1/2″ | Tip Geometry (sharp spear point) | Dulls, overheats, spins in hole without progress. |
| SDS-Plus Carbide | Rotary hammers, holes 3/8″ – 1-1/2″ | Shank Type (must match tool chuck) | Chuck won’t hold it, hammer action is lost, bit flies out. |
| Diamond Core | Core drills, holes > 1-1/2″ | Wet vs. Dry Designation | Dry bit used wet clogs; wet bit used dry overheats and loses diamonds. |
Step-by-Step for a Clean Hole
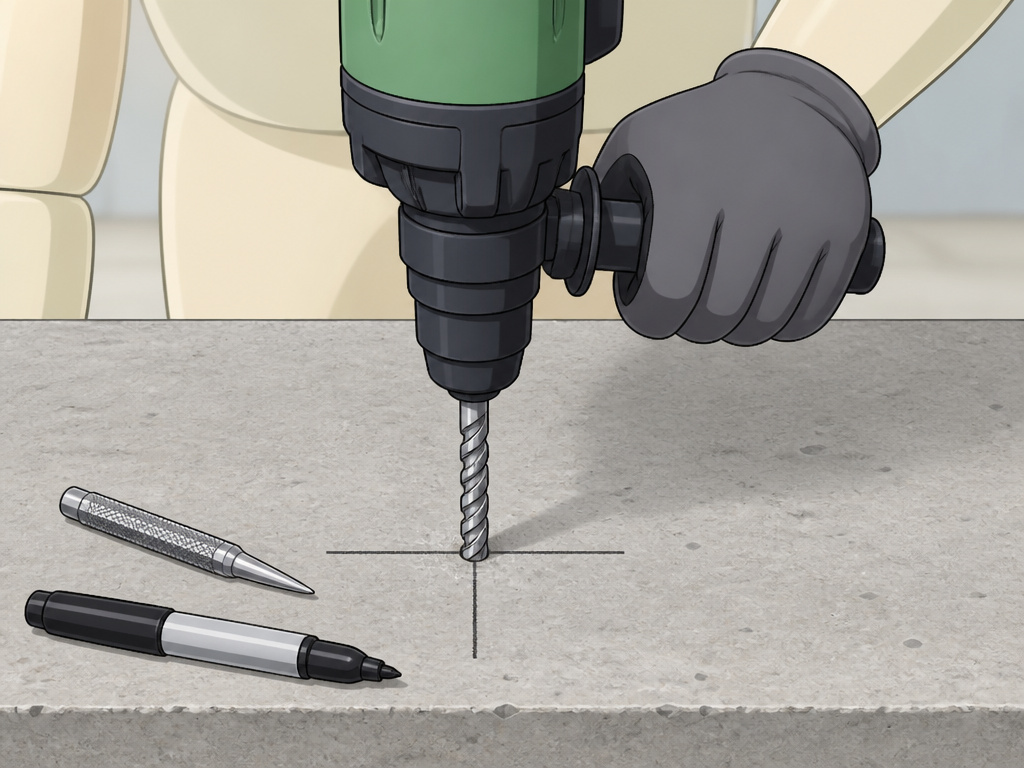 This is the sequence that prevents broken tools and failed holes. The steps change slightly based on your tool, but the principles are universal.
- Mark and Pilot Punch. Use a permanent marker and a center punch. This keeps the bit from wandering on the hard, smooth surface of cured cement. Skipping this gives you an oval scar an inch from where you wanted the hole.
- Set Up Dust and Water Control. For a hammer drill, have a vacuum ready. For a core drill, connect your water hose and a slurry collection ring. Silica dust is a serious health hazard—treat it that way.
- Start Slow and Straight. Begin drilling at a slow speed with very light pressure. Let the bit establish a shallow guide hole. This is especially critical for drilling into cinder block, as the face can easily blow out.
- Apply Steady Pressure and Clear Often. Once the hole is started, increase pressure to a firm, steady push. Every 10-15 seconds, pull the bit out completely to clear dust from the flutes. Impacted dust causes overheating and binding.
- Manage Break-Through. As the bit nears the back side of the material, reduce pressure. The last bit of material will blow out. If you’re drilling into concrete with a hammer drill, this is when the bit can grab and twist the tool violently.
- Clear the Hole. Use compressed air or a bulb blower to remove all dust from the hole before inserting an anchor. Residual dust reduces holding power by up to half.
The part nobody mentions: Cement dust is hygroscopic—it absorbs moisture from the air. If you leave dust in a hole overnight before setting an anchor, that moisture can weaken the bond of your anchoring compound. Clean it and set it the same day.
When to Drill Wet vs. Dry
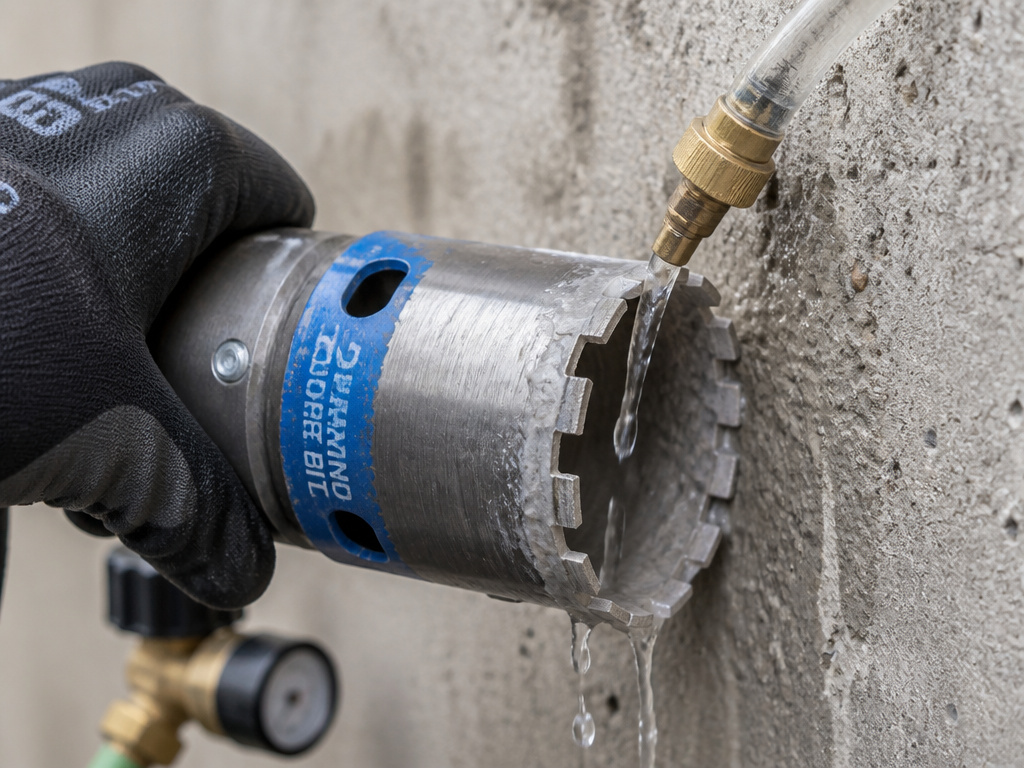 This decision is made for you by the tool manufacturer. Ignoring it is the fastest way to destroy equipment.
Dry drilling is only permissible with a certified dust extraction system. The Eibenstock ESD 200 manual is absolute: “The machine may be used exclusively in conjunction with a vacuum when dry drilling.” This is for situations where water is impossible, like drilling overhead in a finished room. The vacuum must be HEPA-rated for silica dust.
Wet drilling is the standard for core drilling and is vastly preferable for any drilling in cement. Water suppresses deadly silica dust, cools the bit, and extends tool life. The Husqvarna DM 200 manual provides exact water volume rates because it’s a performance requirement, not a suggestion.
Worth knowing before you start: The water pressure matters. The Husqvarna DM 200 specifies a maximum of 3 bar. Too much pressure can force water into the tool’s motor housing. Use a garden hose regulator.
Troubleshooting: Why Your Drill Isn’t Cutting
You’re pushing. The tool is screaming. Nothing is happening.
-
The bit spins but doesn’t advance.
- Likely Cause: A dull bit or incorrect tool for the hole size.
- Fix: Examine the bit’s cutting edges. If they’re rounded or shiny, replace it. Confirm your tool is rated for the bit diameter.
-
The motor slows or stalls under pressure.
- Likely Cause: Overloading the tool, or drilling into rebar with a masonry bit.
- Fix: Ease up on the feed pressure. If you hit metal, stop. Switch to a bit rated for metal or a diamond core bit.
-
Excessive dust and no slurry (core drilling).
- Likely Cause: Insufficient water flow.
- Fix: Check water supply and hose for kinks. Increase flow to the manufacturer’s specified rate (e.g., 1.7-2.4 L/min for the DM 200 with a large bit).
-
The hole is ragged or the surface spalls.
- Likely Cause: Drilling too fast, using a dull bit, or not using a pilot punch.
- Fix: Start slower. Use a sharp bit. Always use a center punch to prevent bit walk.
Maintenance: Keeping Your Tools Alive
Cement drilling is brutal on equipment. Grit infiltrates. Motors overheat. Grease breaks down.
The manuals give you the schedule. The U.S.SAWS Core Pro requires gear oil changes every 300 hours. The RIDGID RB-3W says to check carbon brushes after 300 hours of work. These are the calculated lifespans of consumable parts under load.
After every job, blow out the tool’s vents with compressed air. Check the power cord for damage. For cordless tools, allow the battery to cool before charging. This simple five-minute habit prevents 80% of premature tool failures.
Frequently Asked Questions
Can you drill into cement without a hammer drill?
You can, but you shouldn’t. A standard drill will overheat and dull bits almost immediately. For a few very small holes in soft material, you can use a carbide-tipped bit and extreme patience, but a hammer drill is the correct tool. For more on this last-resort approach, see our guide on how to drill concrete without hammer drill.
What’s the difference between drilling into cement vs. Concrete?
Cement is the powder that binds concrete. You rarely drill into pure cement. When people say “cement,” they usually mean the concrete wall or slab. The drilling process is the same, but concrete contains aggregate (rock), which is harder and requires the hammering action to break.
How do I know if I hit rebar?
You’ll feel a sudden, severe resistance and hear a high-pitched grinding sound. The drill may stop entirely. Immediately stop drilling. You can switch to a dedicated metal-cutting bit or a diamond core bit to get through it. Attempting to power through with a masonry bit will destroy it.
Why is water so important when core drilling?
Water serves three critical functions: it cools the diamond segments (which can exceed 1000°F), it flushes the ground-up material (slurry) from the cut, and it suppresses hazardous silica dust. Without it, the diamonds thermally fracture and the bit is ruined in minutes.
Can I use the same drill for cement and wood?
Yes, but not the same bit. A hammer drill or rotary hammer often has a “drill-only” mode that disengages the hammer mechanism. In this mode, you can use standard twist bits for wood or metal. Always switch the mode and the bit.
The Bottom Line
Drilling into cement is about matching the mechanism to the material’s resistance. For the vast majority of home projects—hanging, fastening, anchoring—a cordless hammer drill like a DeWalt or Milwaukee with a sharp masonry bit is the answer.Buy a two-pack of bits; you’ll need the spare.
When the job gets bigger, or your DIY turns pro, the rotary hammer is the workhorse. It’s the tool that makes drilling screws into concrete a routine task instead of a struggle.
And when you need a hole bigger than your fist, you rent a diamond core drill. You follow the manual’s water rules to the letter. You let the tool do the work.
The right tool, a sharp bit, and a little patience. That’s the whole game.
