
How to Get a Broken Drill Bit Out of a Hole: 3 Working Methods
This post contains affiliate links. As an Amazon Associate, we earn from qualifying purchases.
To get a broken drill bit out of a hole, you have three proven paths: extract it with a left-handed drill bit and extractor, push it out from the back if the hole goes through, or mechanically pull it using tools like a threaded rod for core bits or a depth gauge for cannulated surgical bits. The method is dictated by the bit type, the material, and whether the hole is blind or through.
Force is almost never the answer. A jammed bit creates friction and heat that welds the metal to the sides of the hole. Hitting it, twisting it with pliers, or running the drill in reverse at full power just expands the fragment and locks it tighter.
What follows is a breakdown of those three methods, starting with the single most important diagnostic step everyone skips. We’ll cover the specific tools, like the MK Diamond 5/8-11 threaded rod technique for concrete coring, and the one safety rule from a rock drill manual that prevents catastrophic tool failure.
Key Takeaways
- Your first move is always to identify if the hole is blind or through. A through-hole gives you a push-out option that changes everything.
- For standard twist bits in metal or wood, a left-handed drill bit combined with a screw extractor is the default repair path. Drill a small pilot hole into the broken fragment, then tap the extractor in.
- Removing a stuck diamond core bit from concrete requires a specific diameter threaded rod (like 5/8-11) to push against the core inside, per the OEM manual. Guessing the size strips the hub threads.
- The BTE Mid-Western rock drill handbook explicitly warns never to operate a drill at full throttle when pulling steels. This smashes the steel puller ends and can break the side rods or trunnion.
- A surgical technique using a curved-tip depth gauge to retrieve a broken cannulated drill bit only works because the bit is hollow. It will not work on a solid bit.
The First Step: Stop, Look, and Understand
You feel the snap. The drill motor whines, but the bit doesn’t turn. The immediate instinct is to reverse the drill and pull. Don’t.
That broken fragment is now a precision wedge. The fracture created uneven edges that bite into the walls of the hole. Any rotational force you apply from the top just cams those edges outward, increasing the binding force. This is why pliers and vice grips usually fail. You’re working against geometry.
Before you start: Wear safety glasses. Metal fragments can be ejected with surprising force. If you’re working with a powered drill or core rig, disconnect the power source or hydraulic supply before attempting any removal. A sudden release can cause the tool to kick back.
Your first diagnostic question is simple: does the hole go all the way through the workpiece? Put a flashlight on one side and look from the other. A through-hole is a gift. It means you can potentially drive the fragment out from the opposite side with a punch or rod, provided you have clearance behind the work. A blind hole, one that does not exit, traps the fragment. This dictates your entire strategy.
Your second question: what broke? A small high-speed steel twist bit in a metal plate behaves differently than a carbide-tipped masonry bit in concrete, which is worlds apart from a diamond core bit stuck in a reinforced slab. The removal tools and risks are not interchangeable.
Method 1: Extraction for Standard Twist and Masonry Bits
This is the scenario for most DIYers: a 1/8-inch to 1/2-inch drill bit snaps off flush or below the surface in wood, metal, or plastic. The hole is blind. You need to remove the fragment to salvage the workpiece or continue drilling.
The go-to toolkit here is a left-handed drill bit and a screw extractor. They are a matched set, not alternatives. The left-handed bit, often sold as a “reverse spiral” bit, is designed to turn counter-clockwise. As you drill into the broken fragment, the cutting action can sometimes catch and unscrew the fragment before you even need the extractor. It’s your first, least-destructive attempt.
If the fragment doesn’t back out, you’ve now created a clean, centered pilot hole for the extractor. The extractor is a hardened, tapered spiral with reverse threads. You tap it into the pilot hole and turn it counter-clockwise. The harder you turn, the tighter it grips the inside of the fragment, applying rotational force to back it out.
Where this goes sideways: Using an extractor without a pilot hole, or using a right-handed drill bit to make that hole. A right-handed bit can drive the fragment deeper or tighten it. The extractor needs a clean, centered seat to bite; without it, the extractor spins and widens the hole, destroying your chance of removal.
| Step | Tool | Critical Detail | Risk If Skipped |
|---|---|---|---|
| 1. Center Punch | Center punch, hammer | Find the exact center of the broken bit and make a firm dimple. | The drill bit walks off the fragment, drilling into the workpiece and permanently damaging it. |
| 2. Pilot Hole | Left-handed drill bit, slow-speed drill | Use a bit 1-2 sizes smaller than the fragment. Drill at a slow, steady speed with cutting oil (for metal). | The fragment heats up, expands, and welds itself to the hole. A right-handed bit drives it deeper. |
| 3. Extract | Screw extractor, tap handle or wrench | Tap the extractor firmly into the pilot hole. Turn slowly counter-clockwise with steady pressure. | The extractor spins, strips the pilot hole, or snaps off inside the fragment—creating a harder problem. |
| 4. Clean the Hole | Drill bit, compressed air | Once out, run the original size drill bit through to clean any debris from the threads of the hole. | Remaining metal shavings cause rapid wear on taps or fasteners and can lead to cross-threading. |
This method is your first line of defense for a stuck drill bit in a handheld tool. It’s also the same fundamental process for a broken screw removal or extracting a seized bolt.
Method 2: Mechanical Extraction (The Pro Way)
For larger bits, core drills, or industrial applications, the “drill and extract” method is too light. Here, you’re not fighting a fragment; you’re fighting a lodged tool. The principles shift to push forces and specialized pullers.
For Stuck Core Bits in Concrete: The Threaded Rod Push
This is a primary-source procedure straight from the MK Diamond troubleshooting guide. When a diamond core bit gets stuck in a concrete hole, you don’t hammer it. You push the concrete core inside it. 1. Disconnect the core rig from the bit. 2. Thread a piece of threaded rod the same diameter as the bit’s hub (specifically 5/8-11 or 1-1/4-7) through the hub until it hits the concrete core inside. 3. Place two hex nuts on the rod and lock them against each other on the outside of the hub. 4. Turn the nuts with a wrench. This turns the rod, which pushes against the concrete core, which in turn pushes the bit out of the hole.
The gap between the rod diameter and the hub threads is critical. Using a rod that’s even slightly undersized strips the aluminum hub threads, turning a removal job into a hub replacement. The manual gives you the specs for a reason.
For Pulling Drill Steel in Rock Drills: The Steel Puller Warning
The BTE Mid-Western S83 rock drill handbook is blunt about its steel puller models S53F36A and S53F36B. They are designed to help pull drill steel out of the hole. The handbook then states in all caps: “DO NOT operate a drill at full throttle when pulling steels. This can damage the steel puller by smashing the ends of it.”
The reason is inertia and impact. At full throttle, the piston is still hammering. When the steel suddenly breaks free, the kinetic energy has nowhere to go except into a metal-on-metal collision inside the puller mechanism. This can snap side rods or crack the trunnion. The fix is simple: throttle down before you pull.
The Surgical Analogy: Retrieving a Cannulated Bit
A 2021 orthopedic case study in Cureus detailed retrieving a broken 4mm cannulated drill bit from a femur. The technique used a depth gauge with a curved tip. The surgeon inserted the gauge into the hollow (cannulated) center of the bit, hooked the curved tip on the broken edge, and used a twisting motion to pull it out.
Easy to miss: The study authors note this method only works on cannulated bits. The hollow center allows the tool to latch on. A solid drill bit offers no such purchase. This is a perfect example of how tool design dictates the fix.
These mechanical methods are about applying force in the correct vector, push, pull, or twist, using the tool’s own design against the problem. It’s the difference between yanking on a jammed drill bit and using a purpose-built screw extractor.
Method 3: The Through-Hole Advantage and Drilling Out
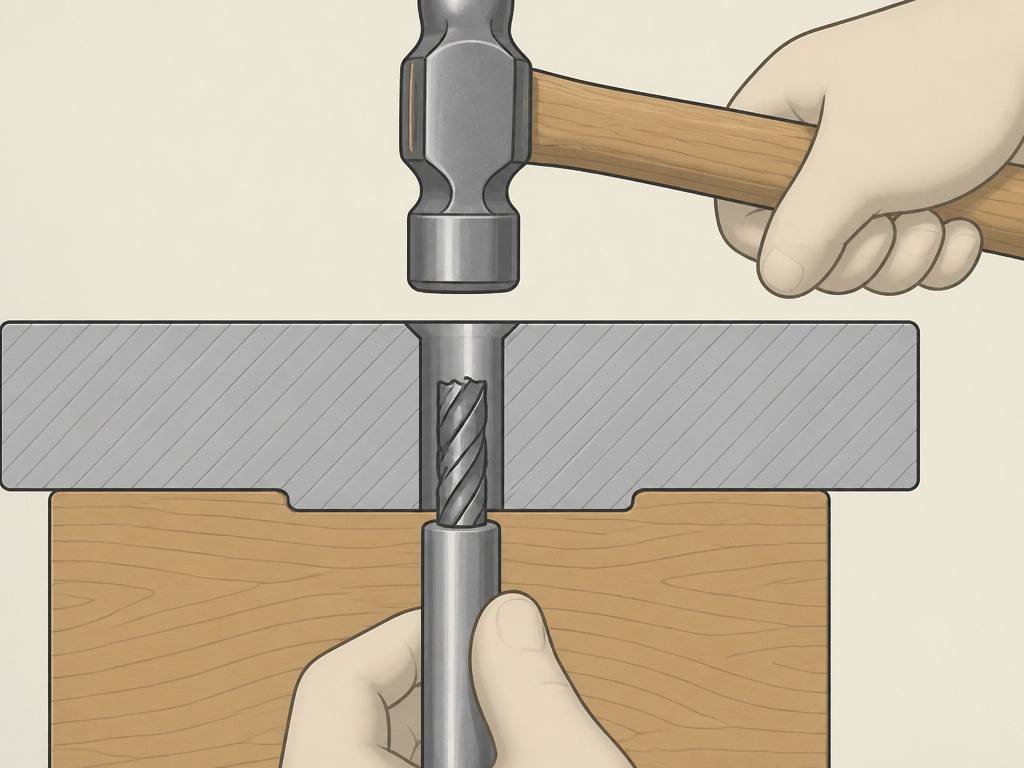
If your hole goes all the way through, your job just got easier. You can bypass extraction and go straight to ejection.
Find a punch, drift pin, or a piece of sturdy rod that fits through the hole but is smaller than the drill bit’s diameter. Place it against the broken fragment from the exit side. Tap it firmly with a hammer. The fragment should drive back out the way it came. Use a block of wood behind the workpiece to protect the surface and give the fragment somewhere to go.
This method is clean, fast, and doesn’t risk damaging the hole’s walls. It’s your first check for a reason.
When You Must Drill Through the Bit: The Last Resort
Sometimes, the fragment is utterly seized, or it’s a hardened bit that defies extractors. Your last option is to drill it out completely. This means using a carbide end mill or a cobalt drill bit that is harder than the broken fragment to literally erase it from the inside out. You must be precise to avoid enlarging the original hole.
This is a high-skill, high-risk operation. It’s essentially the same careful process required to drill out a bolt that has sheared off flush. You start with a small, rigid carbide bit, drill dead center, and slowly step up in size until the remaining shell of the fragment is thin enough to collapse. It destroys the fragment and any threads in the hole, often requiring a helicoil insert or oversize fastener afterward.
How to Prevent a Drill Bit from Breaking in the First Place
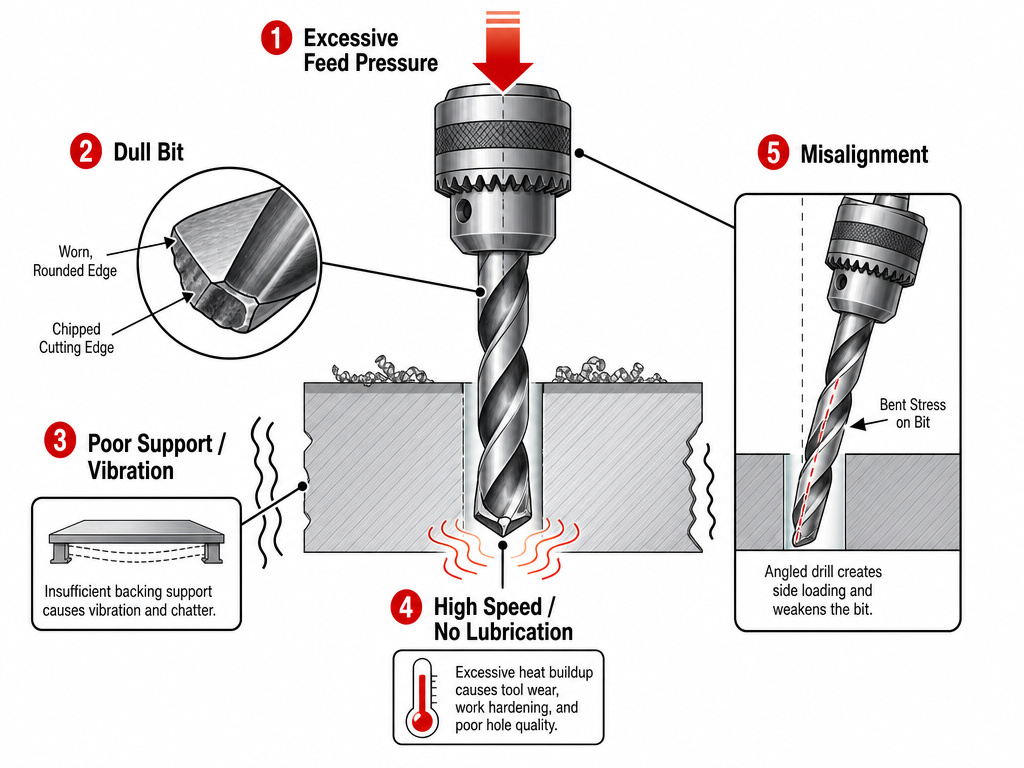
A broken bit is usually a symptom, not bad luck. The causes are predictable and avoidable.
Excessive Feed Pressure. This is the number one killer. You’re leaning on the drill, forcing it to cut faster. The bit binds, the flutes clog, and the torsional stress snaps the shank. Let the tool do the work. An ammeter on a core rig, or the sound and feel of a hand drill, tells you when you’re pushing too hard.
Dull Bits. A sharp bit cuts cleanly. A dull bit requires more pressure, generates more heat, and deflects more. The deflection creates side load, which snaps bits at the neck. Resharpen or replace bits at the first sign of slowing down or burning.
Poor Workpiece Support. Drilling into thin metal or wood without a backup block causes breakout and vibration. The bit catches on the burr at the break-through point and snaps. Always back your work with scrap material.
Incorrect Speed or Lack of Lubrication. Drilling metal too fast creates heat that softens the bit. Drilling masonry without a hammer function or with insufficient water (for core drilling) glazes the carbide and causes catastrophic failure. Use cutting oil for metal and always run water when coring concrete.
Misalignment. If the drill isn’t perpendicular to the work surface, the bit enters at an angle. The entire length of the bit is now in a bending stress. It will snap under load. Use a drill press when possible, or a guide block for hand drills.
Following these rules prevents the vast majority of breaks. It also makes every pilot hole technique you use more effective, as a clean, straight starter hole guides the larger bit perfectly.
Frequently Asked Questions
What’s the first thing I should try?
Look to see if the hole is through or blind. If it’s through, try to punch the fragment out from the back. If it’s blind, your default path is a left-handed drill bit and extractor set. Never start with pliers or by hammering on the bit.
Can I use a magnet to get a broken drill bit out?
Only if the bit is ferrous (steel) and the fragment is loose enough to be pulled straight out. Most broken bits are wedged in place by their own edges. A magnet strong enough to pull it will also pull it sideways, jamming it tighter. It’s not a reliable method.
Why did my screw extractor break off inside the bit?
Extractors are hardened steel, which makes them brittle. The most common causes are using an extractor that’s too large for the pilot hole (applying excessive torque) or trying to extract a fragment that is chemically welded (galled) into the hole. A broken extractor is a nightmare; you now need a carbide bit to drill through the hardened extractor. This is why centering and using the correct size pilot hole is non-negotiable.
My diamond core bit is stuck. Can I just hammer the side of it?
No. The barrel of a core bit is relatively thin steel. Hammering it dents the barrel, which then binds even tighter against the concrete hole. It also risks cracking the diamond segments or deforming the hub. Use the threaded rod push method specified by the manufacturer.
What’s the purpose of a left-handed drill bit?
Left-handed drill bit turns counter-clockwise (reverse) during normal operation. When you drill into a broken fragment, the cutting action can catch the fragment’s remaining threads and back it out before you even switch to an extractor. It’s a low-risk, high-reward first attempt that often solves the problem. You can read more about what a left-handed drill bit is** and its other uses.
Before You Go
A broken drill bit is a friction problem. Heat, pressure, and misalignment created a bond stronger than the bit’s steel. Your job is to break that bond without making it worse.
Start with the geometry. A through-hole gives you a push-out option. A blind hole means extraction. Match your tools to the bit type: left-handed bits and extractors for standard fragments, threaded rods for core bits, and never full throttle when pulling steel.
The real fix happens on the next hole. Sharp bits, correct speed, steady pressure, and solid support prevent the snap. It’s not about strength. It’s about letting the cutting edge do its job.
