
How to Drill a Hole in Glass: Bits, Speed & Pressure Guide
This post contains affiliate links. As an Amazon Associate, we earn from qualifying purchases.
To drill a hole in glass, you need a diamond or carbide-tipped bit, a variable-speed drill, constant lubrication, and a patient touch at low RPM. The hole must be placed at least 6mm from any edge (or twice the glass thickness, whichever is greater) and its diameter must exceed the glass thickness by at least 1/16″. Drill at 400-800 RPM, flip the piece 3/4 of the way through, and never attempt this on tempered safety glass.
That distance-from-the-edge rule is codified in ASTM C-1048, the standard glass fabricators like Viracon use. Get closer, and the internal stress from drilling meets the edge stress, and the pane goes pop.Your project is over.
What follows is the breakdown most DIY guides skip: the industry specs that tell you what’s physically possible, the drill-bit debate between jewelers and carpenters, and the step-by-step that actually works on bottle, pane, or mirror. We’ll cover what to buy, how to set up, and the one type of glass you walk away from.
Key Takeaways
- Use only diamond-coated or carbide-tipped drill bits for glass; high-speed steel bits will skate and shatter the surface.
- Tempered glass cannot be drilled safely after manufacture, identify it by a polished edge or corner etching and abandon the project.
- Maintain a drill speed between 400 and 800 RPM with constant water or oil lubrication to manage heat, the primary cause of cracks.
- Always drill a pilot hole with a small bit first, and flip the glass to finish the hole from the opposite side to prevent exit chipping.
- Adhere to minimum spacing rules: keep holes at least 6mm from edges and 10mm apart, per ASTM C-1048 fabrication standards.
The Two Glass Types: One Drills, One Shatters
Your first step is identifying the material. This decision is binary and non-negotiable.
Annealed glass is standard float glass. It’s what’s in most picture frames, tabletops, and glass jar projects. It breaks into sharp, dangerous shards, but its uniform internal stress makes it drillable. This is the only type you drill at home.
Tempered glass is safety glass. It’s used in shower doors, car windows, and any application where breakage risk is high. It’s processed to shatter into small, blunt cubes. That safety feature is its drilling death sentence.
Tempered glass cannot be drilled after tempering. The tempering process locks in surface compression and internal tension. Drilling through that balance releases the tension catastrophically, causing the entire pane to explode into granules. All guidelines for hole placement refer to glass that is drilled before it is tempered in an industrial furnace.
How do you know? Look for a polished, smooth edge, tempered glass is always finished. Check the corners for a small manufacturer’s etching, often a “bug” with a “T” or “Temp.” If you see it, stop. Your project needs a new piece of acrylic or annealed glass.
The Tool Debate: Diamond vs. Carbide, and Why RPM Matters
The right bit doesn’t just make a clean hole. It decides whether you make a hole at all. General DIY advice often says “carbide or diamond.” Professional tool suppliers for jewelers and lapidaries draw a harder line.
Rio Grande’s instruction sheet is blunt: “Use a diamond drill bit when drilling glass or stone; do not use carbide or high-speed steel drills.” Their reasoning is wear and performance. Diamond grit abrasively grinds through glass, while carbide cuts. On a microscopic level, carbide can grab and fracture rather than abrade, especially on curved surfaces like a sea glass pendant.
For the home workshop, a spear-point carbide-tipped bit is a reliable, affordable entry point. It works. For volume, precision, or harder materials like drill stone, a diamond-coated twist drill or round-end burr is the professional’s choice.
Your drill matters as much as your bit. You need a variable-speed drill you can set to a crawl. A corded model offers consistent torque; a cordless model needs a full charge to avoid stalling.
| Drill Bit Type | Best For | Risk If You Choose Wrong |
|---|---|---|
| Diamond-coated twist drill | Small holes (≤1/4″), bottles, fragile sea glass, repeated use | Higher cost, but minimal chipping and longest life. |
| Carbide-tipped spear point | General DIY, picture frames, single holes in flat panes | Can skate on curved surfaces; wears faster than diamond. |
| Diamond core drill | Holes larger than 1/4″, thick glass slabs | Requires even lower RPM (200-400); expensive but essential for large diameters. |
Where this goes sideways: Using a standard masonry or wood bit. The cutting angle is wrong, the material is too soft, and the bit will skate across the glass like a puck on ice, scratching the surface and likely causing a crack before it even starts to cut.
Speed is your control lever. For a pilot hole, start around 400 RPM. For the main cut with a small diamond bit, you can go up to 800 RPM with ample lubrication. The Rio Grande guide notes that for very small holes (under 1/4″), speeds of 5,000–30,000 RPM are possible on a specialized rotary tool, but that’s for experts with a drill press and a steady drip system. In your hand, slow wins.
The Geometry You Can’t Ignore: Industry Hole-Placement Rules
You can’t drill a hole anywhere you want. Glass is a rigid, brittle solid, not wood. Fabrication standards exist because physics demands them. The ASTM C-1048 standard, referenced by suppliers like Viracon and Glassupply.com, provides the rulebook.
These rules are for glass that will be tempered after drilling. For your annealed glass project, they are your safety margins.
The minimum distance from the edge of a hole to the nearest glass edge must be the greater of 6 mm (1/4″) or two times the glass thickness. The minimum distance between the edges of two holes must be the greater of 10 mm (3/8″) or two times the glass thickness.
Think of it as a stress buffer. Drilling creates a localized stress point. If that point is too close to the edge or another hole, the stresses connect and the glass fractures. It might not happen immediately, it could fail days later from vibration or a temperature change.
| Glass Thickness | Min. Edge Distance (X) | Min. Hole Spacing (Y) | Min. Hole Diameter |
|---|---|---|---|
| 1/8″ (3mm) | 1/4″ (6mm) | 3/8″ (10mm) | 1/4″ (6mm) |
| 1/4″ (6mm) | 1/2″ (12mm) | 3/4″ (19mm) | 5/16″ (8mm) |
| 1/2″ (12mm) | 1″ (25mm) | 1.5″ (38mm) | 9/16″ (14mm) |
The hole itself has size limits. Its diameter must be at least 1/16″ greater than the glass thickness, with 1/4″ as the absolute smallest possible hole. A hole cannot be larger than one-third the narrowest dimension of the glass pane. You cannot drill a 4-inch hole in a 12-inch wide piece of glass.
Why does this matter for a DIYer drilling one hole? It tells you when a project is fundamentally unsafe. If your plan requires a hole closer than these margins, you need a different plan or a different material, like plastic.
The 5-Step Drilling Sequence (And the Flip That Prevents Chips)
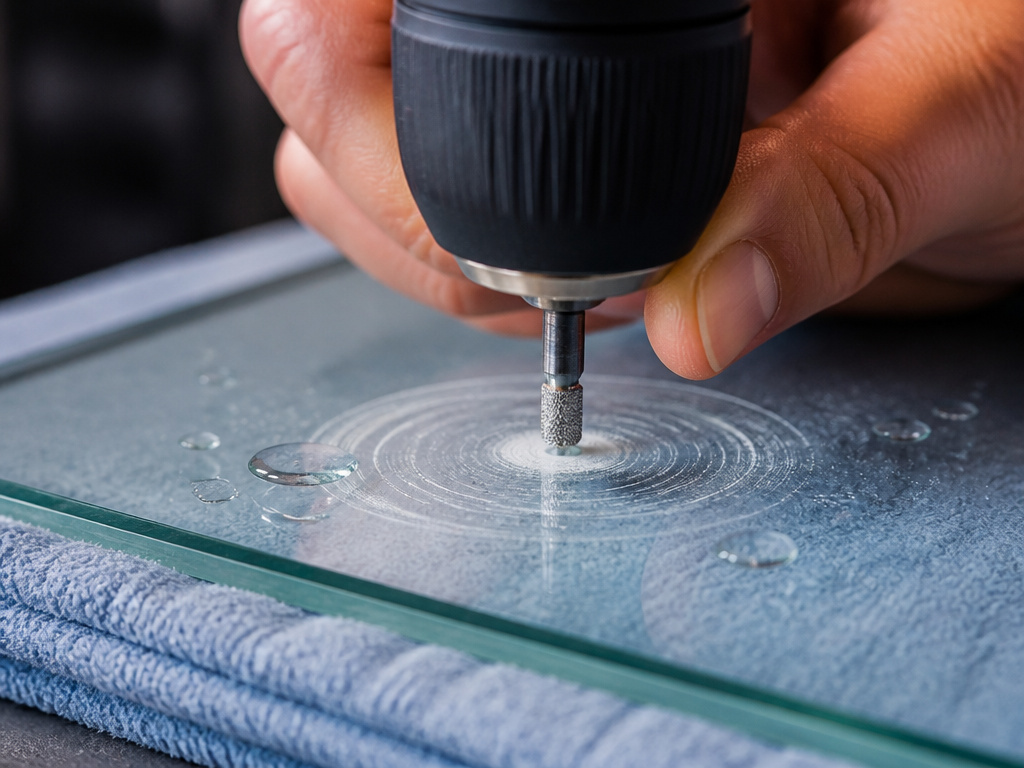 The process is a ritual of patience. Rushing any step converts a $5 piece of glass into trash.
1. Secure and Mark the Glass.
Place the glass on a completely flat, supportive surface. A scrap of plywood topped with a rubber pad or a folded towel works. For a bottle or glass jar, nest it in a vise padded with wood or rubber jaws, clamp the body, not the neck. Apply a small “X” of masking tape over your marked drill spot. This gives the bit initial traction and helps prevent skating.
2. Start the Pilot Hole.
Fit your smallest diamond or carbide bit (1/8″ or 3/32″). Set your drill to its lowest speed, around 400 RPM. Add a few drops of water or light oil to the tape. Hold the drill perfectly perpendicular. Apply the faintest pressure, let the bit’s weight and abrasion do the work. You are creating a dimple, not a hole. This step takes 30 seconds. Skip it, and the larger bit will dance across the surface and likely crack the glass.
3. Drill the Main Hole with Lubrication.
Switch to your final size bit. Flood the area with lubricant. Water is fine; a light oil like mineral oil creates less mess. Begin drilling at your low speed, maintaining perpendicular alignment. Use a pecking motion: drill for 3-4 seconds, lift slightly to let coolant flood in, drill again. This clears debris and keeps everything cool. The sound should be a quiet, gritty whisper, not a whine.
4. Flip and Finish from the Back.
When the bit is about three-quarters of the way through the glass, stop. This is critical. Flip the piece over. Locate the dimple now visible on the reverse side. Center your bit in that dimple and drill from the back. This technique prevents the “blow-out” fracture where the last unsupported layer of glass chips away into a ragged, uneven crater.
5. Deburr and Clean.
The hole will have a slight roughness. Use 600-grit wet/dry sandpaper wrapped around a dowel or a diamond needle file to gently smooth the edges. Rinse the piece thoroughly to remove all glass dust, which is sharp and abrasive. Dry it carefully.
Common mistake: Drilling straight through without flipping. The exit side will almost always chip, leaving a fracture line that can propagate days later. That chip also makes it impossible to get a clean seal if you’re installing a grommet or fastener.
What Breaks Glass: Heat, Pressure, and Bad Angles
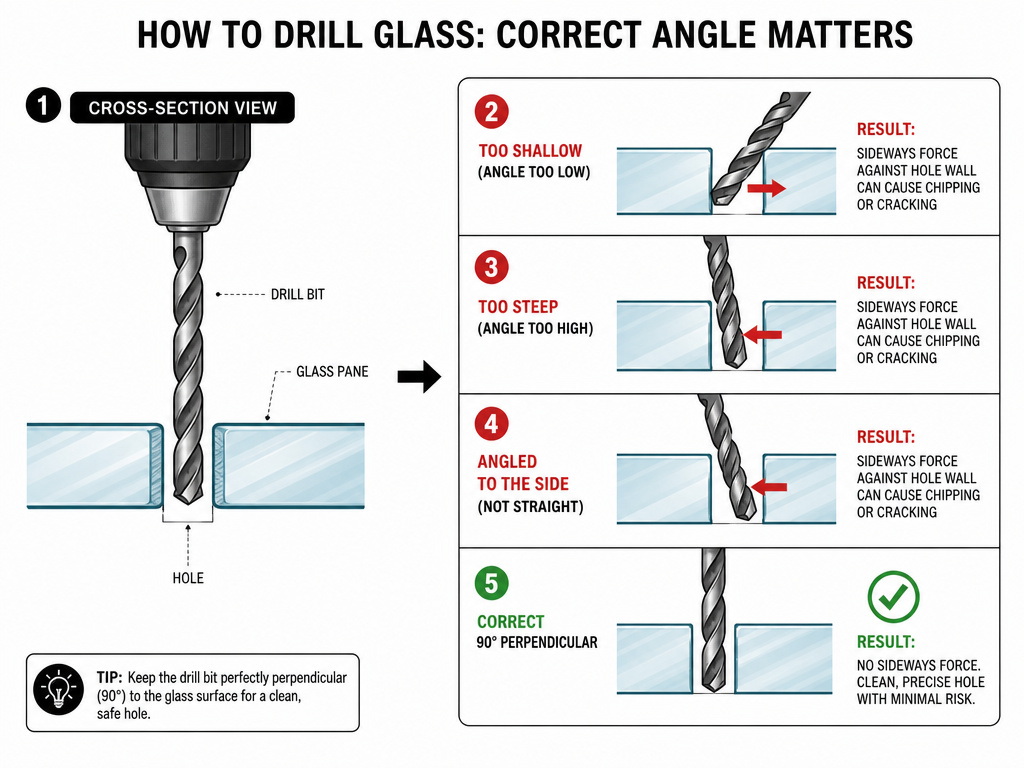 Understanding why glass cracks tells you how to avoid it. The enemy is heat. Friction from the drill bit heats the glass locally. Glass expands when heated. If one spot expands faster than the material around it, the differential stress creates a crack. Lubrication serves as a heat sink and extends bit life.
Excessive pressure is the second cause. You are grinding, not cutting. Pushing down increases friction (heat) and can cause the bit to grab and torque the glass, creating a shear crack. Let the tool work.
An off-angle drill creates an elliptical, stressed hole. The bit exerts sideways force against the walls of the hole. That side load is a vector for fracture. Use a drill stand if you have one. If drilling freehand, brace both wrists against the table.
If you see a crack start, stop immediately. The crack will propagate with any further vibration. You cannot fix it. The piece is lost. This is why you practice on a scrap piece from the glass shop first, always.
Tempered Glass: The One Type You Don’t Drill
This bears repeating because the consequence is injury. Tempered glass is prestressed. The surface is in compression, the core in tension. It’s like a spring under load.
Drilling through the compressed surface releases the tension in the core explosively. The entire pane disintegrates into thousands of pieces in a fraction of a second. It’s not a dramatic movie crack, it’s an instantaneous, violent pop. This isn’t a risk; it’s a certainty.
Industrial shops drill tempered glass by doing it before the tempering process. They follow the ASTM C-1048 rules precisely, then send the drilled pane through the furnace. You cannot replicate this at home. No drill bit, technique, or YouTube hack changes the material science. If you have tempered glass, you need a new pane.
When to Call a Pro: Micro-Holes and Complex Fabrication
The research on micro-hole drilling reveals the hard limits of the DIY method. A 2017 review in the journal Micromachines noted that mechanical drilling for holes smaller than 100 μm (0.1mm) is plagued by exit cracks and rough surfaces. Achieving a clean hole at that scale requires ultrasonic drilling, laser machining, or chemical etching, industrial processes.
Similarly, if your project requires notches, odd shapes, or holes in glass thinner than 3mm, a professional glass shop is your best bet. They have the CNC waterjets, diamond saws, and polishing equipment to do it cleanly. The cost is often lower than the sum of your ruined materials.
This is also true for drilling porcelain dinnerware or other ceramics, the principles are similar, but the material is even harder and more brittle.
Frequently Asked Questions
Can I use a regular drill bit on glass?
No. High-speed steel or masonry bits are designed to cut by shearing material. They will not bite into glass; they will skate, scratch, and generate immediate, fracture-causing heat. You must use a bit designed for abrasion, specifically a diamond-coated or carbide-tipped bit.
What is the best lubricant for drilling glass?
Water is perfectly adequate and readily available. It effectively cools the bit and glass. For slightly better performance and less splash, a light oil like mineral oil or even cutting oil used for metal can be used. The key is constant application to manage heat.
How can I tell if my glass is tempered?
Check the corners for a small, etched logo or marking, it often includes a “T” or “Temp.” Examine the edges: tempered glass edges are always smooth and polished, while annealed glass edges are usually rough or “seamed.” If you hold polarized sunglasses up to the glass and see dark, wavy lines, it’s likely tempered.
Why did my glass crack even though I was careful?
The most likely culprit is heat buildup from insufficient lubrication or too high a drill speed. The second is an unseen flaw or internal stress in the glass itself, especially if you were drilling close to an edge. Always drill a pilot hole, use plenty of coolant, and maintain a speed under 800 RPM.
Can I drill a hole in a glass bottle?
Yes. The process is the same, but securing the bottle is crucial. Use a vise padded with rubber or wood to hold the bottle horizontally. Fill the bottle with water to dampen vibration and help manage heat from the inside. Drill slowly, using the tape-and-pilot-hole method, and be prepared to flip it to finish the hole.
What do I do if the drill bit starts to smoke?
Stop immediately. Smoke means extreme friction and heat. You are either using no lubricant, too high a speed, or too much pressure. Let everything cool completely. Add more lubricant, reduce your speed further, and resume with even lighter pressure. A smoking bit is seconds away from cracking the glass.
The Bottom Line
Drilling glass is a test of patience, not strength. Success hinges on three things: the right abrasive bit, relentless lubrication, and a speed dial turned down low. Remember the minimum spacing rules, that 6mm edge buffer is what keeps a clean hole from becoming a crack.
For one simple hole in a picture frame or bottle, a carbide-tipped bit and a steady hand will get you there. For anything involving tempered glass, complex patterns, or hole in porcelain, the smart move is the phone call to your local glass shop. Their diamond saws and waterjets turn a risky afternoon into a five-minute job, and your piece arrives ready to install, not ready to explode.
