
Master How to Drill a Hole in Sea Glass With Our Pro Tips
This post contains affiliate links. As an Amazon Associate, we earn from qualifying purchases.
Drill a hole in sea glass by using a diamond-coated bit submerged in water, drilling from one side only two-thirds of the way through, then flipping the piece to complete the hole from the opposite side. The water must cover the glass by at least 1/16 inch, and you must drill in 15-second bursts to prevent heat cracks. Match the bit size to your finding: 1mm for earrings, 2mm for pendants, 4mm for thongs.
That two-side flip is the whole game. Get it wrong, and the back of the glass blows out into a jagged crater every time. The hole looks clean from the top, but the exit side is ruined.
What follows is the setup most guides skip, the exact drill rhythm that keeps the bit from glazing over, and the one material difference between dark amber glass and frosty white pieces that changes your mid-drill step.
Key Takeaways
- You must drill from both sides. Drilling straight through from one side always blows out the exit, shattering the glass.
- Use a diamond-coated drill bit and keep it submerged. Water isn’t just a coolant; it washes away glass dust that can clog the bit’s cutting surface.
- Drill in short, 15-second bursts, then lift to let water cool the hole. Pushing past this point heats the glass and cracks it from the inside.
- For dark glass, fill the partial hole with burr lube before flipping. For light glass, mark it with a pencil. This lets you see the target on the second side.
- Shells are a different beast. Drilling them requires a respiratory mask, shell dust can concentrate heavy metals and cause serious illness.
The One Drill Bit That Works (And Two That Don’t)
Forget standard twist bits or even masonry bits. They will skate, chatter, and snap. Sea glass is a form of hardened silica, and you need an abrasive tool, not a cutting one.
A diamond-coated drill bit is the only correct choice. The diamond grit is bonded to a steel shank, and it grinds a hole through abrasion. These bits are sold in specific millimeter sizes. A 1mm bit is for delicate earring wires. A 2mm bit handles most pendant jump rings. A 4mm bit is for thicker cord or leather.
Common mistake: Using a bench drill press for sea glass. The fixed, downward pressure is too blunt. It lacks the fingertip control needed to feel when the bit is about to break through, which almost guarantees a blow-out. Hold the drill in your hand.
You need a rotary tool like a Dremel or a flexible-shaft drill. The key is the collet, the chuck that holds the bit. Heavier 3mm shank bits are better than thin, straight shanks. They grip more securely and wobble less, which is the main cause of off-center holes and bit breakage.
| Drill Bit Type | Best For | Why It Fails on Sea Glass |
|---|---|---|
| Diamond-Coated | Sea glass, stone, ceramic, shells | The only correct choice. Abrades rather than cuts. |
| High-Speed Steel (HSS) | Wood, soft metals | The cutting edges dull instantly on glass and generate extreme heat. |
| Carbide Masonry | Brick, concrete | The tip is too aggressive and will shatter glass on contact. |
The other critical spec is speed, and here’s where common advice is backwards. You do not drill glass slowly. A tiny 2mm bit needs a high rotational speed, think 15,000 RPM or more on your rotary tool, to achieve an effective linear cutting speed. A large core drill spins slowly; a tiny point must spin fast to grind efficiently.
Tools and Setup You Cannot Skip
Your workspace is a wet one. This isn’t a dry drilling operation. Gather these items before you touch a piece of glass: * Rotary Tool (Dremel) with variable speed. * Diamond drill bits (1mm, 2mm, 4mm). * Small deep container (a plastic tub or tall Tupperware). * Piece of soft wood (pine or basswood, about 2×2 inches). * Water. * Safety glasses. * Permanent marker or pencil. * Burr lube or a pencil (for dark/light glass trick). * Respiratory mask (if drilling shells).
Set your wood block in the bottom of the container. This is your drilling platform and a stop-block to prevent you from drilling through the container itself. Fill with water until the water line is 1/2 inch above the wood. This depth is crucial, it ensures the glass and bit stay submerged even when you’re pressing down.
Mark your glass with a dot where you want the hole. Use a permanent marker for dark glass, a pencil for light. Don’t drill closer than 1/8 inch from any edge.
The Core Technique: Drilling from Two Sides
Place your marked glass on the wood block, ensuring it’s fully covered by at least 1/16 inch of water. With the drill OFF, lower the bit until it touches your mark. Check from the side to ensure the bit is perfectly vertical.
To drill a hole in sea glass, submerge the piece and drill at your mark in 15-second intervals, applying light pressure, until you have penetrated two-thirds of the material. Remove the glass, apply a visibility aid to the partial hole, flip it, re-submerge, and carefully drill from the opposite side until the two holes meet, creating a clean through-hole without exit blow-out.
Hold the glass firmly with your non-dominant hand, fingers clear of the bit path. Start the drill at a high speed. Begin drilling at a slight angle to create a starter dimple, then straighten the tool. Apply only the weight of the drill itself, no extra pressure.
Drill for 15 seconds. You’ll see a white slurry of glass dust swirl out. Stop, lift the bit completely out of the hole, and let the water flow in for a few seconds. This cools the glass and clears debris. Repeat this 15-second drill, 5-second pause rhythm.
Stop when you’re two-thirds of the way through. How do you know? The hole will look deep, and if you hold the glass to the light, you’ll see a bright spot getting thin. Do not drill until you see light through the other side.
Now, the flip. This is where dark and light glass diverge. * For dark glass (amber, green, blue): Dry the piece. Rub burr lube (a waxy lubricant) into the partial hole until it’s filled. This creates a visible, shiny target on the other side. * For light glass (frosty white, clear): Rub a pencil lead in the hole. The graphite will transfer a visible mark to the opposite side when you flip it.
Place the glass drilled-side down on the wood block. Find your burr-lube or pencil mark. This is your new target. Center the drill bit, check for vertical alignment, and repeat the 15-second drilling rhythm.
You’ll feel the moment the two holes connect, a slight give, sometimes a change in the drill’s sound. Ease up immediately. You now have a clean hole with neat edges on both sides.
Where This Goes Sideways: Pressure, Heat, and Shells
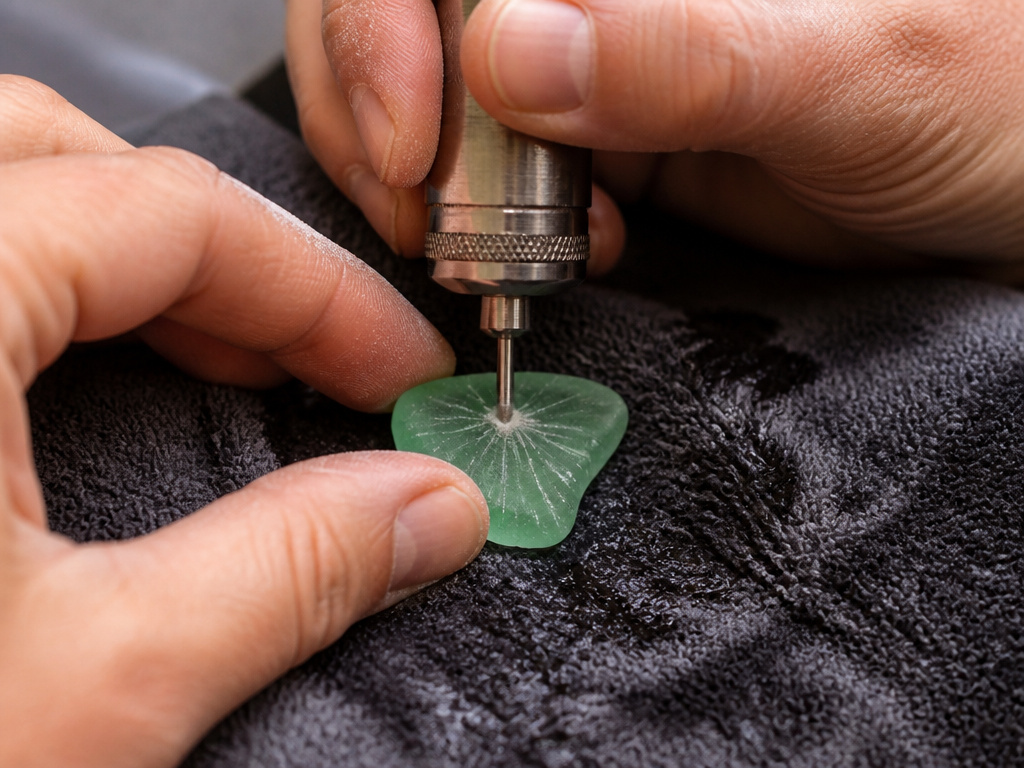
The two biggest failures are too much pressure and not enough cooling. If you lean on the drill, you stress the glass radially. It doesn’t crack at the hole; it fractures out from the center like a spiderweb, often after you think you’ve succeeded.
Heat is a silent killer. A dry bit or cloudy water can’t carry heat away. The glass expands microscopically, and when it cools, it contracts unevenly. This causes a hairline crack that might not show up until you’re stringing the pendant a week later.
What most people get wrong: Treating shells like glass. Diamond bits will drill shells, but shell dust is hazardous. Heavy metals from the ocean environment concentrate in shells, and inhaling the dust can cause serious respiratory illness. Always wear a respiratory mask when drilling shells, even underwater.
If you’re drilling a thicker piece for a jump ring, you may need a slightly larger hole to accommodate the ring’ curve. Test the ring on a scrap piece first. For standard 7mm jump rings, a 1.2mm or 1.5mm hole is usually sufficient.
Finishing and Next Steps
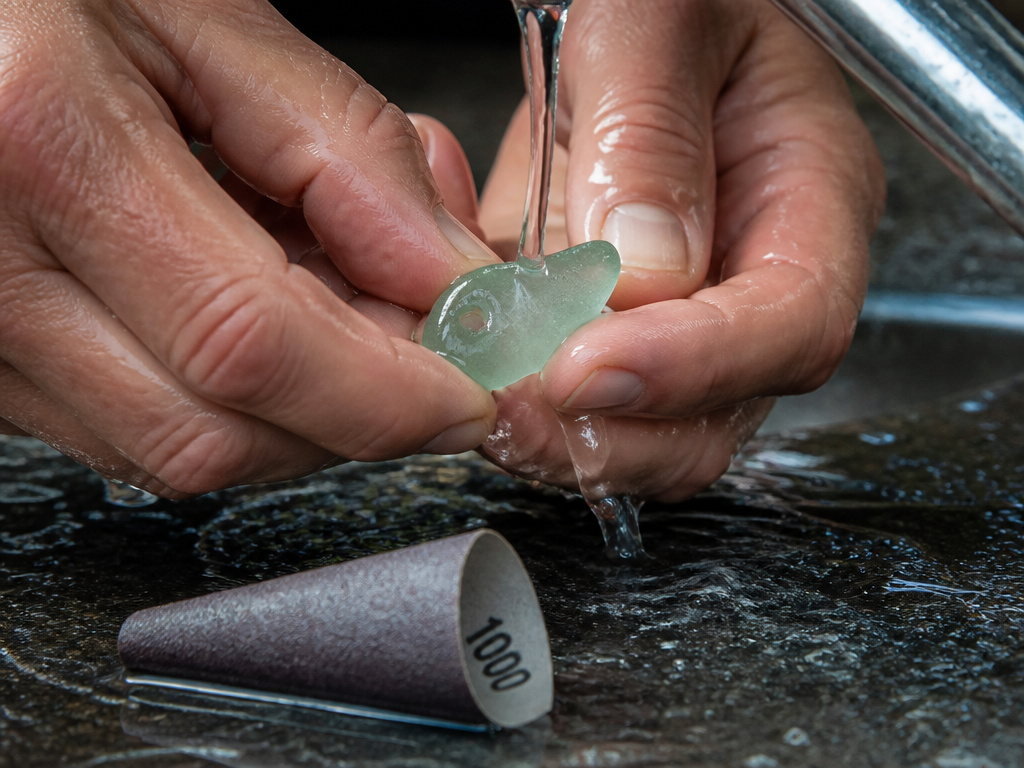
Once drilled, rinse the glass under running water to flush out any remaining grit. The hole edges will feel slightly rough. You can gently smooth them with 1000-grit wet/dry sandpaper used under water. A few light spins with the sandpaper rolled into a tiny cone is enough.
Your sea glass is now ready. Thread it on a necklace cord, attach a jump ring, or use it as a bead. The hole is clean, the glass is intact, and you didn’t breathe in shell dust.
Frequently Asked Questions
Can I use a regular cordless drill to drill sea glass?
You can, but it’s far from ideal. A cordless drill is heavy, lacks the high RPM of a rotary tool, and is difficult to control with one hand while holding the glass with the other. For consistent results, a Dremel-type rotary tool is the right tool for the job.
Why did my diamond drill bit stop cutting?
The bit is likely glazed over. This happens when it gets too hot, melting the glass dust which then fuses to the diamond grit. It can also occur if you don’t use water or apply too much pressure, preventing the bit from clearing debris. Try cleaning the bit by drilling lightly into a piece of soft brick or a dedicated diamond bit cleaning stone.
How long does it take to drill one hole?
It depends on thickness and bit size. A thin piece with a 2mm bit might take 60-90 seconds total (including the flip). A thicker, denser piece could take 3-4 minutes. The 15-second drilling interval is a safety timer, not a countdown to completion. Patience is part of the process.
What’s the best way to hold the sea glass while drilling?
Hold it firmly between your thumb and forefinger, pressed flat against the wood block underwater. Your grip should stabilize the glass but allow you to feel if it starts to spin or vibrate. Some people use a small piece of Blu-Tack on the wood to add grip.
My hole is crooked. Can I fix it?
Once a hole is drilled off-angle, you cannot straighten it. You can sometimes salvage the piece by drilling a second, correct hole in a different spot if the glass size allows. This is why the pre-drill alignment check, looking from the side with the bit touching the mark, is a step you never skip.
Before You Go
Drilling sea glass isn’t about power. It’s about precision, coolant, and the mandatory two-sided technique. The right tool is a high-speed rotary tool with a diamond bit, not a heavy drill press. Remember the 15-second rule to manage heat, and always treat shells with respiratory protection.
If you’re moving on to other brittle materials, the principles of water cooling and abrasive bits apply. The process for drilling porcelain on a china plate is nearly identical. For tougher, granular materials like stone, you’ll need even more patience and a steady feed rate, which we cover in our guide on drilling rock. And if your project calls for a large opening, the technique shifts entirely to using a hole saw with a different set of rules.
