
How Do You Drill a Hole in a Mirror Without Shattering It?
This post contains affiliate links. As an Amazon Associate, we earn from qualifying purchases.
To drill a hole in a mirror, you need a diamond-tipped or carbide-tipped drill bit, a variable-speed drill, and a continuous water spray for cooling. Secure the mirror, mark the spot with masking tape, and drill at low speed with steady pressure. The critical detail is leaving a minimum 1/8” clearance around any anchoring bolt or plumbing pipe to prevent the glass from cracking under stress.
That clearance rule is the line between a clean install and a pile of glass shards. It’s not about the hole itself; it’s about the space you leave around whatever passes through it. Glass and metal expand at different rates with temperature changes. If they touch, the stress transfers directly into the glass.
What follows: the right bit, the foolproof setup, the two screw specs that contradict each other, and the one type of mirror you should never drill.
Key Takeaways
- Toughened glass will shatter. If your mirror is tempered, drilling is impossible. Use heavy-duty adhesive tape instead.
- Cooling is non-negotiable. A continuous spray of water prevents the glass from overheating and cracking. A dry bit will glaze over and stop cutting in seconds.
- Leave 1/8” of space. This is the minimum clearance required around any bolt or pipe passing through the hole to account for differential expansion.
- Screw protrusion isn’t standardized. One manufacturer says 7mm, another says 3mm. You must check your mirror’s manual.
- Use an RCD. When drilling in a bathroom or near any electrical source, plug your drill into a Residual Current Device. It cuts power in milliseconds if you hit a live wire.
The Tools You Actually Need (Not the Marketing List)
You can find a dozen lists of “must-have” tools. Half the items are for show. Here are the four that matter, and what happens if you skip one.
A diamond-tipped drill bit is the only bit that works consistently. Carbide-tipped bits for glass exist, but they dull after two or three holes in mirror glass. The diamond grit is bonded to the tip and grinds through the glass instead of cutting it. A 1/4-inch bit covers most standard mirror mounting screws.
A variable-speed drill set to its lowest setting. A hammer drill will destroy the mirror. You need pure rotary action, and you need to control it. Start at 500 RPM if your drill has a setting. If it only has a trigger, you feather it.
Masking tape in a wide roll. It does three jobs: it prevents the drill bit from skating on the slick surface, it reduces chipping on the backside as the bit exits, and it contains the slurry of glass and water.
A water spray bottle with a continuous mist setting. A squirt bottle you have to stop and pump is useless. You need one hand on the drill and the other spraying a steady stream onto the bit. The water cools the glass and bit, and it flushes away glass dust to keep the bit cutting.
Where this goes sideways: Using a standard masonry or wood drill bit. The cutting edge will skate, then grab, and the torque will snap a corner off the mirror before you even make a mark.
The One Upgrade Worth the Money
If you’re drilling more than two holes, buy a dedicated diamond core bit set. These are hollow cylinders with diamond grit on the rim. They cut a perfect, clean hole with almost no chipping on the back side. A 6mm core bit is the standard for most European mirror fixings. The trade-off is cost, a good set runs 3-4 times the price of a standard diamond tip bit, and they require even more careful cooling.
The 1/8″ Clearance Rule That Prevents Cracks
Drill the hole too tight around the screw or bolt, and the mirror will crack. It might not happen today. It could be six months from now when the room temperature swings 30 degrees and the metal expands just enough to press against the glass.
The Unique Design Solutions Mirror Installation Guidelines specify a minimum 1/8” clearance around any anchoring bolt, plumbing pipe, or other dissimilar material passing through the glass. That’s 3.175 millimeters. This gap prevents stress transfer from the different expansion rates of glass and metal.
| Component Passing Through Hole | Minimum Clearance | What Happens Without It |
|---|---|---|
| Mounting Screw or Bolt | 1/8″ (3.175mm) | Stress cracks radiate from the hole within a year. |
| Plumbing Pipe (e.g., for LED wiring) | 1/8″ (3.175mm) | Pipe movement from water hammer or thermal shift cracks the glass. |
| Cable Grommet or Conduit | 1/8″ (3.175mm) | Compression of the grommet over time transfers pressure to the glass edge. |
This isn’t a suggestion. It’s the difference between a permanent install and a call-back. When you mark your hole, add the diameter of your screw or pipe, then add 1/8 inch to each side. That’s your final drill bit size.
Drilling holes before installing tile is the cleanest method. Drilling from both sides of the glass, if the hole will be visible after installation, produces a cleaner finish with less chipping on the exit side. Using a new diamond coring bit for large holes or a spade bit for small holes with a diamond tip made for glass drilling will give the best results. Lubricating the bit and tile surface with a continuous spray of oil/water mix will prolong the life of bits and provide a better-finished edge.
The blockquote above is from an OEM installation guide. Note the “oil/water mix” detail, a 50/50 blend of water and cutting oil works better than water alone, especially for core bits. It reduces friction and keeps the diamond matrix from loading up with glass dust.
Step-by-Step: Drilling the Hole Without Breaking the Mirror
Step 1: Secure and Mark the Mirror
Lay the mirror face-down on a completely flat, padded surface. A sheet of plywood over sawhorses works. Use soft wood blocks or folded towels under each corner to keep it stable. Never clamp the glass directly, you’ll pinch it and cause a stress fracture.
Place two strips of masking tape in a cross over your drill point. Mark the exact center of the cross with a permanent marker. The tape gives the bit something to bite into immediately.
Step 2: Set Up for Cooling
Fill your spray bottle with water, or a 50/50 water and cutting oil mix. Have a second person ready if possible, their only job is to spray the bit continuously while you drill. If you’re alone, position the bottle so you can press the trigger with your free hand or rig a slow drip from a bottle above the work.
Step 3: Drill the Hole
Set your drill to its lowest speed setting. No hammer action. Position the bit perpendicular to the glass. Start with very light pressure, just enough to keep the bit from skating. Let the diamond grit do the work.
Increase pressure slightly as the bit begins to cut. The sound should be a steady, gritty hum, not a high-pitched whine. The moment you see or smell smoke, you’ve lost coolant and the glass is overheating. Stop immediately, spray more, and let it cool.
Common mistake: Pushing through the last millimeter as the bit exits. That’s when back-side chipping happens. Reduce pressure to almost zero for the final 1/16 inch. Let the bit’s weight finish the cut.
Step 4: Clean and Deburr
Once through, spray the hole to clear out glass slurry. Peel off the tape. The edges will be sharp. Use a diamond hand pad or a ceramic dressing stone to gently smooth the rim. Don’t use a metal file, it can create micro-cracks.
The Two Screw Specs Nobody Agrees On
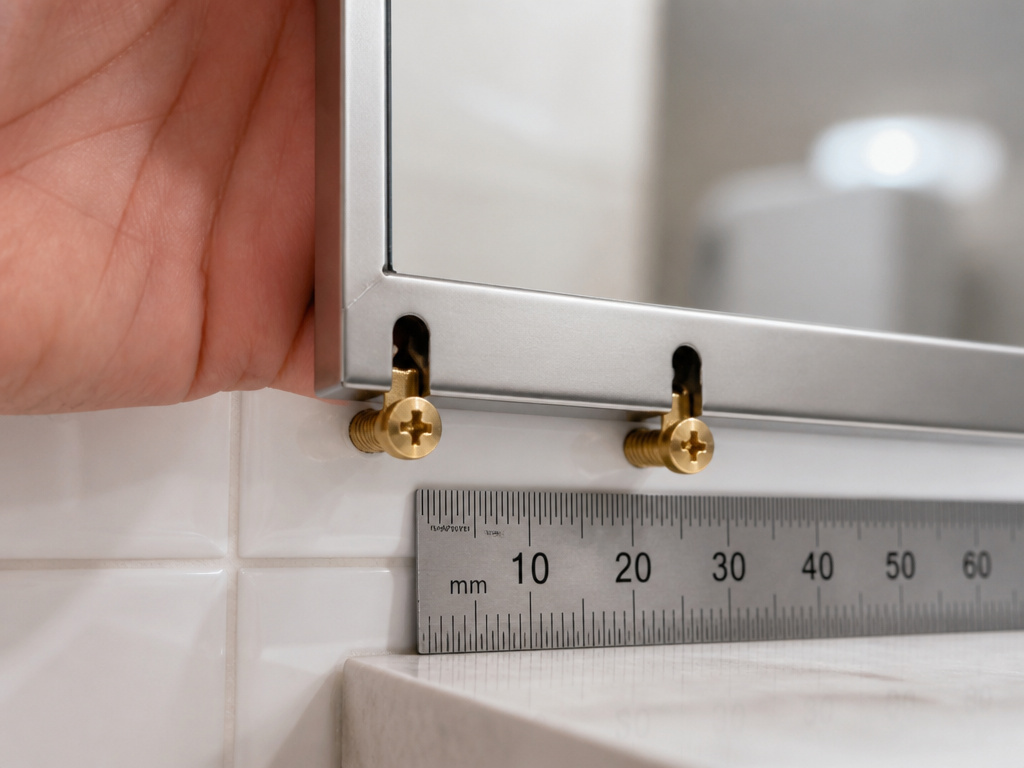
You drilled the hole. Now how far do the screws stick out of the wall to hang the mirror?
Check your mirror’s manual. There is no universal standard.
The Roper Rhodes LED Illuminated Mirror instructions say to leave screw heads approximately 7mm proud of the wall. The Better Bathrooms WALL MOUNTED LED MIRROR manual says protruding by approximately 3mm. That’s a 4mm difference, enough for a mirror to not hang flush or to not catch the keyhole slot at all.
| Mirror Brand / Model | Screw Protrusion Spec | Notes |
|---|---|---|
| Roper Rhodes LED Illuminated | 7mm | Common for heavier, framed mirrors with deep keyhole slots. |
| Better Bathrooms Demister Model | 3mm | Typical for lighter, frameless mirrors with shallow brackets. |
| Generic Frameless Bathroom Mirror | 5mm (avg) | When in doubt, start at 5mm and test-fit before fully tightening. |
If you’ve lost the manual, start with a 5mm protrusion. Hang the mirror. If it wobbles or doesn’t seat, the screws are too short. If the mirror won’t slide down onto the screws or sits too far from the wall, they’re too long.
When You Absolutely Should Not Drill
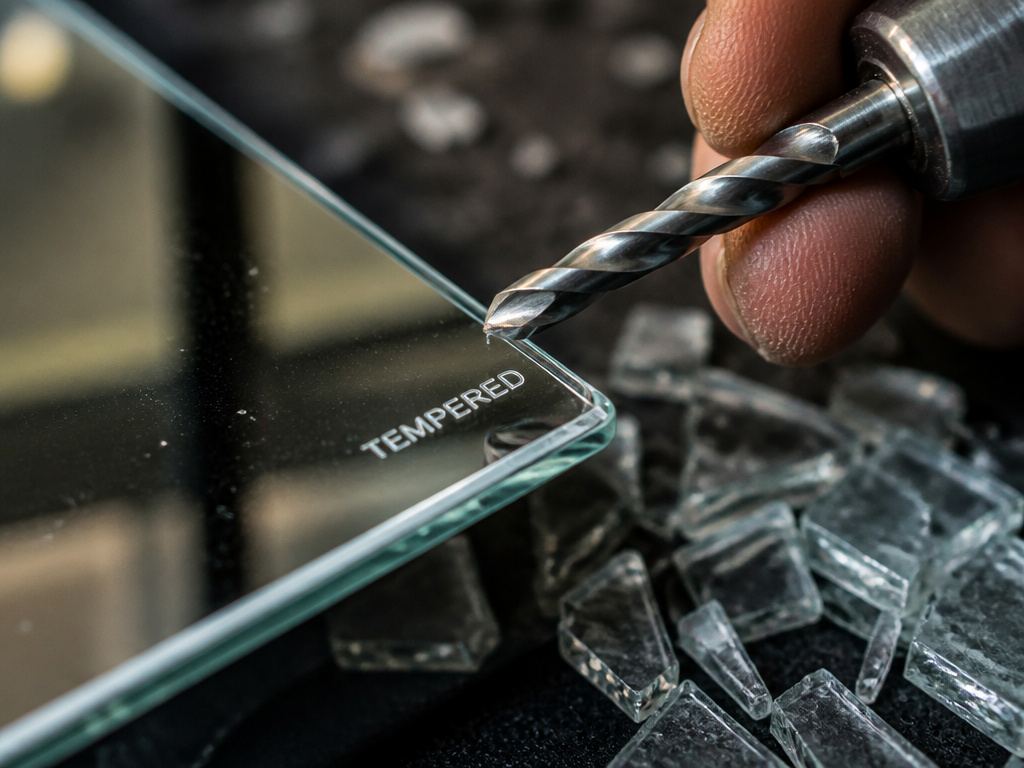
Toughened (Tempered) Glass
This is the non-negotiable stop sign. Toughened glass will not drill. The tempering process puts the outer surface into compression and the core into tension. Drilling through that skin releases the tension catastrophically, the entire pane shatters into thousands of small, blunt pieces.
How do you know? Look for a small etching in one corner, usually a “TEMPERED” stamp or a CPSC safety label. If it’s a bathroom mirror or a large wall mirror purchased after 1970, assume it’s tempered. Your only option is adhesive. Use a heavy-duty double-sided mirror tape like 3M VHB. Clean both surfaces with alcohol, apply the tape in a cross pattern, and press firmly for 30 seconds.
Tiled Walls and Plasterboard
The wall material changes the rules.
For tiled walls, you must drill through the tile first. Use a ceramic tile drill bit. The HiB installation guide states wall plugs should be inserted below the tile surface to avoid cracking the tile when you tighten the screw. Drill your hole, insert the plug, then use a long screw that passes through the plug and grips the wall behind.
For plasterboard (drywall), standard wall plugs will pull out under the mirror’s weight. You need specialist fixings, hollow-wall anchors like toggle bolts or snap toggles. The plasterboard alone cannot hold the shear weight; the anchor must spread the load across the back of the board.
Bathroom Electrical Safety: The RCD Mandate
This isn’t a best practice. It’s in the manufacturer’s installation warnings for a reason. The HiB product instructions and the Croydex mirror guide both explicitly advise using a Residual Current Device (RCD) with any power tool during installation.
Bathroom walls often have hidden cables for lights, fans, and outlets. An RCD plugs between your drill and the wall outlet. If the drill bit contacts a live wire, the RCD cuts power in under 30 milliseconds, fast enough to prevent a lethal shock.
Before you start: Assume every wall has a live wire behind it. Plug your drill into an RCD. Wear safety glasses to protect against glass chips and dust. If you’re drilling into a tiled surface, secure the tile with a piece of scrap wood behind it to prevent blowout.
You can buy a plug-in RCD adapter at any hardware store. Not using one because “I know where the wires are” is how DIY projects turn into emergency room visits.
Frequently Asked Questions
Can you drill a hole in a mirror without a diamond bit?
You might get one hole with a carbide-tipped masonry bit if you’re lucky and keep it soaked in water. The carbide is harder than glass but dulls quickly. For more than one hole or a clean result, a diamond bit is the only reliable choice. A diamond grit hole saw is even better for larger diameters.
What is the best drill speed for mirror glass?
Start between 300-500 RPM. High speed generates heat too quickly, even with coolant. If your drill doesn’t have a speed setting, use the variable trigger and barely depress it. The bit should turn slowly enough that you can almost count the revolutions.
How do you keep the back of the mirror from chipping?
The tape on the front helps, but the real trick is support. Place the mirror over a scrap piece of wood, so the drill point is directly above it. The wood supports the glass fibers as the bit exits, preventing a blowout. This is the same principle used for drilling a hole in a glass jar or other hollow glass objects.
Can you drill a mirror that’s already hanging on the wall?
No. The vibration and pressure will almost certainly crack it. The mirror must be removed, laid flat, and properly supported. Any attempt to drill a vertical, wall-mounted mirror is guaranteed to fail.
What’s the difference between drilling a mirror and drilling acrylic?
The mechanics are opposite. For acrylic sheet, you want a sharp, high-speed steel bit and high drill speed with minimal pressure to melt through the plastic cleanly. For glass, you want a blunt, abrasive bit and low speed to grind without heat. Using a glass bit on acrylic will gum it up; using an acrylic technique on glass will shatter it. The process for drilling acrylic without cracking is a different skill set.
The Bottom Line
Drilling a mirror comes down to three things: the right bit, constant cooling, and that 1/8-inch clearance. Get the first two wrong and you break the mirror today. Get the clearance wrong and it cracks in a year.
Skip the drill entirely if the glass is tempered. Use 3M VHB tape instead. For tiled walls, set the plug below the tile. For plasterboard, use a toggle bolt. And always, always plug the drill into an RCD when working in a bathroom.
The method is the same whether you’re installing a simple bathroom mirror or drilling delicate glass pieces for a craft project, grind, don’t cut, and keep it cool. Your mirror isn’t just glass; it’s under tension. Respect that, and the hole will be clean.
