
What Is a Cordless Drill? How They Work & When to Use Them
This post contains affiliate links. As an Amazon Associate, we earn from qualifying purchases.
A cordless drill is a battery-powered rotary tool that spins a drill bit or driver bit to bore holes or drive fasteners. It combines a motor, a rechargeable battery, a gearbox, and a keyless chuck into a single handheld unit. The clutch is the feature that separates it from an impact driver, letting you dial in torque to avoid stripping screws. For most household tasks, a 12V or 18V drill with a clutch and two-speed gearbox is the default pick.
That clutch is what you reach for when driving a screw into pine. You set it to 8, the screw seats flush, and the mechanism inside the drill head disengages with a loud ratcheting click before the screw head buries itself in the wood. Skip the clutch setting and the bit will spin in the screw head, chewing up the slot.
What follows is a breakdown of the parts, the numbers that matter, and the one mistake that burns out motors on cordless tools that were never meant for the job.
Key Takeaways
- The clutch is the drill’s most important feature for driving screws; it prevents over-torquing and stripping.
- Voltage (V) indicates potential power, but amp-hours (Ah) determine runtime; a 20V 2.0Ah battery drains twice as fast as a 20V 4.0Ah.
- A two-speed gearbox gives you high speed for drilling (0-1,500+ RPM) and low speed for high-torque screw driving.
- Using a drill to drive large screws without pre-drilling causes camming out, which ruins screw heads and strains the motor.
- For drilling into masonry or driving lag bolts, you need an impact driver; a standard drill will stall or burn out.
The Three Main Parts That Define a Cordless Drill
You can ignore most of the marketing. Three components decide what a cordless drill can actually do: the chuck, the clutch, and the gear switch.
The clutch collar adjusts output torque for screwdriving. When the drive torque exceeds the preset limit, a spring-loaded plate lets steel balls ratchet over notches in a ring gear, disengaging the drive. This stops the bit from turning and prevents overdriving or stripping the fastener. (IEC 62841-2-1:2017+AMD1:2021 CSV, the international standard for hand-held drills, details this mechanism.)
The keyless chuck is the three-jaw clamp at the front. Turn the sleeve clockwise to tighten it onto a bit’s shank. A 1/2-inch capacity is standard for general use, holding bits up to 13mm in diameter. The chuck transfers all the drill’s torque to the bit, so if it’s not tight, the bit will spin inside it and round off the shank.
The clutch collar rings the chuck. It has numbered settings (1-20+) and a drill bit symbol. On a setting like “5,” the drill will deliver a set amount of torque, then slip with a rapid clicking sound. This is the clutch protecting your screw and your workpiece. Turn the collar to the drill symbol, and the clutch locks out, delivering maximum torque for drilling holes.
The gear switch, usually a sliding switch near the trigger, toggles between two internal gear ranges. Low gear (1) provides high torque at lower speeds (0-400 RPM), perfect for driving screws or drilling large holes. High gear (2) provides high speed at lower torque (0-1,500+ RPM), ideal for drilling smaller holes or with spade bits.
What Happens When You Skip the Clutch?
You set the collar to the drill icon and drive a cabinet screw. The drill doesn’t slip. It drives the screw until the head is flush, then keeps going. The bit either cams out, chewing a crater in the screw head, or it drives the screw straight through the back of your workpiece. The motor strains, the battery drains fast, and you’re left with a ruined project.
Common mistake: Using the drill setting for all screwdriving. The clutch exists to match torque to the fastener. A #8 wood screw in pine needs setting 8-10; a drywall screw needs 4-6. Find the setting by starting low and increasing until the screw seats and the clutch clicks.
How a Cordless Drill Actually Works (The Short Version)
Power flows from the battery, through a trigger-controlled circuit, to a motor that spins a set of planetary gears. Those gears trade speed for torque before turning the chuck.
Press the trigger. A circuit board regulates voltage from the battery pack to the motor. The further you pull, the faster it spins. The forward/reverse switch beside the trigger changes the motor’s polarity, reversing rotation.
The motor shaft connects to a planetary gearbox. Imagine a central “sun” gear turning three “planet” gears inside a stationary outer “ring” gear. The planet gears turn a carrier, which becomes the output. This first stage reduces speed and increases torque. That output feeds into a second, identical planetary stage. The gear switch physically moves the ring gear in the second stage. In high gear, it locks the planets to the ring, bypassing the second stage for more speed. In low gear, it locks the ring stationary, engaging the second stage for more torque.
Finally, the output shaft turns the chuck. When the clutch is engaged (any numbered setting), a spring-loaded plate pushes steel balls into notches on a ring gear. If the torque at the chuck exceeds the spring pressure, the balls ride up and out of the notches, letting the gear spin freely—that’s the ratcheting click. The bit stops, but the motor doesn’t stall.
Cordless Drill vs. Impact Driver: The Torque War You Can’t Win
This is the most common point of confusion. A drill applies constant, rotating torque. An impact driver delivers sudden, concussive bursts of rotational force.
| Feature | Cordless Drill | Impact Driver |
|---|---|---|
| Primary Use | Drilling holes, driving small-to-medium screws with precision | Driving many large screws or bolts quickly, especially into hard materials |
| Torque Delivery | Constant, smooth rotation | High-torque, concussive impacts (hammering action) |
| Chuck | Keyless, 3-jaw (accepts round-shank bits) | Hex collet (accepts only 1/4″ hex-shank bits) |
| Clutch | Yes, adjustable to prevent over-driving | No; relies on impacts to drive until seated |
| Noise | Moderate motor whine | Loud, rapid “rattling” when impacting |
| Best For | Pilot holes, cabinet installation, delicate work, mixing | Deck building, framing, lag bolts, long screws |
An impact driver is built for brute force. It has a spring-loaded hammer and anvil inside. When the motor meets resistance, the hammer cocks back and slams into the anvil, delivering a burst of rotational impact. This lets it drive a 3-inch screw into a stud without a pilot hole. It also means it has no clutch—it will bury any screw you put in it.
A drill is the wrong tool for that job. The constant torque will either stall the motor or cause the bit to cam out of the screw head, stripping it. The impact driver is the specialist for high-torque driving; the drill is the generalist for precise hole-making and controlled fastening.
How to Choose the Right Cordless Drill for Your Job
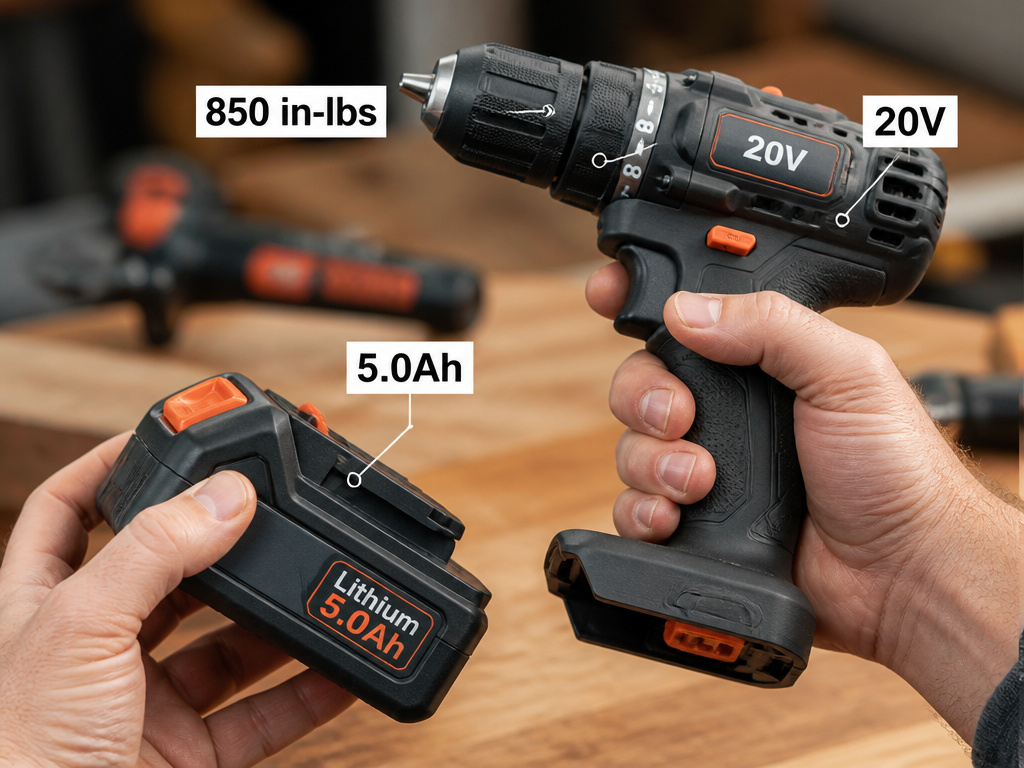 The specs tell the story. Ignore the peak horsepower claims and look at three numbers: voltage, amp-hours, and torque.
Voltage (V) is the potential power. Common ratings are 12V, 18V/20V Max, and 24V. Higher voltage generally means a more powerful motor that won’t bog down under load. For a homeowner, an 18V/20V Max system like the DeWalt DCD800 or Milwaukee M18 Fuel is the sweet spot. A 12V drill, like the Milwaukee M12, is lighter and perfect for overhead work or tight spaces, but it will struggle with dense hardwoods or large auger bits.
Amp-hours (Ah) is the battery’s fuel tank. A 2.0Ah battery might run a drill for 30 minutes of continuous use; a 5.0Ah battery might last over two hours. It’s about runtime, not raw power. A 20V 2.0Ah battery will drive the same number of screws as a 20V 5.0Ah battery—it will just need recharging five times sooner.
Torque, measured in Newton-meters (Nm) or inch-pounds (in-lbs), is twisting force. The POWERSMART PS76405 manual lists a torque force of 45 Nm. The BRUSHLESS DRILL/DRIVER MODEL #KDD 124B-03 specs show 850 in-lbs (about 96 Nm). More torque means easier screw driving and less stall in dense material.
| Job Type | Recommended Voltage | Key Feature | Avoid | | :— | :— | :— | | Light DIY (IKEA furniture, pictures) | 12V | Compact, lightweight | Underpowered 8V models | | General Home & Workshop | 18V/20V Max | 2-speed gearbox, adjustable clutch | Drills without a clutch | | Heavy Construction (framing, decks) | 18V/20V Max Brushless | High torque (60+ Nm), brushless motor | Basic brushed motors | | Continuous Professional Use | 18V/20V Max or 24V | Brushless motor, 5.0Ah+ battery | Small battery packs (≤2.0Ah) |
Where this goes sideways: Buying a drill based on voltage alone. A cheap 20V drill with a brushed motor and a 1.5Ah battery will be out-performed by a premium 12V brushless drill with a 4.0Ah pack. The motor technology and battery capacity matter more than the number on the side.
Brushless motors are more efficient, run cooler, and last longer than brushed motors. They’re worth the upgrade if you use the drill more than a few times a year. For a deeper dive, our guide on brushless motor technology explains why.
The Step-by-Step Guide to Using a Cordless Drill Safely
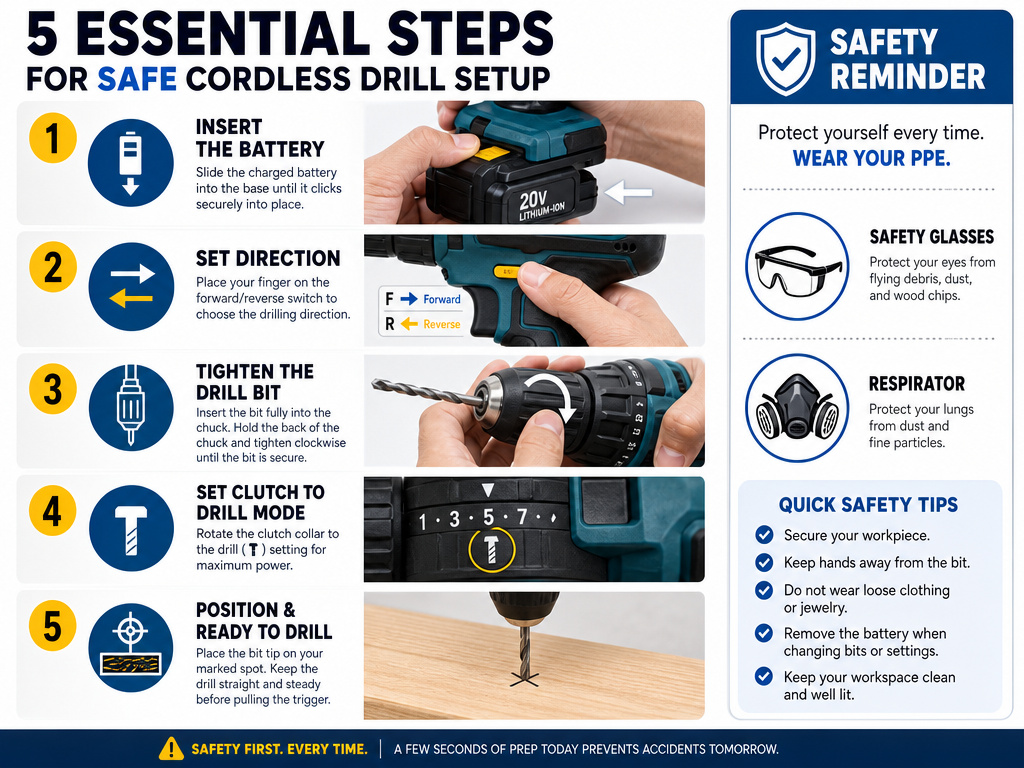 Before you touch the trigger, run through this list. It takes two minutes and prevents the most common injuries.
- Insert the battery. Make sure it clicks and is fully seated. A loose battery can arc and damage the contacts.
- Select the direction. The switch above the trigger has three positions: forward (clockwise), center (lock), and reverse (counter-clockwise). For drilling and driving, set it to forward.
- Insert and tighten the bit. Hold the chuck stationary with one hand and rotate the sleeve clockwise until the jaws grip the bit tightly. Give it a final firm twist by hand—do not use the drill’s power to tighten it.
- Set the clutch and gear. For driving screws, start with a mid-range clutch setting (8-10) and low gear. For drilling, set the clutch collar to the drill symbol and use high gear for small bits, low gear for large bits.
- Position and start slow. Place the bit tip where you want it. Pull the trigger gently to start the rotation, then increase speed. Let the bit do the work; don’t force it.
Before you start: Always wear ANSI Z87.1-rated safety glasses. Drilling creates fine debris that can cause permanent eye injury. If you’re creating dust, use a NIOSH-approved respirator. Tie back long hair, remove loose jewelry, and don’t wear gloves that could get caught in the chuck.
For a complete walkthrough of basic drill operation, including how to drill a straight hole and countersink a screw, check our dedicated guide.
What Do All Those Other Specs and Symbols Mean?
The manual is full of icons and ratings. Here’s the translation.
- No-load Speed (RPM): How fast the chuck spins with nothing attached. A range like “0-400 / 0-1,600 RPM” shows the two gear ranges. Higher RPM is for drilling; lower RPM is for driving.
- Chuck Capacity: The maximum diameter bit shank the chuck can hold. 1/2″ (13mm) is standard.
- Battery Charge Time: How long from empty to full. A one-hour charger is typical.
- Weight: Includes the battery. A lighter drill (under 3.5 lbs) causes less fatigue.
- LED Work Light: A small light near the chuck that illuminates your work surface. It’s not a flashlight, but it helps in dim areas.
- Symbols: A square with a circle inside means “double insulated.” A hammer icon means “impact driver,” not “hammer drill.” A battery with an arrow means “remove battery before servicing.”
The international standard IEC 62841-2-1 governs safety and performance for hand-held drills. Compliance means the tool has been tested for electrical safety, mechanical strength, and vibration levels. If you’re comparing professional models, this is the standard they meet.
Frequently Asked Questions
What’s the difference between a drill and a hammer drill?
Standard drill only spins. A hammer drill (also called an impact drill) pulses forward rapidly while spinning, chipping away at masonry. It’s for concrete, brick, and stone. Using a standard drill on masonry will dull the bit and overheat the motor.
Can I use my cordless drill as a screwdriver?
Yes, that’s one of its primary functions. Use a driver bit (Phillips, square, Torx) in the chuck, set the clutch to a low number, and use the low-speed gear. The clutch prevents over-tightening. For many small screws, a dedicated cordless screwdriver is lighter and more precise.
How long does a cordless drill battery last?
Runtime depends on the battery’s amp-hour (Ah) rating and the task. Drilling a 1/2″ hole in dense wood drains a 2.0Ah battery in 15-20 minutes of continuous load. Driving dozens of 3-inch deck screws might take 30 minutes. For longer runtime, buy a spare higher-Ah battery.
What does the “20V Max” label mean?
It’s a marketing term for the initial, no-load voltage of an 18V nominal battery system. Under load, these batteries operate at 18V. It’s not a lie, but it’s not a direct comparison to true 20V systems. When comparing, look at torque (Nm) and amp-hours (Ah) for real performance.
Is a cordless drill or a corded drill better?
Cordless offers portability and convenience. Corded delivers unlimited runtime and consistent, maximum power. For a workshop with outlets, a corded drill is cheaper and more powerful. For jobs around the house, yard, or a site without power, cordless wins. Our cordless vs corded comparison breaks it down.
What maintenance does a cordless drill need?
Keep the air vents clean of dust. Don’t drop it. Store batteries at room temperature. Every few months, open the chuck fully and blow out metal shavings with compressed air. If the chuck starts wobbling, replace it—a worn chuck ruins drill bits and makes holes oversized.
The Bottom Line
A cordless drill is the anchor of any toolbox because it does two jobs well: it makes holes and drives screws with control. The clutch is what makes it a screwdriver and not just a spinner. Ignore the big voltage number on the box and look for a model with a solid clutch, a two-speed gearbox, and a brushless motor if your budget allows.
For 90% of home projects, an 18V/20V Max drill driver from a major brand will handle everything from assembling furniture to building a shed. Save the impact driver for the deck and the lag bolts.
