
How to Cut Straight with a Circular Saw: 5 Proven Techniques
This post contains affiliate links. As an Amazon Associate, we earn from qualifying purchases.
Cutting straight with a circular saw requires three things: a stable workpiece, a precise guide, and the correct blade set to a shallow depth. The guide, a speed square, clamping straight edge, or homemade jig, is what keeps the saw’s shoe on track, not your hands. The blade should protrude only about a quarter-inch below the material, and you must cut on the waste side of your marked line.
Most people get this wrong because they try to steer the saw freehand while staring at the blade. The blade spins at 5000 RPM. Your eyes can’t track it.
Your job is to watch the shoe, the flat metal base, and keep it glued to your guide. If the shoe wanders, the cut wanders. Every time.
This guide covers the five practical methods for a straight cut, why blade choice matters more than saw power, how to position your body to avoid fatigue, and what to do when the saw starts veering. It also explains the single maintenance check that prevents crooked cuts before you even start.
Key Takeaways
- The saw’s shoe, not the blade, is your reference point. Keep it pressed firmly against your guide throughout the cut.
- Set the blade depth to protrude only 1/4 inch below the workpiece. Too deep increases kickback risk and tear-out; too shallow won’t cut through.
- Always cut on the waste side of your marked line. The blade’s thickness (kerf) removes material; cutting directly on the line yields a piece that’s slightly undersized.
- Use a 40-tooth or higher carbide-tipped blade for clean cuts on plywood, melamine, or hardwoods. A 24-tooth framing blade is for rough construction only.
- If the saw begins to veer off course, stop immediately. Back out, realign, and start a new cut. Trying to steer it back mid-cut leaves a visible dip in the edge.
Before You Start:
Before you start: A circular saw blade rotates upwards at high speed, throwing debris toward your face. Safety goggles are mandatory, regular glasses won’t stop a wood chip traveling at 100 feet per second. The saw can also kick back if the blade binds, which happens when you force the cut or hit a hidden nail. Keep your body offset from the blade path and clamp the workpiece so it cannot move. Unplug the saw before any blade change or adjustment.
The Five Proven Ways to Make a Straight Cut
You don’t need a track saw. A standard circular saw can produce cabinet-grade cuts if you use one of these five guides. Each has a specific use case and a common mistake to avoid.
1. Speed Square for Crosscuts
A DeWalt speed square or similar metal triangle is the fastest guide for cutting boards to length. Hook the lip over the edge of the board, align the blade with your mark, and run the saw’s shoe along the square’s body.
The mistake: placing the square on the wrong side of the line. The saw’s shoe is offset from the blade. If you align the square with the cut line, the blade will cut into your good piece. Position the square so the blade cuts on the waste side. Practice on scrap first.
2. Clamping Straight Edge for Rip Cuts
A Bora clamping guide or any straight piece of plywood clamped to the workpiece acts as a fence for long rip cuts. This is essential for cutting sheet goods like plywood.
I used a warped 2×4 as a straight edge on a maple plywood panel once. The cut followed the warp, leaving a curve that ruined the cabinet side. Now I only use factory-edged plywood or a verified metal guide for rips. The clamp pressure must be even along the entire length; a loose middle section lets the saw drift.
3. Homemade Plywood Jig
Cut a strip of plywood with one perfectly straight edge using a table saw or the clamping guide method above. Attach it to a wider base, creating a custom guide that the saw’s shoe rides against. This is a permanent solution for repeated cuts of the same width.
Build it once. It saves measuring time on every future project.
4. Commercial Track System (Kreg Accu-Cut)
Dedicated tracks like the Kreg Accu-Cut clamp to the workpiece and have a channel that captures the saw’s shoe. They are the most accurate method for sheet materials and eliminate offset calculations.
They’re not cheap. But a single ruined 4×8 sheet of birch plywood costs more than the track.
5. Freehand Technique for Wider Boards
Freehand cutting is possible on wider boards (like 2x12s) where you can sight down the blade path. It requires a sharp pencil line and focusing on the front notch of the shoe, not the blade.
This is the hardest method. Your first ten attempts will wobble. It’s a skill built over hundreds of cuts, not a beginner technique.
| Guide Type | Best For | Critical Mistake |
|---|---|---|
| Speed Square | Crosscuts on boards | Aligning square with line, not blade offset |
| Clamping Straight Edge | Rip cuts on plywood sheets | Using a warped guide or uneven clamp pressure |
| Homemade Jig | Repeated identical cuts | Building the jig with an imperfect reference edge |
| Commercial Track | Precision sheet cutting | Not clamping track firmly, allowing shift during cut |
| Freehand | Wide lumber (practice) | Looking at the spinning blade instead of the shoe |
Blade Selection and Setup
The blade dictates cut quality. Motor power just drives it through. Using a rough blade for a finish cut guarantees splintering.
Blade Teeth and Purpose
- 24-tooth Framing Blade: For fast, rough cuts in construction lumber. The large gullets clear chips quickly but leave a ragged edge.
- 40-tooth to 60-tooth Finishing Blade: For plywood, melamine, and hardwoods. More teeth produce a smoother cut with less tear-out. A Freud Diablo 40T carbide-tipped blade is a common pick for general finish work.
- 80-tooth+ Fine Finish Blade: For laminates, veneers, and plastic where zero chip-out is required. These cut slower but leave a glassy edge.
Depth Setting
Adjust the depth so the blade extends about 1/4 inch below the material. This minimizes the exposed blade, reduces kickback potential, and limits tear-out on the top surface. A blade set too deep acts like a lever, grabbing the wood and throwing the saw back toward you.
The setting is easy. Place the saw on the workpiece with the blade retracted, loosen the depth lever, and lower the blade until a tooth just pierces the underside. Lock it.
“Good Side Down” Rule
The blade rotates upward, so it splinters the surface it exits. For a clean top face, mark and cut from the back side. Place your good side face down on the supports.
This rule is absolute for finished projects. For rough framing, it doesn’t matter.
Body Positioning and Control
Where you stand affects control and safety. A strained posture leads to shaky cuts.
For Rip Cuts (long cuts along the length)
Stand beside the workpiece, not behind the saw. Your dominant hand should be on the main handle, your other hand on the auxiliary handle (if present), and your body offset from the blade path. This gives you a clear view of the guide and keeps you out of the kickback zone.
Advance the saw with steady, even pressure. Let the blade do the work. If you hear the motor straining or see smoke, you’re forcing it. Stop.
For Crosscuts (short cuts across the width)
Stand directly behind the saw with a firm grip. Use the speed square as described earlier. Your focus should be on keeping the shoe flat against the square and the workpiece.
A common fatigue mistake is locking your elbows. Keep a slight bend. Your arms will absorb vibration and maintain control longer.
If your cut starts to veer, do not try to muscle the saw back onto the line. The blade is already committed to a path. Stop the cut, back the saw out, realign from the beginning, and start a new cut. One veered cut on a 8-foot plywood sheet teaches this lesson permanently.
Troubleshooting Common Cut Problems
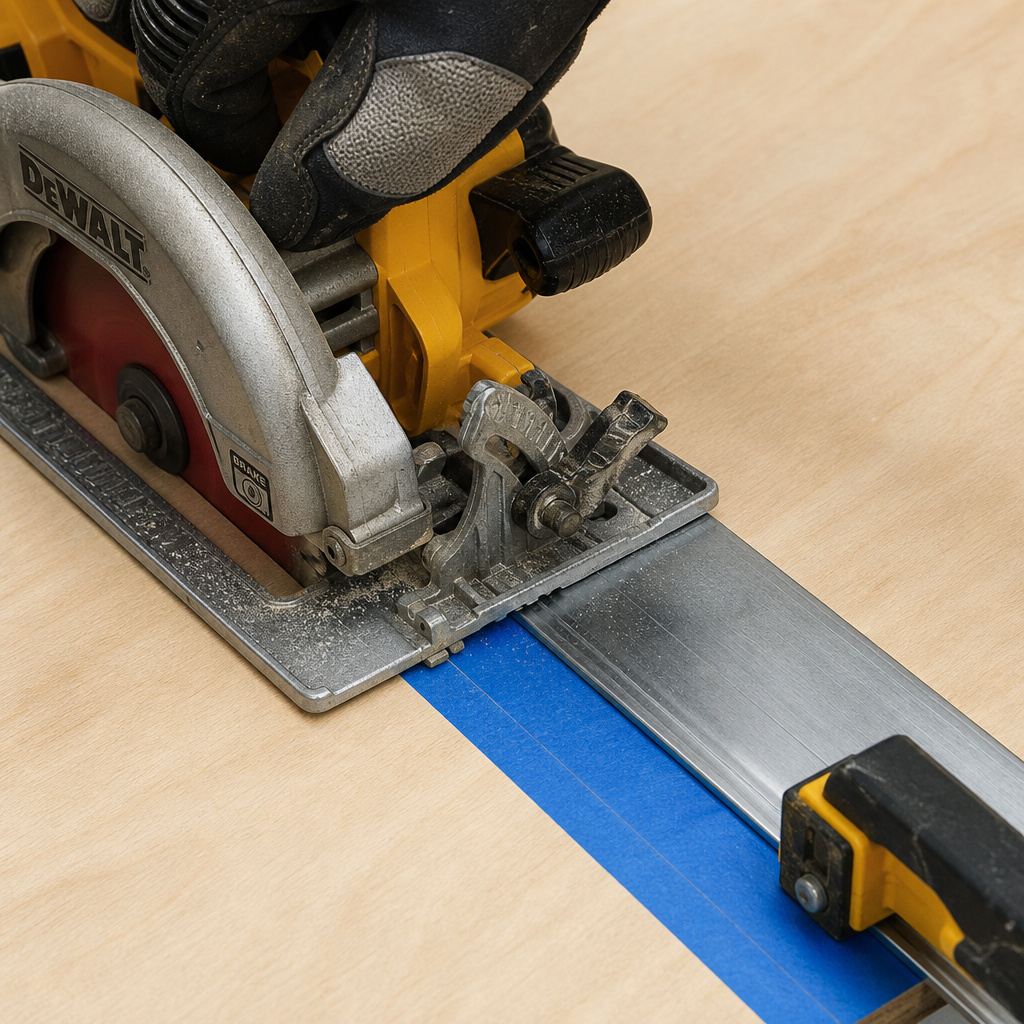
Even with a guide, things can go wrong. Here’s what to do.
Problem: Tear-out or Splintering on Top Surface
Cause: Cutting with the good side up, using a dull blade, or forcing the saw.
Fix: Apply masking tape along the cut line on the top surface before cutting. This stabilizes the fibers. Use a sharp, high-tooth-count blade. Always cut good side down.
Problem: Saw Veers Off Guide Mid-Cut
Cause: The shoe lost contact with the guide due to uneven pressure or a bump in the workpiece.
Fix: Stop immediately. Do not continue. Back out, check guide alignment and clamp pressure, and restart. If the guide is straight, focus on firm, consistent shoe contact.
Problem: Blade Binds or Kickback Occurs
Cause: Blade set too deep, forcing the saw, or cutting into a hidden nail/knot.
Fix: Release the saw immediately and let it stop. Unplug. Check for obstruction and blade depth. Ensure the workpiece is fully supported on both sides of the cut to prevent pinching the blade.
| Symptom | Likely Cause | Immediate Action |
|---|---|---|
| Rough, splintered edge | Good side up, dull blade | Stop, apply tape, use sharper blade, flip workpiece |
| Cut curves off line | Shoe lost guide contact | Stop cut, realign guide, restart |
| Saw jumps/kicks back | Blade binding, forced cut | Release saw, unplug, check depth and support |
| Motor strains/smokes | Wrong blade for material | Stop, select higher tooth-count blade, resume slowly |
Maintaining Your Saw for Accuracy
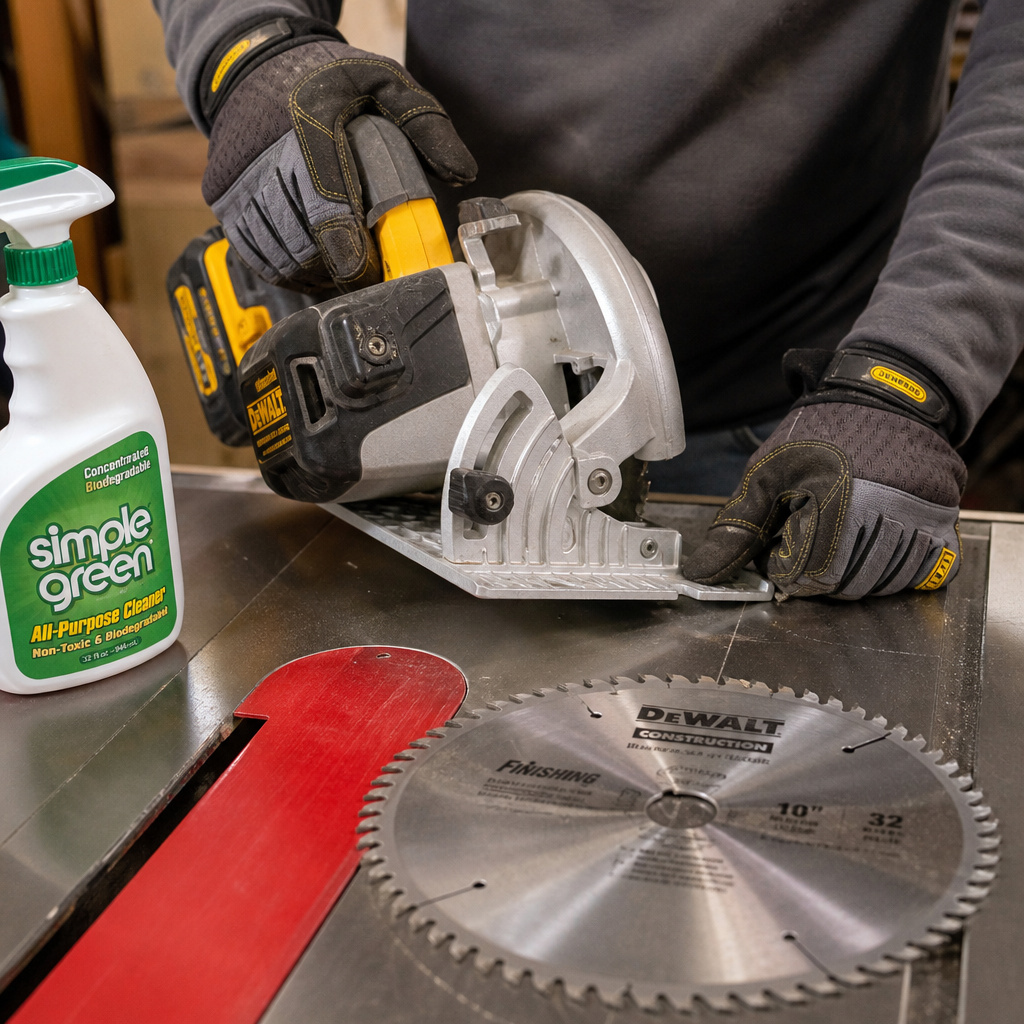
A saw that isn’t true won’t cut true. Two maintenance points matter most.
1. Check Shoe Alignment
The shoe (base plate) must be parallel to the blade. Over time, impacts can bend it. Place the saw on a known flat surface (like a table saw table) and see if the shoe sits flush. If it rocks, the alignment is off.
Some saws allow adjustment; others require straightening. A bent shoe will pull the saw sideways even with a perfect guide.
2. Clean the Blade and Shoe
Resin and pitch buildup on the blade teeth reduces cutting efficiency and can cause overheating. Pitch on the shoe reduces smooth travel against a guide.
Use a blade cleaner (like Simple Green) and a soft brush. Dry thoroughly. A clean blade cuts cooler and lasts longer. This is a simple step most people skip, but it affects every cut.
For deeper maintenance, like checking the blade arbor for burrs or inspecting motor brushes, follow the manufacturer’s guide. Regular cleaning alone maintains 90 percent of performance.
Frequently Asked Questions
Can I cut straight without any guide?
Yes, on wide boards where you can sight a long pencil line. It requires practice and a steady hand. For sheet goods or precise work, always use a guide. Freehand is a skill for speed in framing, not for accuracy in finish carpentry.
What is the best circular saw for straight cuts?
Any saw with a solid, flat shoe and good power can cut straight. The guide and blade are more important than the saw brand. A Makita sidewinder, a DeWalt corded saw, or a Ryobi cordless model all work fine when paired with a proper guide and a Freud Diablo blade.
Why does my saw always cut to the left?
This is usually a body mechanics issue. You are likely pushing the saw slightly with your dominant hand, steering it unconsciously. Focus on applying forward pressure only, not lateral pressure. Ensure your guide is clamped securely on the correct side of the line.
How do I prevent chipping when cutting laminate?
Use an 80-tooth or higher finish blade. Apply masking tape along the cut line on both sides. Cut with the good side down. Use a commercial track guide for the smoothest possible shoe movement. Support the laminate fully to prevent vibration.
How often should I change my circular saw blade?
Change it when cuts require more force, produce excessive smoke, or leave burned edges. A sharp carbide blade can last for years of casual use, but it should be cleaned after every project involving resinous woods like pine. Dull blades are dangerous and inaccurate.
Can I use the same blade for wood and metal?
No. Wood-cutting blades have a different tooth geometry and material. Cutting metal with a wood blade will dull it instantly and can shatter teeth. Use a dedicated abrasive or carbide-tipped metal-cutting blade for metal, and always wear a face shield.
Before You Go
Straight cuts come from a stable workpiece, a true guide, and a sharp blade set shallow. The guide does the work; your job is to keep the shoe against it. Remember the good side down rule for finish work. If the saw veers, stop and restart, muscling it never works. Finally, a clean blade and a flat shoe are the silent maintenance steps that keep your saw accurate year after year. Now go cut something straight.
