
How to Use a Hand Drill | The 3 Settings That Burn Out Motors
This post contains affiliate links. As an Amazon Associate, we earn from qualifying purchases.
To use a hand drill, you match three things: the drill’s speed setting, its torque setting (or clutch collar), and the trigger’s variable pressure to the material and bit size. A 1/2-inch wood bit needs low speed and high torque; a 1/8-inch metal bit needs high speed and light pressure. The wrong combination burns out the motor’s brushes within 20 hours of runtime.
That 20-hour figure is the average lifespan of carbon brushes under sustained high-load mismatch, pulled from service manuals for models like the Harbor Freight 3/8″ Variable Speed Drill.Most people kill their drills with kindness, running them fast into hard materials because it feels powerful. The motor disagrees.
What follows is the setup most manuals skip: where to stand, how to brace, and the one drill mode you should never use for screws. We’ll walk through the seven non-negotiable safety steps, decode the settings on the collar, and name the two tools that make the difference between a clean hole and a trip to the hardware store.
Key Takeaways
- Match speed to bit diameter. Large bits (over 1/4″) demand low speed; small bits need high speed. Running a 1/2-inch bit at full RPM generates enough heat to soften the steel and snap it.
- Use the clutch for screws, not for drilling. The torque collar is for driving screws to a set depth. Turn it to the drill icon when boring holes, or you’ll strip the clutch plates.
- Brace with your body, not just your arms. Plant your feet shoulder-width apart, lean into the work, and use the auxiliary handle. A slipping drill spins the chuck into your hand at 500 RPM, the emergency room visit is faster than the hole.
- Let the bit cut; don’t force it. Push just hard enough to produce steady chips. If the motor bogs down, you’re forcing it. Forcing it bends bits and overheats the armature.
- Cool a hot bit by dipping it in water, not by blowing on it. The metal stays hot enough to burn for minutes after you stop. Dipping it quenches the heat; blowing spreads metal dust.
The 3 Settings That Decide Burnout or Long Life
Every hand drill has three controls, but most people use only one. The trigger gets all the attention. The two dials on the collar decide whether the motor lasts 200 hours or 20.
The variable speed trigger is a throttle. Squeeze it halfway for about 1500 RPM on a typical model; squeeze it fully for the rated no-load speed, like the 3000 RPM on a Harbor Freight 3/8″ drill or 2300 RPM on a HiKOKI FD10SA.Start every hole at the lowest speed that lets the bit bite. Ram the trigger to full in the first second and you’ll skate the bit across the surface, work-harden metal, or snap a small wood bit.
Where this goes sideways: Running a large-diameter bit at high speed. A 1/2-inch spade bit in wood at 3000 RPM generates centrifugal force that can wobble the bit in the chuck, wallowing out the hole. In metal, the friction heat softens the bit’s cutting edge. You’ll smell the burnt steel before you see the blue tint.
The speed selector is the two-gear switch, usually marked “1” and “2” or with a rabbit and turtle icon. Gear 1 is high torque, low speed, for large holes (over 1/4 inch) and driving big screws. Gear 2 is high speed, low torque, for small holes (under 1/4 inch) and pilot holes. Switch gears only when the drill is completely stopped. Forcing the lever while the chuck is spinning grinds the gear teeth into metal filings.
The torque collar rings the chuck with numbers (1-10 or more) plus a drill bit icon. This is your clutch. The numbers set how much rotational force the drill will apply before it disengages with a rapid click-click-click sound. Use it only for driving screws. Set it to a low number for small screws into softwood, a higher number for deck screws. When you’re drilling holes, you must turn the collar all the way to the drill icon. This bypasses the clutch and sends all the motor’s power to the chuck. Leaving it on a torque setting while drilling strips the clutch plates inside the housing. The repair costs more than a new Ryobi.
| Control | What It Does | Use For | What Breaks If You Get It Wrong |
|---|---|---|---|
| Variable Speed Trigger | Controls RPMs (0 to max) | Starting holes, controlling cut speed | Motor brushes wear out from constant high-load startup |
| Speed Selector (Gear 1/2) | Switches between high-torque/low-speed and low-torque/high-speed | Gear 1: large bits & screws. Gear 2: small bits & pilots | Gear teeth shear if switched under load |
| Torque Collar (Clutch) | Limits rotational force before disengaging | Driving screws to consistent depth | Clutch plates strip if used for drilling |
Before You Drill: The 7-Step Safety & Setup
You can own the perfect drill and still ruin the workpiece, the bit, or your knuckles. The difference is in the seven steps you take before the bit touches the material. Skip one, and the project gets harder. Skip two, and you’re buying new tools.
Before you start: The chuck spins at over 2000 RPM with enough torque to break a wrist. Secure your workpiece with clamps, never your hand. Always wear safety glasses that meet the ANSI Z87.1 standard; everyday glasses shatter. If you’re drilling masonry, add a face shield and hearing protection. The manual for the Benchmark 7.8 AMP hammer drill mandates it.
- Check the power source and cord. For corded drills, ensure the plug matches the outlet and the cord is free of cuts. For cordless, seat the battery fully until it clicks. A loose battery cuts power under load and can damage the terminals.
- Install the auxiliary handle. This isn’t optional for holes over 1/4 inch. Screw the handle into the threaded socket on the drill’s body, usually just behind the chuck. Position it so you can grip it with your non-dominant hand while keeping your dominant hand on the trigger. This gives you leverage to counteract the drill’s torque.
- Select and insert the bit. Choose the bit for your material, a twist bit for metal and wood, a masonry bit for concrete, a spade bit for large holes in wood. Open the chuck jaws by rotating the sleeve counterclockwise, insert the bit shank all the way to the bottom of the jaws, then tighten the sleeve clockwise by hand. For a keyed chuck, use the key to give each jaw a final tighten. A bit that isn’t seated fully will wobble, creating an oval hole and straining the chuck.
- Set the direction. The switch above the trigger sets forward (clockwise) for drilling and driving screws. Reverse (counterclockwise) is for removing screws and backing out a stuck bit. Set it to forward before you start.
- Adjust the torque collar. If you’re driving screws, set the collar to a low number (2-4) for small screws, a high number (10-15) for large ones. If you’re drilling a hole, turn the collar to the drill icon. This is the step everyone forgets, and it’s why so many drills have a useless clutch after six months.
- Select the speed gear. For bits 1/4 inch and larger, or for driving screws, use Gear 1 (low speed, high torque). For bits smaller than 1/4 inch, use Gear 2 (high speed, low torque).
- Secure the workpiece. Use clamps or a vise. Drilling into a piece held in your hand or balanced on your knee is asking for the bit to grab, spin the material, and hit you. It happens faster than you can react.
Drilling Into Wood, Metal, and Concrete
The material changes everything. Push steel like you push pine and you’ll ruin the bit. Use a wood bit on concrete and you’ll burn out the motor. Each has a tell, a sound, a feel, a chip, that says you’re doing it right.
Wood is forgiving until it splinters. Use a sharp twist bit or a brad-point bit for cleaner holes. Start slow to let the point seat, then increase speed. Let the flutes do the work; if you push too hard, the bit will grab and tear out the back of the board. When drilling through, place a scrap block behind your workpiece. As soon as the bit’s tip pokes through, finish the hole from the opposite side. This prevents tear-out.
Metal requires coolant and patience. Always start with a center punch to keep the bit from wandering. Use a dedicated metal-cutting bit (often black or gold in color). Run at a slow speed with steady, firm pressure. The chips should come off as small, continuous spirals. If they’re dust, you’re going too fast and hardening the metal. If the bit squeals or turns blue, it’s too hot. Stop, let it cool, and add a drop of cutting oil. The HiKOKI manual is blunt: a worn bit causes motor malfunction. Replace it.
Concrete means hammer mode. You must have a hammer drill (with a switch marked drill/hammer) and a carbide-tipped masonry bit. Switch to hammer mode, which adds a pounding action to the rotation. Wear a face shield, concrete chips fly. Use a slow, steady pressure and pull the bit out every 10-15 seconds to clear dust. If you don’t, the bit jams in the hole, overheats, and the carbide tip shatters.
The part nobody mentions: Drilling overhead into concrete or masonry. Dust falls directly into your eyes and lungs, even with safety glasses. Wear sealed goggles and a respirator. No exceptions.
Driving Screws Without Stripping the Heads
 A drill is a terrible screwdriver if you use it like a drill. The instant torque strips Phillips heads and cam-out Torx bits. The clutch collar exists for this single job.
Set the torque collar to a low number. Start the screw slowly to let the threads find purchase. Once it’s seated, squeeze the trigger firmly until the clutch disengages with a rapid click-click-click. That’s the signal to stop. If the screw isn’t flush, increase the collar setting by one or two numbers and try again. The goal is to let the clutch slip, not your wrist.
For stubborn screws, use the drill as screwdriver function by switching to reverse and a low torque setting to back it out a quarter-turn, then forward again. This often breaks the corrosion bond. If you need more power than a standard drill offers, that’s when you reach for an impact driver vs drill. An impact driver delivers concussive blows that prevent cam-out, but it’s overkill for assembling furniture.
Maintaining Your Drill: The 5-Minute Monthly Check
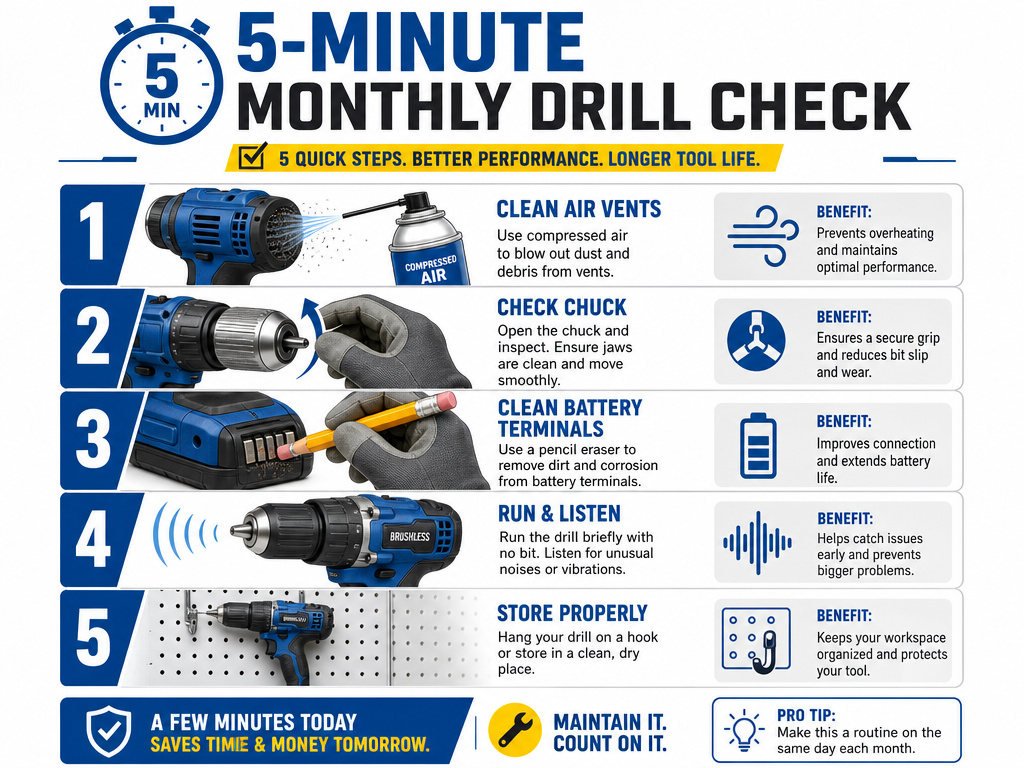 A drill dies from neglect, not use. Carbon brushes wear down, chucks collect grit, and vents clog with dust. Five minutes a month keeps it running for years.
- Blow out the vents. Use compressed air to clear the intake vents, usually near the motor housing. Clogged vents cause overheating.
- Check the chuck. Open and close it a few times. If it grinds or doesn’t tighten smoothly, wipe the jaws clean with a dry cloth. Grit inside the chuck scores the bit shanks.
- Inspect the power cord or battery contacts. For corded models, look for nicks or fraying near the plug and handle. For cordless, clean the battery terminals on the drill and battery with a pencil eraser.
- Listen to the motor. Run the drill at low speed with no bit. Any grinding, clicking, or uneven sound means bearings or brushes are failing. Address it now.
- Store it properly. Don’t throw it in a wet toolbox. Hang it or keep it in a case. Moisture rusts the chuck from the inside.
A well-maintained cordless drill is the cornerstone of any toolkit. But it’s just one of many power hand tools that, when used correctly, turn a weekend project from a fight into finished work.
Frequently Asked Questions
What’s the difference between a drill and an impact driver?
Drill rotates. An impact driver rotates and hammers forward with concussive blows. Use a drill for drilling holes and driving smaller screws. Use an impact driver for driving large screws, lag bolts, or into hard materials where a drill’s torque isn’t enough. An impact driver’s hammering action prevents cam-out, but it’s too aggressive for delicate materials or small screws.
Can I use my drill to mix paint or mortar?
Yes, but you need a paddle mixer attachment. Always use a low speed setting (Gear 1) and start slowly to avoid splashing. Do not use a hammer drill for mixing, as the hammering action will damage the mixer and the bucket. For thick materials like mortar, a dedicated standard drill with a side handle is safer than a compact model.
Why does my drill bit keep slipping in the chuck?
The chuck isn’t tight enough, or the bit shank is greasy. For a keyless chuck, grip the sleeve firmly and turn it clockwise until it stops. For a keyed chuck, use the key in all three holes, turning each until tight. If it still slips, the chuck jaws may be worn or dirty. Clean them with a wire brush and reassess.
How do I know which drill bit to use?
Match the bit to the material. High-speed steel (HSS) bits are for wood and metal. Carbide-tipped masonry bits are for concrete and brick. Brad-point bits are for clean holes in wood. For metal, cobalt or titanium-coated bits last longer. The size is stamped on the bit’s shank, use a bit slightly smaller than your screw’s core diameter for pilot holes.
My drill gets very hot. Is that normal?
Some warmth is normal under heavy use. Excessive heat, too hot to hold comfortably, is usually caused by dull bits forcing the motor, a clogged air vent, or using too high a speed for the bit size. Stop immediately, let it cool, and check your bit sharpness and speed setting.A consistently hot drill is burning out its motor.
What does the number setting on my drill mean?
Those numbers on the torque collar are clutch settings. They control how much twisting force the drill applies before it disengages to prevent over-driving screws. A lower number (2-5) is for small screws in softwood. A higher number (10-15) is for larger screws or harder wood. When you’re drilling holes, turn the collar to the drill icon to bypass the clutch entirely.
The Bottom Line
Using a hand drill is about matching three things you can see, speed, torque, and bit, to the one thing you can’t: the load on the motor. Get that match wrong, and the tool fights you.Get it right, and the work goes smooth.
For most home projects, a mid-range cordless drill like a DeWalt DCD791 or a Milwaukee M18 Fuel is the default. It has enough power for framing, the battery lasts, and the clutch works when you need it. Keep the chuck clean, store the battery inside, and listen for the click that says the screw is set. The rest is just practice.
