
How to Use a Hammer Drill in Concrete: A Complete DIY Guide
This post contains affiliate links. As an Amazon Associate, we earn from qualifying purchases.
To use a hammer drill in concrete, you need three things: a carbide-tipped masonry bit, the tool set to hammer mode, and a firm two-handed grip using the side handle. Drill at full speed with steady pressure, and pull the bit back periodically to clear dust. Missing the side handle is the most common critical error, the Makita manual warns of a “tremendous and sudden twisting force” at hole breakthrough that can wrench the tool from your hands.
That force isn’t a maybe. It’s a guarantee when the bit punches through the back of the slab or hits embedded rebar. The manuals aren’t being dramatic. They’re documenting the precise moment most drill-related wrist injuries happen on DIY concrete jobs.
What follows is the sequence that prevents that: seven steps from bit selection to cleanup, grounded in the OEM service manuals for the Ryobi P214, Makita M8103, and others. You’ll know which bit diameter burns out a cordless motor, how to set a depth stop with masking tape, and why a five-dollar center punch is the best investment you’ll make for this job.
Key Takeaways
- Always use the auxiliary side handle. Makita’s manual explicitly states loss of control and severe injury can occur without it, especially at breakthrough.
- Set the drill to hammer mode. The icon looks like a hammer. Using standard drill mode on concrete will overheat and dull your bit within seconds.
- Use a sharp, carbide-tipped masonry bit. A dull bit hammers without cutting, transferring destructive shock into the drill’s gearbox.
- Mark depth with tape on the bit. Drilling deeper than your anchor needs creates a weak point and wastes effort.
- Clear dust by “fluting.” Pull the spinning bit partially out of the hole every 10-15 seconds to prevent dust compaction and bit overheating.
Before You Start: The Non-Negotiable Safety Gear
Before you start: Concrete dust contains crystalline silica, a known respiratory hazard. Drilling generates high-speed chips and operates at noise levels that can cause hearing damage. Mitigation: wear an N95 respirator, ANSI Z87.1-rated safety goggles, and hearing protection before plugging in the drill.
The gear isn’t optional. This is a hammer drill operation that creates fine particulate. An N95 mask is the bare minimum; a half-face respirator with P100 filters is better for more than a few holes. Your regular safety glasses won’t cut it, you need sealed goggles. The hammering action is loud, especially indoors. Muff-style ear defenders block more decibels than foam plugs.
The tool itself demands respect. Every manual, from the Ryobi P214 to the Skil HD527801, states you must use the side handle (auxiliary grip). It’s not a comfort feature.
Where this goes sideways: Skipping the side handle. When the bit breaks through the concrete or strikes rebar, the sudden release of torque can spin the entire drill out of your single hand. The Makita M8103 manual calls this a “tremendous and sudden twisting force.” The result is a bruised hand at best, a broken wrist or damaged workpiece at worst.
The 3 Things You Need (And One You Might Not Have)
You can’t substitute your way through concrete. The wrong bit or power source turns a five-minute job into a frustrating hour of smoke and failure.
First, the drill. You need a tool capable of hammer drill action. Many combo drills have a hammer setting, but check its capacity. The Ryobi SDS65_416 is rated for 1-inch diameter holes in concrete, while a lighter duty model like the Skil HD527801 has a 1/2-inch chuck and lower blow-per-minute rate. For more than a dozen 1/4-inch holes, a corded model or a high-torque 18V/20V Max brushless cordless drill is the floor.
Second, the bit. Only a carbide-tipped masonry bit works. The carbide tip (the darker, braised-on section at the point) is harder than the sand aggregate in the concrete. A standard black-oxide twist bit will round over in seconds. Bits are sized by diameter, and the drill’s capacity is the limit.
| Drill Model | Max Concrete Capacity | Chuck Type | Key Limitation |
|---|---|---|---|
| Ryobi P214 | 3/8-inch (general) | Keyless 3/8-inch | Cordless; best for under 10 holes |
| Makita M8103 | 1/2-inch | Keyless 1/2-inch | Needs firm 2-hand grip per manual |
| Ryobi SDS65_416 | 1-inch | SDS+ | Not for reverse hammering; 120V AC only |
| Skil HD527801 Series | 1/2-inch | Keyless 1/2-inch | 20V battery; monitor for overheating |
Third, the ancillaries. A hammer, a center punch (or a large masonry nail), and a roll of blue painter’s tape. The tape is for marking depth. The punch is to create a starter divot so the bit doesn’t “skate” across the smooth concrete surface.
You might not have a depth stop rod. Most consumer hammer drills don’t include one. The tape method is the reliable workaround.
How a Hammer Drill Actually Breaks Concrete
A standard drill just spins. A hammer drill adds a forward pounding action along the axis of the bit, like a miniature jackhammer. Inside the tool, a ratcheting mechanism or pair of cam plates slams the entire chuck forward thousands of times per minute while it spins.
This combination crushes the brittle concrete matrix into dust at the tip. The rotation then flings that dust out along the bit’s flutes. If the dust isn’t cleared, it packs in the hole, creates friction, and overheats the bit. This overheating anneals the hardened steel, making it soft and useless.
That’s why the “fluting” technique, pulling the bit back while spinning, is non-negotiable. It’s also why a sharp bit matters. A dull bit pounds the concrete but doesn’t cut it, transferring all that shock energy back into the drill’s internal gears. You’ll hear a labored, grinding sound instead of a crisp tap-tap-tap. This is how you strip a hammer drill’s gearbox on a Saturday morning.
The 7-Step Process for a Clean, Safe Hole
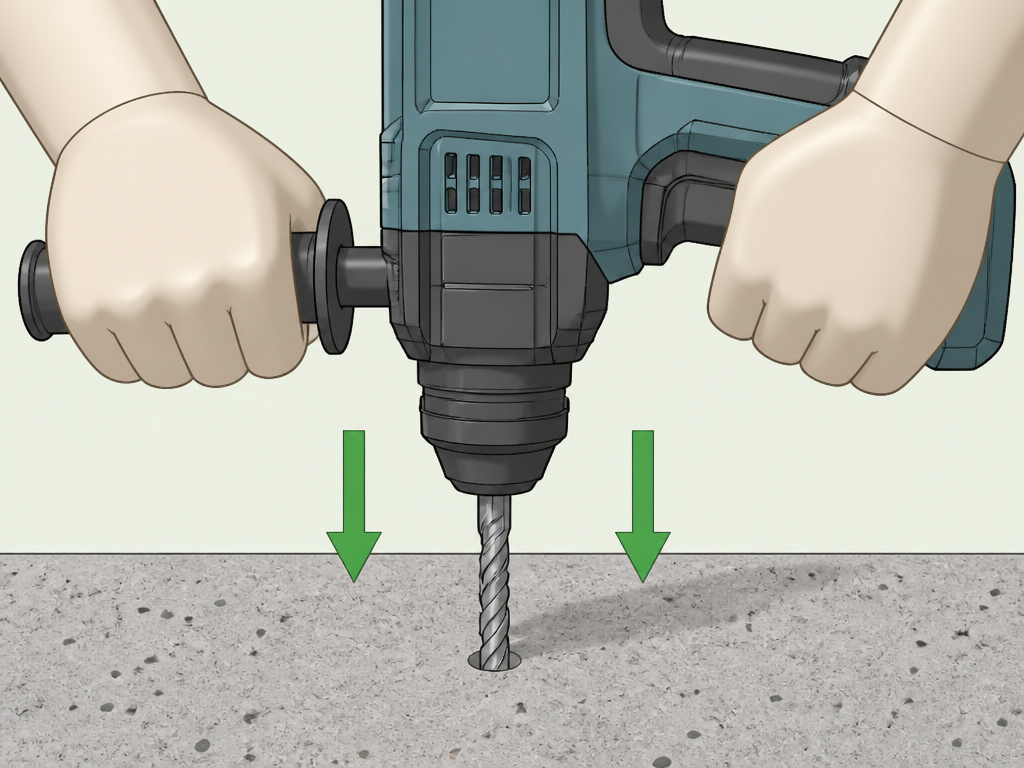
Follow this sequence. The order prevents the three most common errors: skating bits, shallow anchors, and dust-clogged overheating.
Step 1: Mark and Punch the Spot
Measure twice. Concrete is permanent. Use a pencil or marker, then place the point of your center punch exactly on the mark. Hit it firmly with a hammer to create a small crater. This divot gives the bit’s tip a physical place to sit, preventing it from wandering the second you pull the trigger.
Skipping this step results in a scratched-up concrete surface and a hole that’s off its mark by a quarter-inch. That’s enough to miss a wall stud or cause a shelf bracket to sit crooked.
Step 2: Insert and Tighten the Correct Bit
Open the chuck jaws slightly wider than your masonry drill bit. Insert the bit all the way to the base of the chuck, ensuring it’s seated straight. Hand-tighten the chuck firmly. Do not use a chuck key on a keyless chuck, and never use a wrench for extra leverage, you’ll damage the chuck mechanism.
For SDS-plus systems like on the Ryobi SDS65_416, push the bit into the chuck until it clicks, then give it a slight twist to lock it in place. These are the bits you use for heavier concrete drilling.
Step 3: Set Your Depth Stop
This is the step every beginner manual glosses over. If your drill has a depth stop rod, attach it to the side handle and slide the collar so the rod contacts the wall at your desired depth. No rod? Wrap a tight band of painter’s tape around the bit at the exact depth you need to drill.
The rule: drill 1/4 to 1/2 inch deeper than the length of your plastic anchor or concrete screw. This gives room for dust to settle so the anchor can seat fully. Drilling too shallow means the anchor sticks out, and you can’t drive the screw home. Drilling too deep wastes effort and can weaken thin concrete block.
Step 4: Configure the Drill
This is where you choose between a hammer drill vs drill function. Locate the mode selector switch, usually near the chuck. It will have icons: a drill bit (rotation only), a hammer (hammering only on some models), and a drill bit with a hammer (rotation with hammering). Slide it to the hammer+drill icon.
Set the direction selector to forward. Set the variable speed trigger to its maximum. For corded drills, plug into a GFCI outlet. For cordless, insert a fully charged battery. Attach the side handle to the threaded collar near the chuck and tighten it securely.
Step 5: Position, Grip, and Start Drilling
Stand squarely to the work. Hold the drill with your dominant hand on the trigger grip and your other hand firmly on the side handle. This two-handed control is mandated in the Makita M8103 manual for a reason. Position the bit tip into your starter divot.
Start the drill at full speed before the bit touches the concrete. Then, apply steady, firm pressure directly in line with the hole. Let the tool do the work, you shouldn’t be leaning your entire body weight on it. The sound should be a rapid, rhythmic pounding.
Step 6: Clear Dust and Manage Heat
Every 10-15 seconds, or when you feel drilling progress slow, pull the trigger and slightly withdraw the bit about an inch while it’s still spinning. This “fluting” action pulls the dust out. You may see a small plume of powder.
If the bit or drill body becomes hot to the touch, stop. Let the tool cool down. Continuous overheating can damage the motor and the bit’s carbide tip. This is especially critical for cordless hammer drill models like the Skil HD527801, where the battery and motor share a tight space.
Step 7: Finish and Clean Up
Once your depth tape or stop rod hits the wall, pull the spinning bit all the way out. Blow out the hole using a bulb or canned air to remove any remaining dust. This ensures your anchor gets a full grip.
Unplug or remove the battery. Use a dry cloth to wipe concrete dust off the drill. Never use solvents or water. Store the bit separately; leaving it in the chuck can allow moisture to rust the chuck jaws.
Carbide Bits, SDS Systems, and When to Upgrade
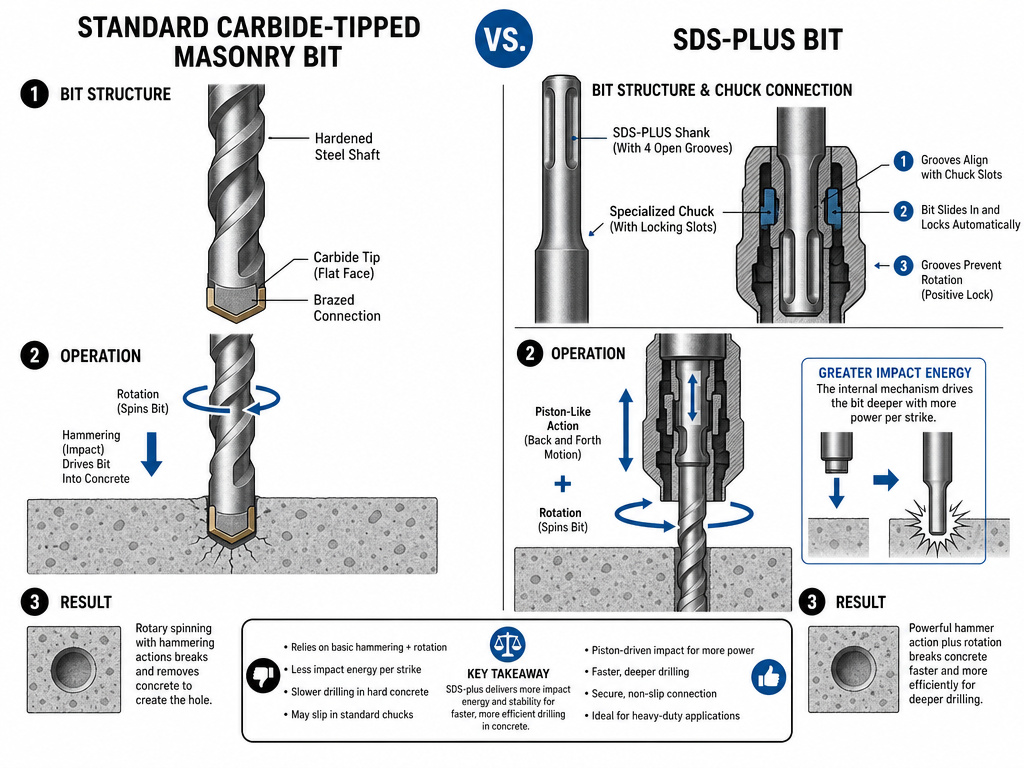
Your bit choice defines your success. A concrete drill bit has a flat, spade-like carbide tip brazed onto a spiraled steel shaft. The flutes are wide to carry dust. For small holes (1/4-inch to 3/8-inch) in poured concrete or block, a standard carbide-tipped masonry bit in a keyless chuck is fine.
For holes 1/2-inch and larger, or for drilling into reinforced concrete, you need an SDS-plus (or SDS-max) system. The SDS bit has deep grooves that lock into a specialized chuck, allowing it to slide back and forth freely with the hammering action. This transfers more impact energy to the tip and is far easier on the tool. The rotary hammer is the professional-grade version of this, delivering a pure piston-driven blow.
| Bit Type | Best For | Chuck Required | Limitation |
|---|---|---|---|
| Carbide-tipped masonry bit | Holes ≤ 3/8″, brick, block | Standard keyless/keyed | Wears quickly on rebar or high-strength mix |
| SDS-plus masonry bit | Holes 3/8″ to 1″, reinforced concrete | SDS-plus chuck | Requires an SDS-capable hammer drill |
| Diamond core bit | Large diameter holes (>1″) | Special core rig | Requires water cooling, specialized drill |
A dull bit is your enemy. If you’re pressing hard and making little progress, or the bit tip looks shiny and rounded, replace it. Driving a spent bit is how you burn out the hammer mechanism.
Troubleshooting: Why It’s Not Working
The drill is noisy but not penetrating. First, confirm you’re in hammer mode. It’s the most common oversight. Second, check the bit. Is the carbide tip intact, or is it rounded or chipped? A visual inspection tells you.
The bit is stuck. Never force it. Switch the direction selector to reverse while the drill is running. The reversing action will often back it out. If it’s truly jammed on rebar, you may need to break the bit and extract the shank with pliers.
The drill is overheating. You’re either pushing too hard, not clearing dust, or using a bit that’s too large for the tool’s capacity. Refer to the capacity table. The Ryobi P214 isn’t meant for 1/2-inch holes through a foundation wall. That’s a job for the rotary hammer vs hammer drill category.
The hole is off-center or ragged. You didn’t use a center punch, or you started drilling before the bit reached full speed. The bit skated. There’s no fix for this hole, you’ll need to drill a new one a slight distance away.
Frequently Asked Questions
Can I use a regular drill for concrete?
No. A standard drill lacks the hammering action needed to fracture masonry. It will spin, overheat, and dull the bit without making meaningful progress. You must use a tool with a dedicated hammer drill function.
What’s the difference between a hammer drill and an impact driver?
An impact driver delivers rotational impacts (twisting) to drive screws. A hammer drill delivers linear impacts (pounding) along the axis of the bit to break masonry. They are completely different mechanisms for different jobs. You cannot use an impact driver to drill into concrete.
How do I know if my bit is carbide-tipped?
Look at the cutting tip. A carbide tip is a separate, darker gray (almost silver) piece of metal that is visibly brazed or welded onto the steel drill body. A standard high-speed steel bit is one uniform piece of metal and is not suitable for concrete.
Why does my hammer drill have a “drill only” mode?
Use drill-only mode for wood, metal, or plastic. It disengages the hammering mechanism to provide smooth rotation, which is necessary for clean holes in those materials and for driving screws. Always switch back to hammer mode for concrete.
Can I use my hammer drill to mix paint or mortar?
Absolutely not. The manuals (like the Ryobi SDS65_416) explicitly warn against using the tool for mixing. The viscous material creates extreme drag on the motor and can overheat it almost instantly, voiding the warranty and likely burning out the drill.
The Bottom Line
Using a hammer drill in concrete boils down to respecting the physics. The concrete is hard; the tool delivers a violent, concussive blow. Your job is to manage that force with the right bit, the right setting, and two hands on the tool.
For the occasional shelf or anchor, a cordless combo drill with a hammer function and a fresh masonry bit will get it done. For a deck ledger board or a series of large holes, rent an SDS-plus rotary hammer. It’s louder, heavier, and will finish in one-tenth the time.
The one universal rule is the side handle. It’s not a suggestion. It’s the line between a finished project and a trip to urgent care. Drill straight, clear the dust, and that concrete will stop being an obstacle and start being a foundation.
